Page 592 of 696

590 MULTIMEDIA
Trailer Brake
After pressing the “Trailer Brake” button on the touchscreen, the following settings will be available:
Audio
After pressing the “Audio” button on the touchscreen, the following settings will be available:Setting Name
Selectable Options
Trailer Select Trailer 1Trailer 2Trailer 3 Trailer 4
Trailer Brake Type Light Electric Heavy Electric Light EOHHeavy EOH
Trailer Name List of Trailer Names Available
NOTE:
You can select and personalize your trailer name depending on the type of trailer you are hauling. Select the trailer name
from the following list: trailer, boat, car, cargo, dump, equipment, flatbed, gooseneck, horse, livestock, motorcycle, snow
mobile, travel, utility, and 5th wheel.
Setting Name Selectable Options
Balance/Fade FrontBack LeftRight
NOTE:
The “Balance/Fade” feature allows you to adjust the Balance and Fade settings. Press and drag the speaker icon or use the
arrows to adjust, tap the “C” icon to readjust to the center.
Equalizer + –
NOTE:
When in the “Equalizer” display you may adjust the Bass, Mid and Treble settings.
Page 599 of 696

MULTIMEDIA 597
Uconnect 4/4C/4C NAV Settings
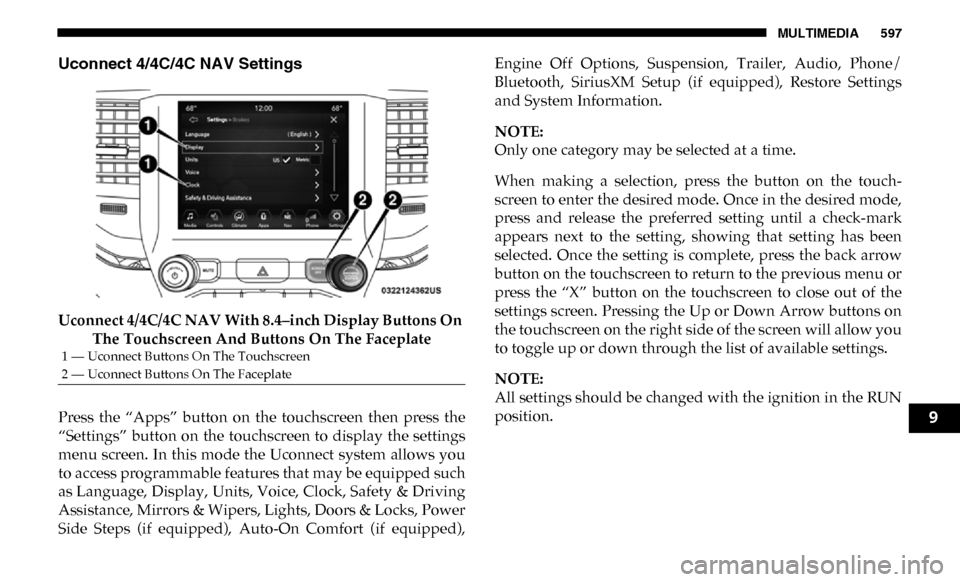
Uconnect 4/4C/4C NAV With 8.4–inch Display Buttons On The Touchscreen And Buttons On The Faceplate
Press the “Apps” button on the touchscreen then press the
“Settings” button on the touchscreen to display the settings
menu screen. In this mode the Uconnect system allows you
to access programmable features that may be equipped such
as Language, Display, Units, Voice, Clock, Safety & Driving
Assistance, Mirrors & Wipers, Lights, Doors & Locks, Power
Side Steps (if equipped), Auto-On Comfort (if equipped), Engine Off Options, Suspension, Trailer, Audio, Phone/
Bluetooth, SiriusXM Setup (if equipped), Restore Settings
and System Information.
NOTE:
Only one category may be selected at a time.
When making a selection, press the button on the touch
-
screen to enter the desired mode. Once in the desired mode,
press and release the preferred setting until a check-mark
appears next to the setting, showing that setting has been
selected. Once the setting is complete, press the back arrow
button on the touchscreen to return to the previous menu or
press the “X” button on the touchscreen to close out of the
settings screen. Pressing the Up or Down Arrow buttons on
the touchscreen on the right side of the screen will allow you
to toggle up or down through the list of available settings.
NOTE:
All settings should be changed with the ignition in the RUN
position.
1 — Uconnect Buttons On The Touchscreen
2 — Uconnect Buttons On The Faceplate
9
Page 606 of 696
604 MULTIMEDIA
Safety & Driving Assistance
After pressing the “Safety & Driving Assistance” button on the touchscreen, the following settings will be available:NOTE:
The “Forward Facing Camera Guidelines” feature is an off-road type of feature that shows the path of the tires based on the
steering wheel input.
CHMSL (Center High Mounted Stop
Lamp) Camera Dynamic Centerline — If Equipped On
Off
NOTE:
When the “CHMSL Camera Dynamic Centerline” feature is selected, it will assist in backing up for trailer alignment and
hook up. Setting Name
Selectable Options
Setting NameSelectable Options
Surround View Camera — If
Equipped On
Off
NOTE:
The “Surround View Camera” feature displays a complete 360 degree view of the vehicle's exterior environment while
backing up.
Surround View Camera
Delay — If Equipped On
Off
Page 608 of 696

606 MULTIMEDIA
NOTE:
The “ParkView Backup Camera Active Guide Lines” feature overlays the Rear Backup Camera image with active, or
dynamic, grid lines to help illustrate the width of the vehicle and its project back up path, based on the steering wheel posi-
tion when the option is checked. A dashed center line overlay indicates the center of the vehicle to assist with parking or
aligning to a hitch/receiver.
Fixed Parkview Backup
Camera Guidelines On
Off
Forward Facing Camera
Guidelines — If Equipped On
Off
NOTE:
The “Forward Facing Camera Guidelines” feature is an off-road type of feature that shows the path of the tires based on the
steering wheel input.
CHMSL (Center High
Mounted Stop Lamp)
Camera Dynamic Centerline
— If Equipped On
Off
NOTE:
When the “CHMSL Camera Dynamic Centerline” feature is selected, it will assist in backing up for trailer alignment and
hook up.
Forward Collision Warning
— If Equipped Off
Warning Only Warning & Braking
Setting Name
Selectable Options
Page 618 of 696

616 MULTIMEDIA
Trailer Brake
After pressing the “Trailer Brake” button on the touchscreen, the following settings will be available:
Audio
After pressing the “Audio” button on the touchscreen, the following settings will be available:Setting Name
Selectable Options
Trailer Select Trailer 1Trailer 2Trailer 3 Trailer 4
Trailer Brake Type Light Electric Heavy Electric Light EOHHeavy EOH
Trailer Name List of Trailer Names Available
NOTE:
You can select and personalize your trailer name depending on the type of trailer you are hauling. Select the trailer name
from the following list: trailer, boat, car, cargo, dump, equipment, flatbed, gooseneck, horse, livestock, motorcycle, snow
mobile, travel, utility, and 5th wheel.
Setting Name Selectable Options
Balance/Fade FrontRearLeftRight
NOTE:
The “Balance/Fade” feature allows you to adjust the Balance and Fade settings. Press and drag the speaker icon or use the
arrows to adjust, tap the “C” icon to readjust to the center.
Equalizer + –
NOTE:
When in the “Equalizer” display you may adjust the Bass, Mid and Treble settings.
Page 623 of 696

MULTIMEDIA 621
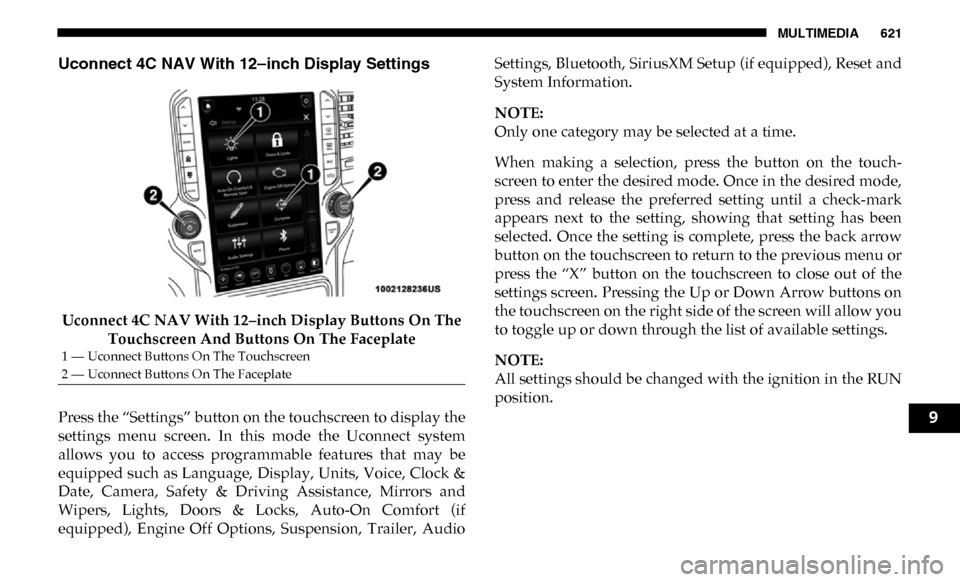
Uconnect 4C NAV With 12–inch Display Settings
Uconnect 4C NAV With 12–inch Display Buttons On The Touchscreen And Buttons On The Faceplate
Press the “Settings” button on the touchscreen to display the
settings menu screen. In this mode the Uconnect system
allows you to access programmable features that may be
equipped such as Language, Display, Units, Voice, Clock &
Date, Camera, Safety & Driving Assistance, Mirrors and
Wipers, Lights, Doors & Locks, Auto-On Comfort (if
equipped), Engine Off Options, Suspension, Trailer, Audio Settings, Bluetooth, SiriusXM Setup (if equipped), Reset and
System Information.
NOTE:
Only one category may be selected at a time.
When making a selection, press the button on the touch
-
screen to enter the desired mode. Once in the desired mode,
press and release the preferred setting until a check-mark
appears next to the setting, showing that setting has been
selected. Once the setting is complete, press the back arrow
button on the touchscreen to return to the previous menu or
press the “X” button on the touchscreen to close out of the
settings screen. Pressing the Up or Down Arrow buttons on
the touchscreen on the right side of the screen will allow you
to toggle up or down through the list of available settings.
NOTE:
All settings should be changed with the ignition in the RUN
position.
1 — Uconnect Buttons On The Touchscreen
2 — Uconnect Buttons On The Faceplate
9
Page 629 of 696
MULTIMEDIA 627
NOTE:
The “Active Backup Camera Guidelines” feature overlays the Rear Backup Camera image with active, or dynamic, grid lines
to help illustrate the width of the vehicle and its project back up path, based on the steering wheel position when the option
is checked. A dashed center line overlay indicates the center of the vehicle to assist with parking or aligning to a hitch/
receiver.Fixed Backup Camera Guidelines OnOff
Forward Facing Camera Guidelines — If Equipped On
Off
NOTE:
The “Forward Facing Camera Guidelines” feature is an off-road type of feature that shows the path of the tires based on the
steering wheel input. CHMSL (Center High Mounted Stop
Lamp) Camera Dynamic Centerline — If Equipped On
Off
NOTE:
When the “CHMSL Camera Dynamic Centerline” feature is selected, it will assist in backing up for trailer alignment and
hook up. Setting Name
Selectable Options
9
Page 638 of 696
636 MULTIMEDIA
Trailer Brake
After pressing the “Trailer Brake” button on the touchscreen, the following settings will be available:Setting Name Selectable Options
Trailer Select Trailer 1Trailer 2Trailer 3 Trailer 4
NOTE:
Once a Trailer is selected, press the “Use This Trailer” on the touchscreen to set this trailer as the one in current use. In each
Trailer setting, the following settings appear:
Braking Light Electric Heavy Electric Light Electric over
Hydraulic Heavy Electric over
Hydraulic
Trailer Name List of Trailer Names Available
NOTE:
You can select and personalize your trailer name depending on the type of trailer you are hauling. Select the trailer name
from the following list: trailer, boat, car, cargo, dump, equipment, flatbed, gooseneck, horse, livestock, motorcycle, snowmo -
bile, travel, utility, and fifth wheel.