2019 Peugeot Partner lock
[x] Cancel search: lockPage 126 of 312
124
With an automatic gearbox, mode P is
automatically selected when the ignition is
switched off. The wheels are blocked.
For further information on the Automatic
gearbox, particularly in relation to leaving
the vehicle in free-wheeling mode, refer to
the corresponding section.
With an automatic gearbox, when mode
N is engaged, the opening of the driver's
door will cause an audible signal to sound.
It will stop when you close the driver's
door again.
Deactivating automatic
operation
In some situations, for example when it is
extremely cold or during towing (caravan,
recovery), it may be necessary to deactivate
automatic operation of the system. F
P
ush and hold the control lever in the
release direction for at least 10 seconds and
no more than 15 seconds.
F
R
elease the control lever.
F
P
ress and hold the brake pedal.
F
P
ull the control lever in the application
direction for 2
seconds.
Deactivation of the automatic functions
is confirmed by illumination of this
indicator lamp in the instrument panel.
F Release the control lever and the brake
pedal.
From now on, the parking brake can only
be applied and released manually using the
control lever.
Repeat this procedure to reactivate automatic
operation.
Reactivation of automatic operation is
confirmed by the indicator lamp in the
instrument panel going off.
Emergency braking
The emergency braking should only be
used in an exceptional situation.
F
S
tart the engine.
F
A
pply the parking brake with the control
lever, if it is released.
F
T
ake your foot fully off the brake pedal.
In the event of a failure of the main ser vice
brake or in an exceptional situation (e.g. driver
taken ill, under instruction, etc.), a continuous pull on the control lever will brake the vehicle.
Braking takes place while the control lever is
being pulled. It is interrupted if the control lever
is released.
The ABS and DSC systems provide stability of
the vehicle during emergency braking.
If the emergency braking malfunctions, the
message "Parking brake control faulty" will be
displayed in the instrument panel.
If the ABS and DSC systems malfunction,
signalled by the illumination of one or both
warning lamps in the instrument panel, then
stability of the vehicle is no longer guaranteed.
In this event, stability must be assured by the
driver by repeating alternate "pull-release"
actions on the control lever until the vehicle is
immobilised.
Hill start assist
System which keeps your vehicle immobilised
temporarily (approximately 2
seconds) when
starting on a gradient, the time it takes to
move your foot from the brake pedal to the
accelerator pedal.
It is only active when:
-
t
he vehicle is completely stationary, with
your foot on the brake pedal,
Driving
Page 131 of 312
129
If the engine speed is too low or too
high, the selected gear flashes for a few
seconds, then the actual activated gear is
displayed.
When the vehicle is stationary or moving
very slowly, the gearbox selects gear M1
automatically.
To save the brakes when descending
a steep incline, use engine braking to
reduce your speed (change down to a
lower gear).
Keeping the brake pedal pressed
continuously for long periods can overheat
the brakes, with the risk of damaging the
braking system or making it inoperative.
Only use the brakes when necessary, to
slow or stop the vehicle.
Depending on the road configuration (e.g.
mountainous road), manual operation is
preferable.
This is because automatic operation may
not be best suited, not allowing the use of
engine braking.Invalid value during manual
operation
This symbol is displayed if a gear is
not engaged correctly (gear selector
between two positions).
F
P
lace the selector "correctly" at a position.
Stopping the vehicle
Before switching off the engine, select position
P then apply the parking brake to immobilise
the vehicle. A point of resistance may be noticed when
moving to position P .
If the selector is not in position P , when the
driver's door is opened or approximately
45
seconds after the ignition is switched
off, an audible signal sounds and a
message appears.
F
R
eturn the selector to position P ; the
audible signal stops and the message
disappears.
On a steep slope with a loaded vehicle,
press the brake pedal , select position P,
apply the parking brake then release the
brake pedal. In all circumstances, ensure that the
selector is in position P before leaving
your vehicle.
Malfunction
When the ignition is on, a message appears
in the instrument panel screen to indicate a
gearbox fault.
In this case, the gearbox switches to back-up
mode and is locked in 3
rd gear. You may feel
a substantial knock when changing from P
to R and from N to R. This will not cause any
damage to the gearbox.
Do not exceed 60
mph (100 km/h), local speed
restrictions permitting.
Have it checked by a PEUGEOT dealer or a
qualified workshop.
There is a risk of damage to the gearbox:
-
i
f you press the accelerator and brake
pedals at the same time (braking or
acceleration must be done only with
the right foot),
-
i
f you force the selector from position P
to another position when the battery is
flat.
6
Driving
Page 136 of 312

134
- Certain road sign qualifier plates detected by the camera (e.g. the speed limit if towing).Qualifier plate detected Displaying the speed associated with
the qualifier plate
Speed limit in rain
Examples: If the wiper control stalk is in the
"intermittent wiping" or "automatic
wiping" position (so that the rain sensor is
activated):
68
mph (110 km/h) (for example)
Speed limit if towing If an approved towing device is fixed to
the vehicle:
56
mph (90 km/h) (for example)
Speed limit applicable over a cer tain distance
Example: 43
mph (70 km/h) (for example)
Speed limit for vehicles whose gross vehicle
weight or gross train weight is less than
3.5 tonnes 56
mph (90 km/h) (for example)
Speed limit in snow
Example: If the exterior temperature is below 3°C:
19
mph (30 km/h) (for example)
with a "snowflake" symbol
Speed limit at cer tain times
Example: 19
mph (30 km/h) (for example)
with a "clock" symbol The units for the speed limits (mph or
km/h) depend on the country you are
driving in.
It should be taken into account so that you
obser ve the speed limit.
For the system to operate correctly when
you change country, the units for speed in
the instrument panel must be those for the
country you are driving in.
The automatic reading of road signs is a
driving aid system and does not always
display speed limits correctly.
The speed limit signs present on the road
always take priority over the display by the
system.
The system cannot, in any circumstances,
replace the need for vigilance on the part
of the driver.
The driver must observe the driving
regulations and must adapt the speed of
the vehicle to suit the weather and traffic
conditions.
It is possible for the system to not display
the speed limit if it does not detect a
speed limit sign within a preset period.
The system is designed to detect signs
that conform to the Vienna Convention on
road signs.
Driving
Page 173 of 312

171
Fuel tank
Capacity of the tank:
- around 61
litres (petrol).
-
around 50
litres (Diesel).
Opening the fuel filler flap
F You must switch off the engine.
F W ith K eyless Entry and Starting, unlock the
vehicle.
F
O
pen the fuel filler flap.
If your vehicle is fitted with Stop & Start,
never refuel with the engine in STOP
mode; you must switch off the ignition
using the key, or the START/STOP button
if your vehicle has
K
eyless Entry and
Starting.
At least 6
litres of fuel must be added, in order
to be registered by the fuel gauge.
Opening the filler cap may create a noise
caused by an inrush of air. This vacuum is
entirely normal, resulting from the sealing of the
fuel system.
F
T
ake care to select the pump that delivers
the correct fuel type for your vehicle's
engine (see a reminder label on the inside
of the fuel filler flap). F
W
ith a conventional key, insert the key into
the filler cap, then turn the key to the left. F
F
ill the tank. Do not continue past the third
cut-off of the nozzle, as this may cause
malfunctions.
F
P
ut the filler cap back in place and close it
by turning to the right.
F
P
ush the fuel filler flap to close it (your
vehicle must be unlocked).
F
U
nscrew and remove the filler cap, then
place it on the holder located on the fuel
filler flap.
F
I
nsert the nozzle and push it in fully
(pushing on the metal valve A ).If your vehicle is equipped with one, do
not open the left-hand sliding side door
when the fuel filler flap is open, other wise
there is a risk that the fuel filler flap and
the sliding door may be damaged and the
person filling up may be injured.
7
Practical information
Page 179 of 312
177
Load reduction mode
System which manages the use of certain
functions according to the level of charge
remaining in the battery.
When the vehicle is being driven, the load
reduction function temporarily deactivates
certain functions, such as air conditioning,
heated rear screen, etc.
The deactivated functions are reactivated
automatically as soon as conditions permit.
Roof bars/Roof rack
Recommendations
Distribute the load uniformly, taking care
to avoid overloading one of the sides.
Arrange the heaviest part of the load as
close as possible to the roof.
Secure the load firmly.
Drive gently: the vehicle will be more
susceptible to the effects of side winds
and its stability may be affected.
Regularly check the security and tight
fastening of the roof bars and racks, at
least before each trip.As a safety measure and to avoid
damaging the roof, it is essential to use
the roof bars and racks approved for your
vehicle.
Obser ve the instructions on fitting and use
contained in the guide supplied with the
roof bars and racks. In the event of loading (
not exceeding
40 cm in height) on the roof, do not
exceed the following loads:
-
T
ransverse bars on longitudinal bars:
80 kg
.
-
T
wo transverse bars bolted to the roof:
100
kg
.
-
T
hree transverse bars bolted to the
roof: 15 0
kg
.
-
A
n aluminium rack: 120
kg
.
-
A s
teel rack: 115
k g
.
If the height exceeds 40 cm, adapt the
speed of the vehicle to the profile of the
road to avoid damaging the roof bars
or the roof rack and the fixings on the
vehicle.
Be sure to refer to national legislation in
order to comply with the regulations for
transporting objects which are longer than
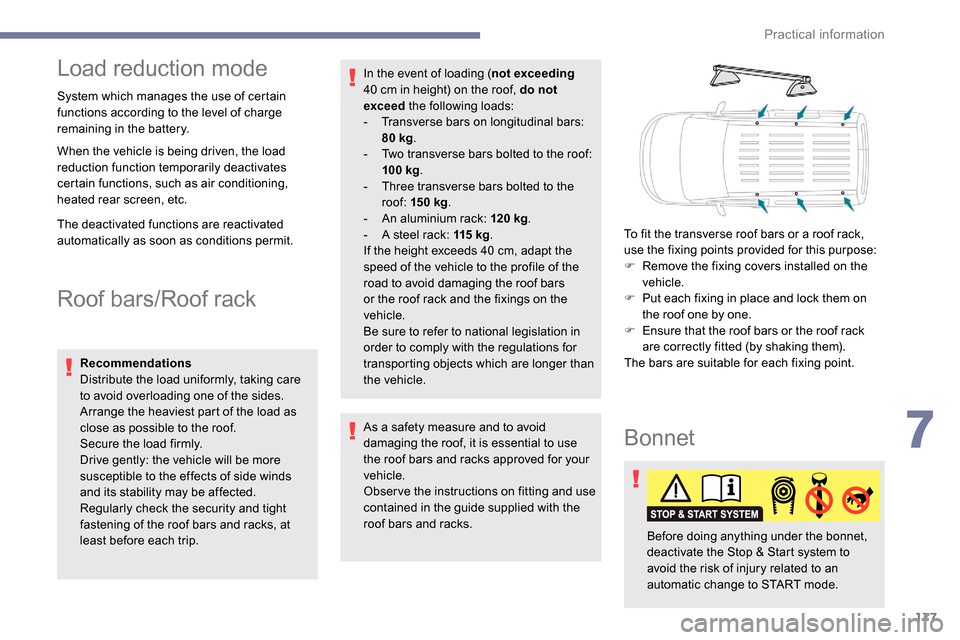
the vehicle. To fit the transverse roof bars or a roof rack,
use the fixing points provided for this purpose:
F
R
emove the fixing covers installed on the
vehicle.
F
P
ut each fixing in place and lock them on
the roof one by one.
F
E
nsure that the roof bars or the roof rack
are correctly fitted (by shaking them).
The bars are suitable for each fixing point.
Bonnet
Before doing anything under the bonnet,
deactivate the Stop & Start system to
avoid the risk of injury related to an
automatic change to START mode.
7
Practical information
Page 187 of 312
185
cannot be discounted: do not inhale the fluid.
Ammonia vapour has an irritant effect on mucous
membranes (eyes, nose and throat).
Keep AdBlue® out of reach of children, in
its original container or bottle.
Procedure
Before starting the top up procedure, ensure
that the vehicle is parked on a flat and level
sur face.
In winter, check that the temperature of the
vehicle is above -11°C. If not, due to freezing,
the AdBlue
® cannot be poured into the tank.
Park your vehicle somewhere warmer for a few
hours before topping up.
In the event of an AdBlue
® breakdown,
confirmed by the message "Add AdBlue:
Starting impossible", you must top up with
at least 5
litres.
Never pour AdBlue
® into the Diesel fuel
tank. If any AdBlue
® is splashed, or if there are
any spillages on the side of the body, rinse
immediately with cold water or wipe with a
damp cloth.
If the fluid has crystallised, clean it off
using a sponge and hot water.
Access to the AdBlue® tank
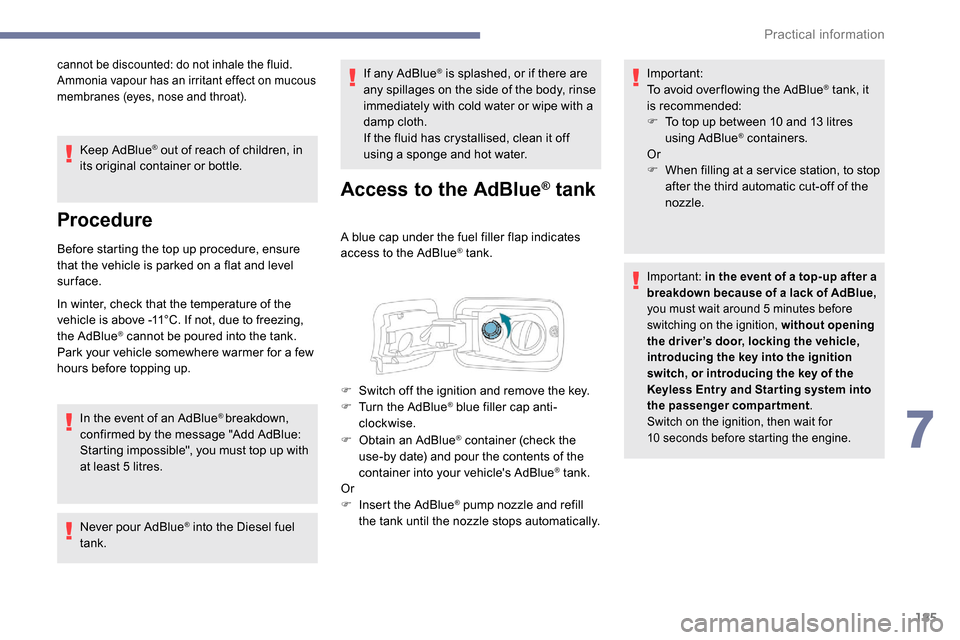
A blue cap under the fuel filler flap indicates
access to the AdBlue® tank.
F
O
btain an AdBlue
® container (check the
use-by date) and pour the contents of the
container into your vehicle's AdBlue
® tank.
Or
F
I
nsert the AdBlue
® pump nozzle and refill
the tank until the nozzle stops automatically. Important:
To avoid over flowing the AdBlue
® tank, it
i
s recommended:
F
T
o top up between 10 and 13
litres
using AdBlue
® containers.
Or
F
W
hen filling at a ser vice station, to stop
after the third automatic cut-off of the
nozzle.
Important: in the event of a top-up after a
breakdown because of a lack of AdBlue,
you must wait around 5
minutes before
switching on the ignition, without opening
the driver’s door, locking the vehicle,
introducing the key into the ignition
switch, or introducing the key of the
K
eyless Entr y and Star ting system into
the passenger compartment.
Switch on the ignition, then wait for
10
seconds before starting the engine.
F Switch off the ignition and remove the key.
F T urn the AdBlue® blue filler cap anti-
clockwise.
7
Practical information
Page 188 of 312

186
Advice on care
General recommendations on the care and maintenance of your vehicle are given in the warranty
and maintenance record.Observe the following recommendations to
avoid damaging your vehicle:
-
D
o not clean your headlamps with a dry
or abrasive cloth, nor with detergent or
solvent products. Use a sponge and
soapy water or a pH neutral product.
-
W
hen using a high-pressure washer on
stubborn dirt, avoid prolonged use on the
headlamps, the lamps and their edges to
avoid damaging their lacquer finish and
seals.
-
N
ever use an abrasive sponge to clean
persistent dirt, as this may scratch the
paint sur face. Use a soft cloth with soapy
water instead.
-
W
hen washing your vehicle, never clean
the interior with a water jet.
-
W
hen washing your vehicle in an
automatic roller-brush car wash, be sure
to lock your doors and, depending on
version, remove the key. -
N
ever use high-pressure washing to
clean the engine compartment, in order
to avoid damaging the electrical units.
-
L
iquids carried in an open vessel (e.g.
a cup or mug) could be spilt, presenting
a risk of damage on contact with the
controls in the dashboard and centre
console. Be careful.
Depending on version, in order to avoid
damaging or unpeeling the stickers on the
bodywork, you are strongly advised against
using high-pressure cleaners to wash your
vehicle. It is recommended that you wash
it using a high-flow water jet and rinse the
vehicle down using demineralised water.
Only a microfibre cloth is recommended for
wiping your vehicle; it must be clean and
used gently.
It is always preferable to have paint repairs carried out by a PEUGEOT dealer or a qualified
workshop.
Practical information
Page 195 of 312
193
Removing a wheel
Parking the vehicle
Immobilise the vehicle where it does not
block traffic: the ground must be level,
stable and non-slippery.
With a manual gearbox, engage first gear
then switch off the ignition to block the
wheels.
With an automatic gearbox, place the gear
selector in position P then switch off the
ignition to block the wheels.
Apply the parking brake and check that
the warning lamp is on in the instrument
panel.
The occupants must get out of the vehicle
and wait where they are safe.
Never go underneath a vehicle raised
using a jack; use an axle stand.
With an automatic electronic parking
brake, place a chock against the wheel
diagonally opposite to the one being
replaced.Wheel with wheel trim
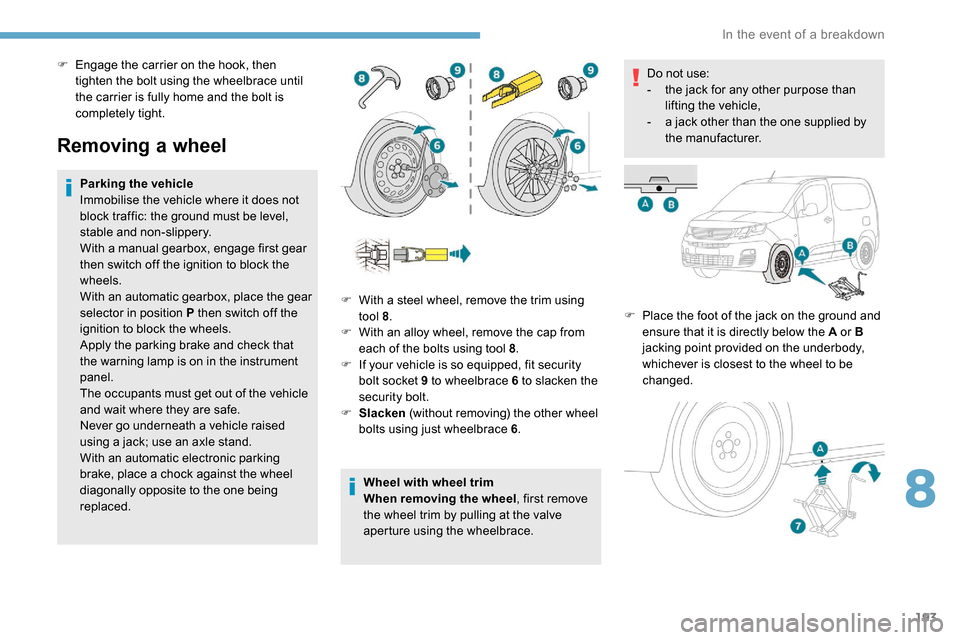
When removing the wheel
, first remove
the wheel trim by pulling at the valve
aperture using the wheelbrace. Do not use:
-
t
he jack for any other purpose than
lifting the vehicle,
-
a j
ack other than the one supplied by
the manufacturer.
F
P
lace the foot of the jack on the ground and
ensure that it is directly below the A or B
jacking point provided on the underbody,
whichever is closest to the wheel to be
changed.
F
W
ith a steel wheel, remove the trim using
tool 8 .
F
W
ith an alloy wheel, remove the cap from
each of the bolts using tool 8 .
F
I
f your vehicle is so equipped, fit security
bolt socket 9 to wheelbrace 6 to slacken the
security bolt.
F
S
lacken (without removing) the other wheel
bolts using just wheelbrace 6 .
F
E
ngage the carrier on the hook, then
tighten the bolt using the wheelbrace until
the carrier is fully home and the bolt is
completely tight.
8
In the event of a breakdown