2019 Peugeot Partner headlamp
[x] Cancel search: headlampPage 165 of 312

163
Malfunction
If a fault occurs when shifting to
reverse, this warning lamp comes on
in the instrument panel, accompanied
by a message and an audible signal
(short beep).
Contact a PEUGEOT dealer or a qualified
workshop to have the system checked.
Reversing camera
With the ignition on, this system uses a camera
located near the third brake lamp to display a
view of the rear of your vehicle on the output
screen (if it is a panel van or has a solid
partition).
The reversing camera is activated automatically
when reverse gear is engaged. The image is
displayed on the output screen. The output
screen switches off when the gearbox is in
neutral or in a for ward gear. The blue lines 1 represent the general direction
of the vehicle (the gap corresponds to the width
of your vehicle with the mirrors).
The red line 2 represents a distance of about
30
cm beyond the edge of your vehicle's rear
b u m p e r.
The green lines 3 represent distances of
about 1 and 2
metres beyond the edge of your
vehicle's rear bumper.
The turquoise blue curves 4 represent the
maximum turning circle.
The reversing camera is a driving aid which
cannot, in any circumstances, replace the
need for vigilance on the part of the driver.
Some objects may not be seen by the
camera. Certain vehicles may be difficult to see
(dark colours, headlamps off) when the
brightness of the screen is reduced by the
vehicle’s lighting dimmer.
The image quality may be affected by the
environment, the exterior conditions (rain,
dirt, dust), the driving mode, the lighting
conditions (night, low sun).
In the presence of areas in shade, or in
conditions of bright sunlight or inadequate
lighting, the image may be darkened and
with lower contrast.
Obstacles may appear further away than
they actually are in reality.
During parking manoeuvres and lane
changes, it is important to check the sides
of the vehicle using the mirrors.
The rear parking sensors also provide
information on the vehicle's surroundings.
6
Driving
Page 167 of 312

165
The blue dimension lines 1 represent the width
of your vehicle with the mirrors unfolded.
The red line 2 represents a distance of 30 cm
from the rear bumper; the two green lines 3 and
4 represent 1
m and 2 m, respectively.
The blue cur ves 5 appear successively; they
are based on the position of the steering wheel
and represent the turning circle radius of your
vehicle.
The orange dashes 6 represent the opening
radii of the rear doors. - The
visual reversing aid : allows a view of
the area close to the rear of the vehicle. Some items may not be seen by the rear
camera.
Certain vehicles may be difficult to see
(dark colours, headlamps off) when the
brightness of the screen is reduced by the
vehicle’s lighting dimmer.
The image quality may be affected by the
environment, the exterior conditions (rain,
dirt, dust), the driving mode, the lighting
conditions (night, low sun).
In the presence of areas in shade, or in
conditions of bright sunlight or inadequate
lighting, the image may be darkened and
with lower contrast.Obstacles may appear further away than
they actually are in reality.
During parking manoeuvres and lane
changes, it is important to check the sides
of the vehicle using the mirrors.
The rear parking sensors also provide
information on the vehicle's surroundings.
Activation/Deactivation
The system starts when the ignition is switched
on.
This system is a driving aid which cannot,
in any circumstances, replace the need for
vigilance on the part of the driver.
Please routinely check your exterior
mirrors while driving and during
manoeuvres.
F
W
ith the ignition on, press the
corresponding button below the screen to
switch the output screen on/off.
A message appears.
6
Driving
Page 178 of 312

176
ON
Measurement display on the
instrument panel.
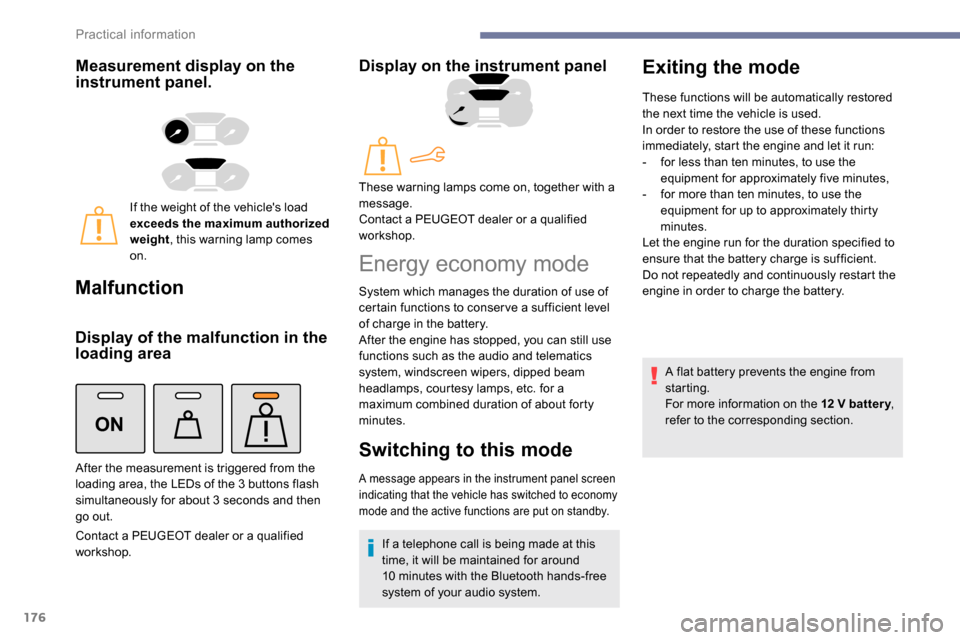
If the weight of the vehicle's load
exceeds the maximum authorized
weight, this warning lamp comes
on.
Malfunction
Display of the malfunction in the
loading area
Contact a PEUGEOT dealer or a qualified
workshop.
Display on the instrument panel
After the measurement is triggered from the
loading area, the LEDs of the 3 buttons flash
simultaneously for about 3
seconds and then
go out. These warning lamps come on, together with a
message.
Contact a PEUGEOT dealer or a qualified
workshop.
Energy economy mode
System which manages the duration of use of
certain functions to conser ve a sufficient level
of charge in the battery.
After the engine has stopped, you can still use
functions such as the audio and telematics
system,
windscreen wipers, dipped beam
headlamps,
courtesy lamps, etc. for a
maximum combined duration of about forty
minutes.
Switching to this mode
A message appears in the instrument panel screen
indicating that the vehicle has switched to economy
mode and the active functions are put on standby.
If a telephone call is being made at this
time, it will be maintained for around
10
minutes with the Bluetooth hands-free
system of your audio system.
Exiting the mode
These functions will be automatically restored
the next time the vehicle is used.
In order to restore the use of these functions
immediately, start the engine and let it run:
-
f
or less than ten minutes, to use the
equipment for approximately five minutes,
-
f
or more than ten minutes, to use the
equipment for up to approximately thirty
minutes.
Let the engine run for the duration specified to
ensure that the battery charge is sufficient.
Do not repeatedly and continuously restart the
engine in order to charge the battery.
A flat battery prevents the engine from
starting.
For more information on the 12
V batter y,
refer to the corresponding section.
Practical information
Page 188 of 312

186
Advice on care
General recommendations on the care and maintenance of your vehicle are given in the warranty
and maintenance record.Observe the following recommendations to
avoid damaging your vehicle:
-
D
o not clean your headlamps with a dry
or abrasive cloth, nor with detergent or
solvent products. Use a sponge and
soapy water or a pH neutral product.
-
W
hen using a high-pressure washer on
stubborn dirt, avoid prolonged use on the
headlamps, the lamps and their edges to
avoid damaging their lacquer finish and
seals.
-
N
ever use an abrasive sponge to clean
persistent dirt, as this may scratch the
paint sur face. Use a soft cloth with soapy
water instead.
-
W
hen washing your vehicle, never clean
the interior with a water jet.
-
W
hen washing your vehicle in an
automatic roller-brush car wash, be sure
to lock your doors and, depending on
version, remove the key. -
N
ever use high-pressure washing to
clean the engine compartment, in order
to avoid damaging the electrical units.
-
L
iquids carried in an open vessel (e.g.
a cup or mug) could be spilt, presenting
a risk of damage on contact with the
controls in the dashboard and centre
console. Be careful.
Depending on version, in order to avoid
damaging or unpeeling the stickers on the
bodywork, you are strongly advised against
using high-pressure cleaners to wash your
vehicle. It is recommended that you wash
it using a high-flow water jet and rinse the
vehicle down using demineralised water.
Only a microfibre cloth is recommended for
wiping your vehicle; it must be clean and
used gently.
It is always preferable to have paint repairs carried out by a PEUGEOT dealer or a qualified
workshop.
Practical information
Page 197 of 312

195
After changing a wheel
Stow the punctured wheel in the carrier.
Go to a PEUGEOT dealer or a qualified
workshop as soon as possible.
Have the punctured tyre examined. After
inspection, the technician will advise you
on whether the tyre can be repaired or if it
must be replaced.
Some driving aid functions should be
disabled, e.g. the Active Safety Brake.If your vehicle has tyre under-inflation
detection, check the tyre pressures and
reinitialise the system.
For more information on Under-inflation
detection
, refer to the corresponding
section.
Wheel with wheel trim
When refitting the wheel , refit the wheel
trim starting by placing its notch facing the
valve and press around its edge with the
palm of your hand.
Changing a bulb
The headlamps have polycarbonate
lenses with a protective coating:
F
d
o not clean them using a dr y or
abrasive cloth, nor with a detergent
or solvent product,
F
u
se a sponge and soapy water or a pH
neutral product,
F
w
hen using a high pressure washer
on persistent marks, do not keep the
lance directed towards the lamps or
their edges for too long, so as not to
damage their protective coating and
seals.
Changing a bulb should only be done after
the headlamp has been switched off for
several minutes (risk of serious burns).
F
D
o not touch the bulb directly with your
fingers, use a lint-free cloth.
It is essential only to use anti-ultraviolet
(UV) type bulbs, so as not to damage the
headlamp.
Always replace a failed bulb with a new
bulb with the same type and specification.
Fitting a steel or "
space-saver" spare
wheel
If your vehicle is fitted with alloy wheels,
when tightening the bolts on fitting it is
normal to notice that the washers do not
come into contact with the steel or "space-
saver" spare wheel. The wheel is secured
by the conical contact of each bolt.
The tyre inflation pressures are given on
this label.
8
In the event of a breakdown
Page 198 of 312

196
Halogen bulbs
To ensure good quality lighting, check
that the bulb is correctly positioned in its
housing.
After changing a bulb
When refitting, close the protective cover
very carefully to guarantee the sealing of
the lamp.
In some weather conditions (e.g. low
temperature or humidity), the presence
of misting on the internal sur face of the
glass of the headlamps and rear lamps is
normal; it disappears after the lamps have
been on for a few minutes. Opening the bonnet /Access to bulbs
With the engine warm, proceed with
caution – risk of burns!
Take care with objects or clothing that
could be caught in the blades of the
cooling fan – risk of strangulation!Types of bulb
Various types of bulb are fitted to your vehicle.
To remove them:
Ty p e A
Ty p e B
Ty p e C Ty p e D
All glass bulb: pull gently as it is fitted by
pressure.
Bayonet bulb: press on the bulb then turn it
anti-clockwise.
Halogen bulb: release the retaining spring from
its housing. Halogen bulb: turn the bulb anti-clockwise.
Halogen bulbs must be changed with
headlamp off and cold (risk of severe
burns). Do not touch the bulb directly, use
a lint-free cloth.
When each operation has been completed,
check the operation of the lighting.
In the event of a breakdown
Page 199 of 312

197
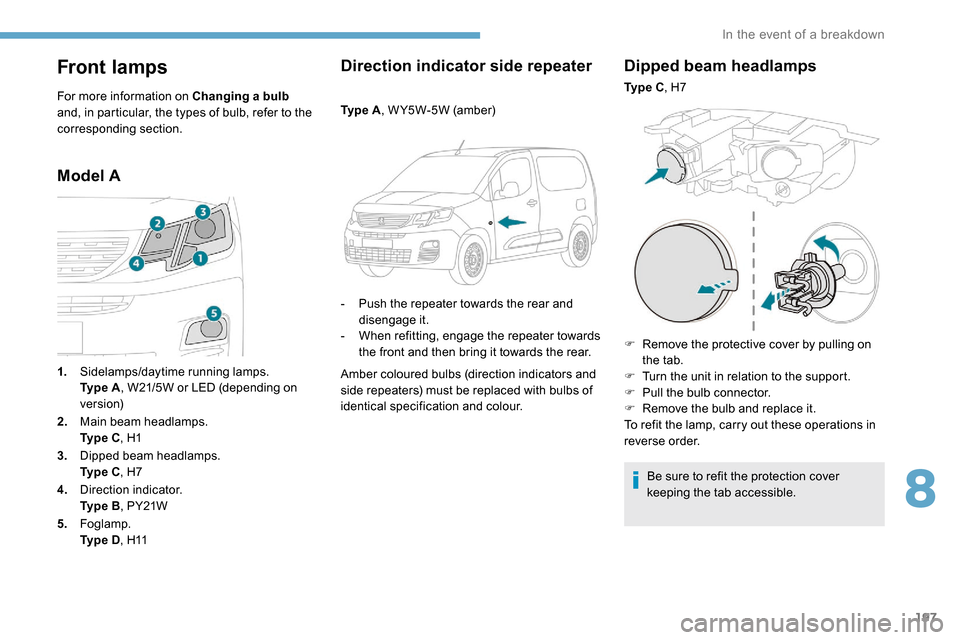
Front lamps
For more information on Changing a bulb
and, in particular, the types of bulb, refer to the
corresponding section.
Model A Direction indicator side repeater
Ty p e A
, W Y5W-5W (amber)
-
P
ush the repeater towards the rear and
disengage it.
-
W
hen refitting, engage the repeater towards
the front and then bring it towards the rear.
Amber coloured bulbs (direction indicators and
side repeaters) must be replaced with bulbs of
identical specification and colour.
Dipped beam headlamps
Ty p e C , H7
F
R
emove the protective cover by pulling on
the tab.
F
T
urn the unit in relation to the support.
F
P
ull the bulb connector.
F
R
emove the bulb and replace it.
To refit the lamp, carry out these operations in
reverse order.
Be sure to refit the protection cover
keeping the tab accessible.
1.
Sidelamps/daytime running lamps.
Ty p e
A , W21/5W or LED (depending on
ve r s i o n)
2. Main beam headlamps.
Ty p e
C , H1
3. Dipped beam headlamps.
Ty p e
C , H7
4. Direction indicator.
Ty p e
B , PY21W
5. Foglamp.
Ty p e
D , H11
8
In the event of a breakdown
Page 200 of 312

198
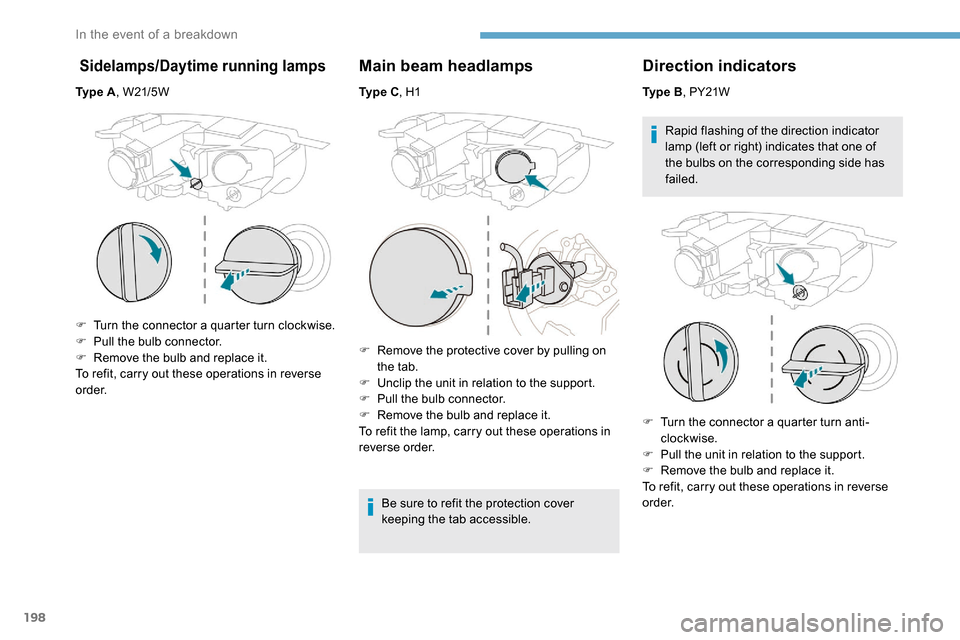
Sidelamps/Daytime running lamps
Ty p e A, W21/5W
F
T
urn the connector a quarter turn clockwise.
F
P
ull the bulb connector.
F
R
emove the bulb and replace it.
To refit, carry out these operations in reverse
o r d e r.
Main beam headlamps
Ty p e C , H1
F
R
emove the protective cover by pulling on
the tab.
F
U
nclip the unit in relation to the support.
F
P
ull the bulb connector.
F
R
emove the bulb and replace it.
To refit the lamp, carry out these operations in
reverse order.
Be sure to refit the protection cover
keeping the tab accessible.
Direction indicators
Ty p e B, PY21W
Rapid flashing of the direction indicator
lamp (left or right) indicates that one of
the bulbs on the corresponding side has
failed.
F
T
urn the connector a quarter turn anti-
clockwise.
F
P
ull the unit in relation to the support.
F
R
emove the bulb and replace it.
To refit, carry out these operations in reverse
o r d e r.
In the event of a breakdown