2019 Peugeot Partner tow bar
[x] Cancel search: tow barPage 175 of 312

173
Snow chains
In wintry conditions, snow chains
improve traction as well as the
behaviour of the vehicle when
braking.
Snow chains must be fitted only to the
front wheels. They must never be fitted to
"space-saver" type spare wheels.
Take account of the legislation in force in
your country on the use of snow chains
and the maximum authorised speed.
Installation tips
F If you have to fit the chains during a journey, stop the vehicle on a flat sur face on the side
of the road.
F
A
pply the parking brake and position any
wheel chocks under the wheels to prevent
movement of your vehicle.
F
F
it the chains following the instructions
provided by the manufacturer.
F
M
ove off gently and drive for a few
moments, without exceeding 31
mph
(50
km/h).
F
S
top your vehicle and check that the snow
chains are correctly tightened. It is strongly recommended that before
you leave, you practise fitting the snow
chains on a level and dry sur face.
Avoid driving with snow chains on roads
that have been cleared of snow to avoid
damaging your vehicle's tyres and the
road sur face. If your vehicle is fitted with
alloy wheels, check that no part of the
chain or its fixings is in contact with the
wheel rim.
Use only the chains designed to be fitted to the
type of wheel fitted to your vehicle:
Original tyre size Maximum link size
(m m)
195/65 R15
9
205/60 R16
205/55 R17 215/65 R16215/60 R17
cannot be fitted with chains
You can also use snow socks.
For more information, contact a PEUGEOT
dealer or a qualified workshop.
Towing device
Load distribution
F D istribute the load in the trailer so that the
heaviest items are as close as possible to
the axle, and the nose weight approaches
the maximum permitted without exceeding
it.
Air density decreases with altitude, thus
reducing engine performance. The maximum
towed load must be reduced by 10
% for every
1,000
metres of altitude.
Use towing devices and their original
harnesses approved by PEUGEOT. It
is recommended that the installation be
per formed by a PEUGEOT dealer or a
qualified workshop.
If the towing device is not fitted by
a PEUGEOT dealer, it must still be
fitted in accordance with the vehicle
manufacturer's instructions.
Certain driving assistance or manoeuvring
assistance functions are automatically
deactivated if an approved towbar is used.
7
Practical information
Page 192 of 312

190
The speed limit sticker must be secured
to the interior of the vehicle in the driver's
field of vision, to remind you that a wheel
is in temporary use.F
S
witch on the ignition.
If a pressure of 2 bars is not reached
after about 7
minutes, this indicates
that the tyre is not repairable; contact a
PEUGEOT dealer or a qualified workshop
for assistance.
F
P
lace the switch in the "O" position.
F
D
isconnect the compressor's electric plug
from the vehicle's 12
V socket.
F
R
eplace the cap on the valve.
F
R
emove the kit.
F
R
emove and then store the bottle of sealant.Take care, the sealant product is harmful
if swallowed and causes irritation to the
eyes.
Keep this product out of the reach of
children.
The use-by date of the fluid is marked on
the bottle.
After use, do not discard the bottle in
standard waste, take it to a PEUGEOT
dealer or an authorised waste disposal
site.
Do not forget to obtain a new bottle of
sealant, available from a PEUGEOT
dealer or a qualified workshop.
The tyre inflation pressures are given on
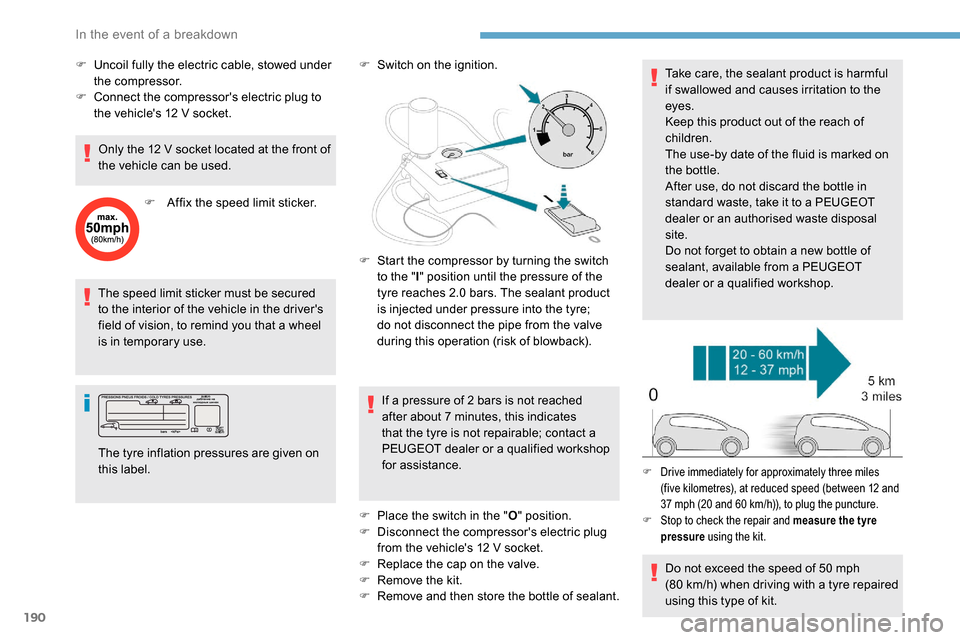
this label. F
S
tart the compressor by turning the switch
to the " l" position until the pressure of the
tyre reaches 2.0 bars. The sealant product
is injected under pressure into the tyre;
do not disconnect the pipe from the valve
during this operation (risk of blowback).
Do not exceed the speed of 50
mph
(80
km/h) when driving with a tyre repaired
using this type of kit.
F Drive immediately for approximately three miles (five kilometres), at reduced speed (between 12 and
37
mph (20 and 60 km/h)), to plug the puncture.
F
S
top to check the repair and measure the tyre
pressure using the kit.
F Uncoil fully the electric cable, stowed under
the compressor.
F
C
onnect the compressor's electric plug to
the vehicle's 12
V socket.
Only the 12
V socket located at the front of
the vehicle can be used.
F
A
ffix the speed limit sticker.
In the event of a breakdown
Page 193 of 312

191
F Check that the compressor switch is at the "O " position.
F
U
ncoil fully the electric cable, stowed under
the compressor.
F
C
onnect the compressor's electric plug to
the vehicle's 12
V socket.
F
S
witch on the ignition. Only the 12
V socket located at the front
of the vehicle can be used to power the
compressor. If a pressure of 2 bars is not reached after
7
m
inutes, this indicates that the tyre is not
repairable; contact a PEUGEOT dealer or
a qualified workshop for assistance.
F
O
nce the correct pressure is reached, put
the switch to the " O" position.
F
R
emove the kit then stow it.
Do not drive more than 125 miles (200 km)
with the repaired tyre; see a PEUGEOT
dealer or a qualified workshop to change
the tyre.
Should the pressure of one or more tyres
be adjusted, it is necessary to reinitialise
the under-inflation detection system.
For more information on Tyre under-
inflation detection , refer to the
corresponding section.
F
S
crew the pipe onto the valve and tighten
f i r m l y. F
S
tart the compressor by placing the switch
at position " I" and adjust the pressure to the
value shown on the vehicle's tyre pressure
label. To deflate: press the black button
located on the compressor pipe, near the
valve connection. The tyre inflation pressures are given on
this label.
Spare wheel
Scan the QR code on page 3 to view
explanatory videos.
Procedure for changing a damaged wheel with
the spare wheel using the tools provided with
the vehicle.
Checking/adjusting tyre
pressures
You can also use the compressor,
without injecting sealant, to check and, if
necessary, adjust the tyre pressures.
F
R
emove the valve cap from the tyre and
place it in a clean area.
F
U
ncoil the pipe stowed under the
compressor.
8
In the event of a breakdown
Page 194 of 312

192
Access to the spare wheel
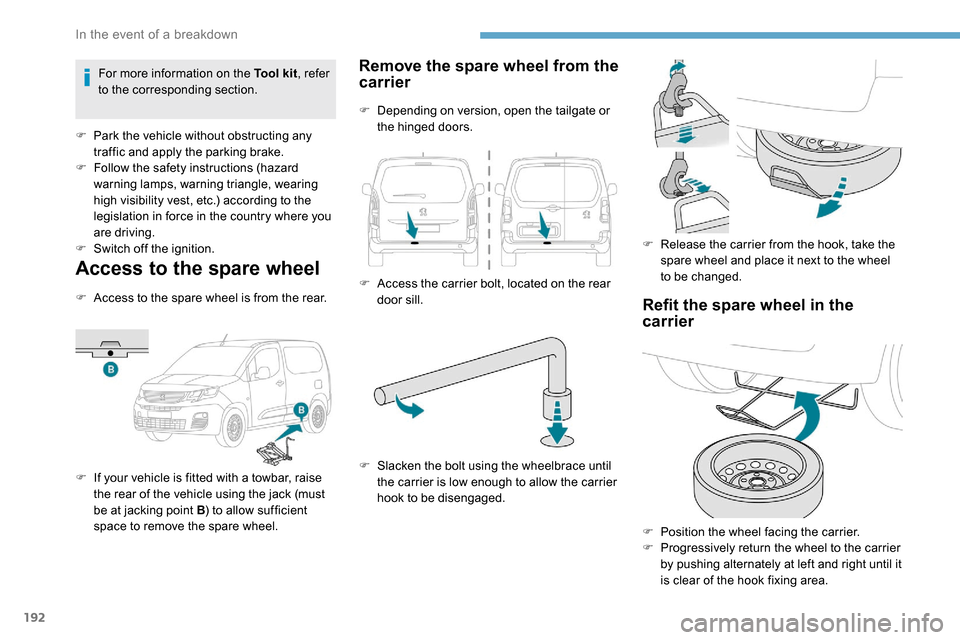
F Access to the spare wheel is from the rear.
F
I
f your vehicle is fitted with a towbar, raise
the rear of the vehicle using the jack (must
be at jacking point B ) to allow sufficient
space to remove the spare wheel.
Remove the spare wheel from the
carrier
F Depending on version, open the tailgate or the hinged doors.
F
A
ccess the carrier bolt, located on the rear
door sill.
F
S
lacken the bolt using the wheelbrace until
the carrier is low enough to allow the carrier
hook to be disengaged. F
R
elease the carrier from the hook, take the
spare wheel and place it next to the wheel
to be changed.
Refit the spare wheel in the
carrier
F Position the wheel facing the carrier.
F P rogressively return the wheel to the carrier
by pushing alternately at left and right until it
is clear of the hook fixing area.
For more information on the Tool kit
, refer
to the corresponding section.
F
P
ark the vehicle without obstructing any
traffic and apply the parking brake.
F
F
ollow the safety instructions (hazard
warning lamps, warning triangle, wearing
high visibility vest, etc.) according to the
legislation in force in the country where you
are driving.
F
S
witch off the ignition.
In the event of a breakdown
Page 204 of 312

202
Fuse No.Rating (A) Functions
F1 10Wireless smartphone charger, electrochrome interior mirror.
F4 15Horn.
F6 20Screenwash pump.
F7 1012
V socket (rear).
F10 30Electric locks module.
F13 10Telematics and radio controls.
F14 5Alarm, overload indicator, advanced telematic unit.
F19 3Trailer inter face unit.
F22 3Surround Rear Vision display screen.
F23 5Generic trailer interface unit.
F27 5Additional heating.
F29 20Audio system, touch screen.
F32 1512
V socket (front).
F34 5Mirrors control.
F36 5USB port.
For more information on installing a
towbar or equipment of the TA XI type,
contact a PEUGEOT dealer.
Dashboard fuses
The fusebox is placed in the lower dashboard
(left-hand side).
Access to the fuses
F Unclip the cover by pulling at the top left,
then right.
The fuses described below vary according to
the equipment in your vehicle.
In the event of a breakdown
Page 209 of 312

207
With a manual gearbox, move the gear
lever into neutral.
With an automatic gearbox, place the gear
selector into position N.
Failure to adhere to this instruction
may lead to damage to braking system
components and the lack of braking
assistance on restarting the engine.
Towing your vehicle Towing another vehicle
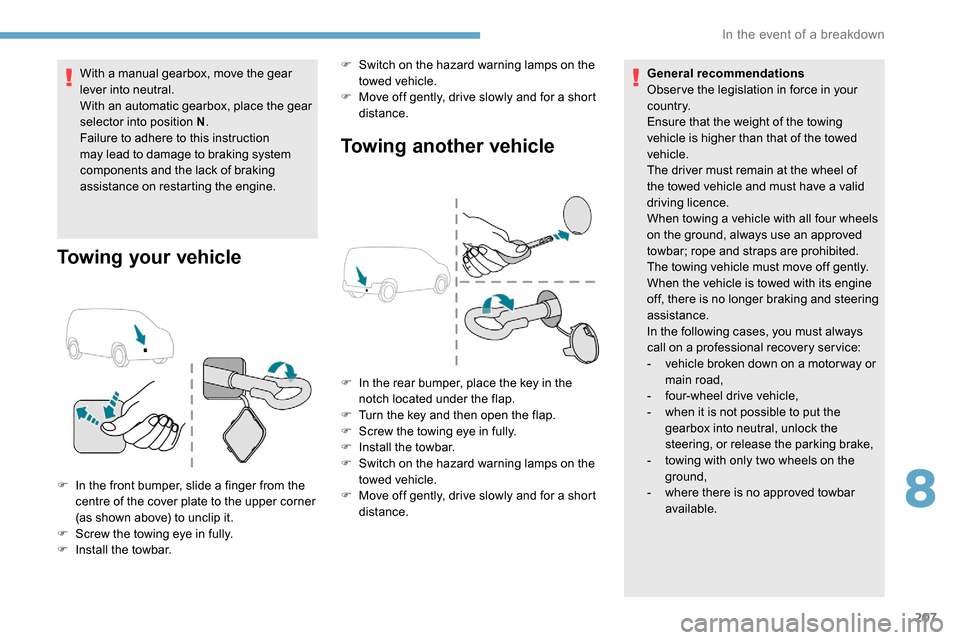
F In the front bumper, slide a finger from the
centre of the cover plate to the upper corner
(as shown above) to unclip it.
F
S
crew the towing eye in fully.
F
I
nstall the towbar. F
S
witch on the hazard warning lamps on the
towed vehicle.
F
M
ove off gently, drive slowly and for a short
distance. General recommendations
Obser ve the legislation in force in your
c o u nt r y.
Ensure that the weight of the towing
vehicle is higher than that of the towed
vehicle.
The driver must remain at the wheel of
the towed vehicle and must have a valid
driving licence.
When towing a vehicle with all four wheels
on the ground, always use an approved
towbar; rope and straps are prohibited.
The towing vehicle must move off gently.
When the vehicle is towed with its engine
off, there is no longer braking and steering
assistance.
In the following cases, you must always
call on a professional recovery ser vice:
-
v
ehicle broken down on a motor way or
main road,
-
f
our-wheel drive vehicle,
-
w
hen it is not possible to put the
gearbox into neutral, unlock the
steering, or release the parking brake,
-
t
owing with only two wheels on the
ground,
- w here there is no approved towbar
available.
F
I
n the rear bumper, place the key in the
notch located under the flap.
F
T
urn the key and then open the flap.
F
S
crew the towing eye in fully.
F
I
nstall the towbar.
F
S
witch on the hazard warning lamps on the
towed vehicle.
F M ove off gently, drive slowly and for a short
distance.
8
In the event of a breakdown
Page 304 of 312

222
PPads, brake ............................................ 182-183
Paint colour code .......................................... 217
Parking brake
................................. 121, 182-183
Parking brake, automatic electronic
..................... 16, 20 , 24-25 , 121-124
Parking sensors, audible and visual
.............160
Parking sensors, front
...................................161
Parking sensors, rear .................................... 160
Petrol
...................................................... 211-212
PEUGEOT Connect Nav
...................................1
PEUGEOT Connect Radio
...............................1
P
lates, identification ...................................... 217
Player, Apple
® ....................................... 10, 9, 26
Player, MP3 CD ............................... ............9, 25
Player, USB
............................................. 7, 9 , 25
Port, USB
.......................................... 65, 7, 9 , 25
Power steering
...............................
.................15
Pre-heater, Diesel
........................................... 18
Pressures, tyres
.................... 183, 191 , 195 , 217
Pre-tensioning seat belts
.............................. 105
Priming the fuel system
................................ 187
Profiles
...................................................... 16, 31
Programmable cruise control
.......................13 9
Protecting children
......................... 10 6, 1 0 9 -113
Puncture
................................................ 189, 191
RRadio ...................................... 4-5, 6 -7 , 9, 23 , 25
Radio, digital (Digital Audio Broadcasting - DAB)
.............................6,
8, 24
Range, AdBlue
........................................... 31- 32
RDS
................
........................................ 7, 23 -24
Rear screen, demisting
...................................79
Recharging the battery
.................................205
Recirculation, air
....................................... 75 -77
Reduction of electrical load
..........................17 7
Regeneration of the particle filter
.................182
Reinitialisation of the under-inflation
detection system ......................................... 168
Reinitialising the remote control
............... 45
-46
Reminder, key in ignition
...............................11
9
Reminder, lighting on
...................................... 86
R
emote control
...........37- 3 9, 42, 44 , 47- 4 8 , 120
Removing a wheel
................................. 193 -195
Removing the mat
..................................... 64-65
Replacing bulbs
..................................... 19
5 -197
Replacing fuses
.................................... 201-203
Replacing the air filter
................................... 18
1
Replacing the oil filter
................................... 18
2
Replacing the passenger compartment filter ....181Reservoir, screenwash ..........................18 0 -181
Resetting the service indicator .......................28
Resetting the trip recorder
..............................29
Reversing camera
...............................
..........163
Reversing lamps
..............................
.............19 9
Roof bars
....................................................... 17 7
Running out of fuel (Diesel)
..........................187
SSafety, children .............................. 10 6, 1 0 9 -113
Saturation of the particle filter (Diesel) .........182
Screen, instrument panel
................................29
Screen menu map
........................................... 12
Screen, multifunction (with audio system)
........4
Screenwash, front
........................................... 92
Screenwash, rear
............................................ 92
SCR (Selective Catalytic Reduction)
............183
Seat belts
................................. 15, 103 -105 , 111
Seat, bench front, 2-seat
.................. 61,
63, 104
Seat, rear bench
............................................. 63
Seats, front
...............................
.................59-63
Seats, front bench
..................................... 61- 63
Seats, heated
.................................................. 61
Seats, Multiflex ~ Extenso Cab
......................70Seats, rear
.....................................
58, 61 , 63-64
Serial number, vehicle
..................................
217
Service indicator
.............................................
28
Servicing
......................................................... 28
S
ettings, equipment
........................................
29
Settings, system
..................................
29, 16 , 32
Sidelamps
......................................... 85,
87
, 198
Side parking sensors
.................................... 16
1
Side repeater
................................................
197
Sliding side door, electric ....................
42, 5 0 - 51
Snow chains
..........................................
167, 173
Snow chains, link
..........................................
173
Socket, 12 V accessory ............................
64-65
Socket, 220 V ..................................................
66
Socket, auxiliary
...................................... 8,
9
, 25
Socket, Jack
................................................
8, 25
Speed limiter
.......................... 13
6 -13 9
, 14 9 -15 0
Speed limit recognition
......... 13
3
, 13 5 , 13 9, 141
Stability control (ESC) ..........25, 97- 9 8 , 10 0 -102
Starting a Diesel engine
............................... 17
0
Starting the engine
....................................... 11
6
Starting the vehicle
.............................
16 ,
20
, 24-25 , 115, 11 8 , 120 , 126 -129
Starting using another battery
......................
204
Station, radio ............................... ...
4, 6 -7 , 23 -24
Stay, bonnet ..................................................178
Steering mounted controls, audio ........ 2-
3, 3 , 3
Steering wheel, adjustment
............................ 57
S
topping the vehicle
...........................
16 , 20 , 24-25 , 115, 11 8 -12 0 , 126 -129
Stop & Start ...........................................
26 , 35 , 78, 83 , 13 0 -132 , 171, 17 7 , 181 , 203 , 206
STOP (warning lamp) ...................................... 17
St orage ............................................................ 65
Stowing rings
.................................................. 68
Surround Rear Vision
................................... 16
4
Switching off the engine
.......................11 6, 11 9
Synchronising the remote control
.............45-46
Alphabetical index