2019 Peugeot Partner Head beam
[x] Cancel search: Head beamPage 91 of 312

89
Activation/Deactivation
Activation and deactivation are
done via the vehicle configuration
menu.When deactivated, the lighting system changes
to "automatic illumination of headlamps" mode.
The state of the system stays in the memory
when switching off the ignition.
Operation
If the ambient light level is sufficient and/or if
the traffic conditions do not allow illumination of
the main beam headlamps:
-
d
ipped beam is maintained,
these indicator lamps come on
in the instrument panel.
If the ambient light level is very low and the
traffic conditions permit: -
m
ain beam comes on
automatically: these indicator
lamps come on in the instrument
panel.
When the system detects thick fog, it
temporarily deactivates the function.
As soon as the vehicle leaves the area of thick
fog, the function reactivates automatically.
This indicator lamp goes off while
the function is deactivated.
Pause
If the situation requires a change of headlamp
beam, the driver can take over at any time. F
F
lashing the headlamps
pauses the function and the
system changes to "automatic
illumination of headlamps"
mode:
To reactivate the function, flash the headlamps
again. -
i
f the "AUTO" and "Dipped beam" indicator
lamps were on, the system changes to main
beam,
-
i
f the "AUTO" and "Main beam" indicator
lamps were on, the system changes to
dipped beam.
4
Lighting and visibility
Page 92 of 312

90
The system may suffer inter ference or not
work correctly:
-
u
nder poor visibility conditions (snow,
heavy rain, etc.),
-
i
f the windscreen is dirty, misted or
obscured (by a sticker, etc.) in front of
the camera,
-
i
f the vehicle is facing highly reflective
signs.
When the system detects thick fog, it
temporarily deactivates the function.
The system is not able to detect:
-
r
oad users that do not have their own
lighting, such as pedestrians,
-
v
ehicles whose lighting is obscured
(for example: vehicles running behind a
safety barrier on a motor way),
-
v
ehicles at the top or bottom of a
steep slope, on winding roads, on
crossroads.Cornering lighting
If fitted to your vehicle, this system makes use
of the beam from a front foglamp to illuminate
the inside of a bend, when the main or dipped
beam headlamps are on and the vehicle speed
is below 25
mph (40 km/h) (urban driving,
winding road, junctions, parking manoeuvres,
e t c .) .
Without cornering lighting With cornering lighting
Switching on
This system starts:
-
w hen the corresponding direction indicator
is switched on,
or
-
f
rom a certain angle of rotation of the
steering wheel.
Switching off
The system does not operate:
- b elow a certain angle of rotation of the
steering wheel,
-
a
bove 25 mph (40 km/h),
-
w
hen reverse gear is engaged.
Lighting and visibility
Page 93 of 312

91
Programming
The system is activated or
deactivated via the vehicle
configuration menu.
This system is activated by default.
Headlamp beam height
adjustment
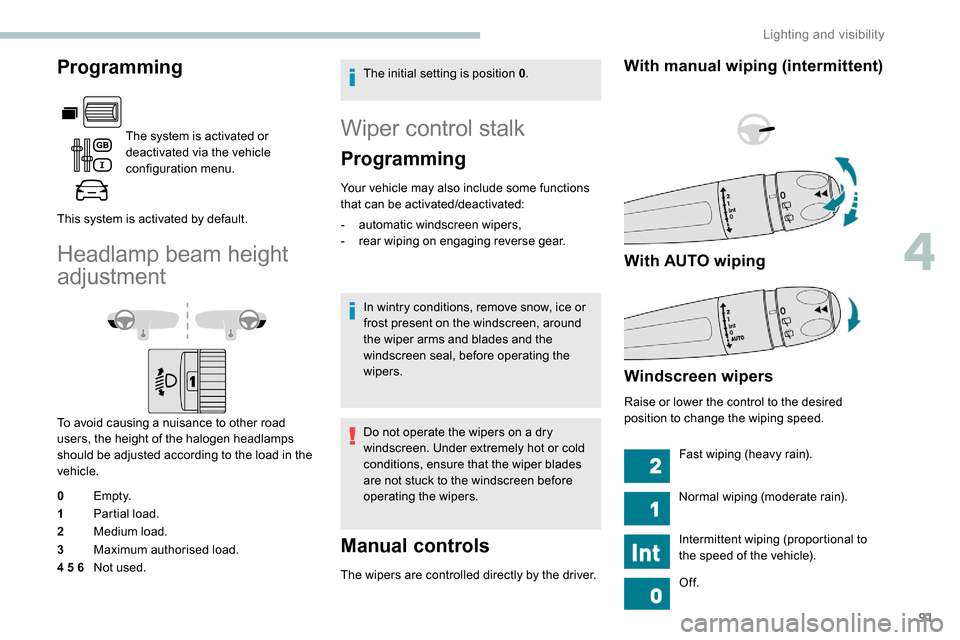
To avoid causing a nuisance to other road
users, the height of the halogen headlamps
should be adjusted according to the load in the
vehicle.
0 Em pt y.
1 Partial load.
2 Medium load.
3 Maximum authorised load.
4 5 6 Not used. The initial setting is position 0
.
Wiper control stalk
Programming
Your vehicle may also include some functions
that can be activated/deactivated:
-
a
utomatic windscreen wipers,
-
r
ear wiping on engaging reverse gear.
In wintry conditions, remove snow, ice or
frost present on the windscreen, around
the wiper arms and blades and the
windscreen seal, before operating the
wipers.
Do not operate the wipers on a dry
windscreen. Under extremely hot or cold
conditions, ensure that the wiper blades
are not stuck to the windscreen before
operating the wipers.
Manual controls
The wipers are controlled directly by the driver.
With manual wiping (intermittent)
With AUTO wiping
Windscreen wipers
Raise or lower the control to the desired
position to change the wiping speed. Fast wiping (heavy rain).
Normal wiping (moderate rain).
Intermittent wiping (proportional to
the speed of the vehicle).
Of f.
4
Lighting and visibility
Page 118 of 312

116
Side wind
F Take into account the increased sensitivity to wind.
Cooling
Towing a trailer on a slope increases the
temperature of the coolant.
As the fan is electrically controlled, its cooling
capacity is not dependent on the engine speed.
F
T
o lower the engine speed, reduce your
speed.
The maximum towable load on an incline
depends on the gradient and the exterior
temperature.
In all cases, keep a check on the coolant
temperature.
F
I
f this warning lamp and the STOP
warning lamp come on, stop the
vehicle and switch off the engine
as soon as possible.
New vehicle
Do not pull a trailer before having
driven at least approximately 620
miles
(1,000
kilometres).
Braking
Towing a trailer increases the braking distance.
To avoid overheating of the brakes, the use of
engine braking is recommended.
Ty r e s
F Check the tyre pressures of the towing vehicle and of the trailer, observing the
recommended pressures.
Lighting
F Check the electrical lighting and signalling on the trailer and the headlamp beam height
of your vehicle.
For more information on Headlamp
beam height adjustment , refer to the
corresponding section.
Certain driving or manoeuvring aids are
automatically disabled if an approved
towbar is used.
If the exterior temperature is high, it is
recommended that the engine is allowed
to idle for 1 to 2
minutes after the vehicle
comes to a stop, to facilitate its cooling.
Starting/switching off the
engine
Starting
The parking brake must be applied.
F
W
ith a manual gearbox, shift the gear lever
into neutral, press the clutch pedal to the
floor and keep the pedal down until the
engine runs.
F
W
ith an automatic gearbox, select position
P, then firmly press the brake pedal.
Using the conventional key/the
remote control key
1. Stop position.
2. Ignition on position.
3. Starting position.
F Insert the key in the ignition switch. The
system recognises the start code.
Driving
Page 178 of 312

176
ON
Measurement display on the
instrument panel.
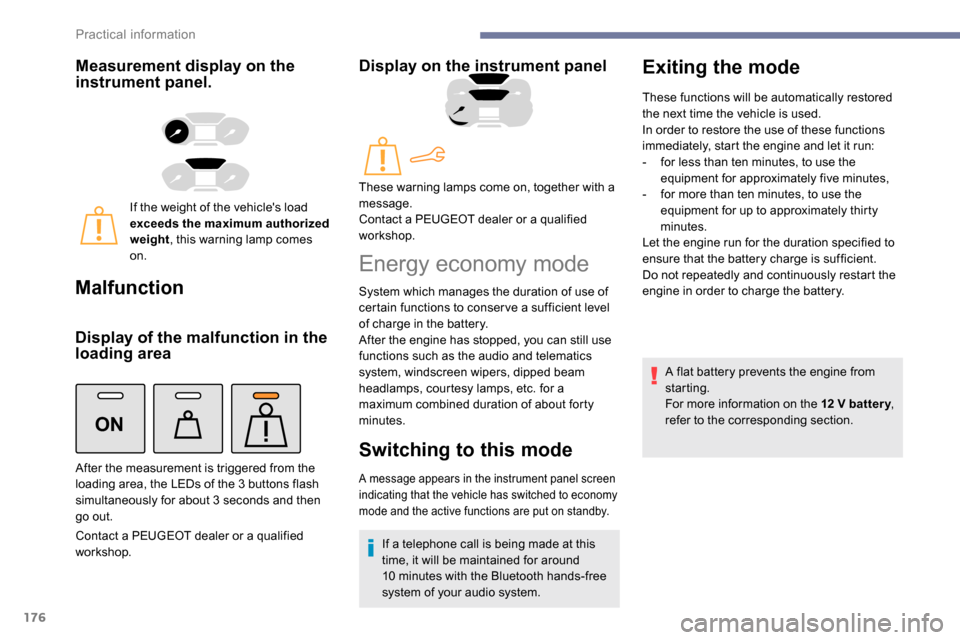
If the weight of the vehicle's load
exceeds the maximum authorized
weight, this warning lamp comes
on.
Malfunction
Display of the malfunction in the
loading area
Contact a PEUGEOT dealer or a qualified
workshop.
Display on the instrument panel
After the measurement is triggered from the
loading area, the LEDs of the 3 buttons flash
simultaneously for about 3
seconds and then
go out. These warning lamps come on, together with a
message.
Contact a PEUGEOT dealer or a qualified
workshop.
Energy economy mode
System which manages the duration of use of
certain functions to conser ve a sufficient level
of charge in the battery.
After the engine has stopped, you can still use
functions such as the audio and telematics
system,
windscreen wipers, dipped beam
headlamps,
courtesy lamps, etc. for a
maximum combined duration of about forty
minutes.
Switching to this mode
A message appears in the instrument panel screen
indicating that the vehicle has switched to economy
mode and the active functions are put on standby.
If a telephone call is being made at this
time, it will be maintained for around
10
minutes with the Bluetooth hands-free
system of your audio system.
Exiting the mode
These functions will be automatically restored
the next time the vehicle is used.
In order to restore the use of these functions
immediately, start the engine and let it run:
-
f
or less than ten minutes, to use the
equipment for approximately five minutes,
-
f
or more than ten minutes, to use the
equipment for up to approximately thirty
minutes.
Let the engine run for the duration specified to
ensure that the battery charge is sufficient.
Do not repeatedly and continuously restart the
engine in order to charge the battery.
A flat battery prevents the engine from
starting.
For more information on the 12
V batter y,
refer to the corresponding section.
Practical information
Page 199 of 312

197
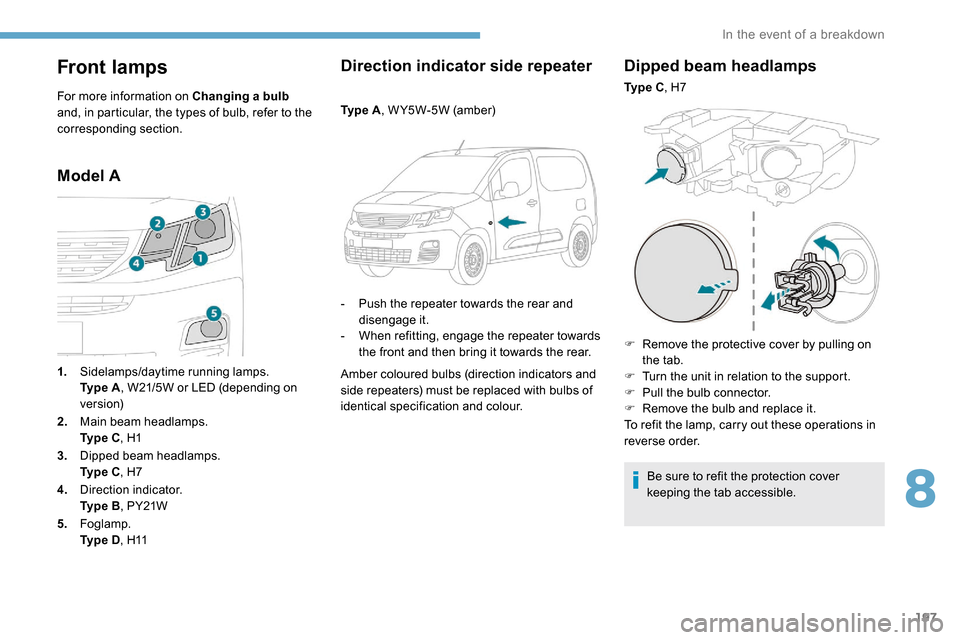
Front lamps
For more information on Changing a bulb
and, in particular, the types of bulb, refer to the
corresponding section.
Model A Direction indicator side repeater
Ty p e A
, W Y5W-5W (amber)
-
P
ush the repeater towards the rear and
disengage it.
-
W
hen refitting, engage the repeater towards
the front and then bring it towards the rear.
Amber coloured bulbs (direction indicators and
side repeaters) must be replaced with bulbs of
identical specification and colour.
Dipped beam headlamps
Ty p e C , H7
F
R
emove the protective cover by pulling on
the tab.
F
T
urn the unit in relation to the support.
F
P
ull the bulb connector.
F
R
emove the bulb and replace it.
To refit the lamp, carry out these operations in
reverse order.
Be sure to refit the protection cover
keeping the tab accessible.
1.
Sidelamps/daytime running lamps.
Ty p e
A , W21/5W or LED (depending on
ve r s i o n)
2. Main beam headlamps.
Ty p e
C , H1
3. Dipped beam headlamps.
Ty p e
C , H7
4. Direction indicator.
Ty p e
B , PY21W
5. Foglamp.
Ty p e
D , H11
8
In the event of a breakdown
Page 200 of 312

198
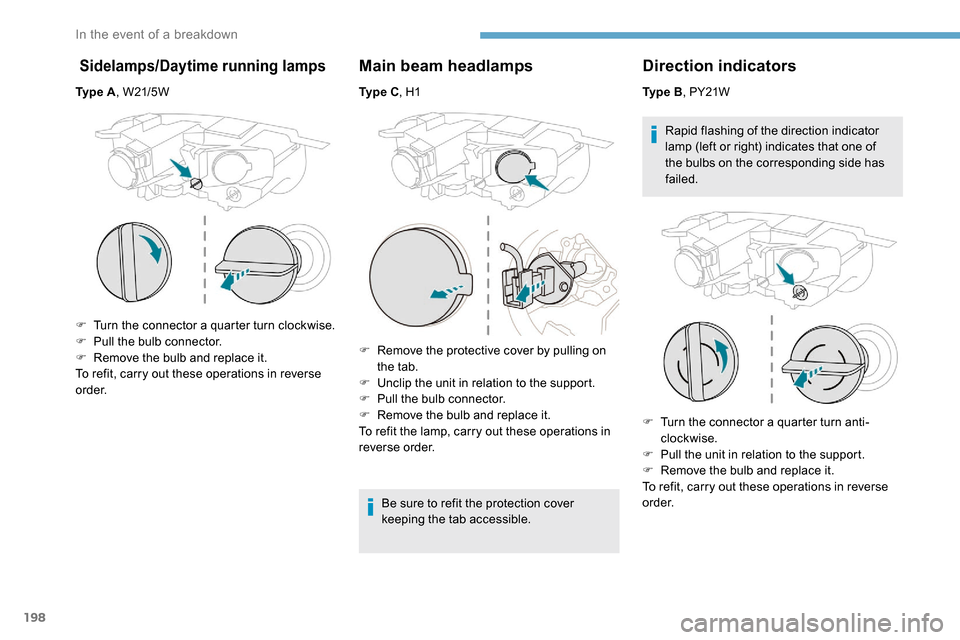
Sidelamps/Daytime running lamps
Ty p e A, W21/5W
F
T
urn the connector a quarter turn clockwise.
F
P
ull the bulb connector.
F
R
emove the bulb and replace it.
To refit, carry out these operations in reverse
o r d e r.
Main beam headlamps
Ty p e C , H1
F
R
emove the protective cover by pulling on
the tab.
F
U
nclip the unit in relation to the support.
F
P
ull the bulb connector.
F
R
emove the bulb and replace it.
To refit the lamp, carry out these operations in
reverse order.
Be sure to refit the protection cover
keeping the tab accessible.
Direction indicators
Ty p e B, PY21W
Rapid flashing of the direction indicator
lamp (left or right) indicates that one of
the bulbs on the corresponding side has
failed.
F
T
urn the connector a quarter turn anti-
clockwise.
F
P
ull the unit in relation to the support.
F
R
emove the bulb and replace it.
To refit, carry out these operations in reverse
o r d e r.
In the event of a breakdown
Page 205 of 312

203
Engine compartment fuses
The fusebox is placed in the engine
compartment near the battery.
Access to the fuses
F Release the two latches A.
F R emove the cover.
F
C
hange the fuse.
F
W
hen you have finished, close the cover
carefully then engage the two latches A , to
ensure correct sealing of the fusebox. Fuse
No. Rating
(A) Functions
F16 15Front foglamp.
F18 10
Right-hand main beam headlamp.
F19 10Left-hand main
beam headlamp.
F29 40Windscreen wipers.
12 V battery
Procedure for starting the engine using another
battery or charging a discharged battery.
Lead-acid starter
batteries
Batteries contain harmful substances
such as sulphuric acid and lead.
They must be disposed of in accordance
with regulations and must not, in any
circumstances, be discarded with
household waste.
Take used remote control batteries and
vehicle batteries to a special collection
point.
Protect your eyes and face before
handling the battery.
All operations on the battery must be
carried out in a well ventilated area and
away from naked flames and sources of
sparks, so as to avoid the risk of explosion
or fire.
Wash your hands afterwards.
Versions equipped with Stop & Start are
fitted with a 12
V lead-acid battery of
specific technology and specification.
Its replacement should be carried out
only by a PEUGEOT dealer or a qualified
workshop.
8
In the event of a breakdown