2019 Peugeot Expert Bonnet release
[x] Cancel search: Bonnet releasePage 6 of 324

4
Instruments and controls
Depending on the vehicle's equipment,
the storage compartments may be open
or closed. This configuration is shown for
illustrative purposes.
Steering mounted controls
1.Glove box
Deactivation of the front passenger airbag
(inside the glove box)
2. 12 V accessory socket (120 W)
Obser ve the maximum power rating to
avoid damaging the accessory 3.
USB socket
4. JACK socket
5. Instrument panel
6. Storage compartments
Cup or can holder
7. Cooled glove box (if the vehicle is so
equipped)
Via a ventilation nozzle, if opened, engine
running and air conditioning on
8. Upper glove box
9. 220 V accessory socket (150 W, if the
vehicle is so equipped)
Obser ve the maximum power rating to
avoid damaging the accessory.
10. Horn
11. Courtesy lamp
Warning lamp display for seat belts and
front passenger airbag
Interior rear view mirror
Surveillance mirror
Emergency and assistance call buttons
12 . Heating
Manual air conditioning
Dual-zone automatic air conditioning
Front demisting - defrosting
Rear screen demisting – defrosting
13. "START/STOP" button
14 . Gearbox
15. Monochrome screen with audio system
Touch screen with PEUGEOT Connect
Radio or PEUGEOT Connect Nav 16.
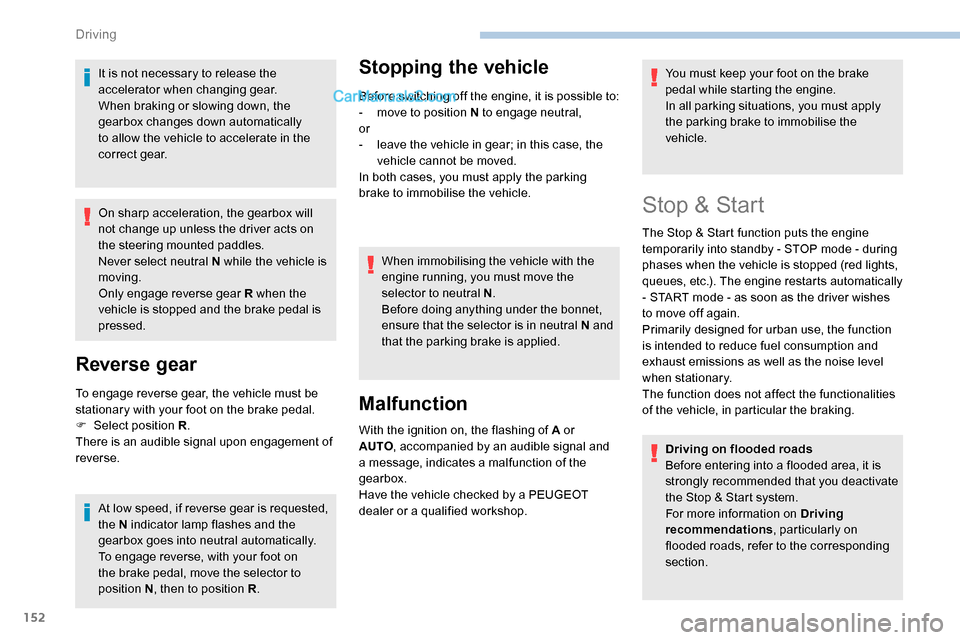
Bonnet release
17. Dashboard fuses
18. Head-up display
1. External lighting/direction indicator
controls
2. Wiper/screenwash/trip computer controls
3. Audio system adjustment controls
(depending on version)
Over view
Page 154 of 324

152
It is not necessary to release the
accelerator when changing gear.
When braking or slowing down, the
gearbox changes down automatically
to allow the vehicle to accelerate in the
correct gear.
On sharp acceleration, the gearbox will
not change up unless the driver acts on
the steering mounted paddles.
Never select neutral N while the vehicle is
moving.
Only engage reverse gear R when the
vehicle is stopped and the brake pedal is
pressed.
Reverse gear
To engage reverse gear, the vehicle must be
stationary with your foot on the brake pedal.
F
Sel
ect position R .
There is an audible signal upon engagement of
reverse.
At low speed, if reverse gear is requested,
the N indicator lamp flashes and the
gearbox goes into neutral automatically.
To engage reverse, with your foot on
the brake pedal, move the selector to
position
N, then to position R .
Stopping the vehicle
Before switching off the engine, it is possible to:
-
m ove to position N to engage neutral,
or
-
l
eave the vehicle in gear; in this case, the
vehicle cannot be moved.
In both cases, you must apply the parking
brake to immobilise the vehicle.
When immobilising the vehicle with the
engine running, you must move the
selector to neutral N .
Before doing anything under the bonnet,
ensure that the selector is in neutral N and
that the parking brake is applied.
Malfunction
With the ignition on, the flashing of A or
AUTO , accompanied by an audible signal and
a message, indicates a malfunction of the
gearbox.
Have the vehicle checked by a PEUGEOT
dealer or a qualified workshop. You must keep your foot on the brake
pedal while starting the engine.
In all parking situations, you must apply
the parking brake to immobilise the
vehicle.
Stop & Start
The Stop & Start function puts the engine
temporarily into standby - STOP mode - during
phases when the vehicle is stopped (red lights,
queues, etc.). The engine restarts automatically
- START mode - as soon as the driver wishes
to move off again.
Primarily designed for urban use, the function
is intended to reduce fuel consumption and
exhaust emissions as well as the noise level
when stationary.
The function does not affect the functionalities
of the vehicle, in particular the braking.
Driving on flooded roads
Before entering into a flooded area, it is
strongly recommended that you deactivate
the Stop & Start system.
For more information on Driving
recommendations , particularly on
flooded roads, refer to the corresponding
section.
Driving
Page 192 of 324

190
As this value may change, please verify
the maximum load set out in the manual
supplied with the roof bars.
If the height exceeds 40 cm, adapt the
speed of the vehicle to the profile of the
road to avoid damaging the roof bars and
the fixings on the vehicle.
Be sure to refer to national legislation in
order to comply with the regulations for
transporting objects which are longer than
the vehicle.
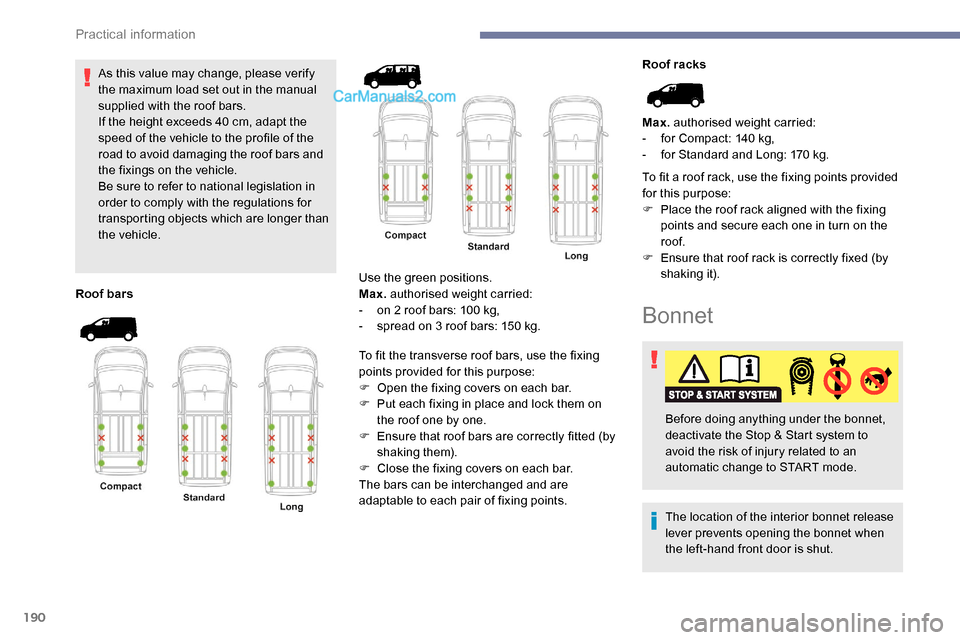
Roof bars Use the green positions.
Max.
authorised weight carried:
-
o
n 2 roof bars: 100 kg,
-
s
pread on 3 roof bars: 150 kg.
To fit the transverse roof bars, use the fixing
points provided for this purpose:
F
O
pen the fixing covers on each bar.
F
P
ut each fixing in place and lock them on
the roof one by one.
F
E
nsure that roof bars are correctly fitted (by
shaking them).
F
C
lose the fixing covers on each bar.
The bars can be interchanged and are
adaptable to each pair of fixing points. Roof racks
Max.
authorised weight carried:
-
f
or Compact: 140 kg,
-
f
or Standard and Long: 170 kg.
To fit a roof rack, use the fixing points provided
for this purpose:
F
P
lace the roof rack aligned with the fixing
points and secure each one in turn on the
roof.
F
E
nsure that roof rack is correctly fixed (by
shaking it).
Bonnet
The location of the interior bonnet release
lever prevents opening the bonnet when
the left-hand front door is shut. Before doing anything under the bonnet,
deactivate the Stop & Start system to
avoid the risk of injury related to an
automatic change to START mode.
Practical information
Page 193 of 324

191
When the engine is hot, handle the
exterior safety catch and the bonnet
stay with care (risk of burns), using the
protected area.
When the bonnet is open, take care not to
damage the safety catch.
Do not open the bonnet under very windy
conditions.
The cooling fan may star t after
switching off the engine: take care
with articles and clothing that might be
caught by the fan blades.
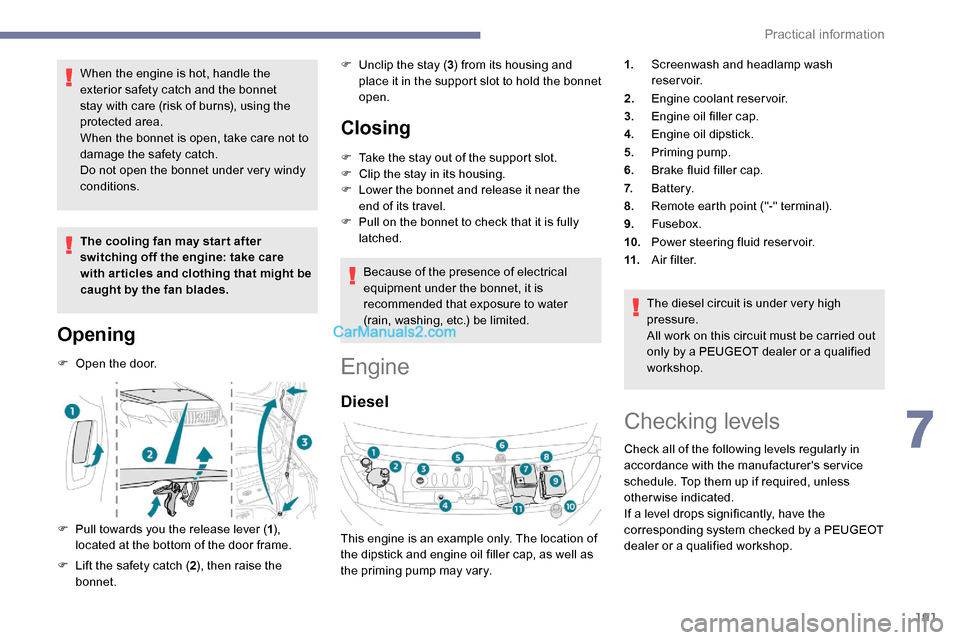
Opening
F Open the door.
F
P
ull towards you the release lever ( 1),
located at the bottom of the door frame.
F
L
ift the safety catch ( 2), then raise the
bonnet. F
U
nclip the stay (
3) from its housing and
place it in the support slot to hold the bonnet
open.
Closing
F Take the stay out of the support slot.
F C lip the stay in its housing.
F
L
ower the bonnet and release it near the
end of its travel.
F
P
ull on the bonnet to check that it is fully
latched.
Because of the presence of electrical
equipment under the bonnet, it is
recommended that exposure to water
(rain, washing, etc.) be limited.
Engine
Diesel
The diesel circuit is under very high
pressure.
All work on this circuit must be carried out
only by a PEUGEOT dealer or a qualified
workshop.
This engine is an example only. The location of
the dipstick and engine oil filler cap, as well as
the priming pump may vary. 1.
Screenwash and headlamp wash
reservoir.
2. Engine coolant reservoir.
3. Engine oil filler cap.
4. Engine oil dipstick.
5. Priming pump.
6. Brake fluid filler cap.
7. Battery.
8. Remote earth point ("-" terminal).
9. Fusebox.
10. Power steering fluid reservoir.
11. A i r f i l t e r.
Checking levels
Check all of the following levels regularly in
accordance with the manufacturer's service
schedule. Top them up if required, unless
otherwise indicated.
If a level drops significantly, have the
corresponding system checked by a PEUGEOT
dealer or a qualified workshop.
7
Practical information
Page 203 of 324

201
F Operate the starter motor to start the engine (if the engine does not start at the first
attempt, wait around 15 seconds before
trying again).
F
I
f the engine does not start after a few
attempts, operate the priming pump again,
then the starter motor.
F
P
ut the cover back in place and clip it in,
then close the bonnet.
2.0 HDi engines
F Open the bonnet and then, if necessary, unclip the cover to access the priming
pump.
F
L
oosen the degassing bolt. F
O
perate the priming pump until
fuel appears in the transparent
tube.
F
R
etighten the degassing bolt.
F
O
perate the starter motor until the engine
starts (if the engine does not start at the
first attempt, wait around 15
seconds before
trying again).
F
I
f the engine does not start after a few
attempts, operate the priming pump again,
then the starter motor.
F
P
ut the cover back in place and clip it in,
then close the bonnet.
Tool box
Access
The tool box is located under the left-hand front
seat.
As a safety measure, bars 1 and 2 prevent
the box escaping from its housing, if it is
not correctly secured.
Removing
F Press latches A and slide them inwards to release the box.
F
L
ift the box slightly then pull it as far as it will
go to take it past bar 1 .
F
T
hen, lift the box upwards to take it past
bar
2.
8
In the event of a breakdown
Page 222 of 324

220
The battery is located under the bonnet.
F O pen the bonnet using the interior release
lever, then the exterior safety catch.
F
S
ecure the bonnet stay.
For more information on the Bonnet and
the Engine , refer to the corresponding
sections.
Starting using another
battery
When your vehicle's battery is discharged, the
engine can be started using a backup battery
(external or from another vehicle) and jump
leads or using a battery booster.
Never start the engine by connecting a
battery charger.
Never use a 24 V or higher battery
b o o s t e r.
Check beforehand that the backup
battery has a nominal voltage of 12 V and
a capacity at least equal to that of the
discharged battery.
The two vehicles must not be in contact
with each other.
Switch off all the electrical consumers
on both vehicles (audio system, wipers,
lighting, etc.).
Make sure that the jump leads are not
close to the moving parts of the engine
(fan, belt, etc.).
Do not disconnect the (+) terminal while
the engine is running.
Always replace the battery with one of
equivalent specification.
Access to the battery
F Remove the plastic cover to access the (+)
terminal, if your vehicle has one.
The battery (-) terminal is not accessible.
A remote earth point is provided at the front of
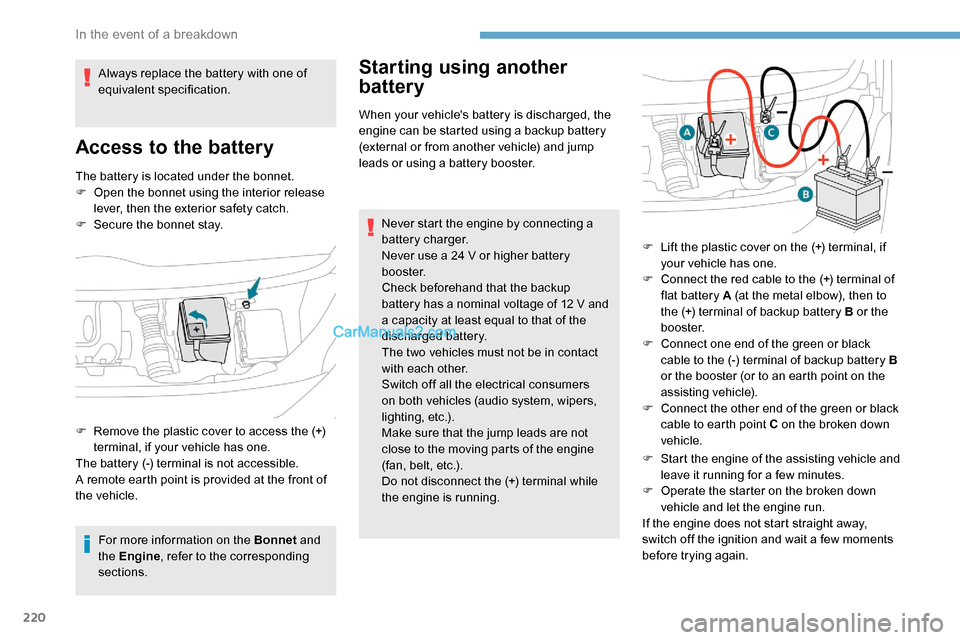
the vehicle. F
L
ift the plastic cover on the (+) terminal, if
your vehicle has one.
F
C
onnect the red cable to the (+) terminal of
flat battery A (at the metal elbow), then to
the (+) terminal of backup battery B or the
b o o s t e r.
F
C
onnect one end of the green or black
cable to the (-) terminal of backup battery B
or the booster (or to an earth point on the
assisting vehicle).
F
C
onnect the other end of the green or black
cable to earth point C on the broken down
vehicle.
F
S
tart the engine of the assisting vehicle and
leave it running for a few minutes.
F
O
perate the starter on the broken down
vehicle and let the engine run.
If the engine does not start straight away,
switch off the ignition and wait a few moments
before trying again.
In the event of a breakdown
Page 309 of 324

233
ABS ...............................................................11 0
Accessories .................................................. 107
Access to the 3rd row
...............................65-66
Access to the spare wheel
............................207
Active Safety Brake........................... 17, 171-173
AdBlue
® ....................................... 1 5 -16, 25, 196
AdBlue® tank ................................................. 19 8
Additive, Diesel ............................... 14, 193, 195
Adjusting headlamp beam height
................. 10
2
Adjusting headlamps
.................................... 102
Adjusting head restraints
................................ 56
Adjusting seat
........................................... 54-56
Adjusting the air distribution
.....................88-89
Adjusting the air flow
................................. 8
8-89
Adjusting the date
........................................... 30
Adjusting the height and reach of the steering wheel
.................................... 58
Adjusting the lumbar support
.......................... 55
A
djusting the seat angle
........................... 54, 56
Adjusting the seat belt height
....................... 11
4
Adjusting the temperature
........................88-89
Adjusting the time
........................................... 30
Advanced Grip Control
.......................... 112 -113
Advice on driving
............................... 7, 13 8 -13 9
Airbags
.............................. 1
8, 117, 119 -120, 122
Airbags, curtain
...................................... 11 8 -12 0
Airbags, front .................................. 11 8 -11 9 , 12 2
Airbags, lateral
...................................... 118, 120
Air conditioning
....................... 86, 88, 88 - 89, 92
Air conditioning, digital
................................... 91
Air conditioning, dual-zone automatic
......88-89
Air conditioning, manual
........................... 87
, 90
Air intake
................................................... 88-90
Air vents
.......................................................... 86
Alarm
.......................................................... 51- 5 2Anti-lock braking system (ABS)
.............
109 -110
Anti-pinch
........................................................ 8
2
Antitheft / Immobiliser
..................................... 33
A
rea, loading
...........................
3
3 -34, 42- 43, 80
Armrest
................
............................................
75
Armrest, front ..................................................
57
Assistance call
...............................
.......
108 -109
Assistance, emergency braking
....
109 -110, 173
Audible warning
............................................ 10
9Capacity, fuel tank
.................................
185 -187
Cap, fuel filler
...............................
..........
185 -187
Central locking
.......................................... 3
1, 37
Changing a bulb
............................. 21
1, 214 -216
Changing a bulb (side-hinged doors)
........... 2
14
Changing a fuse
..................................... 21
7-219
Changing a wheel
......................................... 20
6
Changing a wiper blade
........................ 10
5 -10 6
Changing the remote control battery
..............
40
Checking the engine oil level
....................
24-25
Checking the levels ................................
191-193
Checking tyre pressures (using the kit) ......................................202-205
Checks
...........................................191, 19 4 -195
Checks, routine
.....................................19 4 -195
Child lock
................................................13 6 -137
Child lock, electric
.........................................13 6
Child lock on rear windows
...........................137
Children
..........................................124, 13 0 -13 6
Children (safety)
............................................13 6
Child seats
.............................11
6 -117, 12 0 -12 8
Child seats, conventional
.......................123 -128
Child seats, ISOFIX
...............................13 0 -13 6
Closing the boot
..............................................50
Closing the doors
...........................31, 37, 49 -50
Collision Risk Alert ................................. 171-172
Compressor, tyre inflation
............................202
Container, AdBlue
® ....................................... 19 7
Control, emergency boot release ...................40
Control, emergency door
.................... 3
2, 38 -39
Control, heated seats
...................................... 57
Control stalk, lighting
...................................... 97
Control stalk, wipers
............................. 10
3 -104
Courtesy lamp
................................................. 95
Courtesy lamp, front
......................... 95 - 9 6, 216
Courtesy lamp, rear
.......................... 95 - 9 6, 216
Courtesy lamps
................................. 95 - 9 6, 216
Cover, load space
........................................... 79
Crew cab, fixed
.......................................... 7 3 -74
Crew cab, folding
............................................ 74
A
B
C
Battery ........................................... 189, 219-222
Battery, 12 V ............................... ...19 4, 219 -220
Battery capacity
............................................ 219
Battery, charging
........................................... 221
Battery, remote control
.............................40, 94
Bench seat, one-piece, fixed
.................... 6
4-65
Blind, panoramic roof
...................................... 82
Blind spot monitoring system
..................21, 178
Blind spot monitoring system, active
..............21
Blind spot sensors
.................................. 21, 176
Blinds, side
...................................................... 82
BlueHDi
............................... 13, 15, 25, 194, 200
Bonnet
.................................................... 19 0 -191
Boot
................................................................. 50
Boot lid
.......................................... 37-38, 40, 50
Brake discs
.................................................... 195
Brake lamps
...............................
............214 -216
Brakes
................................................ 11 -12 , 1 9 5
Braking assistance system
....................109 -110
Braking, automatic emergency
.........17, 171-173
Bulbs
............................................................. 2 11
Bulbs (changing)
................................... 211, 214
180° rear vision
.............................................
183
.
Alphabetical index