2019 Peugeot Expert Head up
[x] Cancel search: Head upPage 195 of 324
193
During the 30 minutes after topping up the
oil, the check per formed with the oil level
indicator in the instrument panel when the
ignition is switched on is not valid.
Brake fluid
The level of this fluid should be
close to the "MAX" mark. If not,
check the brake pad wear.
To know how often the brake fluid should be
replaced, refer to the manufacturer's servicing
schedule. If topping up, clean the cap before
replacing it. Use only DOT4 brake fluid
from a sealed canister.
F
A
dd more oil if necessary.
F
A
fter checking the level, carefully refit the oil
filler cap and the dipstick in its tube.
Power steering fluid
The level of this fluid should be
close to the " MAX" mark. With the
engine cold and the vehicle standing
on level ground, check this by
reading the level on the filler neck.
Engine coolant
Check the engine coolant level
regularly.
It is normal to top up this fluid
between two services.
The check and top-up must only be done with
the engine cold.
A low level presents a risk of serious damage
to the engine.
The level of this fluid should be close to the
" MAX " mark but should never exceed it.
If the level is close to or below the " MIN” mark,
it is essential to top up. Once the pressure has dropped, remove the
cap and top up to the required level.
Screen and headlamp
washer fluid
Top up the reser voir when you next
stop the vehicle.
Fluid specification
The fluid must be topped up with a ready-to-
use mixture.
In winter (temperatures below zero), a liquid
containing an agent to prevent freezing must
be used which is appropriate for the prevailing
conditions, in order to protect the elements of
the system (pump, tank, ducts, jets, etc.).
When the engine is hot, the temperature of this
fluid is regulated by the fan.
In addition, as the cooling system is
pressurised, wait at least one hour after
switching off the engine before carrying out any
work.
To avoid the risk of scalding if you need to top
up in an emergency, wrap a cloth around the
cap and unscrew the cap by two turns to allow
the pressure to drop. Filling with pure water is prohibited
under all circumstances (risk of freezing,
limestone deposits, etc.).
Diesel fuel additive (Diesel
with particle filter)
or
The minimum level in the particle
filter additive tank is indicated by
fixed illumination of this warning
lamp, accompanied by an audible
warning and a message warning that
the level of additive is too low.
7
Practical information
Page 201 of 324
199
If your vehicle's AdBlue® tank is
completely empty – which is confirmed
by the message "Top up AdBlue: Starting
impossible", you must top up with at least
5 litres.
Important: in the event of a top-up after
a breakdown because of a lack of
AdBlue, you must wait around 5 minutes
before switching on the ignition, without
opening the driver’s door, locking
the vehicle, introducing the key into
the ignition switch, or introducing
the key of the Keyless Entr y and
Star ting system into the passenger
compartment .
Switch on the ignition, then wait for
10
seconds before starting the engine.
Advice on care
General recommendations on the care and
maintenance of your vehicle are given in the
warranty and maintenance record. Observe the following recommendations to avoid damaging your vehicle:
-
D
o not clean your headlamps with a dry or abrasive cloth, nor with detergent or solvent
products. Use a sponge and soapy water or a pH neutral product.
-
W
hen using a high-pressure washer on stubborn dirt, avoid prolonged use on the
headlamps, the lamps and their edges to avoid damaging their lacquer finish and seals.
-
N
ever use an abrasive sponge to clean persistent dirt, as this may scratch the paint
sur face. Use a soft cloth with soapy water instead.
-
W
hen washing your vehicle, never clean the interior with a water jet.
-
W
hen washing your vehicle in an automatic roller-brush car wash, be sure to lock your
doors and, depending on version, remove the key and deactivate the " Hands-Free
Access " system.
-
N
ever use high-pressure washing to clean the engine compartment, in order to avoid
damaging the electrical units.
-
L
iquids carried in an open vessel (e.g. a cup or mug) could be spilt, presenting a risk of
damage on contact with the controls in the dashboard and centre console. Be careful.
Depending on version, in order to avoid damaging or unpeeling the stickers on the bodywork,
you are strongly advised against using high-pressure cleaners to wash your vehicle. It is
recommended that you wash it using a high-flow water jet and rinse the vehicle down using
demineralised water.
Only a microfibre cloth is recommended for wiping your vehicle; it must be clean and used
g e nt l y.
It is always preferable to have paint repairs carried out by a PEUGEOT dealer or a qualified
workshop.
7
Practical information
Page 211 of 324

209
F Extend jack 2 using the adjustment wheel,
until its head comes into contact with
jacking point
A or B, whichever is used; the
contact sur face
A or B on the vehicle must
be correctly engaged with the central part of
the head of the jack.
F
Ra
ise the vehicle until there is sufficient
space between the wheel and the ground
to admit the spare (not punctured) wheel
easily. Risk of injury!
Ensure that the jack is absolutely stable.
If the ground is slippery or loose, the jack
may slip or drop.
Ensure that the jack is positioned strictly
at one of the jacking points
A or B under
the vehicle, making sure that the vehicle's
contact sur face is correctly centred on the
head of the jack. Otherwise, the vehicle
could be damaged and/or the jack could
collapse.
F R emove the bolts and store them in a clean
place.
F
R
emove the wheel.F
P
ut the wheel in place on the hub.
F
S
crew in the bolts by hand as far as
possible.
F
I
f the vehicle is so equipped, pre-tighten
the security bolt using the wheelbrace 1
fitted with the security socket 4 .
F
P
re-tighten the other bolts using
wheelbrace 1 o n l y.
Fitting the wheel
8
In the event of a breakdown
Page 213 of 324
211
Changing a bulb
The headlamps have polycarbonate
lenses with a protective coating:
F
d
o not clean them using a dr y or
abrasive cloth, nor with a detergent
or solvent product,
F
u
se a sponge and soapy water or a pH
neutral product,
F
w
hen using a high pressure washer
on persistent marks, do not keep the
lance directed towards the lamps or
their edges for too long, so as not to
damage their protective coating and
seals.
Changing a bulb must only be done with
the ignition off and after the lamp has
been switched off for several minutes -
Risk of serious burns!
F
D
o not touch the bulb directly with your
fingers, use a lint-free cloth.
It is essential only to use anti-ultraviolet
(UV) type bulbs, so as not to damage the
headlamp.
Always replace a failed bulb with a new
bulb with the same type and specification. Halogen bulbs
To ensure good quality lighting, check
that the bulb is correctly positioned in its
housing.
After changing a bulb
To refit, carry out the operations in reverse
order to removal.
Close the protective cover very carefully to
guarantee the sealing of the lamps. Opening the bonnet /Access to bulbs
With the engine warm, proceed with
caution - risk of burns!
Take care with objects or clothing that
could be caught in the blades of the
engine cooling fan - risk of strangulation!
In some weather conditions (e.g. low
temperature or humidity), the presence
of misting on the internal sur face of the
glass of the headlamps and rear lamps is
normal; it disappears after the lamps have
been on for a few minutes.
Headlamps (halogen)
Be aware of the zone behind the right
lamp (vehicle direction), which may be hot
with a risk of burning (degassing hoses).
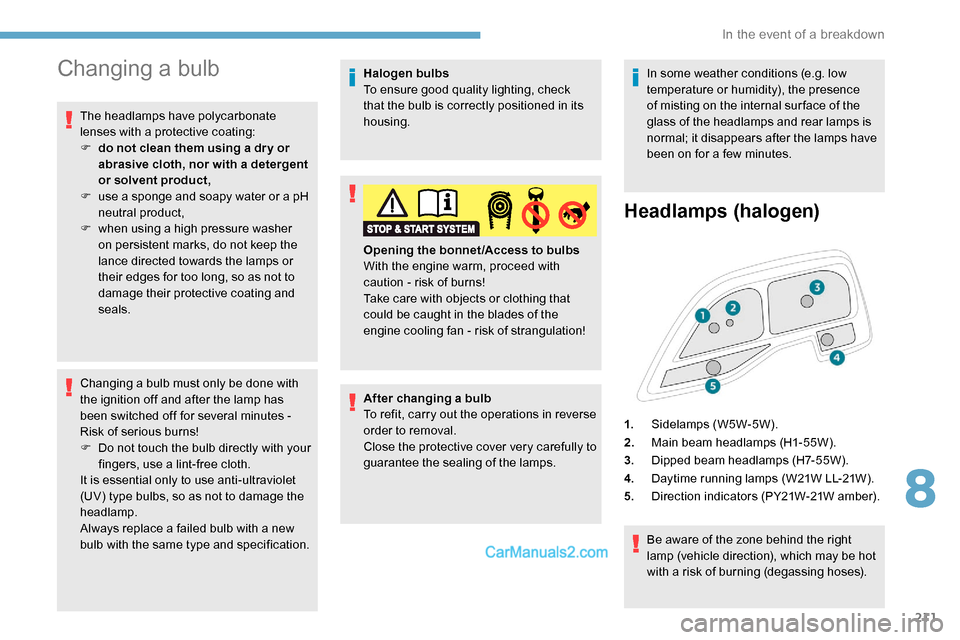
1.
Sidelamps (W5W-5W).
2. Main beam headlamps (H1-55W).
3. Dipped beam headlamps (H7-55W).
4. Daytime running lamps (W21W LL-21W).
5. Direction indicators (PY21W-21W amber).
8
In the event of a breakdown
Page 214 of 324
212
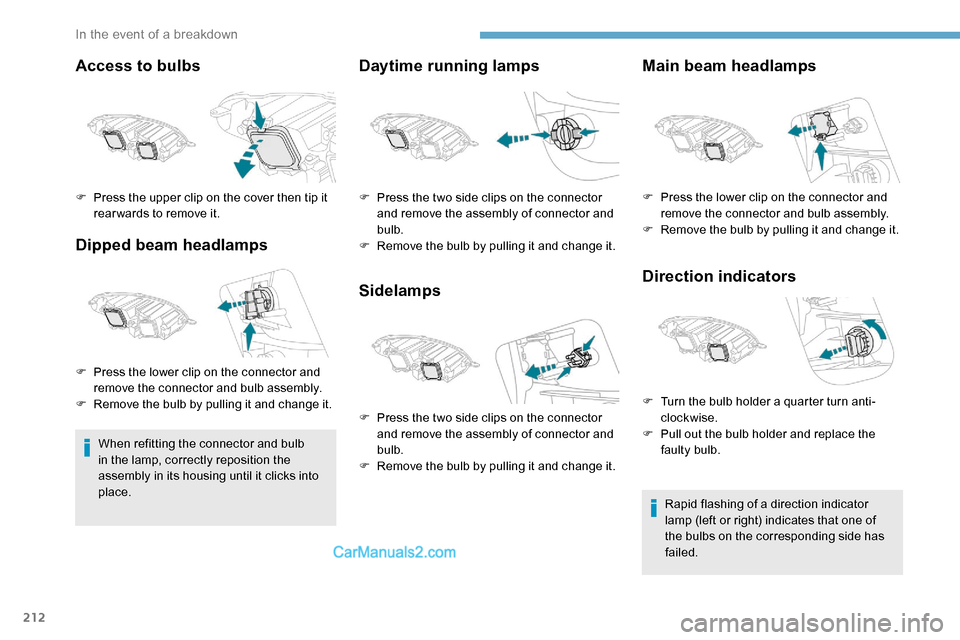
Access to bulbs
Dipped beam headlamps
When refitting the connector and bulb
in the lamp, correctly reposition the
assembly in its housing until it clicks into
place.
Daytime running lamps
SidelampsMain beam headlamps
Direction indicators
Rapid flashing of a direction indicator
lamp (left or right) indicates that one of
the bulbs on the corresponding side has
failed.
F
P
ress the upper clip on the cover then tip it
rear wards to remove it.
F
P
ress the lower clip on the connector and
remove the connector and bulb assembly.
F
R
emove the bulb by pulling it and change it. F
P
ress the two side clips on the connector
and remove the assembly of connector and
bulb.
F
R
emove the bulb by pulling it and change it.
F
P
ress the two side clips on the connector
and remove the assembly of connector and
bulb.
F
R
emove the bulb by pulling it and change it. F
P
ress the lower clip on the connector and
remove the connector and bulb assembly.
F
R
emove the bulb by pulling it and change it.
F
T
urn the bulb holder a quarter turn anti-
clockwise.
F
P
ull out the bulb holder and replace the
faulty bulb.
In the event of a breakdown
Page 215 of 324
213
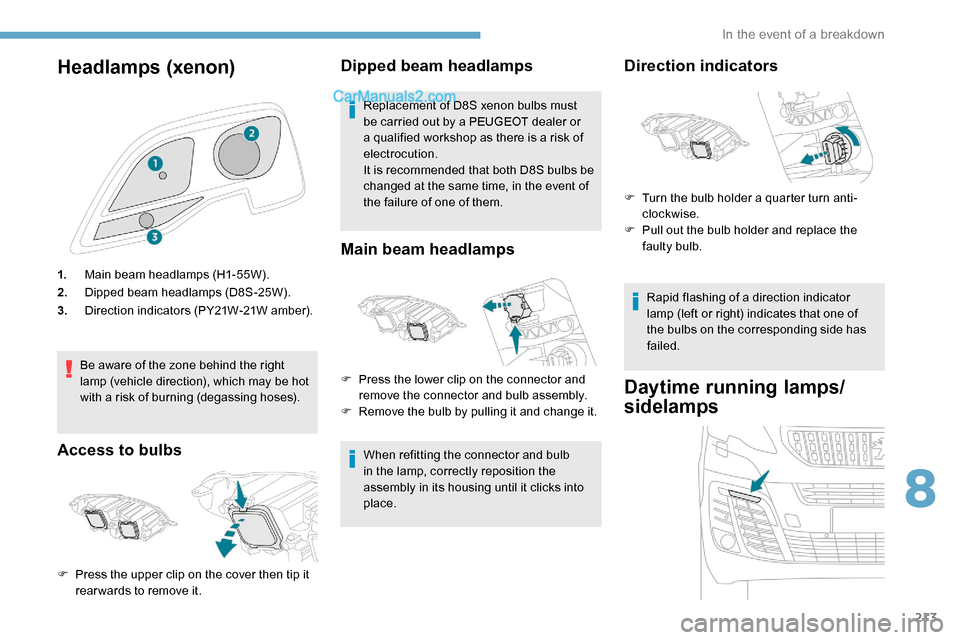
Headlamps (xenon)
1.Main beam headlamps (H1-55W).
2. Dipped beam headlamps (D8S-25W).
3. Direction indicators (PY21W-21W amber).
Be aware of the zone behind the right
lamp (vehicle direction), which may be hot
with a risk of burning (degassing hoses).
Access to bulbs Dipped beam headlamps
Replacement of D8S xenon bulbs must
be carried out by a PEUGEOT dealer or
a qualified workshop as there is a risk of
electrocution.
It is recommended that both D8S bulbs be
changed at the same time, in the event of
the failure of one of them.
Main beam headlamps
When refitting the connector and bulb
in the lamp, correctly reposition the
assembly in its housing until it clicks into
place.
F
P
ress the upper clip on the cover then tip it
rear wards to remove it. F
P
ress the lower clip on the connector and
remove the connector and bulb assembly.
F
R
emove the bulb by pulling it and change it.
Direction indicators
Rapid flashing of a direction indicator
lamp (left or right) indicates that one of
the bulbs on the corresponding side has
failed.
Daytime running lamps/
sidelamps
F Turn the bulb holder a quarter turn anti-
clockwise.
F
P
ull out the bulb holder and replace the
faulty bulb.
8
In the event of a breakdown
Page 221 of 324
219
Engine compartment fuses
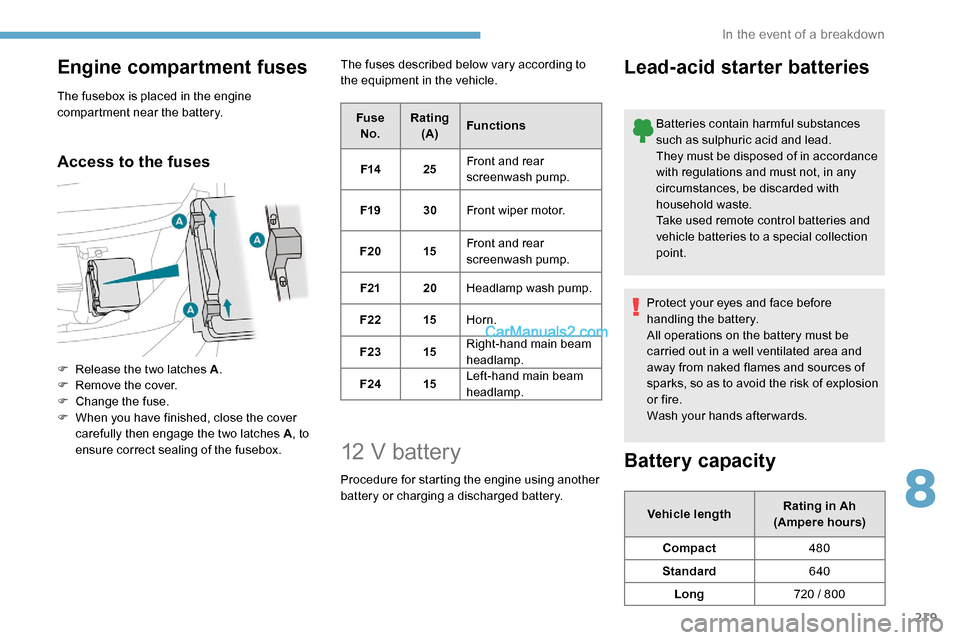
The fusebox is placed in the engine
compartment near the battery.
Access to the fuses
F Release the two latches A.
F R emove the cover.
F
C
hange the fuse.
F
W
hen you have finished, close the cover
carefully then engage the two latches A , to
ensure correct sealing of the fusebox. The fuses described below vary according to
the equipment in the vehicle.
FuseNo. Rating
(A) Functions
F14 25Front and rear
screenwash pump.
F19 30Front wiper motor.
F20 15Front and rear
screenwash pump.
F21 20Headlamp wash pump.
F22 15Horn.
F23 15Right-hand main beam
headlamp.
F24 15Left-hand main beam
headlamp.
12 V battery
Procedure for starting the engine using another
battery or charging a discharged battery.
Lead-acid starter batteries
Batteries contain harmful substances
such as sulphuric acid and lead.
They must be disposed of in accordance
with regulations and must not, in any
circumstances, be discarded with
household waste.
Take used remote control batteries and
vehicle batteries to a special collection
point.
Protect your eyes and face before
handling the battery.
All operations on the battery must be
carried out in a well ventilated area and
away from naked flames and sources of
sparks, so as to avoid the risk of explosion
or fire.
Wash your hands afterwards.
Battery capacity
Vehicle length Rating in Ah
(Ampere hours)
Compact 480
Standard 640
Long 720 / 800
8
In the event of a breakdown
Page 309 of 324

233
ABS ...............................................................11 0
Accessories .................................................. 107
Access to the 3rd row
...............................65-66
Access to the spare wheel
............................207
Active Safety Brake........................... 17, 171-173
AdBlue
® ....................................... 1 5 -16, 25, 196
AdBlue® tank ................................................. 19 8
Additive, Diesel ............................... 14, 193, 195
Adjusting headlamp beam height
................. 10
2
Adjusting headlamps
.................................... 102
Adjusting head restraints
................................ 56
Adjusting seat
........................................... 54-56
Adjusting the air distribution
.....................88-89
Adjusting the air flow
................................. 8
8-89
Adjusting the date
........................................... 30
Adjusting the height and reach of the steering wheel
.................................... 58
Adjusting the lumbar support
.......................... 55
A
djusting the seat angle
........................... 54, 56
Adjusting the seat belt height
....................... 11
4
Adjusting the temperature
........................88-89
Adjusting the time
........................................... 30
Advanced Grip Control
.......................... 112 -113
Advice on driving
............................... 7, 13 8 -13 9
Airbags
.............................. 1
8, 117, 119 -120, 122
Airbags, curtain
...................................... 11 8 -12 0
Airbags, front .................................. 11 8 -11 9 , 12 2
Airbags, lateral
...................................... 118, 120
Air conditioning
....................... 86, 88, 88 - 89, 92
Air conditioning, digital
................................... 91
Air conditioning, dual-zone automatic
......88-89
Air conditioning, manual
........................... 87
, 90
Air intake
................................................... 88-90
Air vents
.......................................................... 86
Alarm
.......................................................... 51- 5 2Anti-lock braking system (ABS)
.............
109 -110
Anti-pinch
........................................................ 8
2
Antitheft / Immobiliser
..................................... 33
A
rea, loading
...........................
3
3 -34, 42- 43, 80
Armrest
................
............................................
75
Armrest, front ..................................................
57
Assistance call
...............................
.......
108 -109
Assistance, emergency braking
....
109 -110, 173
Audible warning
............................................ 10
9Capacity, fuel tank
.................................
185 -187
Cap, fuel filler
...............................
..........
185 -187
Central locking
.......................................... 3
1, 37
Changing a bulb
............................. 21
1, 214 -216
Changing a bulb (side-hinged doors)
........... 2
14
Changing a fuse
..................................... 21
7-219
Changing a wheel
......................................... 20
6
Changing a wiper blade
........................ 10
5 -10 6
Changing the remote control battery
..............
40
Checking the engine oil level
....................
24-25
Checking the levels ................................
191-193
Checking tyre pressures (using the kit) ......................................202-205
Checks
...........................................191, 19 4 -195
Checks, routine
.....................................19 4 -195
Child lock
................................................13 6 -137
Child lock, electric
.........................................13 6
Child lock on rear windows
...........................137
Children
..........................................124, 13 0 -13 6
Children (safety)
............................................13 6
Child seats
.............................11
6 -117, 12 0 -12 8
Child seats, conventional
.......................123 -128
Child seats, ISOFIX
...............................13 0 -13 6
Closing the boot
..............................................50
Closing the doors
...........................31, 37, 49 -50
Collision Risk Alert ................................. 171-172
Compressor, tyre inflation
............................202
Container, AdBlue
® ....................................... 19 7
Control, emergency boot release ...................40
Control, emergency door
.................... 3
2, 38 -39
Control, heated seats
...................................... 57
Control stalk, lighting
...................................... 97
Control stalk, wipers
............................. 10
3 -104
Courtesy lamp
................................................. 95
Courtesy lamp, front
......................... 95 - 9 6, 216
Courtesy lamp, rear
.......................... 95 - 9 6, 216
Courtesy lamps
................................. 95 - 9 6, 216
Cover, load space
........................................... 79
Crew cab, fixed
.......................................... 7 3 -74
Crew cab, folding
............................................ 74
A
B
C
Battery ........................................... 189, 219-222
Battery, 12 V ............................... ...19 4, 219 -220
Battery capacity
............................................ 219
Battery, charging
........................................... 221
Battery, remote control
.............................40, 94
Bench seat, one-piece, fixed
.................... 6
4-65
Blind, panoramic roof
...................................... 82
Blind spot monitoring system
..................21, 178
Blind spot monitoring system, active
..............21
Blind spot sensors
.................................. 21, 176
Blinds, side
...................................................... 82
BlueHDi
............................... 13, 15, 25, 194, 200
Bonnet
.................................................... 19 0 -191
Boot
................................................................. 50
Boot lid
.......................................... 37-38, 40, 50
Brake discs
.................................................... 195
Brake lamps
...............................
............214 -216
Brakes
................................................ 11 -12 , 1 9 5
Braking assistance system
....................109 -110
Braking, automatic emergency
.........17, 171-173
Bulbs
............................................................. 2 11
Bulbs (changing)
................................... 211, 214
180° rear vision
.............................................
183
.
Alphabetical index