2019 Peugeot Expert door
[x] Cancel search: doorPage 51 of 324

49
If the "Hands-free access self-locking "
option is selected in the vehicle menu and
after closing the door, make sure that the
vehicle is locked.
This is because locking will not take place:
-
i
f the ignition is on,
-
i
f one of the doors or the tailgate is
open,
-
i
f a "Keyless Entry and Starting"
remote control is inside the vehicle.
If a number of actions with your foot have
no effect, wait a few seconds before
starting again.
The system is automatically deactivated in
heavy rain or with accumulations of snow.
If it does not work, make sure that the
remote control is not exposed to a
source of electromagnetic interference
(smartphone, etc.).
Operation may be affected if using a
prosthetic leg.
This system may not work correctly if the
vehicle is fitted with a towing device. The side door may open or close
erratically if:
-
t
he vehicle is fitted with a towball,
-
a t
railer is being hitched or unhitched,
-
a b
icycle carrier is being attached or
detached,
-
b
icycles are being loaded or unloaded
on a bicycle carrier,
-
s
omething is being placed or lifted
behind the vehicle,
-
an
animal approaches the bumper,
-
t
he vehicle is being washed,
-
y
our vehicle is being serviced,
-
a w
heel is being changed.
To avoid unwanted operation, keep the
key away from the detection zone (also
from the boot’s interior sides) or deactivate
the function in the vehicle configuration
menu.Side-hinged rear doors
F After first opening the left-hand door, pull the lever A towards you to open the right-
hand door.
Closing
F First close the right-hand door, then the left-hand door.
If the left-hand door is closed
first, a buffer stop located on
the edge of the right-hand
door prevents it closing.
Ensure that no person or object could
prevent the correct opening or closing of
the doors.
Be aware of children when operating the
doors.
If the left-hand side-hinged door is not fully
closed, the "door open" warning lamp comes
on (the right-hand door is not detected). For
more information on the list of warning and
indicator lamps and in particular the door open
warning, refer to the corresponding section.
2
Access
Page 52 of 324
50
Opening to approximately 180°
When parked with the rear
doors open to 90°, the doors
conceal the rear lamps. To
signal the vehicle's position
to other road users driving in
the same direction who may
not have seen the stopped
vehicle, use a warning
triangle or other device
required by the legislation in
your country.
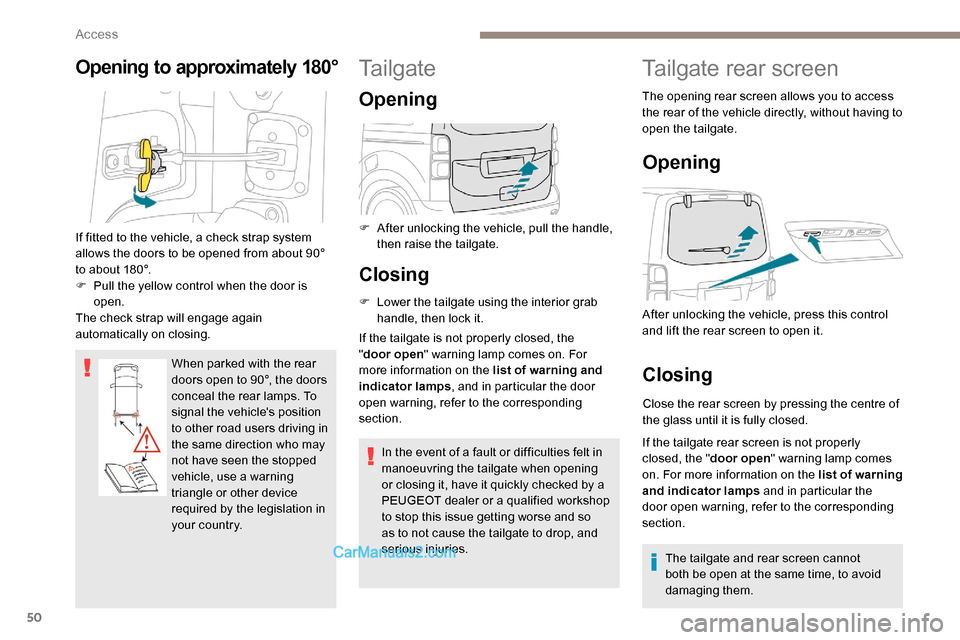
If fitted to the vehicle, a check strap system
allows the doors to be opened from about 90°
to about 180°.
F
P
ull the yellow control when the door is
open.
The check strap will engage again
automatically on closing.
Tailgate
Opening
F After unlocking the vehicle, pull the handle, then raise the tailgate.
Tailgate rear screen
The opening rear screen allows you to access
the rear of the vehicle directly, without having to
open the tailgate.
Opening
Closing
Close the rear screen by pressing the centre of
the glass until it is fully closed.
After unlocking the vehicle, press this control
and lift the rear screen to open it.
Closing
F Lower the tailgate using the interior grab
handle, then lock it.
If the tailgate is not properly closed, the
" door open " warning lamp comes on. For
more information on the list of warning and
indicator lamps , and in particular the door
open warning, refer to the corresponding
section.
In the event of a fault or difficulties felt in
manoeuvring the tailgate when opening
or closing it, have it quickly checked by a
PEUGEOT dealer or a qualified workshop
to stop this issue getting worse and so
as to not cause the tailgate to drop, and
serious injuries. If the tailgate rear screen is not properly
closed, the "
door open" warning lamp comes
on. For more information on the list of warning
and indicator lamps and in particular the
door open warning, refer to the corresponding
section.
The tailgate and rear screen cannot
both be open at the same time, to avoid
damaging them.
Access
Page 53 of 324
51
Alarm
(Depending on version)
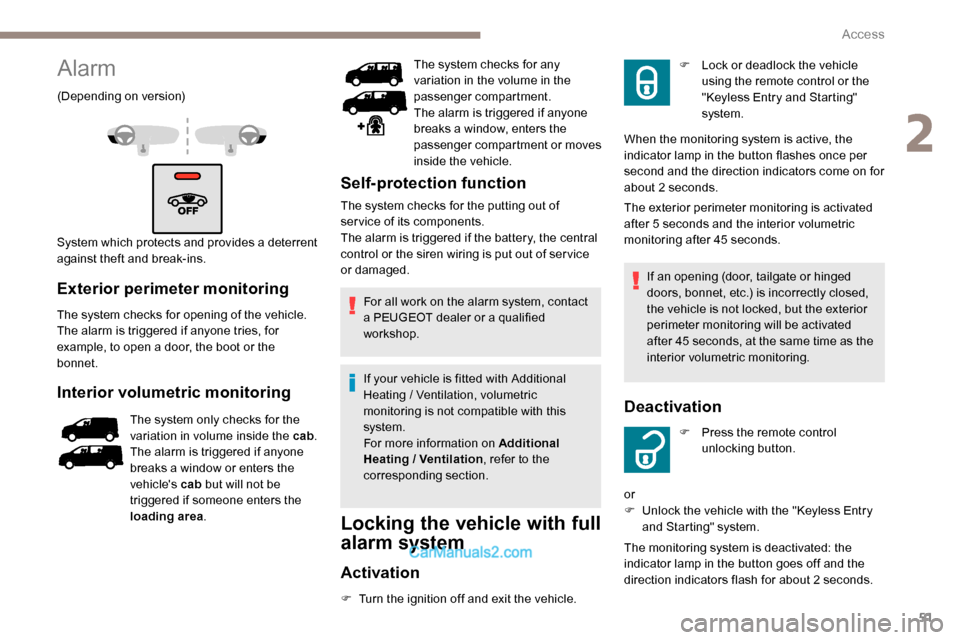
System which protects and provides a deterrent
against theft and break-ins.
Exterior perimeter monitoring
The system checks for opening of the vehicle.
The alarm is triggered if anyone tries, for
example, to open a door, the boot or the
bonnet.
Interior volumetric monitoring
The system only checks for the
variation in volume inside the cab .
The alarm is triggered if anyone
breaks a window or enters the
vehicle's cab but will not be
triggered if someone enters the
loading area . The system checks for any
variation in the volume in the
passenger compartment.
The alarm is triggered if anyone
breaks a window, enters the
passenger compartment or moves
inside the vehicle.
Self-protection function
The system checks for the putting out of
ser vice of its components.
The alarm is triggered if the battery, the central
control or the siren wiring is put out of ser vice
or damaged.
For all work on the alarm system, contact
a PEUGEOT dealer or a qualified
workshop.
If your vehicle is fitted with Additional
Heating / Ventilation, volumetric
monitoring is not compatible with this
system.
For more information on Additional
Heating / Ventilation , refer to the
corresponding section.
Locking the vehicle with full
alarm system
Activation
F Turn the ignition off and exit the vehicle. The exterior perimeter monitoring is activated
after 5 seconds and the interior volumetric
monitoring after 45 seconds.
If an opening (door, tailgate or hinged
doors, bonnet, etc.) is incorrectly closed,
the vehicle is not locked, but the exterior
perimeter monitoring will be activated
after 45 seconds, at the same time as the
interior volumetric monitoring.
Deactivation
F Lock or deadlock the vehicle using the remote control or the
"Keyless Entry and Starting"
system.
When the monitoring system is active, the
indicator lamp in the button flashes once per
second and the direction indicators come on for
about 2 seconds.
F
P
ress the remote control
unlocking button.
or
F
U
nlock the vehicle with the "Keyless Entry
and Starting" system.
The monitoring system is deactivated: the
indicator lamp in the button goes off and the
direction indicators flash for about 2 seconds.
2
Access
Page 54 of 324
52
Triggering of the alarm
This is indicated by sounding of the siren
and flashing of the direction indicators for 30
seconds.
The monitoring functions remain active until
the alarm has been triggered ten times in
succession.
When the vehicle is unlocked, rapid flashing of
the indicator lamp in the button indicates that
the alarm was triggered during your absence.
When the ignition is switched on, this flashing
stops immediately.
Locking the vehicle
with exterior perimeter
monitoring only
Deactivate the interior volumetric monitoring
to avoid unwanted triggering of the alarm in
certain cases such as:
-
l
eaving a pet in the vehicle,
-
l
eaving a window partially open,
-
w
ashing your vehicle,
-
c
hanging a wheel,
-
h
aving your vehicle towed,
-
t
ransport by ship.If the vehicle automatically locks itself
again (as happens if a door or the boot
is not opened within 30 seconds of
unlocking), the monitoring system is
automatically reactivated.
Deactivating the interior
volumetric monitoring
F Switch off the ignition and within 10
seconds
press the alarm button until the indicator
lamp is on fixed.
F
G
et out of the vehicle.
F
I
mmediately lock the vehicle using the
remote control or the "Keyless Entry and
Starting" system.
Only the exterior perimeter monitoring is
activated; the red indicator lamp in the button
flashes every second.
To take effect, this deactivation must be
carried out after each time the ignition is
switched off.
Reactivating the interior
volumetric monitoring
F Deactivate the exterior perimeter monitoring by unlocking the vehicle using the remote
control or the "Keyless Entry and Starting"
system.
F
R
eactivate the alarm system normally.
Locking the vehicle without
activating the alarm
F Lock or deadlock the vehicle using the key (integral to the remote control) in the driver's
door lock.
Failure of the remote
control
To deactivate the monitoring functions:
F
u
nlock the vehicle using the key (integral to
the remote control) in the driver's door lock,
F
O
pen the door; this sets off the alarm.
F
U
pon switching on the ignition the alarm
stops. The button indicator lamp goes off.
Operating fault
When the ignition is switched on, fixed
illumination of the indicator lamp in the button
indicates a fault with the system.
Have it checked by a PEUGEOT dealer or a
qualified workshop.
Automatic activation
(Depending on country of sale)
The system is activated automatically 2 minutes
after the last door or the boot is closed.
F
T
o avoid triggering the alarm on entering
the vehicle, first press the unlocking button
on the remote control or unlock the vehicle
using the “Keyless Entry and Starting”
system.
Access
Page 55 of 324
53
Electric windows
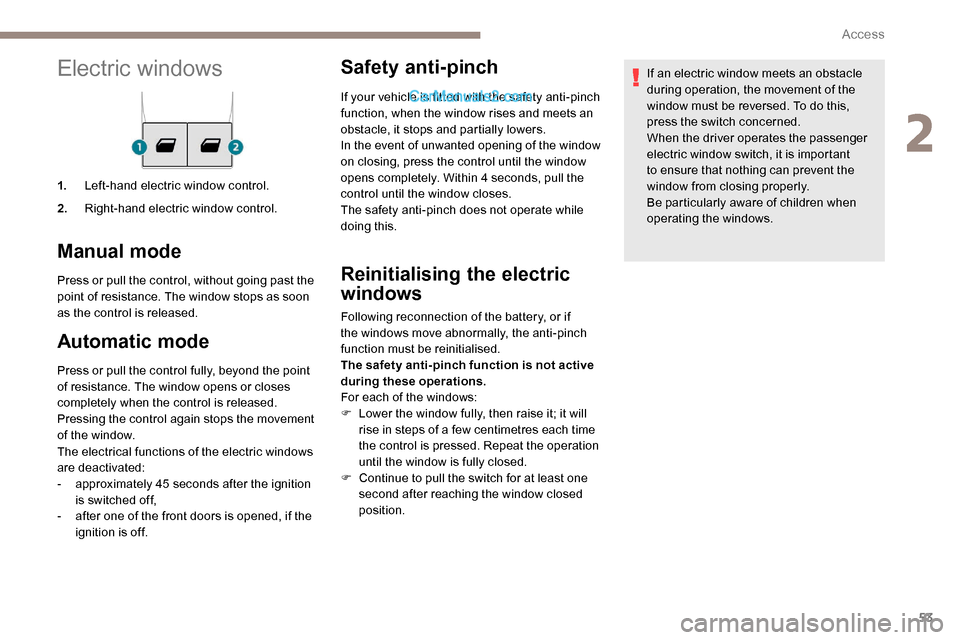
1.Left-hand electric window control.
2. Right-hand electric window control.
Manual mode
Press or pull the control, without going past the
point of resistance. The window stops as soon
as the control is released.
Automatic mode
Press or pull the control fully, beyond the point
of resistance. The window opens or closes
completely when the control is released.
Pressing the control again stops the movement
of the window.
The electrical functions of the electric windows
are deactivated:
-
a
pproximately 45 seconds after the ignition
is switched off,
-
a
fter one of the front doors is opened, if the
ignition is off.
Safety anti-pinch
If your vehicle is fitted with the safety anti-pinch
function, when the window rises and meets an
obstacle, it stops and partially lowers.
In the event of unwanted opening of the window
on closing, press the control until the window
opens completely. Within 4 seconds, pull the
control until the window closes.
The safety anti-pinch does not operate while
doing this.
Reinitialising the electric
windows
Following reconnection of the battery, or if
the windows move abnormally, the anti-pinch
function must be reinitialised.
The safety anti-pinch function is not active
during these operations.
For each of the windows:
F
L
ower the window fully, then raise it; it will
rise in steps of a few centimetres each time
the control is pressed. Repeat the operation
until the window is fully closed.
F
C
ontinue to pull the switch for at least one
second after reaching the window closed
position. If an electric window meets an obstacle
during operation, the movement of the
window must be reversed. To do this,
press the switch concerned.
When the driver operates the passenger
electric window switch, it is important
to ensure that nothing can prevent the
window from closing properly.
Be particularly aware of children when
operating the windows.
2
Access
Page 56 of 324
54
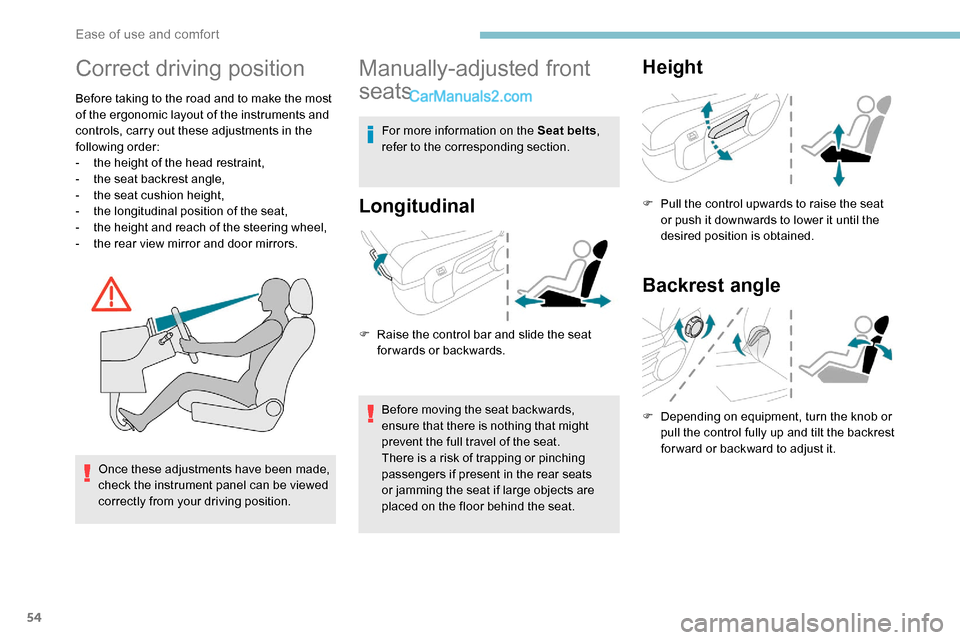
Correct driving position
Before taking to the road and to make the most
of the ergonomic layout of the instruments and
controls, carry out these adjustments in the
following order:
-
t
he height of the head restraint,
-
t
he seat backrest angle,
-
t
he seat cushion height,
-
t
he longitudinal position of the seat,
-
t
he height and reach of the steering wheel,
-
t
he rear view mirror and door mirrors.
Once these adjustments have been made,
check the instrument panel can be viewed
correctly from your driving position.
Manually-adjusted front
seats
For more information on the Seat belts ,
refer to the corresponding section.
Longitudinal
F Raise the control bar and slide the seat forwards or backwards.
Before moving the seat backwards,
ensure that there is nothing that might
prevent the full travel of the seat.
There is a risk of trapping or pinching
passengers if present in the rear seats
or jamming the seat if large objects are
placed on the floor behind the seat.
Height
F Pull the control upwards to raise the seat or push it downwards to lower it until the
desired position is obtained.
Backrest angle
F Depending on equipment, turn the knob or pull the control fully up and tilt the backrest
forward or backward to adjust it.
Ease of use and comfort
Page 61 of 324
59
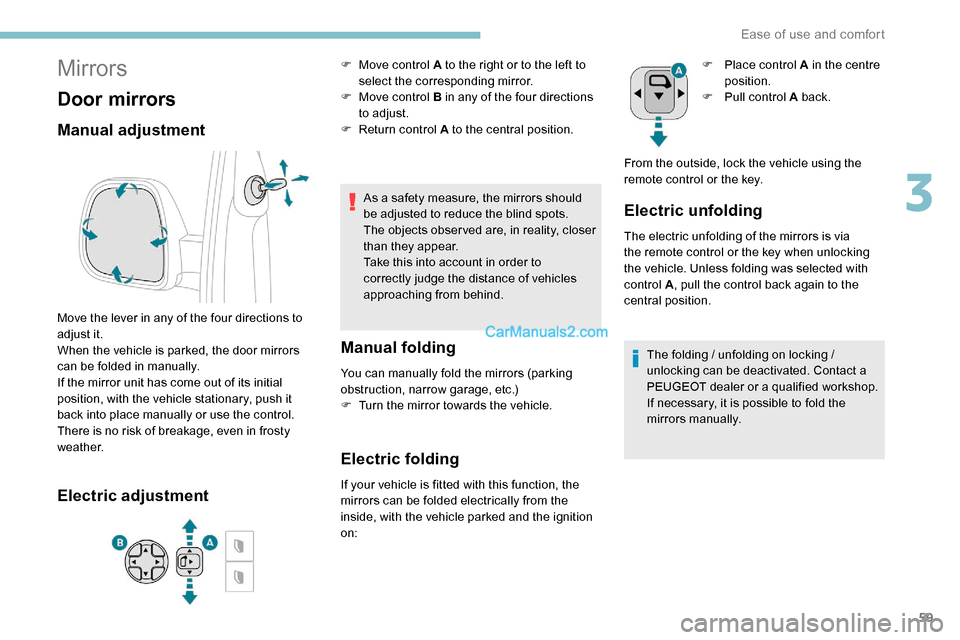
Mirrors
Door mirrors
Manual adjustment
Move the lever in any of the four directions to
adjust it.
When the vehicle is parked, the door mirrors
can be folded in manually.
If the mirror unit has come out of its initial
position, with the vehicle stationary, push it
back into place manually or use the control.
There is no risk of breakage, even in frosty
weather.
Electric adjustment
F Move control A to the right or to the left to select the corresponding mirror.
F
M
ove control B in any of the four directions
to adjust.
F
R
eturn control A to the central position.
As a safety measure, the mirrors should
be adjusted to reduce the blind spots.
The objects obser ved are, in reality, closer
than they appear.
Take this into account in order to
correctly judge the distance of vehicles
approaching from behind.
Manual folding
You can manually fold the mirrors (parking
obstruction, narrow garage, etc.)
F
T
urn the mirror towards the vehicle.
Electric folding
If your vehicle is fitted with this function, the
mirrors can be folded electrically from the
inside, with the vehicle parked and the ignition
on:
Electric unfolding
The electric unfolding of the mirrors is via
the remote control or the key when unlocking
the vehicle. Unless folding was selected with
control A , pull the control back again to the
central position. F
P
lace control A in the centre
position.
F
P
ull control A back.
From the outside, lock the vehicle using the
remote control or the key.
The folding / unfolding on locking /
unlocking can be deactivated. Contact a
PEUGEOT dealer or a qualified workshop.
If necessary, it is possible to fold the
mirrors manually.
3
Ease of use and comfort
Page 69 of 324
67
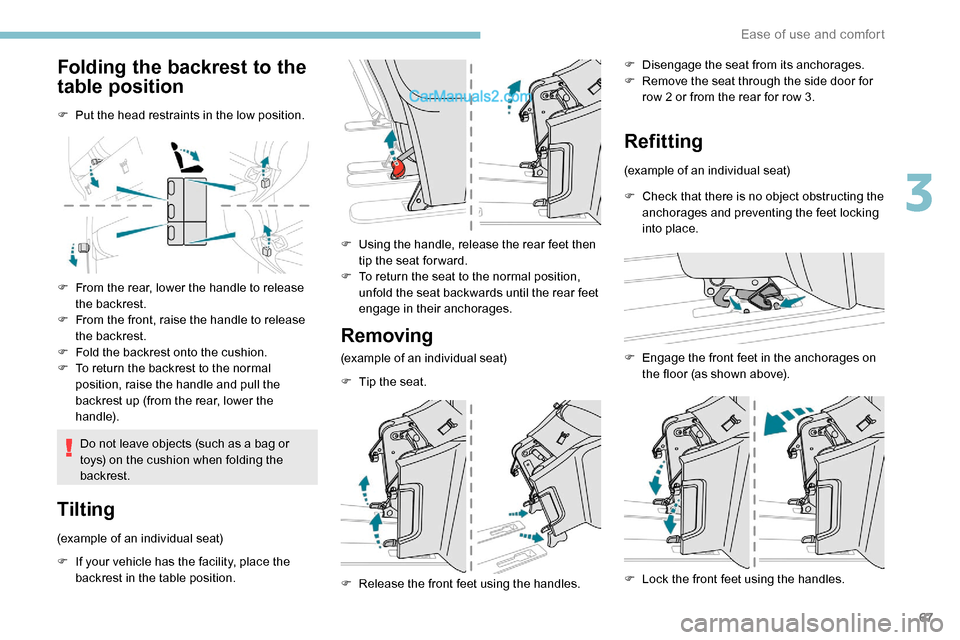
Folding the backrest to the
table position
F Put the head restraints in the low position.
F
F
rom the rear, lower the handle to release
the backrest.
F
F
rom the front, raise the handle to release
the backrest.
F
F
old the backrest onto the cushion.
F
T
o return the backrest to the normal
position, raise the handle and pull the
backrest up (from the rear, lower the
handle).
Do not leave objects (such as a bag or
toys) on the cushion when folding the
backrest.
Tilting
(example of an individual seat)
F
I
f your vehicle has the facility, place the
backrest in the table position. F
U
sing the handle, release the rear feet then
tip the seat for ward.
F
T
o return the seat to the normal position,
unfold the seat backwards until the rear feet
engage in their anchorages.
Removing
(example of an individual seat)
F
T
ip the seat. F
D
isengage the seat from its anchorages.
F
R
emove the seat through the side door for
row 2 or from the rear for row 3.
Refitting
(example of an individual seat)
F
C
heck that there is no object obstructing the
anchorages and preventing the feet locking
into place.
F
E
ngage the front feet in the anchorages on
the floor (as shown above).
F
L
ock the front feet using the handles.
F
R
elease the front feet using the handles.
3
Ease of use and comfort