2019 Peugeot 508 engine
[x] Cancel search: enginePage 74 of 320

72
12:13
23 °C
OFF
OK
12:13
1 12:00 AM
12:00 AM
2
23 °C
Heating
This is an additional and separate system
which heats the passenger compartment and
improves defrosting performance.
This indicator lamp is illuminated
when the system is programmed.
This indicator lamp flashes while
the heating is in operation or when
you carry out a remote start via the
remote control.
This indicator lamp goes off at the
end of the heating cycle or when the
heating is stopped using the remote
control.
Ventilation
This system allows ventilation of the passenger
compartment with exterior air to improve the
temperature experienced on entering the
vehicle in summer.
Programming
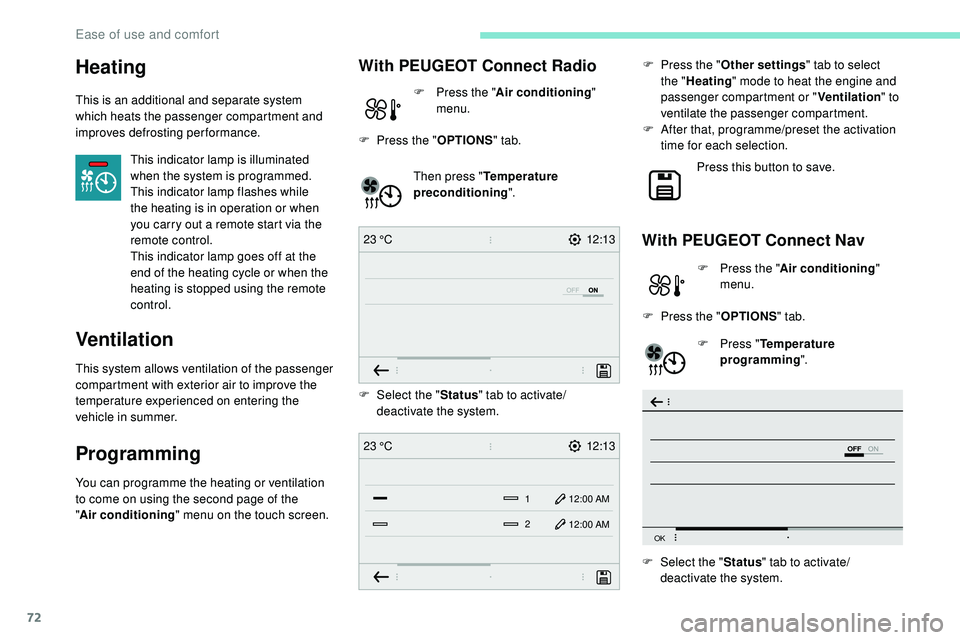
You can programme the heating or ventilation
to come on using the second page of the
"Air
conditioning " menu on the touch screen. Then press "
Temperature
preconditioning ".
With PEUGEOT Connect Nav
F Press the "Air conditioning "
menu.
F
P
ress the " OPTIONS " tab.
F
P
ress " Temperature
programming ".
With PEUGEOT Connect Radio
F Press the " Air conditioning "
menu.
F
P
ress the " OPTIONS " tab.
F
Sel
ect the "Status" tab to activate/
deactivate the system.
F
Sel
ect the " Status" tab to activate/
deactivate the system. F
P
ress the "
Other settings " tab to select
the " Heating " mode to heat the engine and
passenger compartment or " Ventilation" to
ventilate the passenger compartment.
F
A
fter that, programme/preset the activation
time for each selection.
Press this button to save.
Ease of use and comfort
Page 75 of 320

73
OK
00 00
00 00
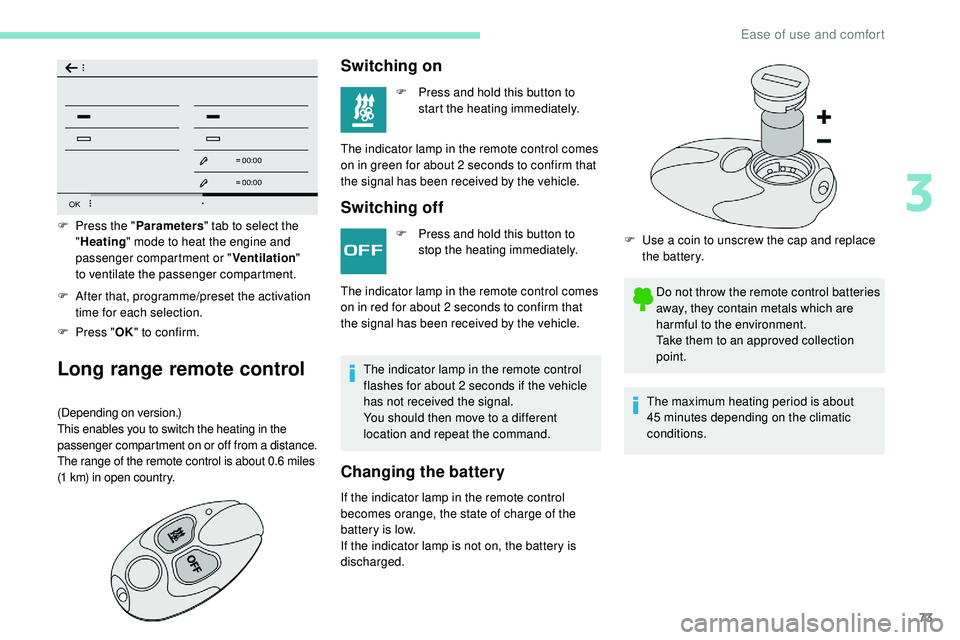
F After that, programme/preset the activation time for each selection.
F
P
ress " OK" to confirm.
Long range remote control
(Depending on version.)
This enables you to switch the heating in the
passenger compartment on or off from a distance.
The range of the remote control is about 0.6 miles
(1
km) in open country.
F Press the " Parameters" tab to select the
" Heating " mode to heat the engine and
passenger compartment or " Ventilation"
to
ventilate the passenger compartment.
Switching on
F Press and hold this button to start the heating immediately.
The indicator lamp in the remote control comes
on in green for about 2
seconds to confirm that
the signal has been received by the vehicle.
Switching off
F Press and hold this button to stop the heating immediately.
The indicator lamp in the remote control
flashes for about 2 seconds if the vehicle
has not received the signal.
You should then move to a different
location and repeat the command.
Changing the battery
The indicator lamp in the remote control comes
on in red for about 2 seconds to confirm that
the signal has been received by the vehicle.
If the indicator lamp in the remote control
becomes orange, the state of charge of the
battery is low.
If the indicator lamp is not on, the battery is
discharged. F
U
se a coin to unscrew the cap and replace
the battery.
Do not throw the remote control batteries
away, they contain metals which are
harmful to the environment.
Take them to an approved collection
point.
The maximum heating period is about
45
minutes depending on the climatic
conditions.
3
Ease of use and comfort
Page 76 of 320

74
The additional heating system is powered
by the fuel in the vehicle's fuel tank.
Before use, ensure that there is enough
fuel in the tank.
If the tank level is on reser ve, the system
cannot be used.
The ventilation is activated provided that
the battery is sufficiently charged.
The heating is activated provided that:
-
t
he battery is sufficiently charged,
-
t
he fuel level is adequate,
-
t
he engine has been started since the
previous heating cycle.
Always switch off the additional heating
while refuelling – Risk of fire or explosion! To avoid the risks of poisoning or
asphyxia, the programmable heating must
not be used, even for short periods, in a
closed environment such as a garage or
workshop which is not equipped with an
exhaust gas extraction system.
Do not park the vehicle on a flammable
sur face (dry grass, dead leaves, paper,
etc.) – Risk of fire!
Glazed sur faces such as the rear screen
or windscreen can become very hot in
places.
Never put objects on these sur faces;
never touch these sur faces – Risk of
burns!Front fittings
1.
Sun visor
2. Ticket holder
3. Illuminated glove box
4. Door pockets
Ease of use and comfort
Page 79 of 320

77
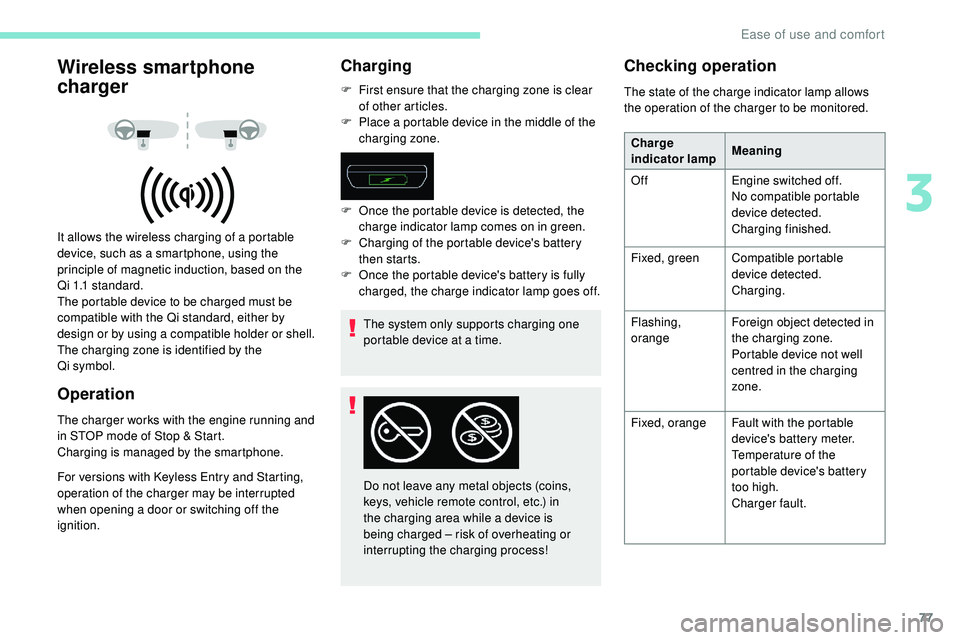
Wireless smartphone
charger
It allows the wireless charging of a portable
device, such as a smartphone, using the
principle of magnetic induction, based on the
Qi 1.1 standard.
The portable device to be charged must be
compatible with the Qi standard, either by
design or by using a compatible holder or shell.
The charging zone is identified by the
Qi
symbol.
Operation
The charger works with the engine running and
in STOP mode of Stop & Start.
Charging is managed by the smartphone.
For versions with Keyless Entry and Starting,
operation of the charger may be interrupted
when opening a door or switching off the
ignition.
Charging
F First ensure that the charging zone is clear of other articles.
F
P
lace a portable device in the middle of the
charging zone.
The system only supports charging one
portable device at a time.
F
O
nce the portable device is detected, the
charge indicator lamp comes on in green.
F
C
harging of the portable device's battery
then starts.
F
O
nce the portable device's battery is fully
charged, the charge indicator lamp goes off.
Do not leave any metal objects (coins,
keys, vehicle remote control, etc.) in
the charging area while a device is
being charged – risk of overheating or
interrupting the charging process!
Checking operation
The state of the charge indicator lamp allows
the operation of the charger to be monitored. Charge
indicator lamp Meaning
Off Engine switched off.
No compatible portable
device detected.
Charging finished.
Fixed, green Compatible portable
device detected.
Charging.
Flashing,
orange Foreign object detected in
the charging zone.
Portable device not well
centred in the charging
zone.
Fixed, orange Fault with the portable
device's battery meter.
Temperature of the
portable device's battery
too high.
Charger fault.
3
Ease of use and comfort
Page 87 of 320

85
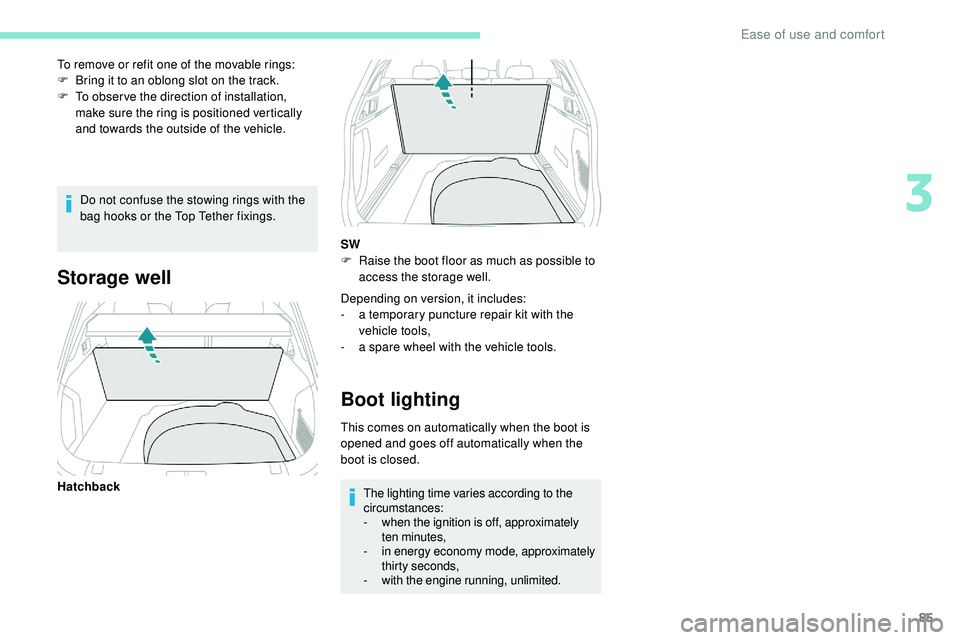
Do not confuse the stowing rings with the
bag hooks or the Top Tether fixings.
To remove or refit one of the movable rings:
F
B
ring it to an oblong slot on the track.
F
T
o obser ve the direction of installation,
make sure the ring is positioned vertically
and towards the outside of the vehicle.
Storage well
Depending on version, it includes:
- a t emporary puncture repair kit with the
vehicle tools,
-
a s
pare wheel with the vehicle tools.
Boot lighting
This comes on automatically when the boot is
opened and goes off automatically when the
boot is closed.The lighting time varies according to the
circumstances:
-
w
hen the ignition is off, approximately
ten minutes,
-
i
n energy economy mode, approximately
thirty seconds,
-
w
ith the engine running, unlimited.
Hatchback SW
F
R
aise the boot floor as much as possible to
access the storage well.
3
Ease of use and comfort
Page 89 of 320

87
Switching off of the lamps when the
ignition is switched off
On switching off the ignition, all of the
lamps turn off instantly, except when
automatic guide-me-home lighting is
activated.
Switching on the lighting after the
ignition is switched off
To reactivate the lighting control, set
the ring to "AUTO", then to the desired
position.
On opening the driver's door, a temporary
audible signal warns the driver that the
lighting is on.
It switches off automatically after a period
of time that depends on the state of charge
in battery (entering energy economy mode).
In some weather conditions (e.g. low
temperature or humidity), the presence
of misting on the internal sur face of the
glass of the headlamps and rear lamps is
normal; it disappears after the lamps have
been on for a few minutes.
Never look too closely at the luminous
beam of "Full LED" headlamps: risk of
serious eye injury. Travelling abroad
If using your vehicle in a country that
drives on the other side of the road, the
headlamps must be adjusted to avoid
dazzling oncoming drivers.
Contact a PEUGEOT dealer or a qualified
workshop.
Daytime running lamps/
Sidelamps
The front and rear lamps light up automatically
when the engine starts.
They provide the following functions:
-
D
aytime running lamps (lighting control
stalk at position " AUTO" with adequate light
level).
-
S
idelamps (lighting control stalk at " AUTO"
position with low light levels or "Sidelamps
only” or "Dipped/main beam headlamps").
The LEDs are brighter when operating as
daytime running lamps.
Direction indicators
F Left: lower the lighting control stalk passing the point of resistance.
F
R
ight: raise the lighting control stalk passing
the point of resistance.
If you forget to cancel the direction
indicators for more than twenty seconds,
the volume of the audible signal will
increase if the speed is above 37 mph
(60
km/h).
Three flashes
F Press briefly upwards or downwards, without going beyond the point of resistance; the
direction indicators will flash 3 times.
4
Lighting and visibility
Page 94 of 320

92
Clean the windscreen regularly,
particularly the area in front of the camera.
The internal sur face of the windscreen can
also become misted around the camera.
In humid and cold weather, demist the
windscreen regularly.
Do not allow snow to accumulate on the
bonnet or roof of the vehicle as this could
conceal the detection camera.
Static cornering lighting
Activation/Deactivation
The function is activated and
deactivated in the Driving/Vehicle
menu of the touch screen.
Switching on
This system operates from a certain angle of
rotation of the steering wheel.
Switching off
The system does not operate:
- b elow a certain angle of rotation of the
steering wheel,
-
a
bove 56 mph (90 km/h),
-
w
hen reverse gear is engaged.
Night Vision
Using an infrared camera at the front of the
vehicle, the system identifies and signals the
presence of pedestrians and animals in the
driver’s field of vision, in low exterior light
conditions.
For the permanent display of the image from
the infrared camera in the instrument panel,
select the "Night Vision" display mode by
turning the knob located to the left of the
steering wheel. Once the conditions are met,
an alert is triggered when there is a risk of
collision. Night Vision is a driving aid system that
cannot, under any circumstances, replace
the personal assessment of night-time
visibility and traffic conditions.
In some conditions, the contrasts in
temperature are insufficient and the
system may not detect all dangers or,
conversely, it may give false warnings
(e.g. engines of lorries parked on the edge
of the road).
Conditions for operation
With the dipped or main beam headlamps on,
this function allows headlamps to illuminate
the inside of a bend using light-emitting diodes
(LEDs).
The speed of the vehicle must be less than 56
mph (90 km/h).
This function is only available with the "Full
LED" technology headlamps. If the "Night Vision" display mode has not been
selected, the alert is triggered in the form of a
temporary window displayed in the instrument
panel.
The function is available with the engine
running and in STOP mode of Stop & Start.
The light conditions must be very poor. The
dipped beam headlamps must be switched on
and maintained in good working order.
The temperature detection range is between
-30°C and +30°C.
The speed of the vehicle must be less than
99
mph (160 km/h).
The camera detection range is between 15
m
(for pedestrians) and 200
m, depending on
visibility conditions.
Lighting and visibility
Page 103 of 320

101
Anti-lock braking system
(ABS) and electronic brake
force distribution (EBFD)
The fixed illumination of this warning
lamp signals that there is a fault with
the ABS.
Emergency braking assistance
(EBA)
In an emergency, this system enables you to
reach the optimum braking pressure more
quickly and therefore reduce the stopping
distance.
It is triggered in relation to the speed at which
the brake pedal is pressed. This is felt by a
reduction in the resistance of the pedal and an
increase in braking efficiency.
Anti-slip regulation (ASR)
This system optimises traction in order to
avoid wheel slip by acting on the brakes of
the driving wheels and on the engine. It also
improves the directional stability of the vehicle
on acceleration.
Dynamic stability control (DSC)
If there is a difference between the path
followed by the vehicle and that required by the
driver, this system monitors each wheel and
automatically acts on the brake of one or more
wheels and on the engine to return the vehicle
to the required path, within the limits of the laws
of physics.
Trailer stability assist (TSA)
This system allows control of the vehicle to be
retained when towing a trailer, so as to avoid
the risk of snaking.The vehicle retains conventional braking. Drive
carefully at moderate speed.
Contact a PEUGEOT dealer or a qualified
workshop as soon as possible.
Illumination of this warning lamp,
linked with the STOP and ABS
warning lamps, accompanied by
the display of a message and an
audible signal, signals that there is a
fault with the electronic brake force
distribution (EBFD).
You must stop as soon as it is safe to do so.
Call on a PEUGEOT dealer or a qualified
workshop.
Normal operation of the ABS may make
itself felt by slight vibrations of the brake
pedal.
When braking in an emergency, press
very firmly and maintain this pressure. When changing wheels (tyres and rims),
ensure that these are approved for your
vehicle.
After an impact, have these systems
checked by a PEUGEOT dealer or a
qualified workshop.
Anti-slip regulation (ASR)/
Dynamic stability control
(DSC)
Operation
These systems are activated automatically
every time the vehicle is started.
They come into operation in the event of a
problem with grip or trajectory.
This is indicated by flashing of this
warning lamp in the instrument panel.
Deactivation
In exceptional conditions (starting a vehicle
which is bogged down, stuck in snow, on soft
ground, etc.), it may be advisable to deactivate
the ASR system, so that the wheels can turn
freely and regain grip.
Reactivate the system when grip conditions
allow.
5
Safety