2019 Peugeot 508 reverse
[x] Cancel search: reversePage 84 of 320

82
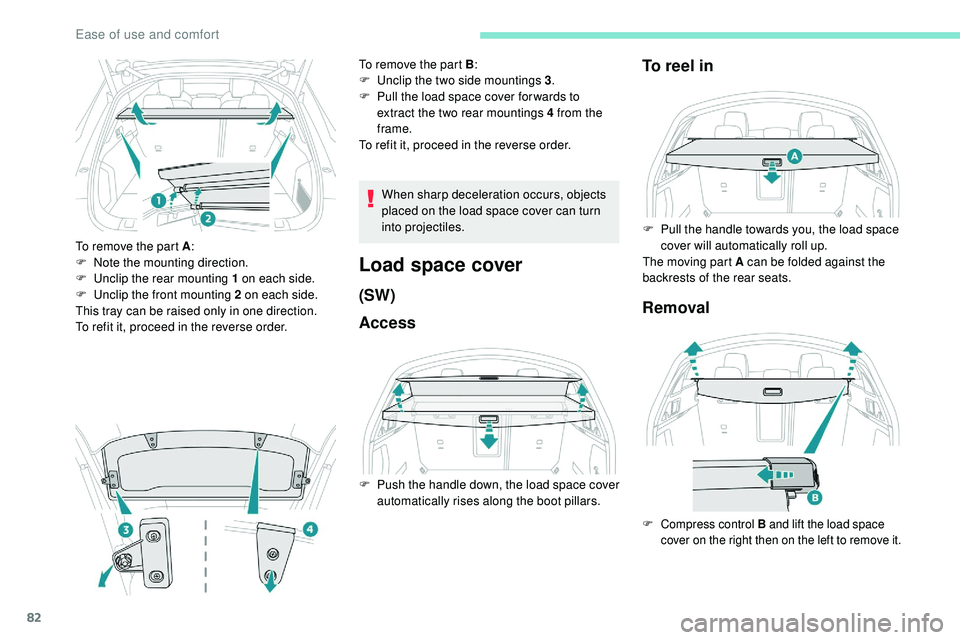
To remove the part A:
F N ote the mounting direction.
F
U
nclip the rear mounting 1 on each side.
F
U
nclip the front mounting 2 on each side.
This tray can be raised only in one direction.
To refit it, proceed in the reverse order. When sharp deceleration occurs, objects
placed on the load space cover can turn
into projectiles.
Load space cover
(SW)
AccessTo reel in
Removal
To remove the part B
:
F U nclip the two side mountings 3 .
F
P
ull the load space cover for wards to
extract the two rear mountings 4 from the
frame.
To refit it, proceed in the reverse order.
F
P
ush the handle down, the load space cover
automatically rises along the boot pillars. F
P
ull the handle towards you, the load space
cover will automatically roll up.
The moving part A
can be folded against the
backrests of the rear seats.
F Compress control B and lift the load space
cover on the right then on the left to remove it.
Ease of use and comfort
Page 94 of 320

92
Clean the windscreen regularly,
particularly the area in front of the camera.
The internal sur face of the windscreen can
also become misted around the camera.
In humid and cold weather, demist the
windscreen regularly.
Do not allow snow to accumulate on the
bonnet or roof of the vehicle as this could
conceal the detection camera.
Static cornering lighting
Activation/Deactivation
The function is activated and
deactivated in the Driving/Vehicle
menu of the touch screen.
Switching on
This system operates from a certain angle of
rotation of the steering wheel.
Switching off
The system does not operate:
- b elow a certain angle of rotation of the
steering wheel,
-
a
bove 56 mph (90 km/h),
-
w
hen reverse gear is engaged.
Night Vision
Using an infrared camera at the front of the
vehicle, the system identifies and signals the
presence of pedestrians and animals in the
driver’s field of vision, in low exterior light
conditions.
For the permanent display of the image from
the infrared camera in the instrument panel,
select the "Night Vision" display mode by
turning the knob located to the left of the
steering wheel. Once the conditions are met,
an alert is triggered when there is a risk of
collision. Night Vision is a driving aid system that
cannot, under any circumstances, replace
the personal assessment of night-time
visibility and traffic conditions.
In some conditions, the contrasts in
temperature are insufficient and the
system may not detect all dangers or,
conversely, it may give false warnings
(e.g. engines of lorries parked on the edge
of the road).
Conditions for operation
With the dipped or main beam headlamps on,
this function allows headlamps to illuminate
the inside of a bend using light-emitting diodes
(LEDs).
The speed of the vehicle must be less than 56
mph (90 km/h).
This function is only available with the "Full
LED" technology headlamps. If the "Night Vision" display mode has not been
selected, the alert is triggered in the form of a
temporary window displayed in the instrument
panel.
The function is available with the engine
running and in STOP mode of Stop & Start.
The light conditions must be very poor. The
dipped beam headlamps must be switched on
and maintained in good working order.
The temperature detection range is between
-30°C and +30°C.
The speed of the vehicle must be less than
99
mph (160 km/h).
The camera detection range is between 15
m
(for pedestrians) and 200
m, depending on
visibility conditions.
Lighting and visibility
Page 96 of 320

94
Recommendations on care
The infrared camera has a wash nozzle
connected to the vehicle’s front screenwash
system.
This nozzle operates every 5th use of the
screenwash.
Regularly check that the camera is clean.
In bad weather, or in wintry conditions, ensure
that the camera is not covered with mud, ice
or snow.
Malfunction
An orange warning lamp coming on
whilst all the operating conditions
have been met, accompanied by
a message, indicates a system
malfunction.
Contact a PEUGEOT dealer or a qualified
workshop.
Wiper control stalk
Programming
You can activate automatic wiping for the front
wipers.
On the SW, you can also configure rear wiping
on engaging reverse gear. In wintry conditions, remove snow, ice or
frost present on the windscreen, around
the wiper arms and blades and the
windscreen seal, before operating the
wipers.
Do not operate the wipers on a dry
windscreen. Under extremely hot or cold
conditions, ensure that the wiper blades
are not stuck to the windscreen before
operating the wipers.
Windscreen wipers
After switching off the ignition, a slight
movement of the windscreen wipers being
stored under the bonnet may occur.
Each time the ignition has been switched
off for more than a minute, regardless of
the previous wiper control stalk position,
it is necessary to reactivate the wiping by
operating the control.
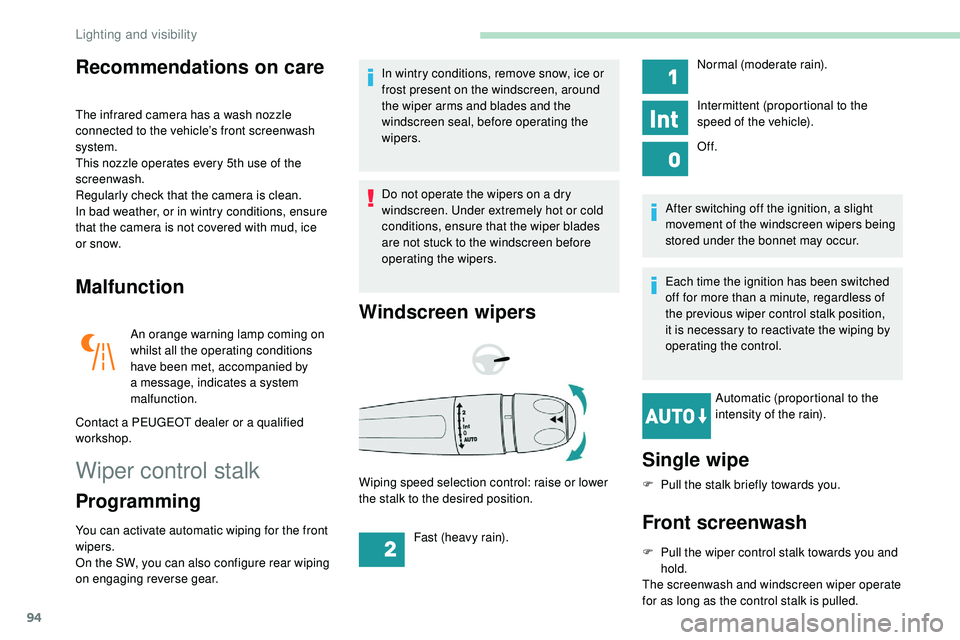
Automatic (proportional to the
intensity of the rain).
Wiping speed selection control: raise or lower
the stalk to the desired position.
Single wipe
F Pull the stalk briefly towards you.
Front screenwash
F Pull the wiper control stalk towards you and hold.
The screenwash and windscreen wiper operate
for as long as the control stalk is pulled. Normal (moderate rain).
Intermittent (proportional to the
speed of the vehicle).
Of f.
Fast (heavy rain).
Lighting and visibility
Page 97 of 320

95
The screenwash jets are integrated in the
tips of each arm.
Additional jets are installed below the
midpoint of each arm.
The screenwash fluid is sprayed along the
length of the wiper blade. This improves
visibility and reduces the consumption of
screenwash fluid.
In some cases, depending on the contents
or colour of the fluid and on the exterior
brightness, the liquid spray may be hardly
noticeable.
To avoid damaging the wiper blades,
do not operate the screenwash if the
screenwash reservoir is empty.
Only operate the screenwash if there
is no risk of the fluid freezing on the
windscreen and hindering visibility. Always
use a screenwash fluid suitable for low
temperatures during the winter period.
Never top up with water.
Rear wiper (SW)
To select the rear wiper: turn the ring to place
the desired symbol against the marking.Of f.
Intermittent wipe.
Wash-wipe.
Rear screenwash
Termination of the screenwash is followed by a
final wiping cycle.
F
T
urn and hold the ring all the way towards
the dashboard.
The screenwash and the wiper operate for as
long as the ring remains turned.
Termination of the screenwash is followed by a
final wiping cycle.
Reverse gear
When reverse gear is engaged, the rear wiper
will come into operation automatically if the
front windscreen wipers are operating. The function is activated or
deactivated in the Driving/Vehicle
menu of the touch screen.
This function is activated by default.
In the event of snow or hard frost or if a
bicycle carrier is fitted to a towing system,
deactivate the automatic rear wiper via the
touch screen’s Driving/Vehicle menu.
Special position of the
windscreen wipers
This position is used for cleaning or
replacement of the wiper blades. It can also
be useful, in winter (ice, snow), to release the
wiper blades from the windscreen.
To maintain the effectiveness of the wiper
blades, it is advisable to:
-
h
andle them with care,
-
c
lean them regularly using soapy
water,
-
a
void using them to retain cardboard
on the windscreen,
-
r
eplace them at the first signs of wear.
4
Lighting and visibility
Page 131 of 320

129
Manual operation
Manual release
With the ignition on or engine running:
F p ress the brake pedal,
F
w
hile maintaining pressure on the brake
pedal, briefly push the control lever.
The complete release of the parking brake is
confirmed by the brake indicator lamp and the
P indicator lamp in the control lever going off,
accompanied by the display of the message
"Parking brake released".
If you push the control lever without
pressing the brake pedal, the parking
brake will not be released and a message
is displayed.
Manual application
With the vehicle stationary:
F p ull briefly on the control lever.
Confirmation of the instruction is signalled by
flashing of the indicator lamp in the control
l eve r.
Application of the parking brake is confirmed
by illumination of the brake indicator lamp
and the P indicator lamp in the control lever,
accompanied by the display of the message
"Parking brake applied".
Automatic operation
Automatic release
Ensure first that the engine is running and the
driver's door is properly closed.
The electric parking brake releases
automatically and progressively when the
vehicle moves off .
With a manual gearbox
F
F
ully depress the clutch pedal, engage 1
st
gear or reverse.
F
P
ress the accelerator pedal and release the
clutch pedal.
With an automatic gearbox
F
P
ress the brake pedal.
F
Sel
ect mode D , M or R.
F
R
elease the brake pedal and press the
accelerator pedal.
With an automatic gearbox, if the brake
does not release automatically, check that
the front doors are correctly closed. The complete release of the parking brake is
confirmed by the brake indicator lamp and the
P indicator lamp in the control lever going off,
accompanied by the display of the message
"Parking brake released".
When stationary with the engine running, do not
depress the accelerator pedal unnecessarily,
you risk releasing the parking brake.
Automatic application
With the vehicle stationary, the parking brake
is automatically applied when the engine is
switched off
.
Application of the parking brake is confirmed
by illumination of the brake indicator lamp
and the P indicator lamp in the control lever,
accompanied by the display of the message
"Parking brake applied".
Automatic application does not take place
if the engine stalls or goes into STOP
mode of Stop & Start.
With automatic operation, you can also
manually apply or release the parking
brake using the control lever.
6
Driving
Page 133 of 320

131
F Release the control lever and the brake pedal.
From now on, the parking brake can only
be applied and released manually using the
control lever.
Repeat this procedure to reactivate automatic
operation.
Reactivation of automatic operation is
confirmed by the indicator lamp in the
instrument panel going off.
Emergency braking
The emergency braking should only be
used in an exceptional situation.
In the event of a failure of the main ser vice
brake or in an exceptional situation (e.g. driver
taken ill, under instruction, etc.), a continuous
pull on the control lever will brake the vehicle.
Braking takes place while the control lever is
being pulled. It is interrupted if the control lever
is released.
The ABS and DSC systems provide stability of
the vehicle during emergency braking.
If the emergency braking malfunctions, the
message "Parking brake control faulty" will be
displayed in the instrument panel.
6-speed manual gearbox
Engaging 5th or 6th gear
F Move the gear selector fully to the right to engage 5th or 6th g e a r.
Failure to follow this advice could cause
permanent damage to the gearbox
(inadvertent engagement of 3
rd or 4th gear).
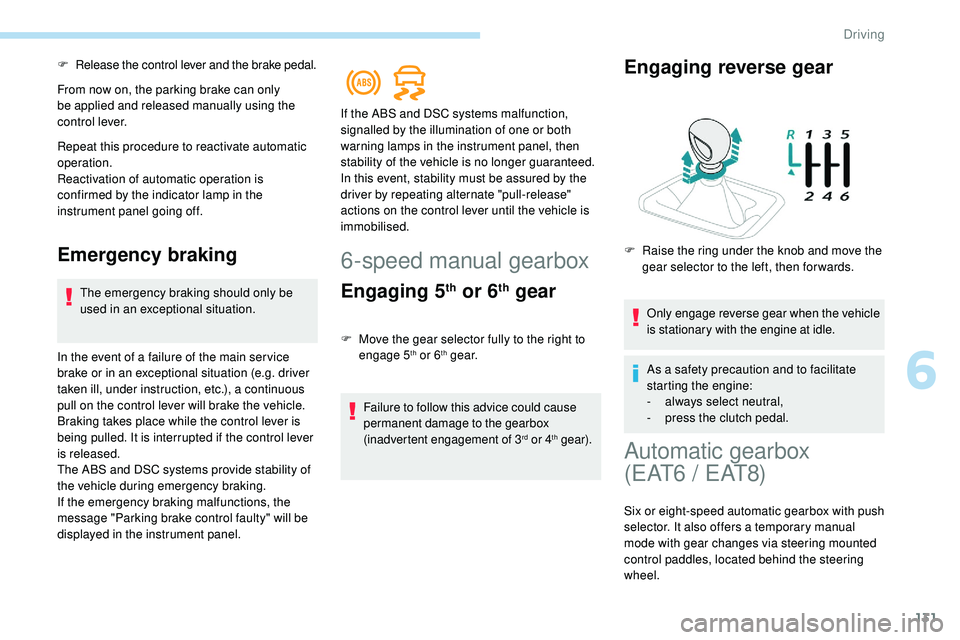
Engaging reverse gear
F Raise the ring under the knob and move the gear selector to the left, then for wards.
Only engage reverse gear when the vehicle
is stationary with the engine at idle.
As a safety precaution and to facilitate
starting the engine:
-
a
lways select neutral,
-
p
ress the clutch pedal.
If the ABS and DSC systems malfunction,
signalled by the illumination of one or both
warning lamps in the instrument panel, then
stability of the vehicle is no longer guaranteed.
In this event, stability must be assured by the
driver by repeating alternate "pull-release"
actions on the control lever until the vehicle is
immobilised.
Automatic gearbox
( E AT 6
/ E AT 8)
Six or eight-speed automatic gearbox with push
selector. It also offers a temporary manual
mode with gear changes via steering mounted
control paddles, located behind the steering
wheel.
6
Driving
Page 134 of 320

132
Gearbox selector positions
P.Park.
For parking the vehicle: the front wheels
are blocked.
R. Reverse.
N. Neutral.
For moving the vehicle with the ignition off:
for some car wash machines, when towing
the vehicle, etc.
D. Automatic mode.
The gearbox manages gear changes
according to the style of driving, the road
profile and the vehicle load.
M. Manual mode.
The driver changes gear using the steering
mounted control paddles.
Push selector
A.P button.
To put the gearbox into Parking mode.
B. Unlock button.
To unlock the gearbox and come out of P
or change to R , with the foot on the brake
pedal.
This button should be pressed and held
before moving the selector.
C. M button. (Depending on the version: with
Full Park Assist, this mode is accessed via
the DRIVE MODE control).
To change from automatic mode D to
permanent manual mode.
D. Gearbox state indicators (P, R, N, D) .Move the selector by pressing it once or
twice for ward (
N or R ) or rear ward ( N or D ), if
necessary going beyond the point of resistance.
The selector returns to its initial position when
released.
For example, to change from P to R , you can
optionally push forward twice without passing
the point of resistance or push once beyond the
point of resistance:
-
I
n the first case, the gearbox goes from P to
N , then from N to R .
-
I
n the second case, the gearbox goes
directly from P to R .
Driving
Page 135 of 320

133
Steering mounted controls
In mode M or D, the steering mounted control
paddles allow the driver to change gear
manually.
These paddles cannot be used to engage
neutral, nor to select or leave reverse
g e a r.
Displays in the instrument
panel
If the driver's door is opened with the
ignition on, a message is displayed asking
you to put the gearbox into mode P .
The state of the gearbox is displayed in
the instrument panel for a few moments
after switching off the ignition.
Operation
With the engine running, if it is necessary to
press the brake pedal or the Unlock button
in order to change mode, an alert message is
displayed in the instrument panel.
Only appropriate attempted changes of mode
are accepted. With the engine running and the brakes
released, if R
, D or M is selected, the
vehicle moves off, even without pressing
the accelerator pedal.
Never press the accelerator and brake
pedals at the same time – risk of damage
to the gearbox!
In the event of a battery failure, you
must place the chock supplied with the
vehicle tools against one of the wheels to
immobilise the vehicle.
-
F
rom mode P
:
F
f
ully depress the brake pedal,
F press the
Unlock button,
F
w
hile continuing to press the brake pedal
and the Unlock button, select another
mode.
-
F
rom neutral N
, at a speed below 3 mph
(5
km/h):
F
f
ully depress the brake pedal,
F
w
hile continuing to press the brake pedal,
select another mode.
F
P
ull the right-hand "
+" paddle towards you
and release to change up a gear.
F
P
ull the left-hand "
-"
paddle towards
you
and release to change down a gear. When the ignition is switched on, the status
of the gearbox is displayed in the instrument
panel:
P
: park.
R : reverse.
N : neutral.
D1...D6 or D8 : automatic mode.
S : Sport mode.
M1...M6 or M8 : manual mode.
- : instruction not accepted in manual mode.
Unlocking the gearbox
6
Driving