2019 Peugeot 508 height adjustment
[x] Cancel search: height adjustmentPage 7 of 320

5
Steering mounted controls
1.External lighting/direction indicator control
stalk
2. Automatic gearbox control paddles
3. Wiper/screenwash/trip computer controls
4. Audio system adjustment controls
5. Instrument panel display mode selection
wheel
6. Voice synthesis control
Volume adjustment
7. Controls for Speed limiter/Cruise control/
Adaptive cruise control
Side switch panel
1.Halogen headlamp beam height
adjustment
2. Hands-free tailgate
3. Active Lane Keeping Assistance
4. Lane Positioning Assist
5. Alarm
6. Programmable Heating/Ventilation
7. Heated windscreen
Centre switch panel
1.8" (PEUGEOT Connect Radio) or 10" HD
(PEUGEOT Connect Nav) touch screen
controls
i- Cockpit® Amplify function
2. Heated seats
3. Stop & Start
4. Windscreen and front windows demist
5. Recirculation of interior air
6. Rear screen defrost
7. Automatic air conditioning
.
Over view
Page 58 of 320

56
Driving position
Adopting a good driving position helps improve
your comfort and protection.
It also optimises interior and exterior visibility
as well as access to controls.
Sitting comfortably
Whether or not your vehicle has certain seat
adjustments described in this section depends
on the trim level and country of sale.
Driver’s sideAs a safety precaution, adjust the seats
only when the vehicle is stationary.
If your vehicle has electric seats, the
ignition must be on to adjust them.
Passenger’s side
Before moving off
Adjust the interior and exterior door mirrors to
reduce blind spots.
Fasten your seat belt: place the diagonal belt in
the middle of your shoulder and adjust the lap
belt so that it is tightened across your pelvis.
Ensure that all passengers have fastened their
seat belts correctly.
Follow these recommendations as much as
your height permits...
Sit fully back in the seat with your pelvis, back
and shoulders in contact with the seat backrest.
The seat cushion height should be set so
your eyes are looking at the centre of the
windscreen. Adjust the longitudinal position of the seat so
you can fully press the pedals with legs slightly
flexed.
Adjust the head restraint so that its upper edge
is level with the top of your head.
Adjust the length of the seat cushion to support
your thighs.
Adjust the lumbar support so that it conforms to
the shape of your spine.
Adjust the steering wheel so that your arms are
slightly bent.
The steering wheel should not hide the
instrument panel.
Sit fully back in the seat with your pelvis, back
and shoulders in contact with the seat backrest.
Adjust the longitudinal position of the seat so
that you are at a distance of at least 10 in (25
cm) from the dashboard.
Adjust the head restraint so that its upper edge
is level with the top of your head.
Ease of use and comfort
Page 59 of 320

57
If your vehicle has electric door mirrors,
the ignition must be on to adjust them.
When driving
Maintain a good driving position and hold the
steering wheel with both hands at the "quarter
to three" position, so that you can quickly reach
the controls on and near the steering wheel.Never adjust the seats or steering wheel
when driving.
Always keep your feet on the floor.
Front seats
Front head restraints
Adjusting the height
The adjustment is correct when the upper
edge of the head restraint is level with the
top of the head.
Removing a head restraint
F Pull the head restraint up as far as it will go.
F P ress the lug A to release the head restraint
and remove it completely.
F
S
tow the head restraint securely.
Refitting a head restraint
F Introduce the head restraint rods into the guides in the seat backrest.
F
P
ush the head restraint down as far as it will go.
F
P
ress the lug A to free the head restraint and
push it down.
F
A
djust the height of the head restraint.
Never drive with the head restraints
removed; they should be in place and
correctly adjusted for the occupant of the
seat.
Upwards:
F
p
ull the head restraint up to the desired
position; the head restraint can be felt to
click into position.
Downwards:
F
p
ress and hold button B and push the head
restraint down to the desired position.
Seats with manual adjustments
For safety reasons, only adjust seats
when the vehicle is stationary.
Longitudinal
F Raise the control bar and slide the seat forwards or backwards.
F
R
elease the bar to lock the seat in position
on one of the runners.
Before moving the seat backwards,
ensure that there is nothing that might
prevent the full travel of the seat.
There is a risk of trapping or pinching
passengers if present in the rear seats
or jamming the seat if large objects are
placed on the floor behind the seat.
Height
F Pull the control upwards to raise or push it downwards to lower, as many times as
necessary to obtain the position required.
3
Ease of use and comfort
Page 61 of 320

59
Backrest angle
F Tilt the control for wards or rear wards.
Seat cushion height and angle
Comfort functions
Storing driving positions
Associated with the electrically-adjusted
driver’s seat, this function allows two driving
positions to be memorised, to make these
adjustments easier if there are frequent driver
changes.It takes account of the electric adjustments
of the seat, the door mirrors, and the air
conditioning system.
F
T
ilt the rear of the control upwards or
downwards to obtain the required height.
F
T
ilt the front of the control upwards or
downwards to obtain the required angle.
Recalling a stored position
Ignition on or engine running
F P ress button 1 or 2 to recall the
corresponding position.
An audible signal confirms that adjustment is
complete.
You can interrupt the current movement by
pressing button M , 1 or 2 or by using one
of the seat controls.
A stored position cannot be recalled while
driving.
Recalling stored positions is deactivated
45 seconds after switching off the ignition.
Heated seats
The function is active only with the engine
running.
Using buttons M/1/2
F
T
ake your seat and switch on the ignition.
F
A
djust your seat and the door mirrors.
F
P
ress button M
, then press button 1 or 2
within 4 seconds.
An audible signal confirms the memorisation.
Memorising a new position cancels the
previous position.
3
Ease of use and comfort
Page 63 of 320

61
F next, proceed with the passenger's seat in the same way.
The changes are taken into account immediately.Once activated, the system starts a one hour
massage cycle, made up of sequences of 6 minutes
of massage followed by 3 minutes at rest.
The system stops automatically at the end of the
cycle; the indicator lamp in the button goes off.
Steering wheel adjustment
F When stationary , pull the control lever
to release the steering wheel adjustment
mechanism.
F
A
djust the height and reach to suit your
driving position.
F
P
ush the control lever to lock the steering
wheel adjustment mechanism.
As a safety measure, these adjustments
should only be carried out with the vehicle
stationary.
Mirrors
Door mirrors
Each fitted with an adjustable mirror glass
providing the lateral rear ward vision necessary
for overtaking or parking.
They can also be folded for parking in narrow
spaces.
On versions fitted with "electrochrome" mirrors,
a system connected to a brightness sensor
darkens the mirror to reduce the nuisance
to the driver caused by low sun or headlamp
beams from other vehicles.
Demisting/Defrosting
If fitted to your vehicle, the demisting/
defrosting of the door mirrors is
done by pressing the rear screen
defrosting control.
For more information on Rear screen demist/
Adjustment
As a safety measure, the mirrors should
be adjusted to reduce the blind spots.
The objects that you see in the mirrors are
in fact closer than they appear.
Take this into account in order to
correctly judge the distance of vehicles
approaching from behind.
F
M
ove control A to the right or to the left to
select the corresponding mirror.
F
M
ove control B in any of the four directions
to adjust.
F
R
eturn control A to its central position.
defrost , refer to the corresponding section.
3
Ease of use and comfort
Page 90 of 320

88
Parking lamps
Vehicle side marking by illumination of the
sidelamps on the traffic side only.
F
D
epending on version, within one minute
of switching off the ignition, operate the
lighting control stalk up or down depending
on the traffic side (for example, when
parking on the right, push the lighting
control stalk downwards; the left-hand
sidelamps come on).
This is confirmed by an audible signal and
illumination of the corresponding direction
indicator lamp in the instrument panel.
To switch off the parking lamps, return the
lighting control stalk to the central position.
Headlamp adjustment
Manual adjustment of
halogen headlamps
To avoid causing a nuisance to other road
users, the height of the halogen headlamps
should be adjusted according to the load in the
vehicle.
0 Driver only or driver + front passenger.
1 5 people.
2 5 people + loads in the boot.
3 Driver + loads in the boot.
4 5 6 Not used.
The initial setting is position " 0".
Automatic adjustment of
"Full LED" technology
headlamps
If a fault occurs, this warning lamp
comes on in the instrument panel,
accompanied by a message and an
audible signal.
This system automatically adjusts the height
of the beams from this type of headlamp,
according to the load in the vehicle, to avoid
causing a nuisance to other road users.
The system then places the headlamp beams
in the lowest position.
Have the system checked by a PEUGEOT
dealer or a qualified workshop.
Do not touch the "Full LED" technology
headlamps. Risk of electrocution!
Lighting and visibility
Page 119 of 320

117
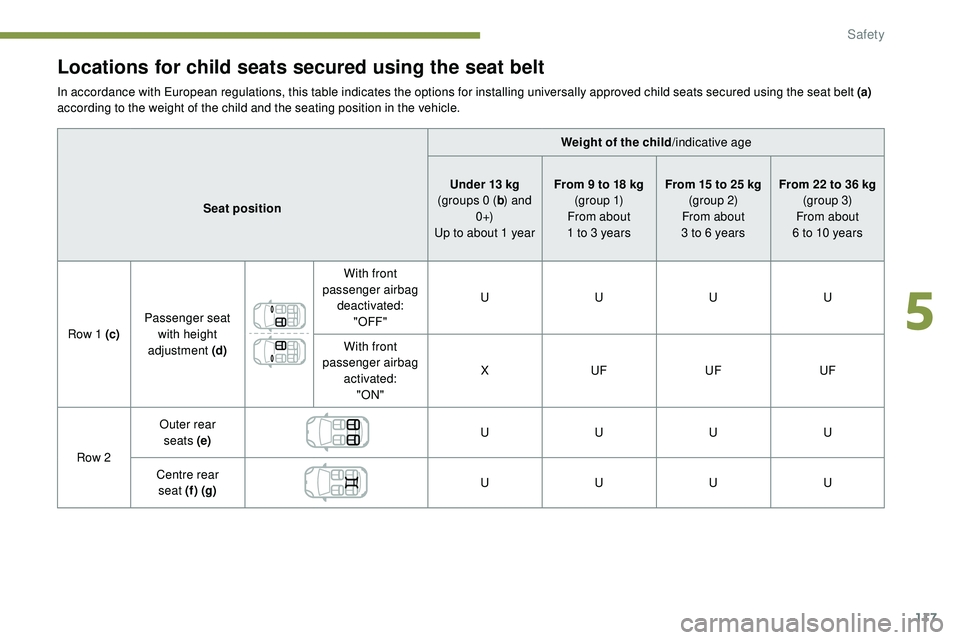
Locations for child seats secured using the seat belt
In accordance with European regulations, this table indicates the options for installing universally approved child seats secured using the seat belt (a)
according to the weight of the child and the seating position in the vehicle.Weight of the child/indicative age
Seat position Under 13
kg
(groups 0 ( b) and
0 +)
Up to about 1 year From 9 to 18 kg
(g r o u p 1)
From about
1 to 3 years From 15 to 25 kg
(group 2)
From about
3 to 6 years From 22 to 36 kg
(group 3)
From about
6 to 10 years
Row 1 (c) Passenger seat
with height
adjustment
(d)With front
passenger airbag deactivated: "OFF" U
UUU
With front
passenger airbag activated:"ON" X
UF UFUF
Row 2 Outer rear
seats
(e) U
UUU
Centre rear seat
(f )
(g) U
UUU
5
Safety
Page 122 of 320

120
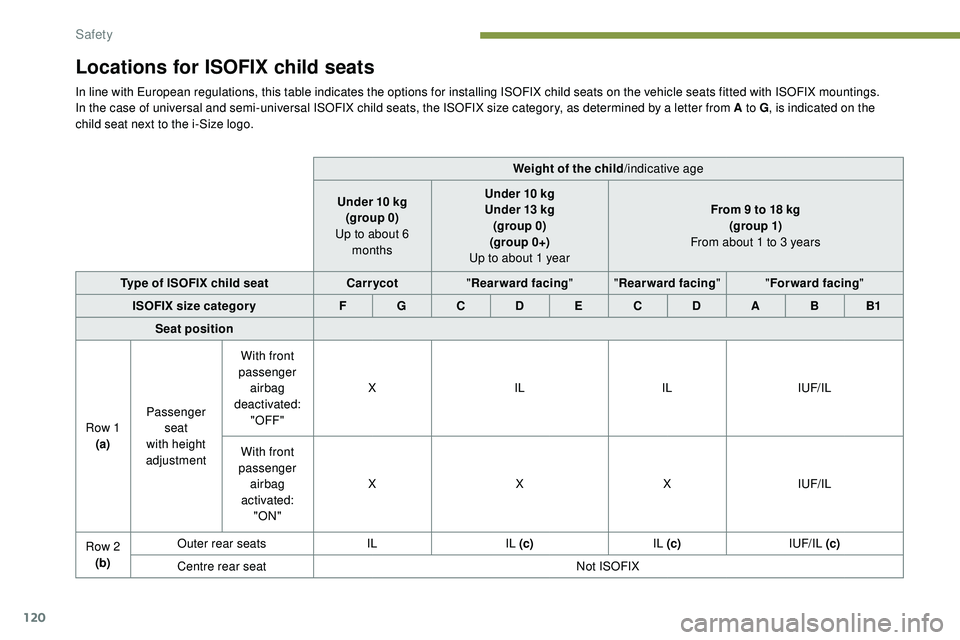
Locations for ISOFIX child seats
In line with European regulations, this table indicates the options for installing ISOFIX child seats on the vehicle seats fitted with ISOFIX mountings.
In the case of universal and semi-universal ISOFIX child seats, the ISOFIX size category, as determined by a letter from A to G, is indicated on the
child seat next to the i-Size logo.
Weight of the child/indicative age
Under 10
kg
(group 0)
Up to about 6 months Under 10
kg
Under 13
kg
(group 0)
(group
0+)
Up to about 1 year From 9 to 18 kg
(g ro up 1)
From about 1 to 3 years
Type of ISOFIX child seat Carr ycot"Rearward facing " "Rearward facing " "Forward facing "
ISOFIX size categor y F G C D E C D A B B1
Seat position
Row 1 (a) Passenger
seat
with height
adjustment With front
passenger airbag
deactivated: "OFF" X
IL ILIUF/IL
With front
passenger airbag
activated: "ON" X
XXIUF/IL
Row 2 (b) Outer rear seats
ILIL (c) IL (c)IUF/IL (c)
Centre rear seat Not ISOFIX
Safety