2019 OPEL CROSSLAND X fuel consumption
[x] Cancel search: fuel consumptionPage 98 of 263

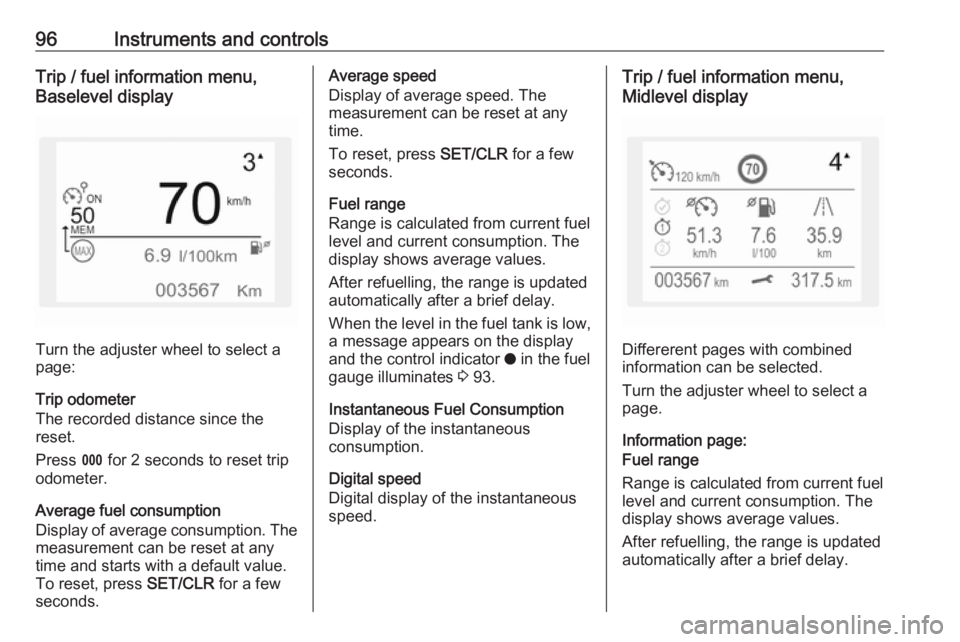
96Instruments and controlsTrip / fuel information menu,
Baselevel display
Turn the adjuster wheel to select a
page:
Trip odometer
The recorded distance since the reset.
Press L for 2 seconds to reset trip
odometer.
Average fuel consumption
Display of average consumption. The measurement can be reset at any
time and starts with a default value.
To reset, press SET/CLR for a few
seconds.
Average speed
Display of average speed. The
measurement can be reset at any
time.
To reset, press SET/CLR for a few
seconds.
Fuel range
Range is calculated from current fuel
level and current consumption. The
display shows average values.
After refuelling, the range is updated
automatically after a brief delay.
When the level in the fuel tank is low,
a message appears on the display
and the control indicator o in the fuel
gauge illuminates 3 93.
Instantaneous Fuel Consumption
Display of the instantaneous
consumption.
Digital speed
Digital display of the instantaneous
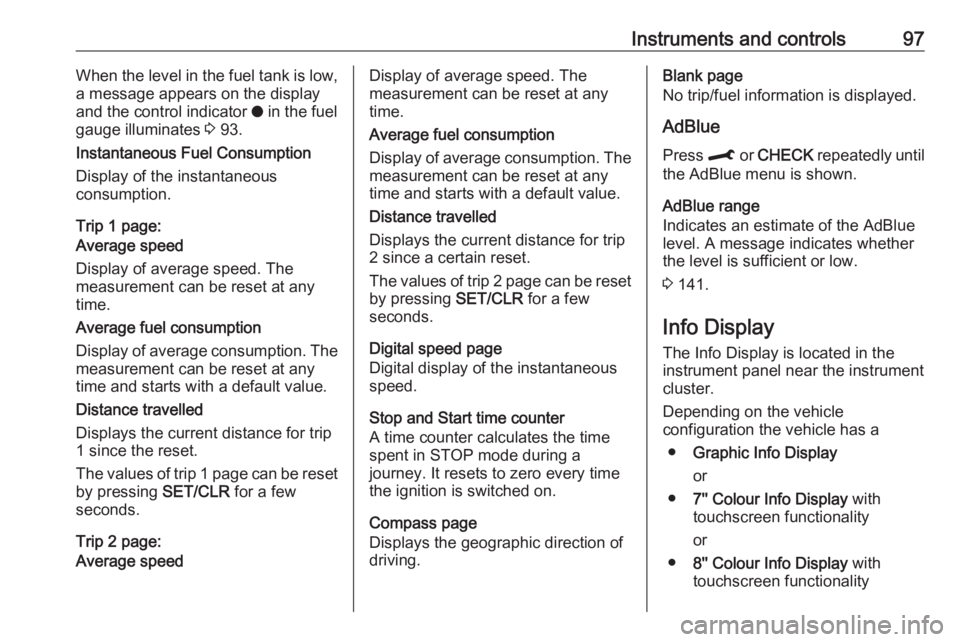
speed.Trip / fuel information menu,
Midlevel display
Differerent pages with combined
information can be selected.
Turn the adjuster wheel to select a
page.
Information page:
Fuel range
Range is calculated from current fuel
level and current consumption. The
display shows average values.
After refuelling, the range is updated
automatically after a brief delay.
Page 99 of 263

Instruments and controls97When the level in the fuel tank is low,
a message appears on the display
and the control indicator o in the fuel
gauge illuminates 3 93.
Instantaneous Fuel Consumption
Display of the instantaneous
consumption.
Trip 1 page:
Average speed
Display of average speed. The
measurement can be reset at any
time.
Average fuel consumption
Display of average consumption. The measurement can be reset at any
time and starts with a default value.
Distance travelled
Displays the current distance for trip
1 since the reset.
The values of trip 1 page can be reset
by pressing SET/CLR for a few
seconds.
Trip 2 page:
Average speedDisplay of average speed. The
measurement can be reset at any
time.
Average fuel consumption
Display of average consumption. The measurement can be reset at any
time and starts with a default value.
Distance travelled
Displays the current distance for trip
2 since a certain reset.
The values of trip 2 page can be reset
by pressing SET/CLR for a few
seconds.
Digital speed page
Digital display of the instantaneous
speed.
Stop and Start time counter
A time counter calculates the time
spent in STOP mode during a
journey. It resets to zero every time
the ignition is switched on.
Compass page
Displays the geographic direction of
driving.Blank page
No trip/fuel information is displayed.
AdBlue Press M or CHECK repeatedly until
the AdBlue menu is shown.
AdBlue range
Indicates an estimate of the AdBlue
level. A message indicates whether
the level is sufficient or low.
3 141.
Info Display The Info Display is located in the
instrument panel near the instrument
cluster.
Depending on the vehicle
configuration the vehicle has a
● Graphic Info Display
or
● 7'' Colour Info Display with
touchscreen functionality
or
● 8'' Colour Info Display with
touchscreen functionality
Page 134 of 263

132Driving and operatingDriving hints
Control of the vehicle
Never coast with engine not
running
Many systems will not function in this situation ( e.g. brake servo unit, power
steering). Driving in this manner is a
danger to yourself and others.
All systems function during an
Autostop.
Stop-start system 3 137.
Idle boost
If charging of the vehicle battery is
required due to battery condition, the
power output of the generator must
be increased. This will be achieved by an idle boost which may be audible.
A message appears in the Driver
Information Centre.
Pedals
To ensure the pedal travel is
uninhibited, there must be no mats in
the area of the pedals.Use only floor mats, which fit properly and are fixed by the retainers on the
driver side.
Steering If power steering assist is lost
because the engine stops or due to a system malfunction, the vehicle can
be steered but may require increased
effort.Starting and operating
New vehicle running-in Do not brake unnecessarily hard for
the first few journeys.
During the first drive, smoke may
occur because of wax and oil
evaporating off the exhaust system.
Park the vehicle in the open for a
while after the first drive and avoid
inhaling the fumes.
During the running-in period, fuel and engine oil consumption may be
higher.
Additionally, the cleaning process of
the exhaust filter may take place more
often.
Exhaust filter 3 140.
Autostop may be inhibited to allow
charging of the vehicle battery.
Ignition switch positions Turn key:
Page 189 of 263

Vehicle care187Vehicle careGeneral Information...................187
Accessories and vehicle modifications .......................... 187
Vehicle storage ........................188
End-of-life vehicle recovery .....188
Vehicle checks ........................... 189
Performing work ......................189
Bonnet ..................................... 189
Engine oil ................................. 190
Engine coolant ......................... 191
Washer fluid ............................ 191
Brakes ..................................... 192
Brake fluid ............................... 192
Vehicle battery ......................... 192
Diesel fuel system bleeding .....193
Wiper blade replacement ........194
Bulb replacement .......................194
Halogen headlights ..................195
LED headlights ........................ 197
Front fog lights ......................... 197
Tail lights ................................. 198
Side turn lights ......................... 201
Number plate light ...................202
Interior lights ............................ 202Electrical system........................202
Fuses ....................................... 202
Engine compartment fuse box . 203
Instrument panel fuse box .......204
Vehicle tools .............................. 207
Tools ........................................ 207
Wheels and tyres .......................208
Winter tyres ............................. 208
Tyre designations ....................208
Tyre pressure .......................... 208
Tyre deflation detection system .................................... 209
Tread depth ............................. 210
Changing tyre and wheel size . 211
Wheel covers ........................... 211
Tyre chains .............................. 212
Tyre repair kit .......................... 212
Wheel changing .......................215
Spare wheel ............................ 216
Jump starting ............................. 220
Towing ....................................... 222
Towing the vehicle ...................222
Towing another vehicle ...........223
Appearance care .......................224
Exterior care ............................ 224
Interior care ............................. 226General Information
Accessories and vehiclemodifications
We recommend the use of genuine
parts and accessories and factory approved parts specific for your
vehicle type. We cannot assess or guarantee reliability of other products
- even if they have a regulatory or
otherwise granted approval.
Any modification, conversion or other changes made to standard vehicle
specifications (including, without
limitation, software modifications,
modifications of the electronic control
units) may invalidate the warranty
offered by Opel. Furthermore, such
changes may affect driver assistance
systems, may impact fuel
consumption, CO 2 emissions and
other emissions of the vehicle and
cause the vehicle to no longer
conform to the operating permit,
impacting the validity of your vehicle
registration.
Page 211 of 263

Vehicle care209The tyre pressure information label
on the left door frame indicates the
original equipment tyres and the
correspondent tyre pressures.
The tyre pressure data refers to cold
tyres. It applies to summer and winter
tyres.
Always inflate the spare tyre to the
pressure specified for full load.
The ECO tyre pressure serves to
achieve the smallest amount of fuel
consumption possible.
Incorrect tyre pressures will impair
safety, vehicle handling, comfort and fuel economy and will increase tyre
wear.
Tyre pressures differ depending on
various options. For the correct tyre
pressure value, follow the procedure
below:
1. Identify drive axle and body style.
2. Identify the engine identifier code.
Engine data 3 238.
3. Identify the respective tyre.
The tyre pressure tables show all possible tyre combinations 3 244.For the tyres approved for your
vehicle, refer to the EEC Certificate of
Conformity provided with your vehicle or other national registration
documents.
The driver is responsible for correct
adjustment of tyre pressure.9 Warning
If the pressure is too low, this can
result in considerable tyre warm-
up and internal damage, leading to tread separation and even to tyre
blow-out at high speeds.
9 Warning
For specific tyres the
recommended tyre pressure as
shown in the tyre pressure table may exceed the maximum tyre
pressure as indicated on the tyre.
Never exceed the maximum tyre
pressure as indicated on the tyre.
Temperature dependency
The tyre pressure depends on the
temperature of the tyre. During
driving, tyre temperature and
pressure increase. Tyre pressure
values provided on the tyre
information label and tyre pressure
chart are valid for cold tyres, which means at 20 °C.
The pressure increases by nearly
10 kPa for a 10 °C temperature
increase. This must be considered
when warm tyres are checked.
Tyre deflation detectionsystem
The tyre deflation detection system
continually checks the rotation speed
of all four wheels and warns on low
tyre pressure condition once vehicle
is driving. This is achieved by
comparing tyre rolling circumference
with reference values and further
signals.
If a tyre loses pressure the control
indicator w illuminates and a warning
message is displayed in the Driver Information Centre.