Page 638 of 682

CAUTION
If the engine does not start, place the
ignition switch in the OFF position and
wait 10 seconds before cranking again,
otherwise the starter could be
damaged.3. Allow the engine to idle for at least 30 seconds af ter starting. Do not race
the engine while warming it up. Drive at
a moderate speed for a short distance
first, especially in cold weather.
In cold weather, keep the engine run-
ning for a minimum of 2–3 minutes
before shutting it off. Starting and
stopping the engine over a short pe-
riod of time may make the vehicle
more difficult to start.
SWITCHING ENGINE OFF
Push the ignition switch to the OFF posi-
tion.
To prolong the engine life (especially af ter
extended high speed, high ambient tem-
perature, or during heavy load operation,
such as trailering), it is recommended that
a hot engine be idled for 3–5 minutes be-
fore shutting down. This allows the turbo-
charged engine to cool down.
ENGINE BREAK-IN
RECOMMENDATIONS
∙ Warm up the engine before operating it under load.
∙ Do not operate the engine at idle for extended periods.
∙ Prevent engine lugging by selecting the appropriate transmission gear.
∙ Monitor the vehicle oil pressure and temperature gauges.
∙ Check fluid levels frequently (oil and coolant).
∙ Vary the throttle position at highway speeds when carrying weight or tow-
ing.
NOTE:
Extended light or no load operation will
extend the time before the engine
reaches its full efficiency. If the engine is
operated in this manner, reduced fuel
economy and power may be observed.
The aforementioned procedure should be
observed for the first 6,000 miles. The en-
gine run-in is improved by operating the
vehicle under load.
REMOTE ENGINE START (if so
equipped)
CAUTION
Laws in some jurisdictions prohibit use
of Remote Engine Start.
Vehicles started with the Remote Engine
Start require the ignition switch to be
placed in the ON position before the shif t
lever can be moved from the P (Park) posi-
tion. To place the ignition switch in the ON
position, follow these steps: 1. Make sure that the Intelligent Key is on you.
2. Apply the brake.
3. Push the ignition switch once to the ON position.
For additional information, refer to “NISSAN
Intelligent Key®” in the “Pre-driving checks
and adjustments” section of the Titan
Owner’s Manual.
Starting and Stopping the Engine3-3
Page 654 of 682
7 Do-it-yourself
Engine compartment check locations........... 7-2
Engine cooling system .......................... 7-3
Checking engine coolant level ................ 7-4
Changing engine coolant ..................... 7-4
Engine oil ........................................ 7-5
Checking engine oil level ..................... 7-5
Changing engine oil ..........................7-6
Changing engine oil filter .....................7-8 Fuel filter (CUMMINS 5.0L)
........................ 7-9
Fuel filter replacement (stage 1 and 2) ........ 7-9
Diesel Particulate Filter (DPF) .................... 7-10
Automatic regeneration ......................7-11
Drive belt ........................................7-11
Air cleaner ...................................... 7-12
In-cabin microfilter .......................... 7-12
Page 655 of 682
1. Windshield-washer fluid reservoir
2. Fuse box
3. Fuse/Fusible link box
4. Engine coolant reservoir
5. Fuel filter (Stage 2)
6. Engine oil filler cap
7. Brake fluid reservoir
8. Air cleaner
9. Battery
10. Power steering fluid reservoir
11. Radiator cap
12. Engine oil dipstick
13. Drive belt location
14. Fuse/Fusible link box
15. Battery
Cummins 5.0L
LDI2870
ENGINE COMPARTMENT CHECK
LOCATIONS
7-2Do-it-yourself
Page 658 of 682
. To avoid damage to your vehicle,
the oil, oil filter, and fuel filter wil")
CAUTION
Your vehicle may require more frequent
maintenance if it operates on biodiesel
blends between 6% and 10% (B6 and
B10). To avoid damage to your vehicle,
the oil, oil filter, and fuel filter will need
to be replaced af ter a shorter time in-
terval than if your vehicle was operat-
ing on pure petroleum-based diesel.
For additional information, refer to the
“Maintenance and schedules” section in
the Titan Owner’s Manual.
CHECKING ENGINE OIL LEVEL
NOTE:
The factory fill oil may include a red dye
that is added for manufacturing quality
processes. The dye makes the oil appear
to be red. This is normal. The red dye will
be flushed from the engine af ter ap-
proximately 4–5 oil changes.1. Park the vehicle on a level surface and
apply the parking brake.
2. Start the engine and let it idle until it reaches operating temperature.
3. Turn off the engine. Wait more than
10 minutes for the oil to drain back
into the oil pan.
4. Remove the dipstick and wipe it clean. Reinsert it all the way.
LDI2872
ENGINE OIL
Do-it-yourself7-5
Page 659 of 682
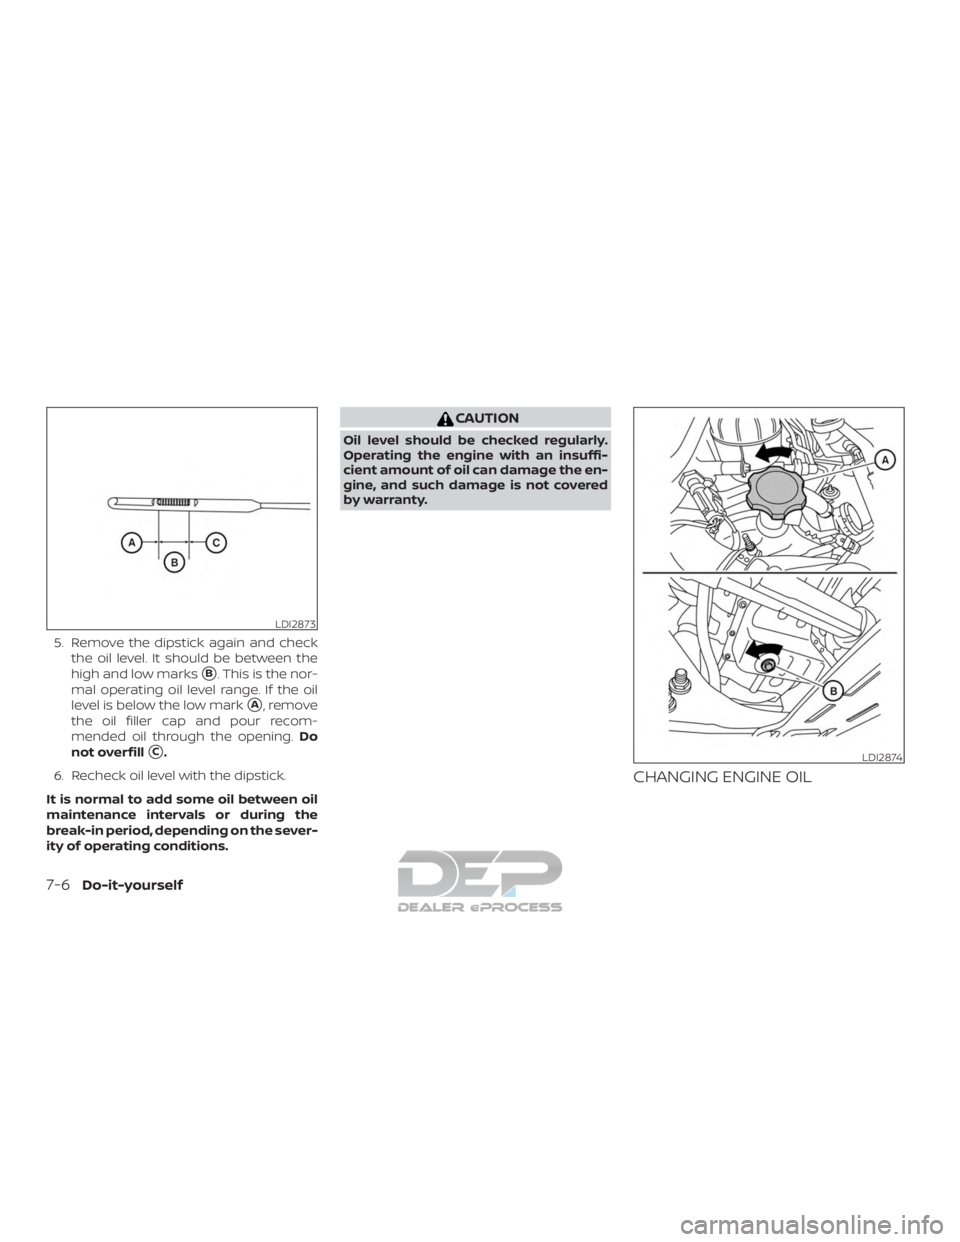
5. Remove the dipstick again and checkthe oil level. It should be between the
high and low marks
�B. This is the nor-
mal operating oil level range. If the oil
level is below the low mark
�A, remove
the oil filler cap and pour recom-
mended oil through the opening. Do
not overfill
�C.
6. Recheck oil level with the dipstick.
It is normal to add some oil between oil
maintenance intervals or during the
break-in period, depending on the sever-
ity of operating conditions.
CAUTION
Oil level should be checked regularly.
Operating the engine with an insuffi-
cient amount of oil can damage the en-
gine, and such damage is not covered
by warranty.
CHANGING ENGINE OIL
LDI2873
LDI2874
7-6Do-it-yourself
Page 660 of 682

NOTE:
The factory fill oil may include a red dye
that is added for manufacturing quality
processes. The dye makes the oil appear
to be red. This is normal. The red dye will
be flushed from the engine af ter ap-
proximately 4–5 oil changes.1. Park the vehicle on a level surface and apply the parking brake.
2. Start the engine and let it idle until it reaches operating temperature, then
turn it off.
3. Remove the oil filler cap
�Aby turning it
counterclockwise.
4. Place a large drain pan under the drain plug
�B.
5. Remove the drain plug
�Bwith a
wrench by turning it counterclockwise
and completely drain the oil.
Remove and replace the engine oil fil-
ter at this time. For additional informa-
tion, refer to “Changing engine oil filter”
in this section.
∙ Waste oil must be disposed of prop-
erly.
∙ Check your local regulations.
WARNING
∙ Prolonged and repeated contact with
used engine oil may cause skin
cancer.
∙ Try to avoid direct skin contact with used oil. If skin contact is made, wash
thoroughly with soap or hand cleaner
as soon as possible.
∙ Keep used engine oil out of reach of children.
CAUTION
Be careful not to burn yourself. The en-
gine oil may be hot.
6. Clean and reinstall the drain plug. Se- curely tighten the drain plug with a
wrench. Do not use excessive force.
Drain plug tightening torque: 25 f t-lb (34 N·m) 7. Refill engine with recommended oil
through the oil filler opening, then install
the oil filler cap securely.
For additional information on drain
and refill capacity, refer to “Recom-
mended fluids/lubricants and capaci-
ties” in the “Capacities and specifica-
tions” section of this manual.
The drain and refill capacity depends
on the oil temperature and drain time.
Use these specifications for reference
only. Always use the dipstick to deter-
mine when the proper amount of oil is
in the engine.
8. Start the engine. Check for leakage around the drain plug and oil filter. Cor-
rect as required.
9. Turn the engine off and wait more than 10 minutes. Check the oil level with the
dipstick. Add engine oil if necessary.
NOTE:
For additional information on resetting
the oil control system, refer to “Resetting
the oil control system” in the “Instrument
panel” section of this manual.
Do-it-yourself7-7
Page 661 of 682
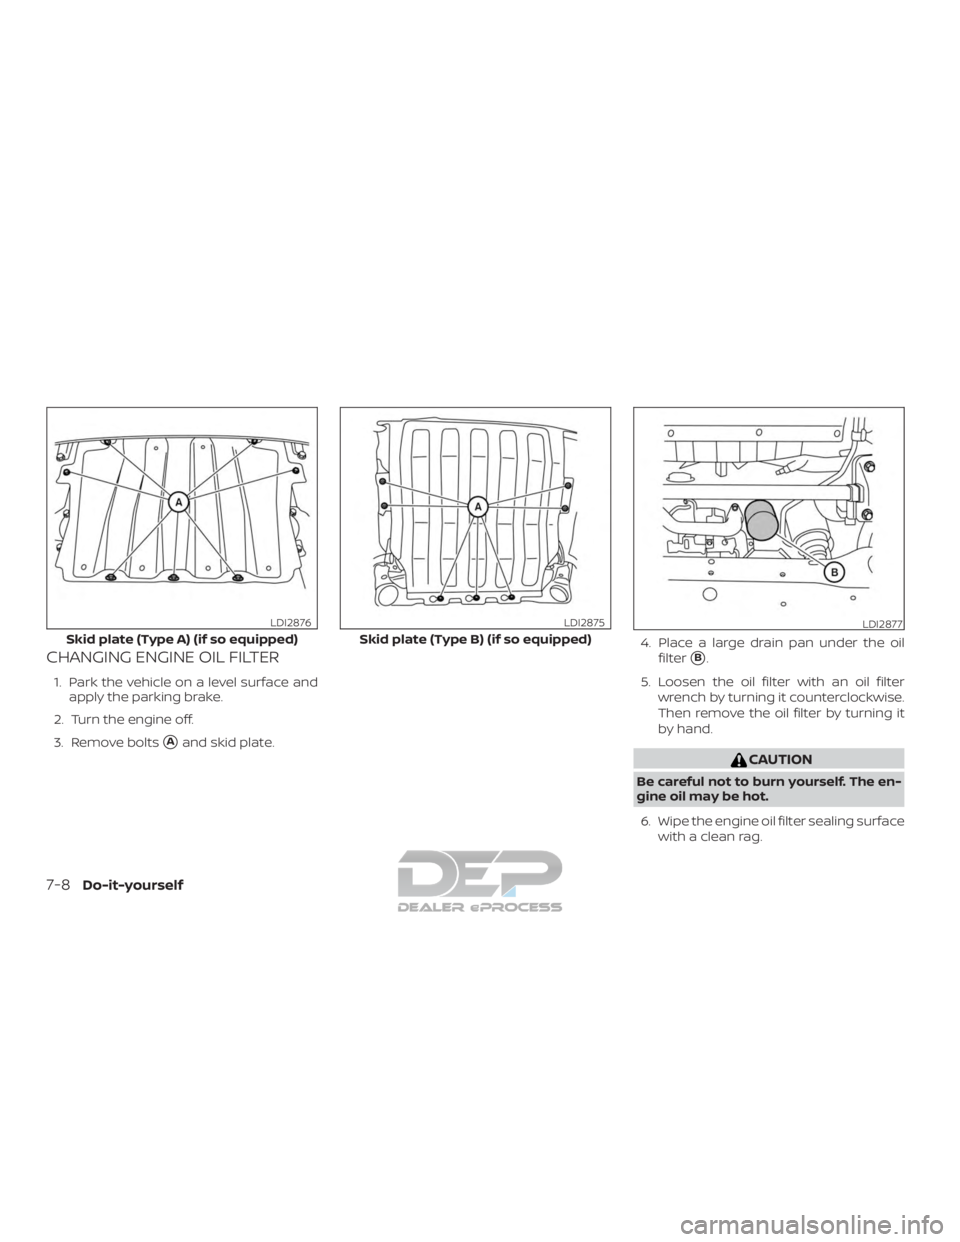
CHANGING ENGINE OIL FILTER
1. Park the vehicle on a level surface andapply the parking brake.
2. Turn the engine off.
3. Remove bolts
�Aand skid plate. 4. Place a large drain pan under the oil
filter
�B.
5. Loosen the oil filter with an oil filter wrench by turning it counterclockwise.
Then remove the oil filter by turning it
by hand.
CAUTION
Be careful not to burn yourself. The en-
gine oil may be hot.
6. Wipe the engine oil filter sealing surface with a clean rag.
Skid plate (Type A) (if so equipped)
LDI2876
Skid plate (Type B) (if so equipped)
LDI2875LDI2877
7-8Do-it-yourself
Page 662 of 682

CAUTION
Be sure to remove any old gasket mate-
rial remaining on the sealing surface of
the engine. Failure to do so could lead to
an oil leak and engine damage.7. Fill the new filter with clean engine oil.
8. Coat the gasket on the new filter with clean engine oil.
9. Screw on the oil filter until a slight resis- tance is felt, then tighten an additional
3/4 turn.
10. Start the engine and check for leakage around the oil filter. Correct as required.
11. Install skid plate in reverse order of re- moval.
12. Turn the engine off and wait more than 10 minutes. Check the oil level. Add en-
gine oil if necessary.
CAUTION
Your vehicle may require more frequent
maintenance if it operates on biodiesel
blends between 6% and 10% (B6 and
B10). To avoid damage to your vehicle,
the oil, oil filter, and fuel filter will need
to be replaced af ter a shorter time in-
terval than if your vehicle was operat-
ing on pure petroleum-based diesel.
For additional information, refer to the
“Maintenance and schedules” section in
the Titan Owner’s Manual.
FUEL FILTER REPLACEMENT (stage
1 and 2)
A NISSAN dealer can change the stage 1
and stage 2 fuel filters. The service proce-
dure can be found in the NISSAN Service
Manual.
Improper servicing can result in the vehicle
not starting, fuel leaks and engine stalling.
Fuel filter
LDI2921
FUEL FILTER (CUMMINS 5.0L)
Do-it-yourself7-9


6. Engine oil filler cap
7. Brake fluid reservoir
8. Air cleaner
9. Batte")