2019 NISSAN TITAN maintenance schedule
[x] Cancel search: maintenance schedulePage 593 of 682
Top tether strap anchor point
locations...................1-31
Child safety rear door lock ..........3-10
Chimes, audible reminders .........2-25
Cleaningexteriorandinterior......7-2,7-4
Climatecontrolseatswitch.........2-55
C.M.V.S.S. certification label .........10-20
Coldweatherdriving.............5-68
Compass ....................2-12
Console light ..................2-88
Controls Heater and air conditioner controls . .4-39
Heater and air conditioner controls
(manual) ...................4-29
Coolant Capacities and recommended
fuel/lubricants...............10-2
Changing engine coolant .........8-6
Checking engine coolant level ......8-6
Engine coolant temperature gauge . .2-8
Corrosionprotection..............7-7
Cruisecontrol...........5-41,5-41,5-42
Cupholders...................2-78
Curtain side-impact and rollover air
bag........................1-78
D
Daytime Running Light System . . .2-52, 8-30
Diesel Particulate Filter (DPF) .........8-11
DigitalvideodiscDVD ............4-44
Dimensions and weights ..........10-12
Dimmer switch for instrument panel . . .2-53
Display......................2-26
Door locks ..................3-5,3-6 Door open warning light
...........2-19
Drivebelt ....................8-19
Drive positioner, Automatic ......3-43,3-45
Driving Cold weather driving ...........5-68
Driving with automatic
transmission ................5-17
Precautions when starting and
driving..................5-2,5-9
Drivingthevehicle...............5-17
E
Eco Drive Report ................5-53
Economy - fuel .................5-44
Electronic locking rear differential (E-Lock)
system ......................5-52
Electronic locking rear differential (E-Lock)
system switch .................2-62
Emergency engine shutoff .......5-13,6-2
Emission control information label . . . .10-20
Emission control system warranty . . . .10-65
Engine Before starting the engine ........5-15
Blockheater................5-70
Capacities and recommended
fuel/lubricants...............10-2
Changing engine coolant .........8-6
Changing engine oil ............8-8
Changing engine oil filter .........8-9
Checking engine coolant level ......8-6
Checking engine oil level .........8-7
Engine compartment check
locations...................8-3
Engine coolant temperature gauge . .2-8 Engine cooling system
..........8-5
Engine oil ...................8-7
Engine oil and oil filter
recommendation .............10-7
Engine oil pressure gauge .....2-10,2-11
Engine oil pressure warning light ....2-19
Engine oil viscosity ............10-8
Engine serial numbe r..........10-19
Engine specifications ..........10-10
Engine coolant temperature gauge ....2-8
Engine oil pressure gauge .......2-10,2-11
EventDatarecorders............10-67
Exhaust gas (Carbon monoxide) .......5-2
Explanation of maintenance items .....9-2
Explanation of scheduled maintenance
items .......................9-5
Extended storage switch ..........2-70
Eyeglasscase..................2-77
F
Flashers
(Seehazardwarningflasherswitch)....6-2
Flattire....................6-3,6-4
F lo
ormatpositioningaid...........7-5
Fluid Brakefluid..................8-13
Capacities and recommended
fuel/lubricants...............10-2
Engine coolant ...............8-5
Engine oil ...................8-7
Powersteeringfluid............8-12
Windshield-washer fluid .........8-13
F.M.V.S.S. certification label .........10-20
Foglightswitch................2-54
11-2
Page 595 of 682

Key fob battery replacement........8-27
Keyless entry With Intelligent Key system
(See Intelligent Key system) .......3-16
Keys NISSAN Intelligent Key® .......3-2,3-10
NISSAN Vehicle Immobilizer System
keys......................3-4
L
Labels Air conditioner specification label . . .10-21
C.M.V.S.S. certification label .......10-20
Emission control information label . .10-20
Engine serial numbe r..........10-19
F.M.V.S.S. certification label .......10-20
Tire and Loading Information label . .10-21
Vehicle identification number (VIN) . .10-18
Vehicle identification number (VIN)
plate.....................10-18
Warning labels (for SRS) .........1-80
LATCH (Lower Anchors and Tethers for
CHildren)System............... .1-29
License plate Installing the license plate .......10-22
Light Airbagwarninglight........1-81, 2-22
Brakelight(Seestoplight)........8-32
Bulb check/instrument panel ......2-17
Bulb replacement .............8-32
Charge warning light ...........2-19
Console light ................2-88
ExteriorandInteriorlights........8-32 Foglights..................8-29
Foglightswitch..............2-54
Headlight and turn signal switch
....2-49
Headlightcontrolswitch.........2-49
Headlights .................8-29
Interiorlight.................2-87
Lightbulbs.................8-29
Low tire pressure warning light .....2-20
Low windshield-washer fluid warning
light......................2-38
Passenger air bag and status light . . .1-63
Personal lights ...............2-89
Security indicator light ..........2-25
Warning/indicator lights and audible
reminders ...............2-17,2-23
Lights......................8-29 Maplights..................2-88
Lock Child safety rear door lock ........3-10
Door locks ................3-5,3-6
Power door locks ..............3-7
Loose fuel cap warning ...........2-40
Lowfuelwarninglight.........2-22,2-37
Low tire pressure warning light .......2-20
Low windshield-washer fluid warning
light........................2-38
Luggage hook .................2-82
Luggage
(See vehicle loading information) .....10-23
M
Maintenance General maintenance ...........9-2 Insidethevehicle..............9-3
Maintenance precautions
.........8-2
Outsidethevehicle.............9-2
Seat belt maintenance ..........1-23
Under the hood and vehicle .......9-4
Maintenance log ................9-18
Maintenance requirements ..........9-2
Maintenance schedules ............9-7
Malfunctionindicatorlight......2-22,2-24
Manual front seat adjustment ........1-4
Maplights....................2-88
Map pocket ...................2-72
Memory Seat ..............3-43,3-45
Meters and gauges ...........2-6,2-10
Instrument brightness control .....2-53
Mirror Automatic anti-glare inside mirror. . .3-34
Outsidemirrors..............3-35
Rearview...................3-33
Vanitymirror................3-33
Mirrors......................3-33
Moving Object Detection (MOD) ......4-24
N
NissanConnect® Owner's Manual ......
4-
2
NISSAN Intelligent Key® .........3-2,3-10
NISSAN Vehicle Immobilizer
System..................2-44,5-14
O
Octane rating (See fuel octane rating) . . .10-7
Odometer ....................2-7
11-4
Page 606 of 682
CAUTION
Your vehicle may require more frequent
maintenance if it operates on biodiesel
blends between 6% and 10% (B6 and
B10). To avoid damage to your vehicle,
the oil, oil filter, and fuel filter will need
to be replaced af ter a shorter time in-
terval than if your vehicle was operat-
ing on pure petroleum-based diesel.
For additional information, refer to the
“Maintenance and schedules” section in
the Titan Owner’s Manual.
FUEL FILTER REPLACEMENT (stage
1)
NOTE:∙ It is possible the “Low Fuel Pressure:
See Owner’s Manual” message will
display on the vehicle information
display af ter fuel filter replacement
due to air being introduced into the
fuel system. ∙
If the “Low Fuel Pressure: See Owner’s
Manual” message is displayed on the
vehicle information display with the
engine running, complete a full key
cycle (turn the vehicle off and wait
2 minutes) and restart the vehicle. If
the message is still displayed or the
Malfunction Indicator Light is illumi-
nated af ter a full key cycle , it is rec-
ommended that you visit a NISSAN
dealer for service.
WARNING
∙ The fuel system (fuel pump, high pres- sure fuel lines, fuel rail, injectors) con-
tain very high pressure fuel. To avoid
the risk of personal injury or fire;
– Do not loosen any fittings while the engine is running.
– Wait at least 10 minutes af ter shut- ting down the engine before loos-
ening any fittings in the high-
pressure fuel system to allow
pressure to decrease to a lower
level.
– Wear appropriate eye protection and protective equipment as high-
pressure fuel spray can penetrate
the skin.
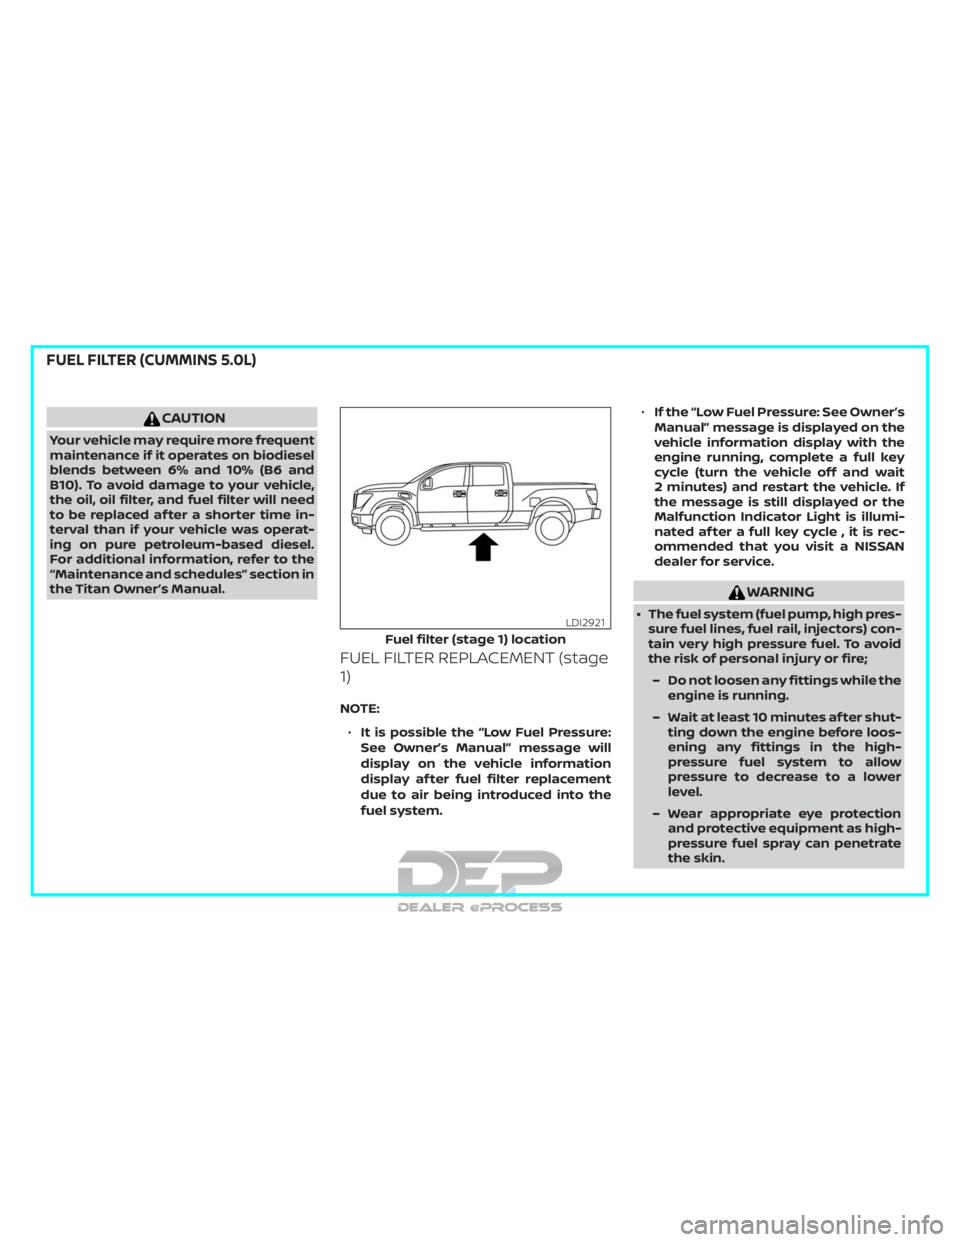
Fuel filter (stage 1) location
LDI2921
FUEL FILTER (CUMMINS 5.0L)
Page 623 of 682
Preventive maintenance is the easiest and
least expensive type of maintenance. Keep
records of regularly scheduled mainte-
nance and follow the maintenance sched-
ule recommendations outlined in the Titan
Owner’s Manual.
Use the correct fuel, lubricating oil, and
coolant in your engine. Blending engine oil
with fuel is prohibited for engines with an
af tertreatment system. For additional in-
formation, refer to the “Capacities and
specifications” section of this manual.
A NISSAN dealership knows your vehicle.
When you require any service or have any
questions, they will be glad to assist you
with the extensive resources available to
them.
DIESEL ENGINE OPERATION
The operation of the diesel engine in your
new vehicle varies from the operation of
traditional gasoline engines found in other
vehicles. Reading this supplement will fa-
miliarize you and other operators of the
vehicle with the unique maintenance and
operating procedures that will prolong the
life of the diesel engine and related sys-
tems.
ENGINE BREAK-IN
RECOMMENDATIONS
∙ Warm up the engine before operating itunder load
∙ Do not operate the engine at idle for extended periods
∙ Prevent engine lugging by selecting the appropriate transmission gear
∙ Monitor the vehicle oil pressure and temperature gauges
∙ Check fluid levels frequently (Oil & Cool- ant)
∙ Vary the throttle position at highway speeds when carrying weight or towing
NOTE:
Extended light or no load operation will
extend the time before the engine
reaches its full efficiency. If the engine is
operated in this manner, reduced fuel
economy and power may be observed.
The aforementioned procedure should be
observed for the first 6,000 miles. The en-
gine run-in is improved by operating the
vehicle under load.
DIESEL FUEL SYSTEM
The diesel engine fuel system is a pressur-
ized two-stage filtration system and con-
sists of: ∙ A frame-mounted primary (stage 1) fuel filter containing water/fuel separator,
electric fuel pump, and water in fuel
drain valve
∙ An engine-mounted secondary (stage 2) fuel filter
∙ A fuel injector for each cylinder (8 total)
∙ A high-pressure fuel pump
∙ A high-pressure fuel rail for each cylin- der bank (2 total)
∙ High-pressure fuel lines from the high- pressure fuel pump to the right bank
fuel rail, right bank fuel rail to the lef t
bank fuel rail, and fuel rails to fuel injec-
tors.
GENERAL INFORMATION
1-2Introduction
Page 624 of 682
The stage 1 fuel filter separates water and
filters impurities from the fuel. The stage 2
fuel filter filters finer impurities from the
diesel fuel. The stage 1 and stage 2 fuel
filters should be changed at the recom-
mended service interval or when indicated
by the information display. For additional
information, refer to “Maintenance and
schedules” and “Instruments and controls”
sections of the Titan Owner’s Manual.
The water/fuel separator should be
drained when indicated by illumination of
the water in fuel warning light.
NOTE:
Proper fuel filter maintenance and
prompt water draining when the water
in the fuel filter warning light illuminates
is essential to prevent damage to fuel
injection system components. Ignoring
the water in fuel warning light can cause
your vehicle to go into a reduced power
mode and has the potential for fuel sys-
tem damage.ENGINE PROTECTION MODE
The diesel engine in this vehicle is equipped
with electronically controlled fuel and
emission systems. Both systems monitor
engine temperatures and pressures, and
then modif y engine operation accordingly.
It is normal for the diesel engine to operate
under these modified conditions for short
durations of time. If the engine operates
under the modified conditions for ex-
tended periods of time, and the service en-
gine soon light is illuminated, have the sys-
tem checked. It is recommended that you
visit a NISSAN dealer for this service as
soon as possible.
LUBRICATION SYSTEM
It is important to change the engine oil at
the recommended service intervals to
maintain oil viscosity. Extending the oil and
filter change interval beyond the recom-
mended interval can negatively affect en-
gine performance, fuel economy and en-
gine life. For additional information, refer to
the “Do-it-yourself ” section of this manual.
GLOW PLUGS
The diesel engine glow plug system con-
sists of:∙ Eight Glow Plugs (one per cylinder)
∙ Glow Plug Control Module - Uses input from the Engine Coolant Temperature
Sensor
The glow plugs are energized momentarily
when the ignition is first turned on. The
length of time that the glow plugs are en-
ergized varies depending on engine and
environmental conditions. The required
time for the glow plugs to be energized
decreases as coolant temperature in-
creases. For additional information, refer to
the “Starting and stopping the engine” sec-
tion of this manual.
Introduction1-3
Page 658 of 682
CAUTION
Your vehicle may require more frequent
maintenance if it operates on biodiesel
blends between 6% and 10% (B6 and
B10). To avoid damage to your vehicle,
the oil, oil filter, and fuel filter will need
to be replaced af ter a shorter time in-
terval than if your vehicle was operat-
ing on pure petroleum-based diesel.
For additional information, refer to the
“Maintenance and schedules” section in
the Titan Owner’s Manual.
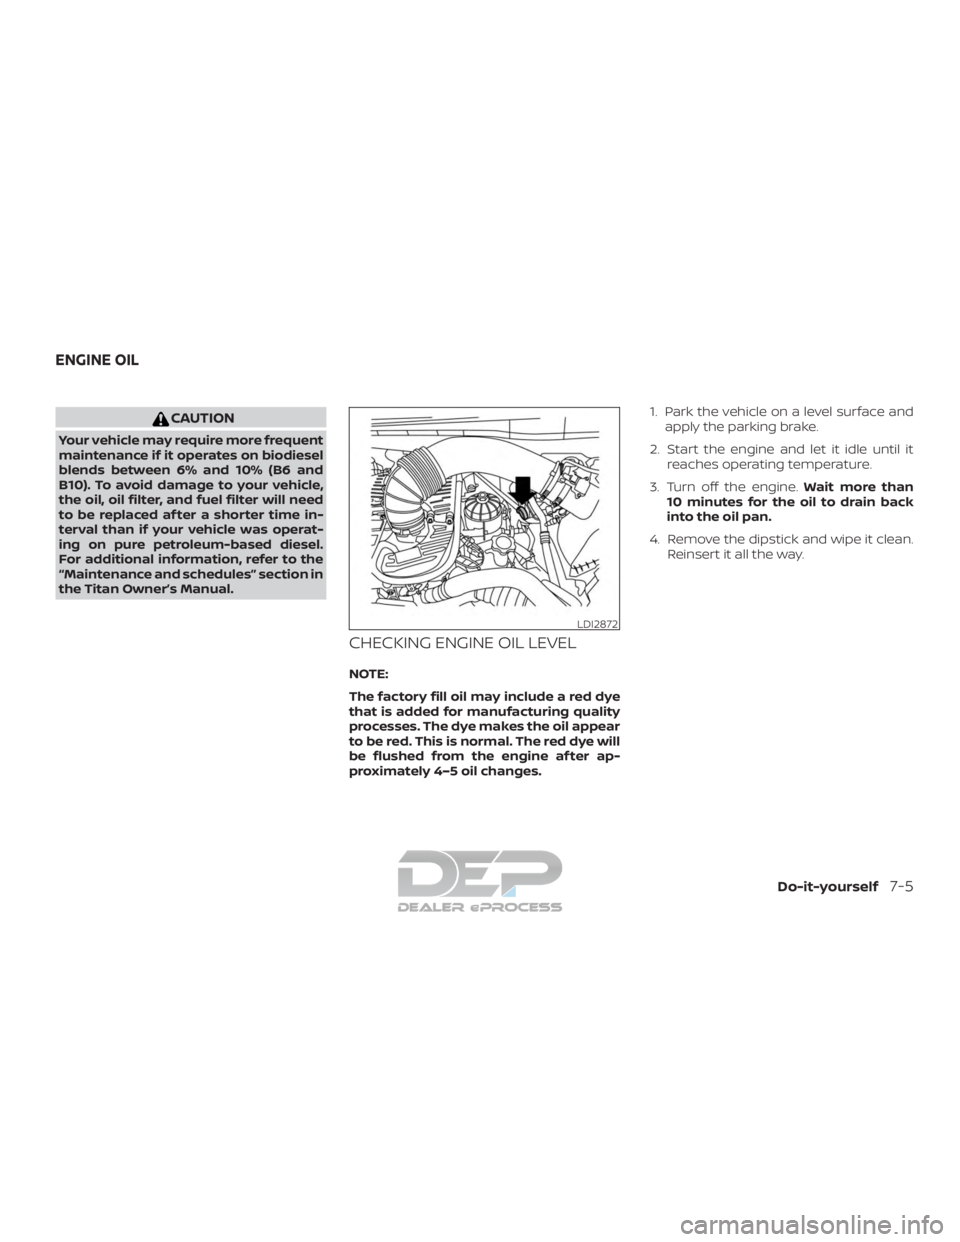
CHECKING ENGINE OIL LEVEL
NOTE:
The factory fill oil may include a red dye
that is added for manufacturing quality
processes. The dye makes the oil appear
to be red. This is normal. The red dye will
be flushed from the engine af ter ap-
proximately 4–5 oil changes.1. Park the vehicle on a level surface and
apply the parking brake.
2. Start the engine and let it idle until it reaches operating temperature.
3. Turn off the engine. Wait more than
10 minutes for the oil to drain back
into the oil pan.
4. Remove the dipstick and wipe it clean. Reinsert it all the way.
LDI2872
ENGINE OIL
Do-it-yourself7-5
Page 662 of 682
CAUTION
Be sure to remove any old gasket mate-
rial remaining on the sealing surface of
the engine. Failure to do so could lead to
an oil leak and engine damage.7. Fill the new filter with clean engine oil.
8. Coat the gasket on the new filter with clean engine oil.
9. Screw on the oil filter until a slight resis- tance is felt, then tighten an additional
3/4 turn.
10. Start the engine and check for leakage around the oil filter. Correct as required.
11. Install skid plate in reverse order of re- moval.
12. Turn the engine off and wait more than 10 minutes. Check the oil level. Add en-
gine oil if necessary.
CAUTION
Your vehicle may require more frequent
maintenance if it operates on biodiesel
blends between 6% and 10% (B6 and
B10). To avoid damage to your vehicle,
the oil, oil filter, and fuel filter will need
to be replaced af ter a shorter time in-
terval than if your vehicle was operat-
ing on pure petroleum-based diesel.
For additional information, refer to the
“Maintenance and schedules” section in
the Titan Owner’s Manual.
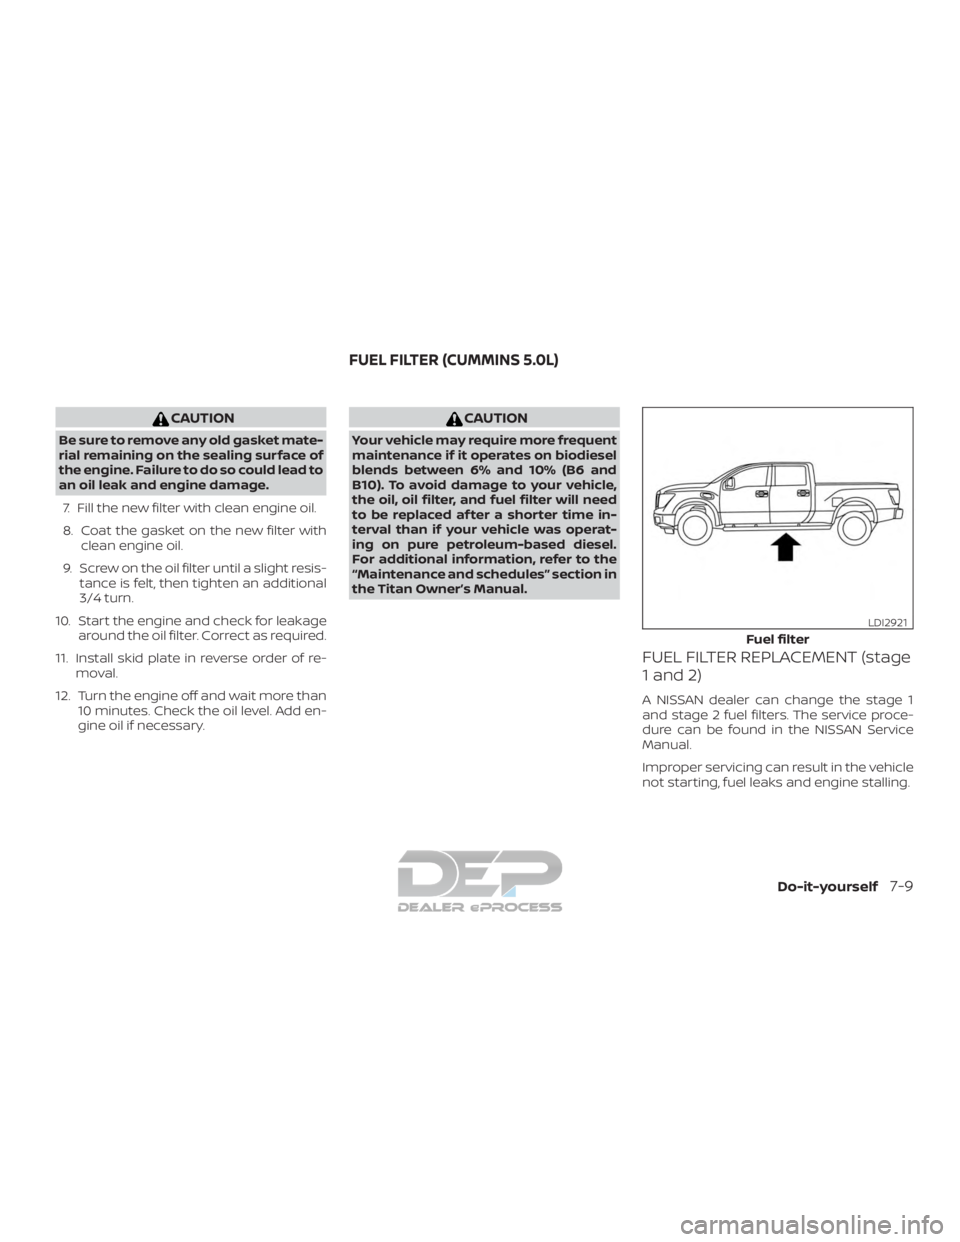
FUEL FILTER REPLACEMENT (stage
1 and 2)
A NISSAN dealer can change the stage 1
and stage 2 fuel filters. The service proce-
dure can be found in the NISSAN Service
Manual.
Improper servicing can result in the vehicle
not starting, fuel leaks and engine stalling.
Fuel filter
LDI2921
FUEL FILTER (CUMMINS 5.0L)
Do-it-yourself7-9
Page 664 of 682
AUTOMATIC REGENERATION
Automatic regeneration occurs when the
control module detects the exhaust filter
needs to be cleaned. This is a normal pro-
cess and will not typically require any op-
erator interaction.
If the automatic regeneration is not able to
clean the exhaust filter the vehicle informa-
tion display will display the following mes-
sages in order of severity:∙ Exhaust Filter Overloaded See Owner’s Manual for Drive Pattern
∙ Exhaust Filter Overloaded Engine Power Reduced See Owner’s Manual
∙ Exhaust Filter Overloaded Immediate Service Required
The instructions for these messages in the
“Meters and gauges” section of this manual
will inform the driver to modif y their driving
pattern to enable the automatic regenera-
tion process.
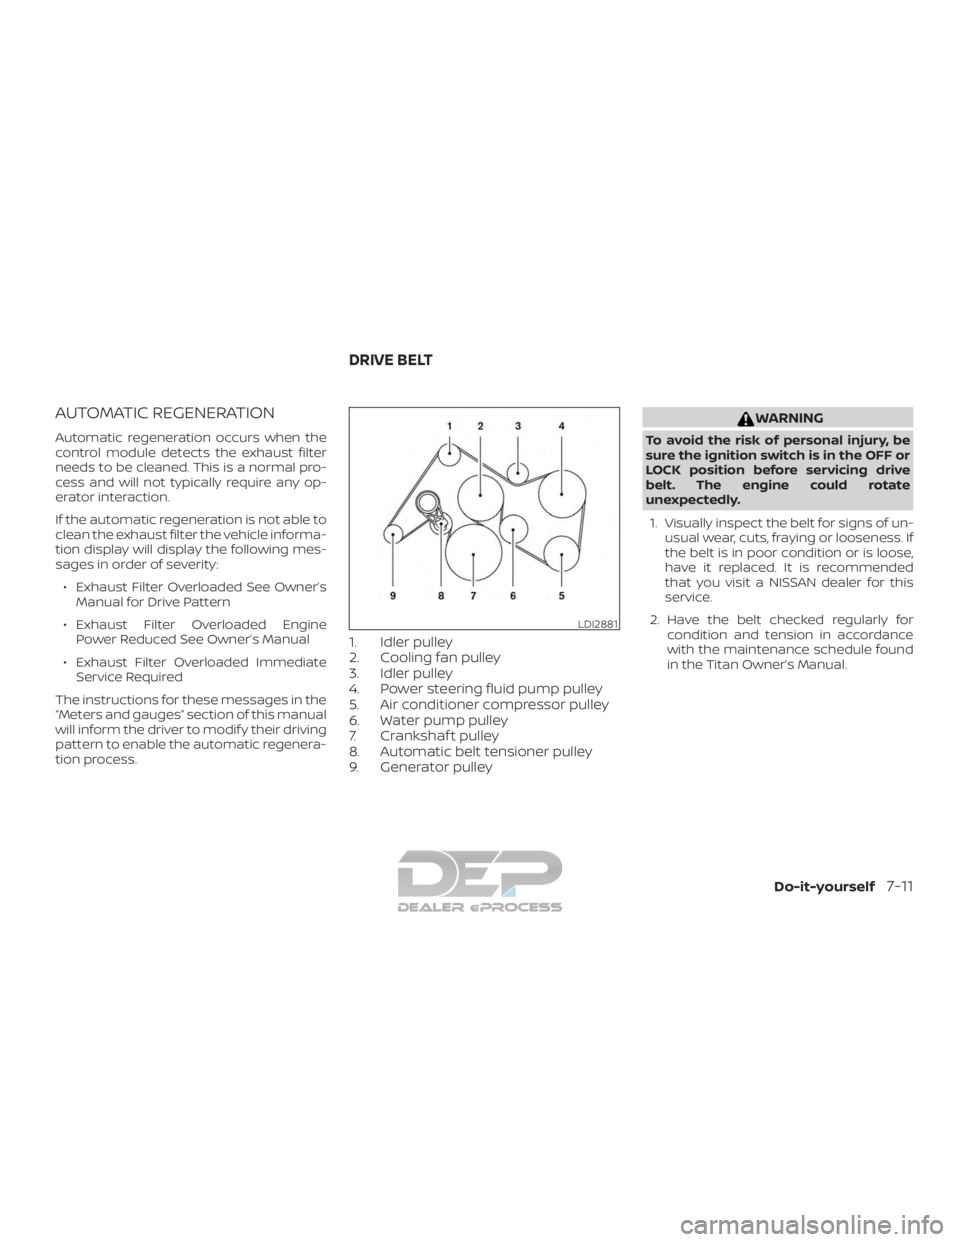
1. Idler pulley
2. Cooling fan pulley
3. Idler pulley
4. Power steering fluid pump pulley
5. Air conditioner compressor pulley
6. Water pump pulley
7. Crankshaf t pulley
8. Automatic belt tensioner pulley
9. Generator pulley
WARNING
To avoid the risk of personal injury, be
sure the ignition switch is in the OFF or
LOCK position before servicing drive
belt. The engine could rotate
unexpectedly.
1. Visually inspect the belt for signs of un- usual wear, cuts, fraying or looseness. If
the belt is in poor condition or is loose,
have it replaced. It is recommended
that you visit a NISSAN dealer for this
service.
2. Have the belt checked regularly for condition and tension in accordance
with the maintenance schedule found
in the Titan Owner’s Manual.
LDI2881
DRIVE BELT
Do-it-yourself7-11