Page 139 of 461
POWER WINDOWS
WARNING
∙ Make sure that all passengers havetheir hands, etc., inside the vehicle
while it is in motion and before closing
the windows. Use the window lock
switch to prevent unexpected use of
the power windows.
∙ To help avoid risk of injury or death through unintended operation of the
vehicle and/or its systems, including
entrapment in windows or inadver-
tent door lock activation, do not leave
children, people who require the as-
sistance of others or pets unattended
in your vehicle. Additionally, the tem-
perature inside a closed vehicle on a
warm day can quickly become high
enough to cause a significant risk of
injury or death to people and pets.
The power windows operate when the ig-
nition switch is placed in the ON position or
for a period of time af ter the ignition switch
is placed in the OFF position. If the driver’s
or passenger’s door is opened during this
period of time, the power to the windows is
canceled.
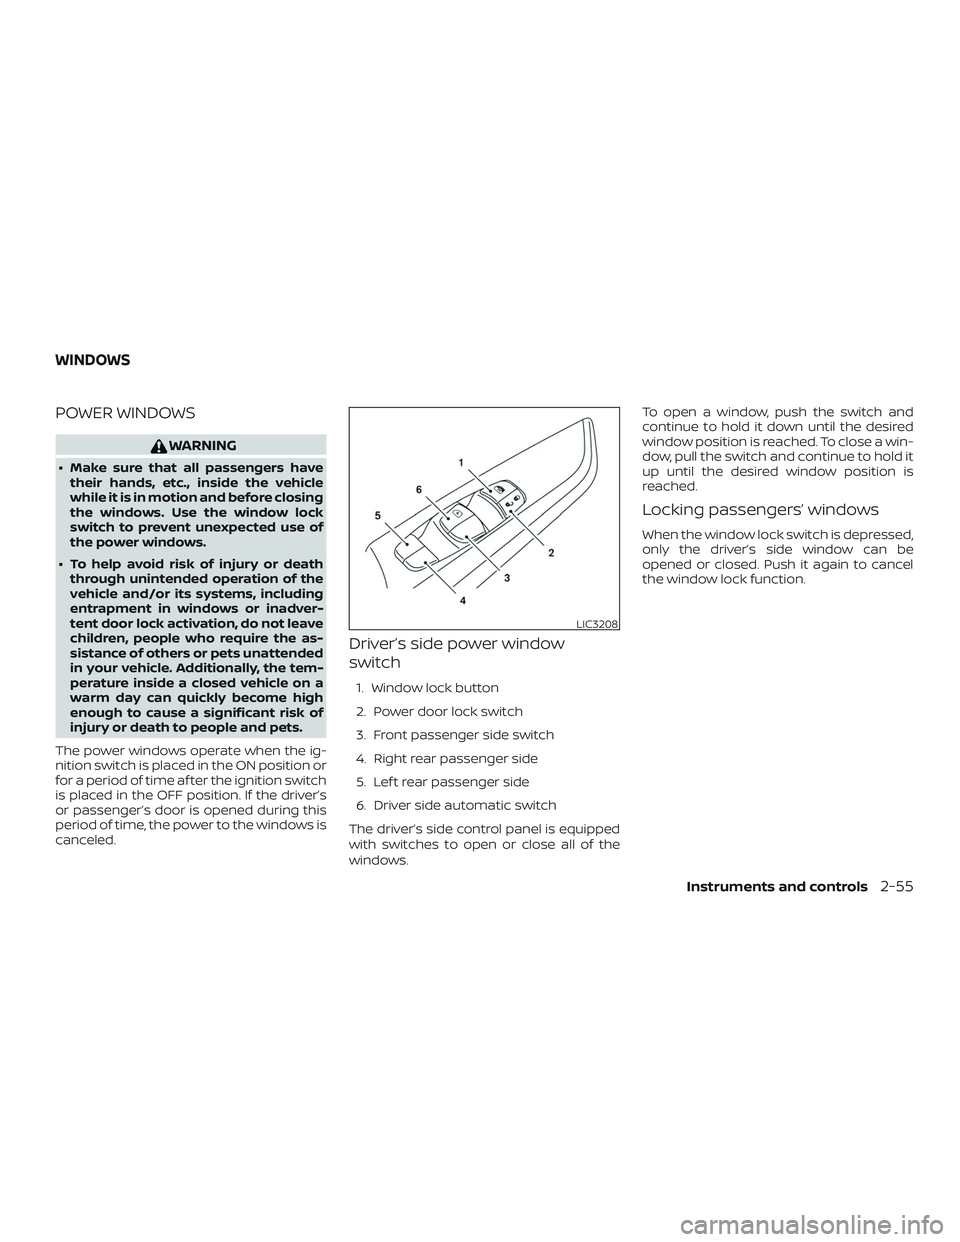
Driver’s side power window
switch
1. Window lock button
2. Power door lock switch
3. Front passenger side switch
4. Right rear passenger side
5. Lef t rear passenger side
6. Driver side automatic switch
The driver’s side control panel is equipped
with switches to open or close all of the
windows. To open a window, push the switch and
continue to hold it down until the desired
window position is reached. To close a win-
dow, pull the switch and continue to hold it
up until the desired window position is
reached.
Locking passengers’ windows
When the window lock switch is depressed,
only the driver’s side window can be
opened or closed. Push it again to cancel
the window lock function.
LIC3208
WINDOWS
Instruments and controls2-55
Page 140 of 461
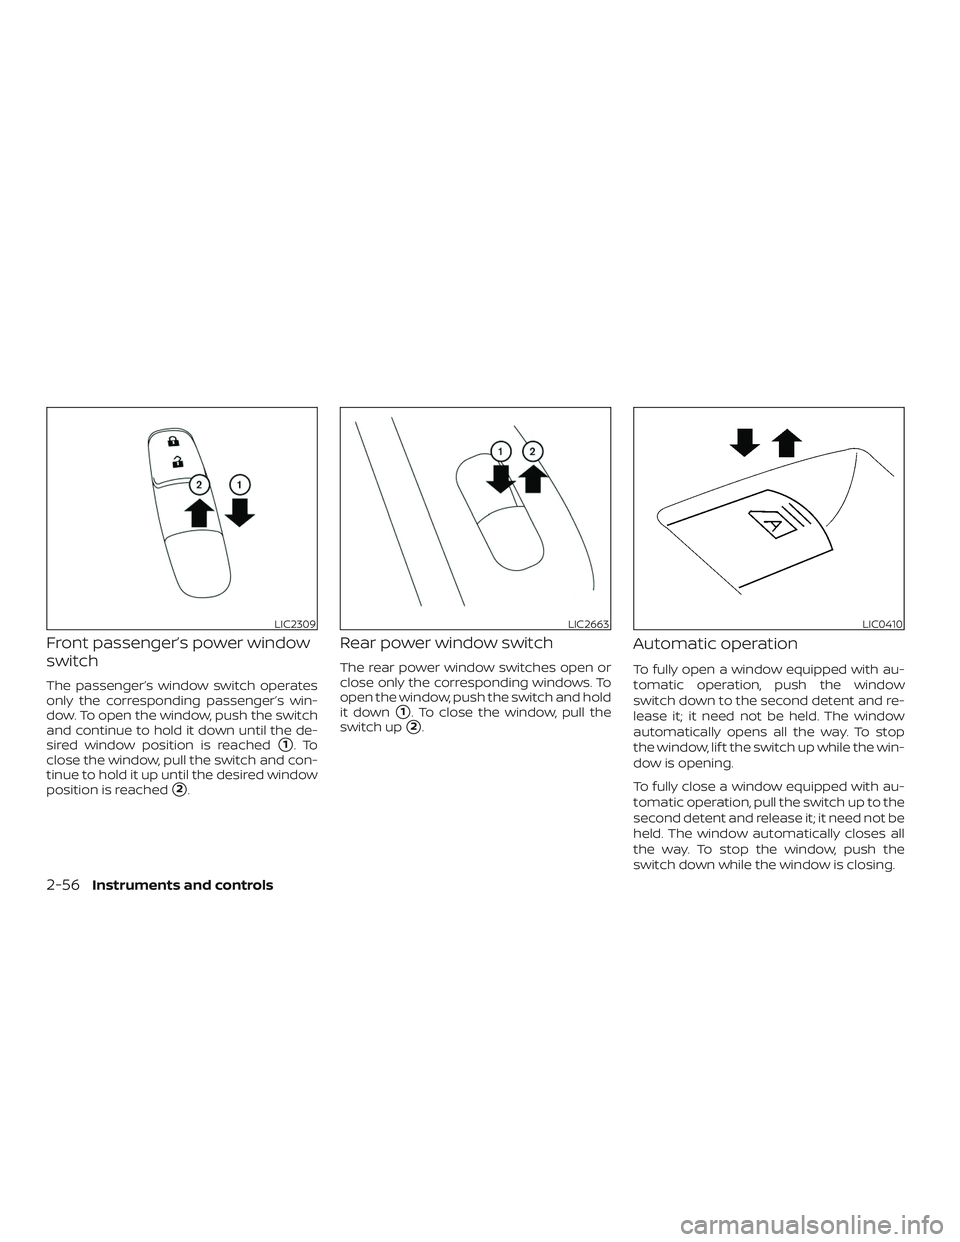
Front passenger’s power window
switch
The passenger’s window switch operates
only the corresponding passenger’s win-
dow. To open the window, push the switch
and continue to hold it down until the de-
sired window position is reached
�1.To
close the window, pull the switch and con-
tinue to hold it up until the desired window
position is reached
�2.
Rear power window switch
The rear power window switches open or
close only the corresponding windows. To
open the window, push the switch and hold
it down
�1. To close the window, pull the
switch up
�2.
Automatic operation
To fully open a window equipped with au-
tomatic operation, push the window
switch down to the second detent and re-
lease it; it need not be held. The window
automatically opens all the way. To stop
the window, lif t the switch up while the win-
dow is opening.
To fully close a window equipped with au-
tomatic operation, pull the switch up to the
second detent and release it; it need not be
held. The window automatically closes all
the way. To stop the window, push the
switch down while the window is closing.
LIC2309LIC2663LIC0410
2-56Instruments and controls
Page 141 of 461
Auto-reverse function
The auto-reverse function can be acti-
vated when a window is closed by auto-
matic operation.
Depending on the environment or driv-
ing conditions, the auto-reverse func-
tion may be activated if an impact or
load similar to something being caught
in the window occurs.
WARNING
There are some small distances imme-
diately before the closed position which
cannot be detected. Make sure that all
passengers have their hands, etc., in-
side the vehicle before closing the
window.
If the vehicle’s battery is disconnected, re-
placed, or jump started, the power window
auto-reverse function may not operate
properly. Have the power window auto-
reverse system re-initialized. It is recom-
mended that you visit a NISSAN dealer for
this service.
If the control unit detects something
caught in a window equipped with auto-
matic operation as it is closing, the window
will be immediately lowered.
When power window switch does
not operate
If the power window automatic function
(closing only) does not operate properly,
perform the following procedure to initial-
ize the power window system: 1. Place the ignition switch in the ON po- sition.
2. Open the window more than half way by operating the power window switch.
3. Pull the power window switch and hold it to close the window, and then hold
the switch more than 3 seconds af ter
the window is closed.
4. Release the power window switch. Op- erate the window by the automatic
function to confirm the initialization is
complete. The power window auto-
matically opens or closes depending
on if the automatic down or up func-
tion is selected.
5. Perform steps 2 through 4 above for other windows. If the power window function does not op-
erate properly af ter performing the above
procedure have the system checked and
repaired. It is recommended that you visit a
NISSAN dealer for this service.
Instruments and controls2-57
Page 155 of 461
When the doors are locked using one of the
following methods, the doors cannot be
opened using the inside or outside door
handles. The doors must be unlocked to
open the doors.
WARNING
∙ Always have the doors locked whiledriving. Along with the use of seat
belts, this provides greater safety in
the event of an accident by helping to
prevent persons from being thrown
from the vehicle. This also helps keep
children and others from unintention-
ally opening the doors, and will help
keep out intruders.
∙ Before opening any door, always look for and avoid oncoming traffic. ∙ To help avoid risk of injury or death
through unintended operation of the
vehicle and/or its systems, including
entrapment in windows or inadver-
tent door lock activation, do not leave
children, people who require the as-
sistance of others or pets unattended
in your vehicle. Additionally, the tem-
perature inside a closed vehicle on a
warm day can quickly become high
enough to cause a significant risk of
injury or death to people and pets.
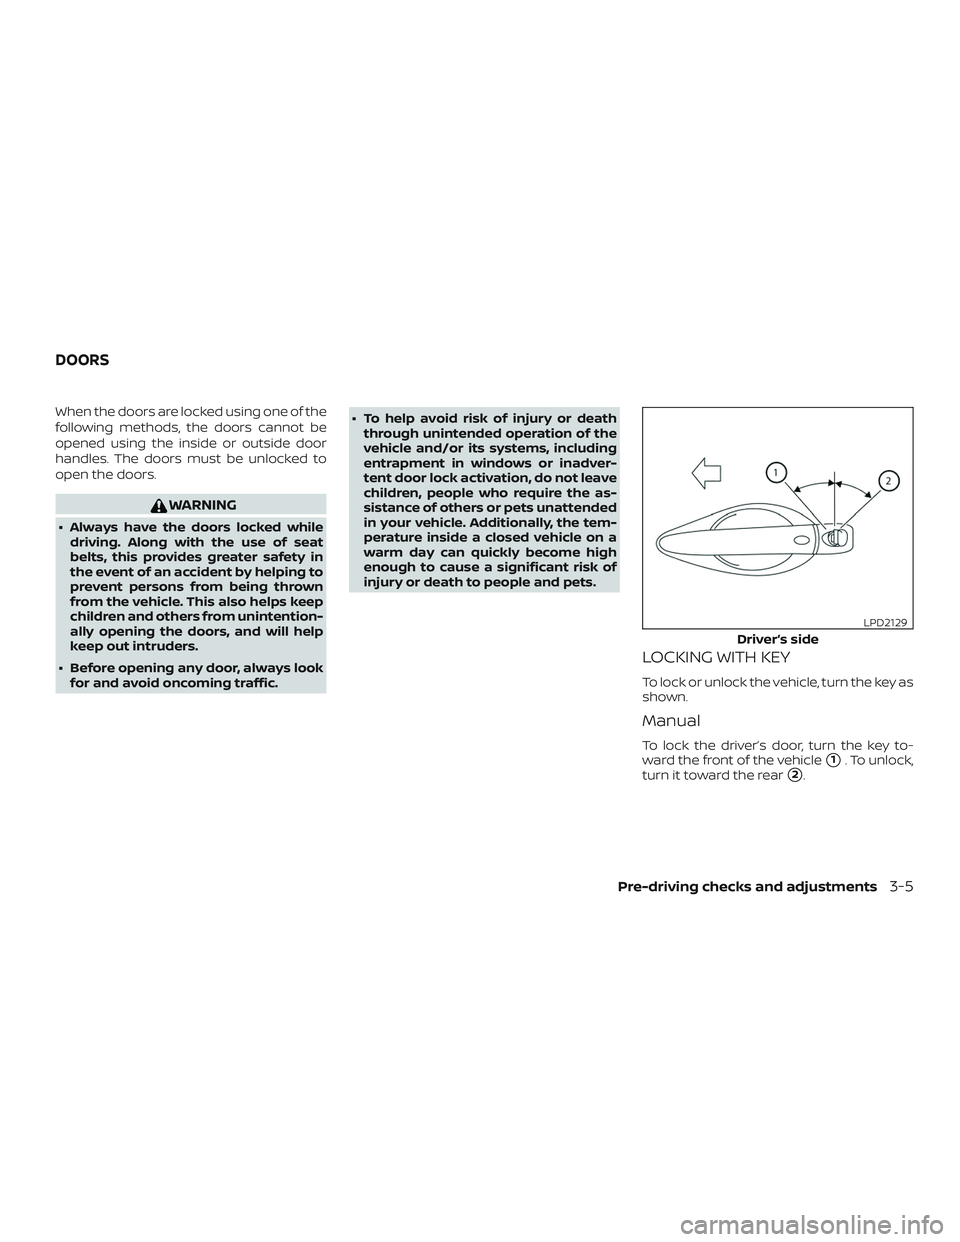
LOCKING WITH KEY
To lock or unlock the vehicle, turn the key as
shown.
Manual
To lock the driver’s door, turn the key to-
ward the front of the vehicle
�1. To unlock,
turn it toward the rear
�2.
Driver’s side
LPD2129
DOORS
Pre-driving checks and adjustments3-5
Page 183 of 461
WARNING
∙ Objects viewed in the outside mirroron the passenger side are closer than
they appear. Be careful when moving
to the right. Using only this mirror
could cause an accident. Use the in-
side mirror or glance over your shoul-
der to properly judge distances to
other objects.
∙ Do not adjust the mirrors while driv- ing. You could lose control of your ve-
hicle and cause an accident.
Manual folding outside mirrors
Pull the outside mirror toward the door to
fold it.
Heated mirrors (if so equipped)
Some outside mirrors can be heated to
defrost, defog, or de-ice for improved vis-
ibility. For additional information, refer to
“Rear window and outside mirror (if so
equipped) defroster switch” in the “Instru-
ments and controls” section of this manual.
LPD2112
Pre-driving checks and adjustments3-33
Page 192 of 461
WARNING
∙ Failure to follow the warnings and in-structions for proper use of the Rear-
View Monitor system could result in
serious injury or death. ∙
RearView Monitor is a convenience fea-
ture and is not a substitute for proper
backing. Always turn and look out the
windows and check mirrors to be sure
that it is safe to move before operating
the vehicle. Always back up slowly.∙ The system is designed as an aid to the driver in showing large stationary
objects directly behind the vehicle, to
help avoid damaging the vehicle.
LHA4780
REARVIEW MONITOR
4-8Monitor, climate, audio, phone and voice recognition systems
Page 200 of 461
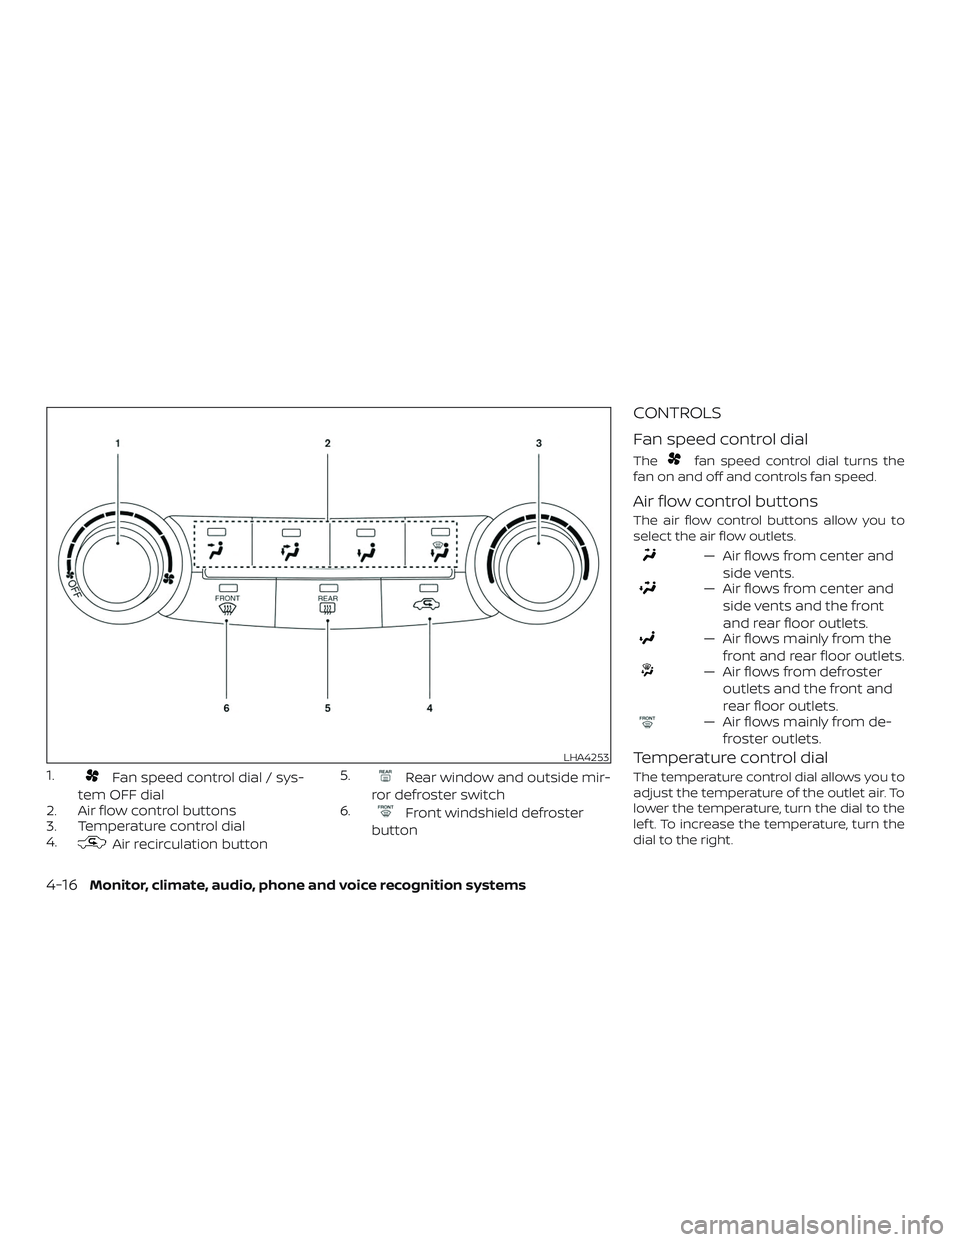
1.Fan speed control dial / sys-
tem OFF dial
2. Air flow control buttons
3. Temperature control dial
4.
Air recirculation button 5.
Rear window and outside mir-
ror defroster switch
6.
Front windshield defroster
button
CONTROLS
Fan speed control dial
Thefan speed control dial turns the
fan on and off and controls fan speed.
Air flow control buttons
The air flow control buttons allow you to
select the air flow outlets.
— Air flows from center and
side vents.
— Air flows from center andside vents and the front
and rear floor outlets.
— Air flows mainly from thefront and rear floor outlets.
— Air flows from defrosteroutlets and the front and
rear floor outlets.
— Air flows mainly from de-froster outlets.
Temperature control dial
The temperature control dial allows you to
adjust the temperature of the outlet air. To
lower the temperature, turn the dial to the
lef t. To increase the temperature, turn the
dial to the right.
LHA4253
4-16Monitor, climate, audio, phone and voice recognition systems
Page 201 of 461
Air recirculation button
On position (Indicator light on):
Interior air is recirculated inside the vehicle.
Press the
button to the ON position
when:
∙ driving on a dusty road.
∙ to prevent traffic fumes from entering passenger compartment.
Off position (Indicator light off ):
Outside air is drawn into the passenger
compartment and distributed through the
selected outlet.
Use the OFF position for normal heater op-
eration.
Rear window and outside mirror
defroster switch
For additional information, refer to “Rear
window and outside mirror (if so equipped)
defroster switch” in the “Instruments and
controls” section of this manual.
HEATER OPERATION
Heating
This mode is used to direct heated air to
the foot outlets. Some air also flows from
the defrost outlets and the side vent out-
lets.
1. Press the
button to the OFF posi-
tion for normal heating.
2. Press the
air flow control button.
3. Turn the
fan speed control dial to
the desired position.
4. Turn the temperature control dial to the desired position between the
middle and the hot position.
Ventilation
This mode directs outside air to the side
and center vents.
1. Press the
button to the OFF posi-
tion.
2. Press the
air flow control button.
3. Turn the
fan speed control dial to
the desired position.
4. Turn the temperature control dial to the desired position.
Defrosting or defogging
This mode directs the air to the defrost
outlets to defrost/defog the windows.
1. Press the
defrost/defog button.
2. Turn the
fan speed control dial to
the desired position.
3. Turn the temperature control dial to the desired position between the
middle and the hot position.
∙ To quickly remove ice or fog from the windows, turn the
fan control dial
to the highest setting and the tempera-
ture control to the full HOT position.
Bi-level heating
The bi-level mode directs warmed air to
the side and center vents and to the front
and rear floor outlets.
1. Press the
button to the OFF posi-
tion.
2. Press the
air flow control button.
3. Turn the
fan speed control dial to
the desired position.
4. Turn the temperature control dial to the desired position.
Monitor, climate, audio, phone and voice recognition systems4-17