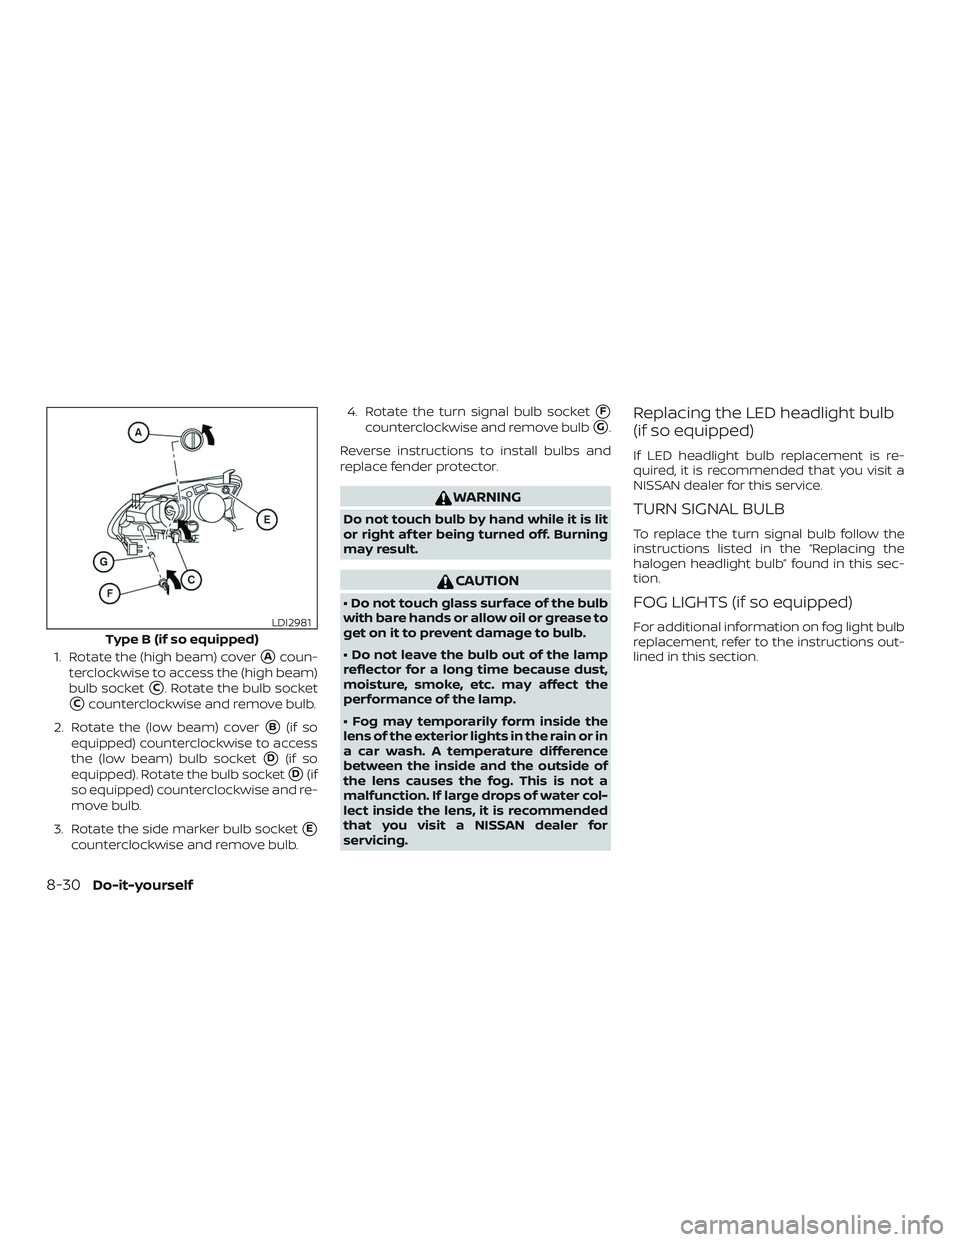
1. Rotate the (high beam) cover�Acoun-
terclockwise to access the (high beam)
bulb socket
�C. Rotate the bulb socket
�Ccounterclockwise and remove bulb.
2. Rotate the (low beam) cover
�B(if so
equipped) counterclockwise to access
the (low beam) bulb socket
�D(if so
equipped). Rotate the bulb socket
�D(if
so equipped) counterclockwise and re-
move bulb.
3. Rotate the side marker bulb socket
�E
counterclockwise and remove bulb. 4. Rotate the turn signal bulb socket
�F
counterclockwise and remove bulb�G.
Reverse instructions to install bulbs and
replace fender protector.
WARNING
Do not touch bulb by hand while it is lit
or right af ter being turned off. Burning
may result.
CAUTION
• Do not touch glass surface of the bulb
with bare hands or allow oil or grease to
get on it to prevent damage to bulb.
• Do not leave the bulb out of the lamp
reflector for a long time because dust,
moisture, smoke, etc. may affect the
performance of the lamp.
• Fog may temporarily form inside the
lens of the exterior lights in the rain or in
a car wash. A temperature difference
between the inside and the outside of
the lens causes the fog. This is not a
malfunction. If large drops of water col-
lect inside the lens, it is recommended
that you visit a NISSAN dealer for
servicing.
Replacing the LED headlight bulb
(if so equipped)
If LED headlight bulb replacement is re-
quired, it is recommended that you visit a
NISSAN dealer for this service.
TURN SIGNAL BULB
To replace the turn signal bulb follow the
instructions listed in the “Replacing the
halogen headlight bulb” found in this sec-
tion.
FOG LIGHTS (if so equipped)
For additional information on fog light bulb
replacement, refer to the instructions out-
lined in this section.Type B (if so equipped)
LDI2981
8-30Do-it-yourself
Replacing the fog light bulb
CAUTION
∙ High pressure halogen gas is sealedinside the halogen bulb. The bulb may
break if the glass envelope is
scratched or the bulb is dropped.
∙ When handling the bulb, do not touch the glass envelope.
∙
Use the same number and wattage as
originally installed as shown in the chart.
∙ Do not leave the bulb out of the fog light for a long period of time as dust,
moisture and smoke may enter the
fog light body and affect the perfor-
mance of the fog light.
1. Disconnect the negative battery cable.
2. Access to the fog light is in front of and behind the front tire and the fascia.
3. Remove the fasteners
�A; carefully pull
back the front fender protector.
4. Rotate the bulb
�Bcounterclockwise
and pull out to remove.
5. Remove by pulling straight off the fog light. Do not shake or rotate the bulb
when removing it.
6. Install the new bulb in the reverse order of removal.LDI2935
Do-it-yourself8-31
Brightness/contrast button.........4-7
Brightness control Instrument panel .............2-44
Bulb check/instrument panel ........2-14
Bulb replacement ...............8-32
C
Capacities and recommended
fuel/lubricants.................10-2
Cargo (See vehicle loading information). .10-14
Car phone or CB radio ............4-54
Check tire press .................2-6
Check tire pressure ..............2-33
Childrestraints........1-20, 1-21, 1-23, 1-25 LATCH (Lower Anchors and Tethers for
CHildren)System..............1-25
Precautions on child
restraints.........1-23, 1-29, 1-35, 1-40
Top tether strap anchor point
locations.................. .1-27
Child safety rear door lock ..........3-7
Chimes, audible reminders .........2-23
Cleaningexteriorandinterior......7-2,7-4
Clockset.....................4-5
Clutch Clutchfluid.................8-12
C.M.V.S.S. certification label .........10-12
Coldweatherdriving.............5-77
Console box ..................2-52
Console light ..................2-60
Continuously Variable Transmission
(CVT) .....................5-9,5-17
Continuously Variable Transmission
(CVT) fluid ..................8-11 Driving with Continuously Variable
Transmission (CVT)
..........5-9,5-17
Control panel buttons .............4-3
Brightness/contrast button .......4-7
Controls Audio controls (steering wheel) ....4-49
Heater and air conditioner
controls................4-21,4-29
Coolant Capacities and recommended
fuel/lubricants...............10-2
Changing engine coolant .........8-7
Checking engine coolant level ......8-6
Engine coolant temperature gauge. . .2-7
Corrosionprotection..............7-8
Cruisecontrol.................5-45
Cupholders...............2-53,2-54
Curtain side-impact air bag system
(See supplemental side air bag and
curtain side-impact air bag system) . . . .1-58
D
Daytime Running Light System . . .2-43, 2-44
Defroster switch Rear window and outside mirror
defrosterswitch..............2-40
Dimensions and weights ..........10-10
Dimmer switch for instrument panel . . .2-44
Display controls
(see control panel buttons) ..........4-3
Door locks ....................3-5
Door open warning light ...........2-15
Drivebelt ....................8-16 Driving
Coldweatherdriving...........5-77
Driving with Continuously Variable
Transmission (CVT) ..........5-9,5-17
Driving with manual
transmission .............5-10,5-23
Precautions when starting and
driving .....................5-2
Driving the vehicle ...............5-17
E
E-CALL (SOS) SWITCH .............2-48
ECO mode switch ...............5-26
Economy - fuel .................5-70
Emergency engine shutoff ..........5-13
Emission control information label . . . .10-12
Emission control system warranty . . . .10-20
Engine Before starting the engine ........5-14
Capacities and recommended
fuel/lubricants...............10-2
Changing engine coolant .........8-7
Changing engine oil ............8-8
Changing engine oil filter .........8-10
Checking engine coolant level ......8-6
Checking engine oil level .........8-7
Engine compartment check
locations...................8-3
Engine coolant temperature gauge. . .2-7
Engine cooling system ..........8-5
Engine oil ...................8-7
Engine
oil and oil filter
recommendation .............10-7
Engine oil pressure warning light ....2-15
11-2