2019 NISSAN ROGUE SPORT seat adjustment
[x] Cancel search: seat adjustmentPage 42 of 500
1-22Safety — Seats, seat belts and supplemental restraint system
.Check the child restraint in your
vehicle to be sure it is compatible with
the vehicle’s seat and seat belt sys-
tem.
. If the child restraint is compatible with
your vehicle, place your child in the
child restraint and check the various
adjustments to be sure the child
restraint is compatible with your child.
Choose a child restraint that is de-
signed for your child’s height and
weight. Always follow all recom-
mended procedures.
. If the combined weight of the child
and child restraint is less than 65 lbs
(29.5 kg), you may use either the
LATCH anchors or the seat belt to
install the child restraint (not both at
the same time).
. If the combined weight of the child
and child restraint is greater than 65
lbs (29.5 kg), use the vehicle’s seat belt
(not the lower anchors) to install the
child restraint.
. Be sure to follow the child restraint
manufacturer’s instructions for instal-
lation.
All U.S. states and Canadian provinces
or territories require that infants and
small children be restrained in an ap-
proved child restraint at all times while
the vehicle is being operated. Canadian law requires the top tether strap on
forward-facing child restraints be se-
cured to the designated anchor point
on the vehicle.
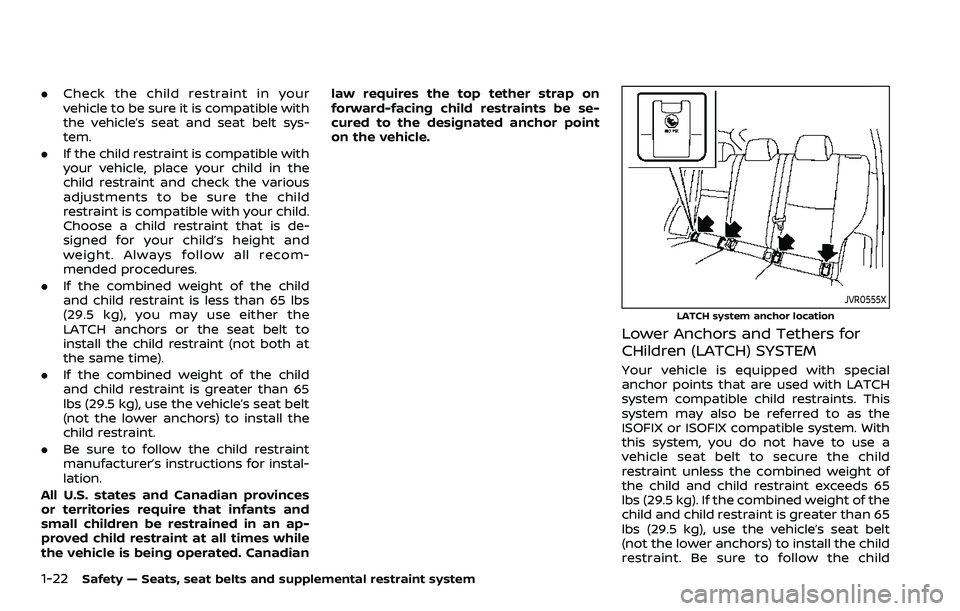
JVR0555X
LATCH system anchor location
Lower Anchors and Tethers for
CHildren (LATCH) SYSTEM
Your vehicle is equipped with special
anchor points that are used with LATCH
system compatible child restraints. This
system may also be referred to as the
ISOFIX or ISOFIX compatible system. With
this system, you do not have to use a
vehicle seat belt to secure the child
restraint unless the combined weight of
the child and child restraint exceeds 65
lbs (29.5 kg). If the combined weight of the
child and child restraint is greater than 65
lbs (29.5 kg), use the vehicle’s seat belt
(not the lower anchors) to install the child
restraint. Be sure to follow the child
Page 52 of 500
1-32Safety — Seats, seat belts and supplemental restraint system
7. Check to make sure the child restraintis properly secured prior to each use. If
the child restraint is loose, repeat
steps 1 through 6.
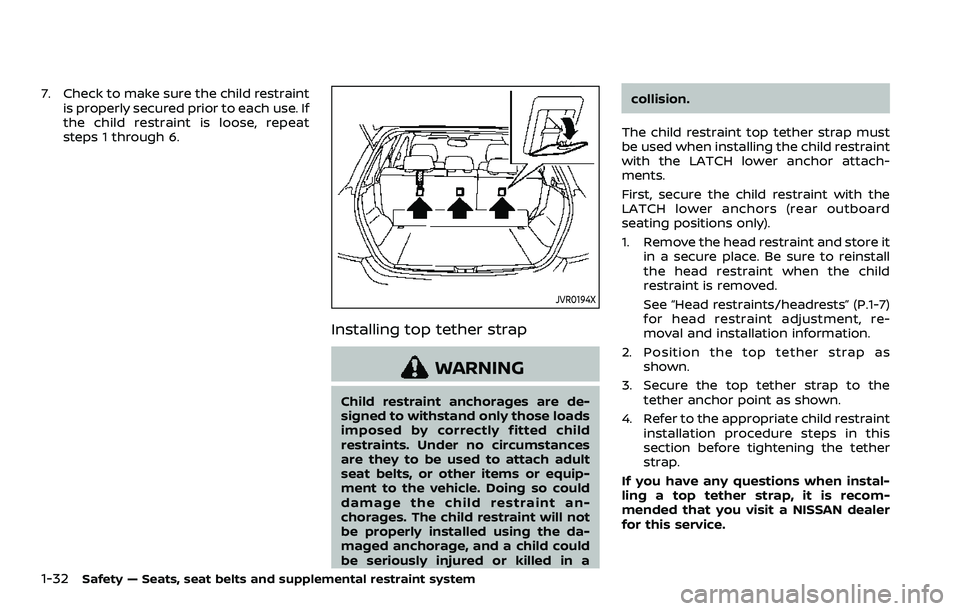
JVR0194X
Installing top tether strap
WARNING
Child restraint anchorages are de-
signed to withstand only those loads
imposed by correctly fitted child
restraints. Under no circumstances
are they to be used to attach adult
seat belts, or other items or equip-
ment to the vehicle. Doing so could
damage the child restraint an-
chorages. The child restraint will not
be properly installed using the da-
maged anchorage, and a child could
be seriously injured or killed in a collision.
The child restraint top tether strap must
be used when installing the child restraint
with the LATCH lower anchor attach-
ments.
First, secure the child restraint with the
LATCH lower anchors (rear outboard
seating positions only).
1. Remove the head restraint and store it in a secure place. Be sure to reinstall
the head restraint when the child
restraint is removed.
See “Head restraints/headrests” (P.1-7)
for head restraint adjustment, re-
moval and installation information.
2. Position the top tether strap as shown.
3. Secure the top tether strap to the tether anchor point as shown.
4. Refer to the appropriate child restraint installation procedure steps in this
section before tightening the tether
strap.
If you have any questions when instal-
ling a top tether strap, it is recom-
mended that you visit a NISSAN dealer
for this service.
Page 56 of 500
1-36Safety — Seats, seat belts and supplemental restraint system
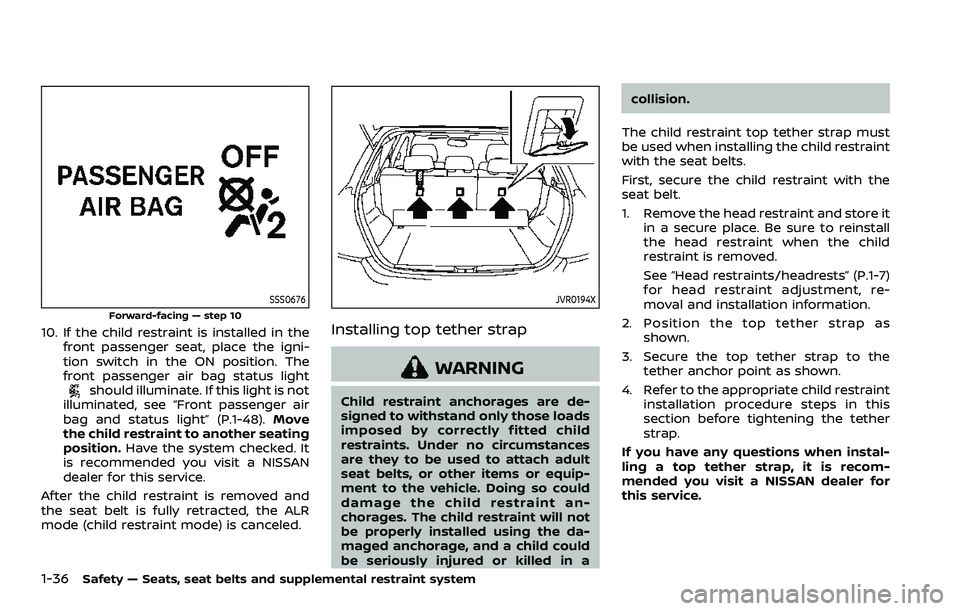
SSS0676
Forward-facing — step 10
10. If the child restraint is installed in thefront passenger seat, place the igni-
tion switch in the ON position. The
front passenger air bag status light
should illuminate. If this light is not
illuminated, see “Front passenger air
bag and status light” (P.1-48). Move
the child restraint to another seating
position. Have the system checked. It
is recommended you visit a NISSAN
dealer for this service.
After the child restraint is removed and
the seat belt is fully retracted, the ALR
mode (child restraint mode) is canceled.
JVR0194X
Installing top tether strap
WARNING
Child restraint anchorages are de-
signed to withstand only those loads
imposed by correctly fitted child
restraints. Under no circumstances
are they to be used to attach adult
seat belts, or other items or equip-
ment to the vehicle. Doing so could
damage the child restraint an-
chorages. The child restraint will not
be properly installed using the da-
maged anchorage, and a child could
be seriously injured or killed in a collision.
The child restraint top tether strap must
be used when installing the child restraint
with the seat belts.
First, secure the child restraint with the
seat belt.
1. Remove the head restraint and store it in a secure place. Be sure to reinstall
the head restraint when the child
restraint is removed.
See “Head restraints/headrests” (P.1-7)
for head restraint adjustment, re-
moval and installation information.
2. Position the top tether strap as shown.
3. Secure the top tether strap to the tether anchor point as shown.
4. Refer to the appropriate child restraint installation procedure steps in this
section before tightening the tether
strap.
If you have any questions when instal-
ling a top tether strap, it is recom-
mended you visit a NISSAN dealer for
this service.
Page 58 of 500
1-38Safety — Seats, seat belts and supplemental restraint system
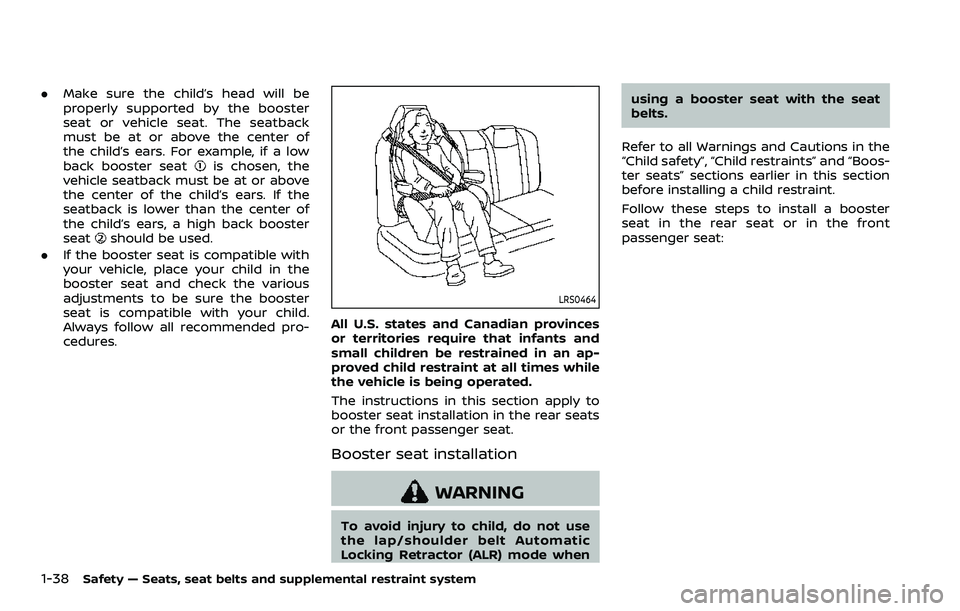
.Make sure the child’s head will be
properly supported by the booster
seat or vehicle seat. The seatback
must be at or above the center of
the child’s ears. For example, if a low
back booster seat
is chosen, the
vehicle seatback must be at or above
the center of the child’s ears. If the
seatback is lower than the center of
the child’s ears, a high back booster
seat
should be used.
. If the booster seat is compatible with
your vehicle, place your child in the
booster seat and check the various
adjustments to be sure the booster
seat is compatible with your child.
Always follow all recommended pro-
cedures.
LRS0464
All U.S. states and Canadian provinces
or territories require that infants and
small children be restrained in an ap-
proved child restraint at all times while
the vehicle is being operated.
The instructions in this section apply to
booster seat installation in the rear seats
or the front passenger seat.
Booster seat installation
WARNING
To avoid injury to child, do not use
the lap/shoulder belt Automatic
Locking Retractor (ALR) mode when using a booster seat with the seat
belts.
Refer to all Warnings and Cautions in the
“Child safety”, “Child restraints” and “Boos-
ter seats” sections earlier in this section
before installing a child restraint.
Follow these steps to install a booster
seat in the rear seat or in the front
passenger seat:
Page 59 of 500
SSS0640
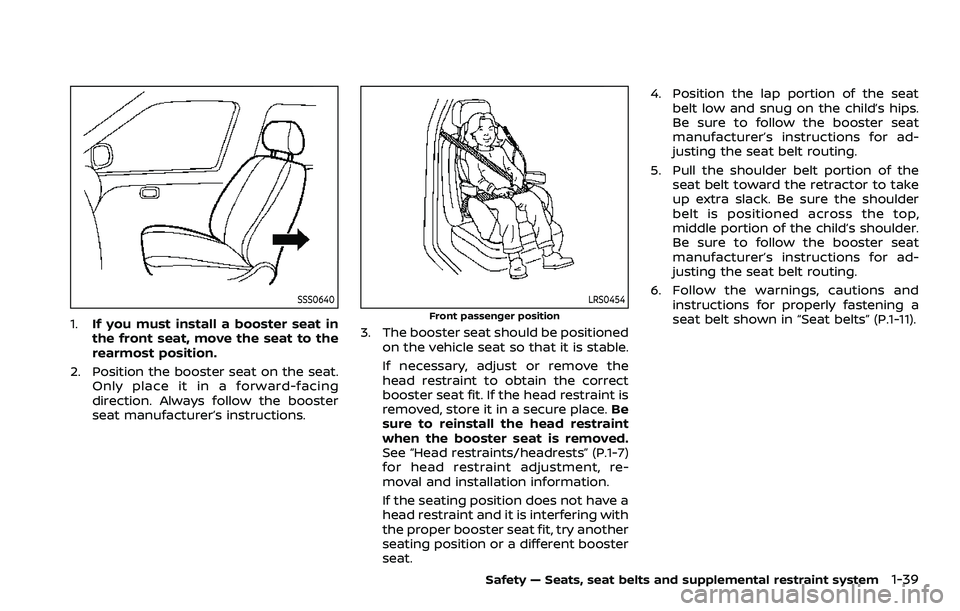
1.If you must install a booster seat in
the front seat, move the seat to the
rearmost position.
2. Position the booster seat on the seat. Only place it in a forward-facing
direction. Always follow the booster
seat manufacturer’s instructions.
LRS0454
Front passenger position
3. The booster seat should be positioned
on the vehicle seat so that it is stable.
If necessary, adjust or remove the
head restraint to obtain the correct
booster seat fit. If the head restraint is
removed, store it in a secure place. Be
sure to reinstall the head restraint
when the booster seat is removed.
See “Head restraints/headrests” (P.1-7)
for head restraint adjustment, re-
moval and installation information.
If the seating position does not have a
head restraint and it is interfering with
the proper booster seat fit, try another
seating position or a different booster
seat. 4. Position the lap portion of the seat
belt low and snug on the child’s hips.
Be sure to follow the booster seat
manufacturer’s instructions for ad-
justing the seat belt routing.
5. Pull the shoulder belt portion of the seat belt toward the retractor to take
up extra slack. Be sure the shoulder
belt is positioned across the top,
middle portion of the child’s shoulder.
Be sure to follow the booster seat
manufacturer’s instructions for ad-
justing the seat belt routing.
6. Follow the warnings, cautions and instructions for properly fastening a
seat belt shown in “Seat belts” (P.1-11).
Safety — Seats, seat belts and supplemental restraint system1-39
Page 165 of 500
CAUTION
Always carry the mechanical key
installed in the Intelligent Key.
WARNING
.Always have the doors locked
while driving. Along with the use
of seat belts, this provides great-
er safety in the event of an
accident by helping to prevent
persons from being thrown from
the vehicle. This also helps keep
children and others from unin-
tentionally opening the doors,
and will help keep out intruders.
. Before opening any door, always
look for and avoid oncoming
traffic.
. To help avoid risk of injury or
death through unintended opera-
tion of the vehicle and or its
systems, including entrapment
in windows or inadvertent door
lock activation, do not leave chil-
dren, people who require the
assistance of others or pets un-
attended in your vehicle. Addi-
tionally, the temperature inside a
closed vehicle on a warm day can
quickly become high enough to
cause a significant risk of injury
or death to people and pets.
SPA2457
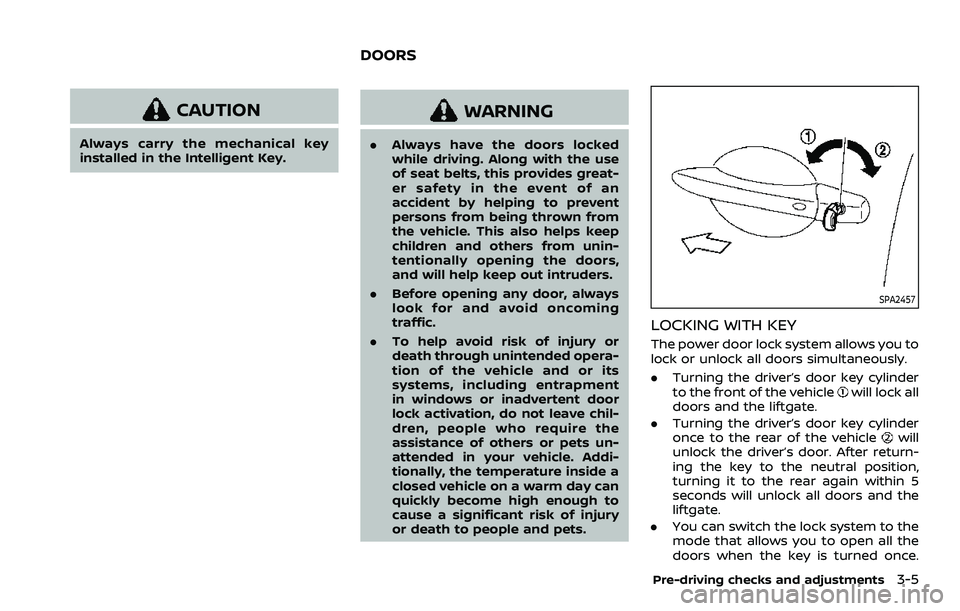
LOCKING WITH KEY
The power door lock system allows you to
lock or unlock all doors simultaneously.
.Turning the driver’s door key cylinder
to the front of the vehicle
will lock all
doors and the liftgate.
. Turning the driver’s door key cylinder
once to the rear of the vehicle
will
unlock the driver’s door. After return-
ing the key to the neutral position,
turning it to the rear again within 5
seconds will unlock all doors and the
liftgate.
. You can switch the lock system to the
mode that allows you to open all the
doors when the key is turned once.
Pre-driving checks and adjustments3-5
DOORS
Page 177 of 500
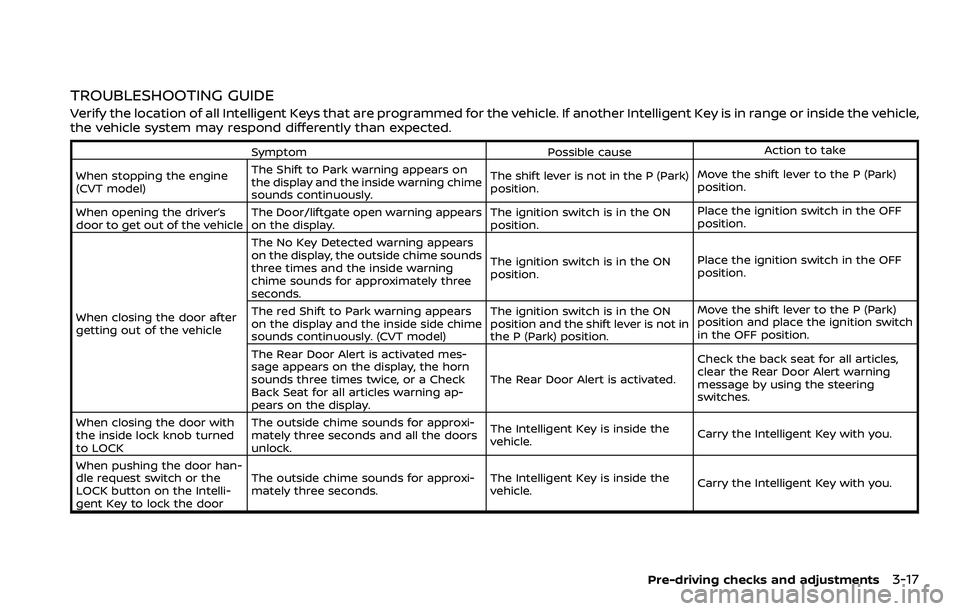
TROUBLESHOOTING GUIDE
Verify the location of all Intelligent Keys that are programmed for the vehicle. If another Intelligent Key is in range or inside the vehicle,
the vehicle system may respond differently than expected.
SymptomPossible causeAction to take
When stopping the engine
(CVT model) The Shift to Park warning appears on
the display and the inside warning chime
sounds continuously. The shift lever is not in the P (Park)
position.
Move the shift lever to the P (Park)
position.
When opening the driver’s
door to get out of the vehicle The Door/liftgate open warning appears
on the display. The ignition switch is in the ON
position.Place the ignition switch in the OFF
position.
When closing the door after
getting out of the vehicle The No Key Detected warning appears
on the display, the outside chime sounds
three times and the inside warning
chime sounds for approximately three
seconds.
The ignition switch is in the ON
position.
Place the ignition switch in the OFF
position.
The red Shift to Park warning appears
on the display and the inside side chime
sounds continuously. (CVT model) The ignition switch is in the ON
position and the shift lever is not in
the P (Park) position.Move the shift lever to the P (Park)
position and place the ignition switch
in the OFF position.
The Rear Door Alert is activated mes-
sage appears on the display, the horn
sounds three times twice, or a Check
Back Seat for all articles warning ap-
pears on the display. The Rear Door Alert is activated.
Check the back seat for all articles,
clear the Rear Door Alert warning
message by using the steering
switches.
When closing the door with
the inside lock knob turned
to LOCK The outside chime sounds for approxi-
mately three seconds and all the doors
unlock.
The Intelligent Key is inside the
vehicle.
Carry the Intelligent Key with you.
When pushing the door han-
dle request switch or the
LOCK button on the Intelli-
gent Key to lock the door The outside chime sounds for approxi-
mately three seconds.
The Intelligent Key is inside the
vehicle.
Carry the Intelligent Key with you.
Pre-driving checks and adjustments3-17
Page 187 of 500
CAUTION
Do not use accessory carriers that
attach to the liftgate. Doing so will
cause damage to the vehicle.
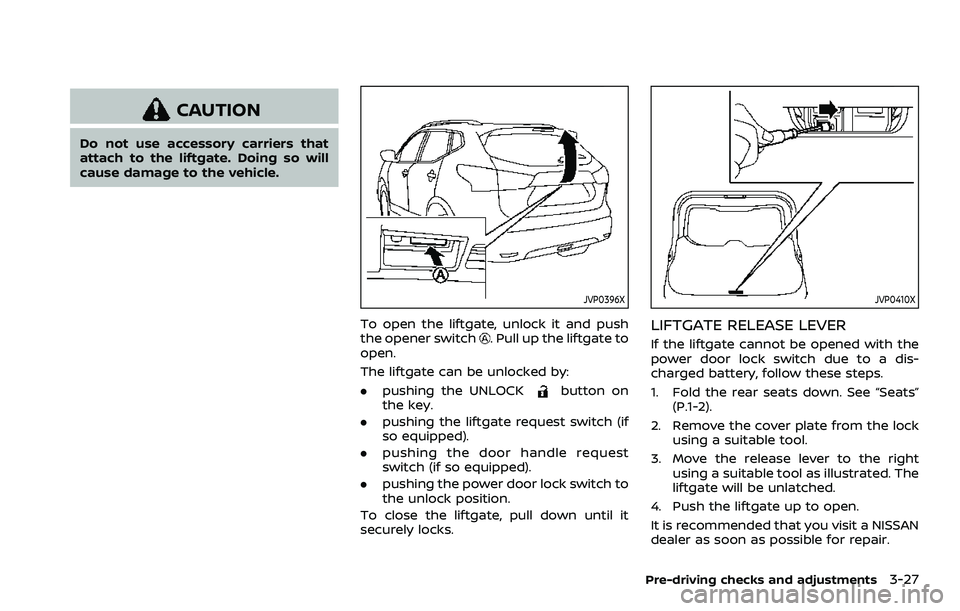
JVP0396X
To open the liftgate, unlock it and push
the opener switch. Pull up the liftgate to
open.
The liftgate can be unlocked by:
. pushing the UNLOCK
button on
the key.
. pushing the liftgate request switch (if
so equipped).
. pushing the door handle request
switch (if so equipped).
. pushing the power door lock switch to
the unlock position.
To close the liftgate, pull down until it
securely locks.
JVP0410X
LIFTGATE RELEASE LEVER
If the liftgate cannot be opened with the
power door lock switch due to a dis-
charged battery, follow these steps.
1. Fold the rear seats down. See “Seats” (P.1-2).
2. Remove the cover plate from the lock using a suitable tool.
3. Move the release lever to the right using a suitable tool as illustrated. The
liftgate will be unlatched.
4. Push the liftgate up to open.
It is recommended that you visit a NISSAN
dealer as soon as possible for repair.
Pre-driving checks and adjustments3-27