2019 NISSAN ROGUE SPORT engine
[x] Cancel search: enginePage 269 of 500
WAF0078X
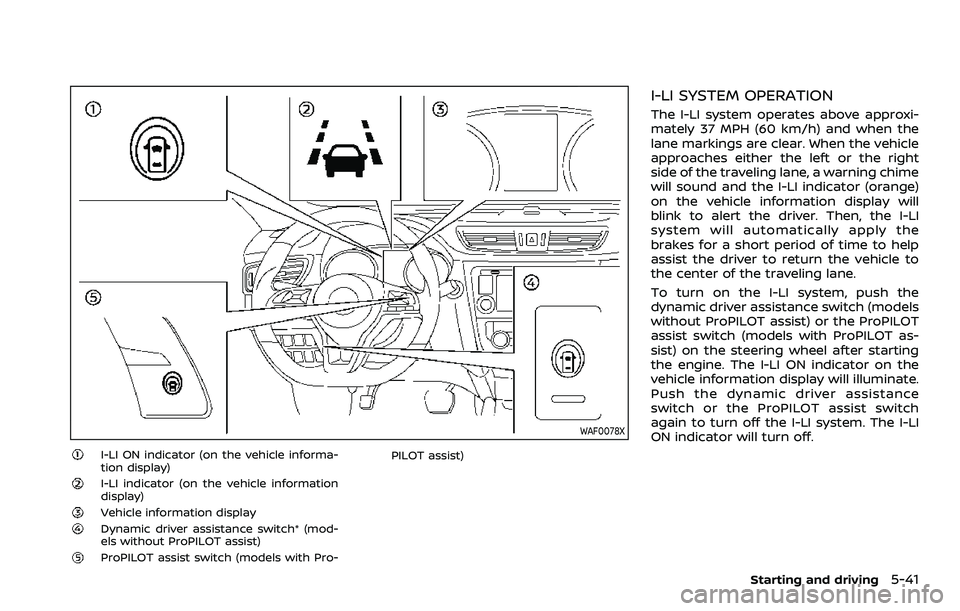
I-LI ON indicator (on the vehicle informa-
tion display)
I-LI indicator (on the vehicle information
display)
Vehicle information displayDynamic driver assistance switch* (mod-
els without ProPILOT assist)
ProPILOT assist switch (models with Pro-PILOT assist)
I-LI SYSTEM OPERATION
The I-LI system operates above approxi-
mately 37 MPH (60 km/h) and when the
lane markings are clear. When the vehicle
approaches either the left or the right
side of the traveling lane, a warning chime
will sound and the I-LI indicator (orange)
on the vehicle information display will
blink to alert the driver. Then, the I-LI
system will automatically apply the
brakes for a short period of time to help
assist the driver to return the vehicle to
the center of the traveling lane.
To turn on the I-LI system, push the
dynamic driver assistance switch (models
without ProPILOT assist) or the ProPILOT
assist switch (models with ProPILOT as-
sist) on the steering wheel after starting
the engine. The I-LI ON indicator on the
vehicle information display will illuminate.
Push the dynamic driver assistance
switch or the ProPILOT assist switch
again to turn off the I-LI system. The I-LI
ON indicator will turn off.
Starting and driving5-41
Page 271 of 500
information, see “ProPILOT assist” (P.5-
86).
For models without ProPILOT assist
1. To turn on the I-LI system, push thedynamic driver assistance switch on
the instrument panel after starting
the engine.
2. The I-LI ON indicator on the Vehicle Information Display will appear.
3. Push the dynamic driver assistance switch again to turn off the I-LI
system. The I-LI ON indicator on the
vehicle information display will turn
off. The I-LI system will be automati-
cally turned off when the engine off.
I-LI SYSTEM LIMITATIONS
WARNING
Listed below are the system limita-
tions for the I-LI system. Failure to
follow the warnings and instructions
for proper use of the I-LI system
could result in serious injury or
death.
.The I-LI system may activate if
you change lanes without first
activating your turn signal or, for
example, if a construction zone
directs traffic to cross an existing lane marker. If this occurs you
may need to apply corrective
steering to complete your lane
change.
. Because the I-LI may not activate
under the road, weather, and lane
marker conditions described in
this section, it may not activate
every time your vehicle begins to
leave its lane and you will need to
apply corrective steering.
. The I-LI system will not operate at
speeds below approximately 37
MPH (60 km/h) or if it cannot
detect lane markers.
. Do not use the I-LI system under
the following conditions as it may
not function properly:
— During bad weather (rain, fog,
snow, etc.).
— When driving on slippery roads, such as on ice or snow.
— When driving on winding or uneven roads.
— When there is a lane closure due to road repairs.
— When driving in a makeshift or temporary lane. — When driving on roads where
the lane width is too narrow.
— When driving without normal tire conditions (for example,
tire wear, low tire pressure,
installation of spare tire, tire
chains, non-standard wheels).
— When the vehicle is equipped with non-original brake parts
or suspension parts.
. The system may not function
properly under the following con-
ditions:
— On roads where there are
multiple parallel lane markers;
lane markers that are faded or
not painted clearly; yellow
painted lane markers; non-
standard lane markers; or
lane markers covered with
water, dirt, snow, etc.
— On roads where discontinued lane markers are still detect-
able.
— On roads where there are sharp curves.
— On roads where there are sharply contrasting objects,
such as shadows, snow,
water, wheel ruts, seams or
Starting and driving5-43
Page 273 of 500
off.
Action to take:
When the above conditions no longer
exist, turn off the I-LI system. Push the
dynamic driver assistance switch (models
without ProPILOT assist) or the ProPILOT
assist switch (models with ProPILOT as-
sist) again to turn the I-LI system back on.
Temporary disabled status at high tem-
perature:
If the vehicle is parked in direct sunlight
under high temperature conditions (over
approximately 104°F (40°C)) and then the
I-LI system is turned on, the I-LI system
may be deactivated automatically and
the following message will appear on
the vehicle information display: “Unavail-
able: High Cabin Temperature.” When the
interior temperature is reduced, the sys-
tem will resume operating automatically.
SYSTEM MALFUNCTION
If the I-LI system malfunctions, it will
cancel automatically. The I-LI indicator
(orange) will illuminate and the “Malfunc-
tion” warning message will appear in the
display.
If the I-LI indicator (orange) illuminates in
the display, pull off the road to a safe
location. Turn the engine off and restart
the engine. If the I-LI indicator (orange)
continues to illuminate, have the I-LI system checked. It is recommended that
you visit a NISSAN dealer for this service.
JVS1079X
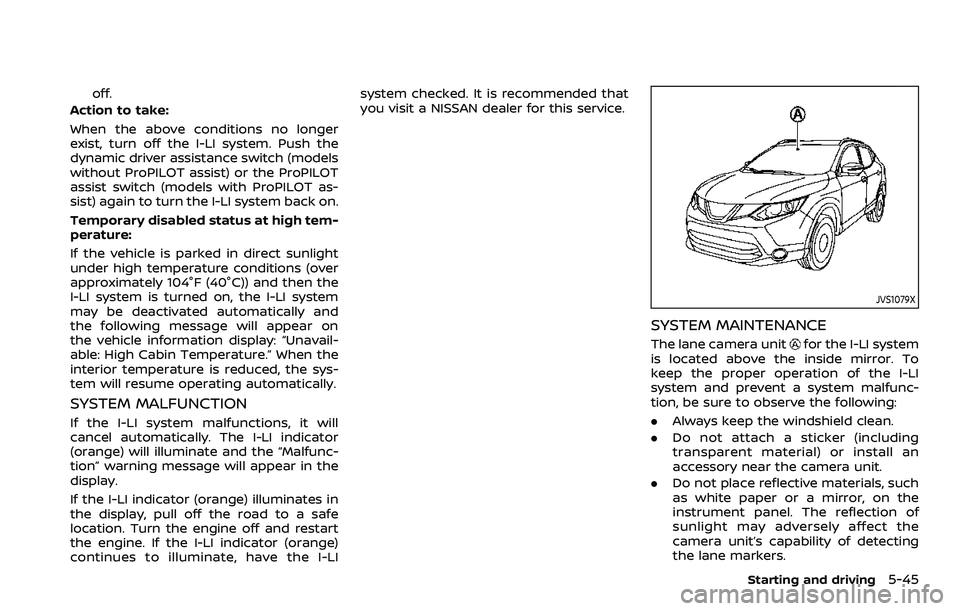
SYSTEM MAINTENANCE
The lane camera unitfor the I-LI system
is located above the inside mirror. To
keep the proper operation of the I-LI
system and prevent a system malfunc-
tion, be sure to observe the following:
. Always keep the windshield clean.
. Do not attach a sticker (including
transparent material) or install an
accessory near the camera unit.
. Do not place reflective materials, such
as white paper or a mirror, on the
instrument panel. The reflection of
sunlight may adversely affect the
camera unit’s capability of detecting
the lane markers.
Starting and driving5-45
Page 277 of 500
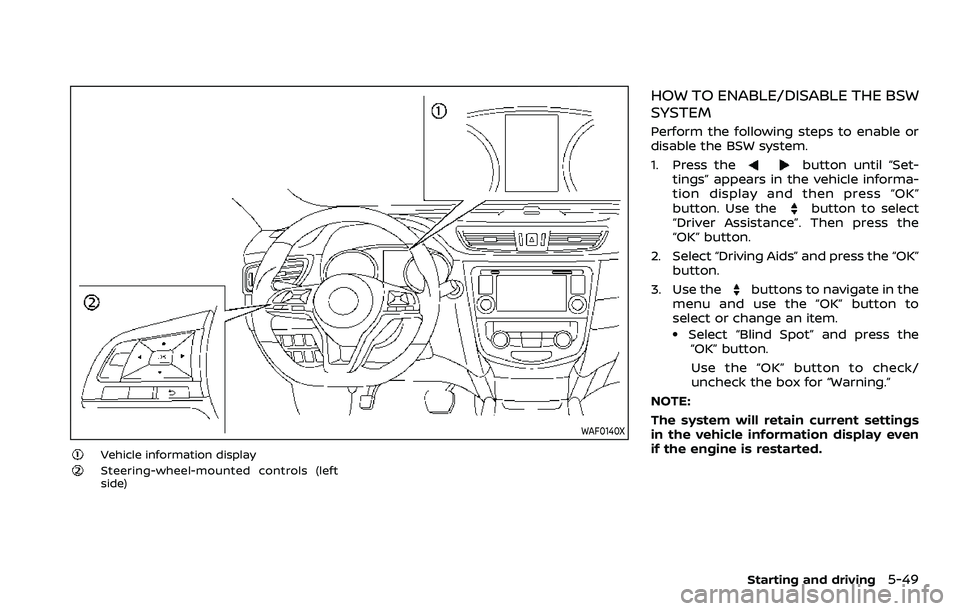
WAF0140X
Vehicle information displaySteering-wheel-mounted controls (left
side)
HOW TO ENABLE/DISABLE THE BSW
SYSTEM
Perform the following steps to enable or
disable the BSW system.
1. Press the
button until “Set-
tings” appears in the vehicle informa-
tion display and then press “OK”
button. Use the
button to select
“Driver Assistance”. Then press the
“OK” button.
2. Select “Driving Aids” and press the “OK” button.
3. Use the
buttons to navigate in the
menu and use the “OK” button to
select or change an item.
.Select “Blind Spot” and press the “OK” button.
Use the “OK” button to check/
uncheck the box for “Warning.”
NOTE:
The system will retain current settings
in the vehicle information display even
if the engine is restarted.
Starting and driving5-49
Page 283 of 500
SYSTEM MALFUNCTION
When the BSW system malfunctions, it will
be turned off automatically and the
system malfunction warning message will
appear in the vehicle information display.
NOTE:
If the BSW system stops working, the
RCTA system will also stop working.
Action to take:
Stop the vehicle in a safe location, turn
the engine off and restart the engine. If
the message continues to appear, have
the BSW system checked. It is recom-
mended that you visit a NISSAN dealer for
this service.
JVS0649X
SYSTEM MAINTENANCE
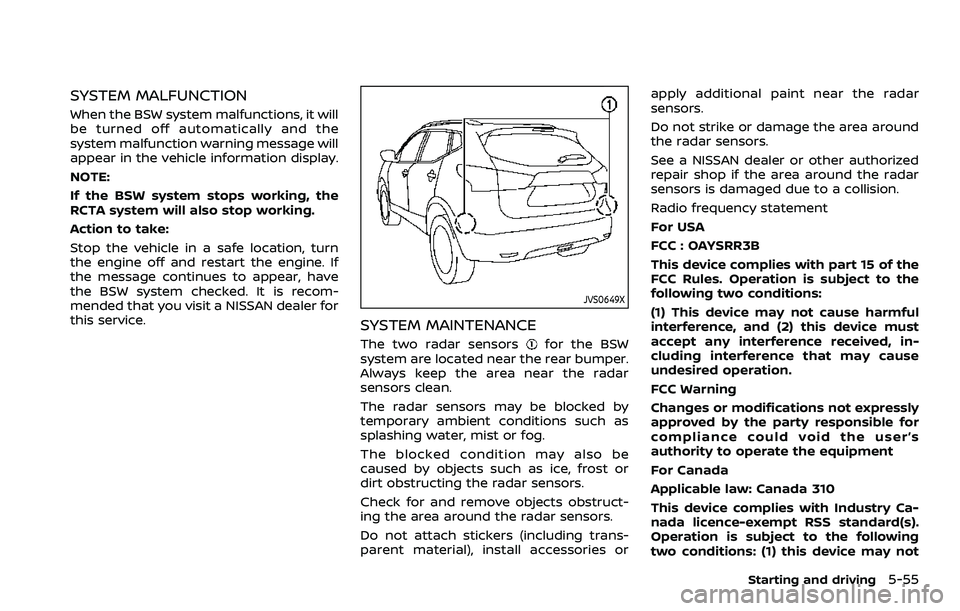
The two radar sensorsfor the BSW
system are located near the rear bumper.
Always keep the area near the radar
sensors clean.
The radar sensors may be blocked by
temporary ambient conditions such as
splashing water, mist or fog.
The blocked condition may also be
caused by objects such as ice, frost or
dirt obstructing the radar sensors.
Check for and remove objects obstruct-
ing the area around the radar sensors.
Do not attach stickers (including trans-
parent material), install accessories or apply additional paint near the radar
sensors.
Do not strike or damage the area around
the radar sensors.
See a NISSAN dealer or other authorized
repair shop if the area around the radar
sensors is damaged due to a collision.
Radio frequency statement
For USA
FCC : OAYSRR3B
This device complies with part 15 of the
FCC Rules. Operation is subject to the
following two conditions:
(1) This device may not cause harmful
interference, and (2) this device must
accept any interference received, in-
cluding interference that may cause
undesired operation.
FCC Warning
Changes or modifications not expressly
approved by the party responsible for
compliance could void the user’s
authority to operate the equipment
For Canada
Applicable law: Canada 310
This device complies with Industry Ca-
nada licence-exempt RSS standard(s).
Operation is subject to the following
two conditions: (1) this device may not
Starting and driving5-55
Page 287 of 500
JVS0942X
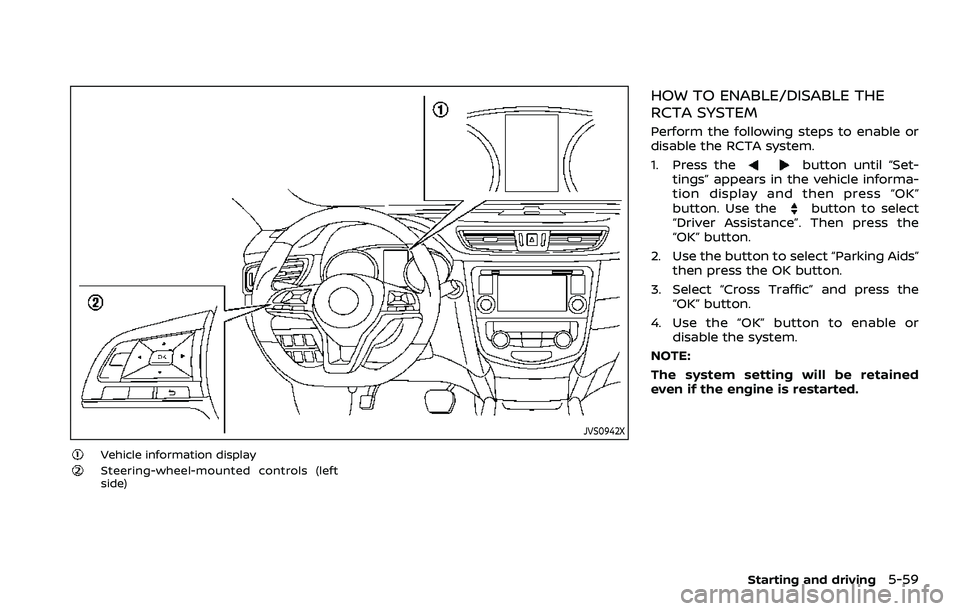
Vehicle information displaySteering-wheel-mounted controls (left
side)
HOW TO ENABLE/DISABLE THE
RCTA SYSTEM
Perform the following steps to enable or
disable the RCTA system.
1. Press the
button until “Set-
tings” appears in the vehicle informa-
tion display and then press “OK”
button. Use the
button to select
“Driver Assistance”. Then press the
“OK” button.
2. Use the button to select “Parking Aids” then press the OK button.
3. Select “Cross Traffic” and press the “OK” button.
4. Use the “OK” button to enable or disable the system.
NOTE:
The system setting will be retained
even if the engine is restarted.
Starting and driving5-59
Page 291 of 500
SYSTEM TEMPORARILY UNAVAIL-
ABLE
When radar blockage is detected, the
system will be deactivated automatically.
The “Unavailable: Side Radar Obstruction”
warning message will appear in the
vehicle information display.
The systems are not available until the
conditions no longer exist.
The radar sensors may be blocked by
temporary ambient conditions such as
splashing water, mist or fog.
The blocked condition may also be
caused by objects such as ice, frost or
dirt obstructing the radar sensors.
NOTE:
If the BSW system stops working, the
RCTA system will also stop working.
Action to take:
When the above conditions no longer
exist, the system will resume automati-
cally.
SYSTEM MALFUNCTION
When the RCTA system malfunctions, it
will turn off automatically. The system
malfunction warning message will appear
in the vehicle information display.NOTE:
If the BSW system stops working, the
RCTA system will also stop working.
Action to take:
Stop the vehicle in a safe location, turn
the engine off and restart the engine. If
the message continues to appear, have
the system checked. It is recommended
that you visit a NISSAN dealer for this
service.
JVS0649X
SYSTEM MAINTENANCE
The two radar sensorsfor the RCTA
system are located near the rear bumper.
Always keep the area near the radar
sensors clean.
The radar sensors may be blocked by
temporary ambient conditions such as
splashing water, mist or fog.
The blocked condition may also be
caused by objects such as ice, frost or
dirt obstructing the radar sensors.
Check for and remove objects obstruct-
ing the area around the radar sensors.
Do not attach stickers (including trans-
parent material), install accessories or
Starting and driving5-63
Page 293 of 500
— When it is not possible to keepthe vehicle at a constant
speed
— When driving in heavy traffic
— When driving in traffic that varies speed
— When driving in windy areas
— When driving on winding or hilly roads
— When driving on slippery (rain, snow, ice, etc.) roads
CAUTION
On Manual Transmission (MT) model,
do not shift to the N (Neutral) posi-
tion without depressing the clutch
pedal when the cruise control is
operated. Should this occur, depress
the clutch pedal and turn the Cruise
ON/OFF switch off immediately. Fail-
ure to do so may cause engine
damage.
PRECAUTIONS ON CRUISE CON-
TROL
. If the cruise control system malfunc-
tions, it will cancel automatically. The
CRUISE indicator in the vehicle infor-
mation display will then blink to warn
the driver.
. If the CRUISE indicator blinks, turn the
Cruise ON/OFF switch off and have
the system checked. It is recom-
mended that you visit a NISSAN dealer
for this service.
. The CRUISE indicator may blink when
the Cruise ON/OFF switch is turned
ON while pushing the RES/+, SET/-, or
CANCEL switch. To properly set the
cruise control system, perform the
following procedures.
CRUISE CONTROL OPERATIONS
The cruise control allows driving at
speeds above 25 MPH (40 km/h) without
keeping your foot on the accelerator
pedal.
The cruise control will automatically be
canceled if the vehicle slows down more
than approximately 8 MPH (13 km/h)
below the set speed.
Moving the shift lever to the N (Neutral)
position will cancel the cruise control.
Turning on cruise control
Push the Cruise ON/OFF switch. The
CRUISE indicator in the vehicle informa-
tion display will appear.
Setting cruising speed
1. Accelerate to the desired speed.
2. Push the SET/- switch and release it.
3. Take your foot off the accelerator
pedal.
The vehicle will maintain the set speed.
Passing another vehicle:
Depress the accelerator pedal to accel-
erate. After releasing the accelerator
pedal, the vehicle will return to the pre-
viously set speed.
The vehicle may not maintain the set
speed when going up or down steep hills.
In such cases, drive without the cruise
control.
Resetting to slower speed:
Use any one of the following methods to
reset to a slower speed.
. Lightly tap the foot brake pedal. When
the vehicle reaches the desired speed,
push and release the SET/- switch.
. Push and hold the SET/- switch. When
the vehicle reaches the desired speed,
release the SET- switch.
Starting and driving5-65