Page 25 of 476

CAUTION
When adjusting the seat positions, be
sure not to contact any moving parts to
avoid possible injuries and/or damage.
FRONT MANUAL SEAT
ADJUSTMENT (if so equipped)
Your vehicle seats can be adjusted manu-
ally. For additional information about ad-
justing the seats, refer to the steps outlined
in this section.
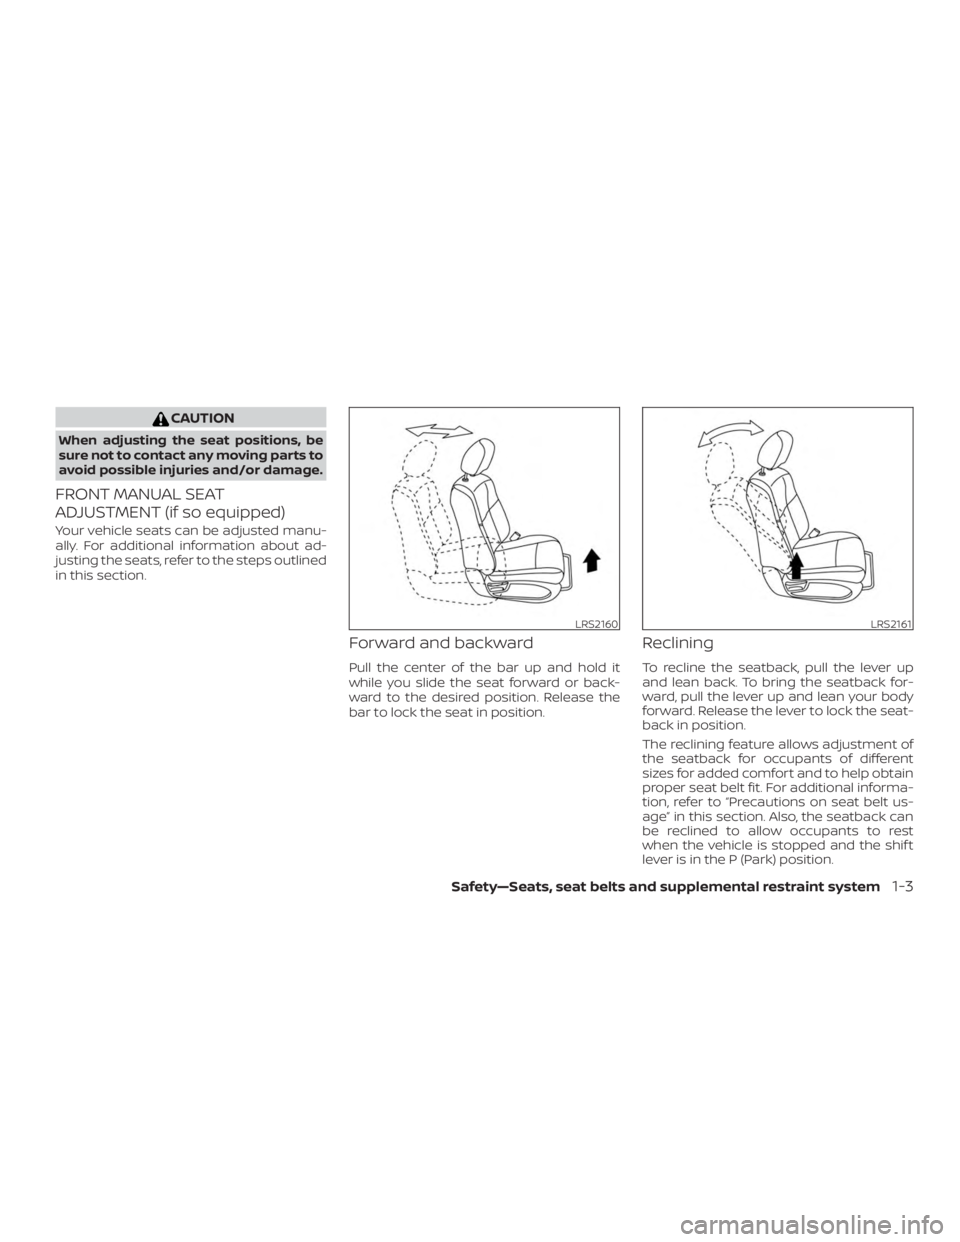
Forward and backward
Pull the center of the bar up and hold it
while you slide the seat forward or back-
ward to the desired position. Release the
bar to lock the seat in position.
Reclining
To recline the seatback, pull the lever up
and lean back. To bring the seatback for-
ward, pull the lever up and lean your body
forward. Release the lever to lock the seat-
back in position.
The reclining feature allows adjustment of
the seatback for occupants of different
sizes for added comfort and to help obtain
proper seat belt fit. For additional informa-
tion, refer to “Precautions on seat belt us-
age” in this section. Also, the seatback can
be reclined to allow occupants to rest
when the vehicle is stopped and the shif t
lever is in the P (Park) position.
Page 33 of 476

∙ When returning the seatbacks to theupright position, be certain they are
completely secured in the latched po-
sition. If they are not completely se-
cured, passengers may be injured in
an accident or sudden stop.
∙ Properly secure all cargo to help pre- vent it from sliding or shif ting. Do not
place cargo higher than the seat-
backs. In a sudden stop or collision,
unsecured cargo could cause per-
sonal injury.
Folding the 2nd row bench seat
To fold the 2nd row bench seat flat for
maximum cargo hauling:
1. Make sure that the head restraints/headrests are lowered or re-
moved. To remove the head
restraint/headrest, push and hold the
lock knob while moving the head
restraint/headrest in an upward direc-
tion. Store the head restraint/headrest
properly so it is not loose in the vehicle.
2. Stow the 2nd row seat belts in the seat belt hooks found on the sides of the
vehicle. 3. Lif t up on the recline lever on the side of
the outboard seats to fold the seat-
backs flat.
4. To return the 2nd row bench seats to a seating position, push up on the seat-
back until it latches in place.
Page 34 of 476
Folding the 3rd row seats
To fold the 3rd row seats flat for maximum
cargo capacity:1. Pull the strap
�Ato release the head
restraint/headrest forward.
2. Stow the 3rd row seat belts in the seat belt hooks
�Dfound on the sides of the
cargo area.
3. Pull up on the latch
�Blocated in the
upper corner of each seatback and
lower the seatback forward over the
seat base. To return the 3rd row seats to a seating
position:
1. Use the pull straps
�Cto raise each
seatback. Pull back until the seatback
latches into position. Make sure to
properly raise each seatback to an
upright and secured position.
2. Do not use the pull strap to return the head restraint/headrest to the upright
position. Pull back on the head
restraint/headrest until it latches in the
upright position.
Page 41 of 476
WARNING
∙ Every person who drives or rides inthis vehicle should use a seat belt at
all times. Children should be in the
rear seats and in an appropriate
restraint.
Page 43 of 476

SEAT BELT WARNING LIGHT
Both the driver’s and passenger’s front
seats are equipped with a seat belt warn-
ing light. The warning light, located on the
instrument panel, will show the status of
the driver and passenger seat belt.
NOTE:
The front passenger seat belt warning
light will not light up if the seat is not
occupied.For additional information, refer to “Warn-
ing lights, indicator lights and audible re-
minders” in the “Instruments and controls”
section of this manual.
PREGNANT WOMEN
NISSAN recommends that pregnant
women use seat belts. The seat belt should
be worn snug and always position the lap
belt as low as possible around the hips, not
the waist. Place the shoulder belt over your
shoulder and across your chest. Never run
the lap/shoulder belt over your abdominal
area. Contact your doctor for specific rec-
ommendations.
INJURED PERSONS
NISSAN recommends that injured persons
use seat belts. Check with your doctor for
specific recommendations.
THREE-POINT TYPE SEAT BELT
WITH RETRACTOR
Page 44 of 476
∙ Do not allow children to play with theseat belts. Most seating positions are
equipped with Automatic Locking Re-
tractor (ALR) mode seat belts. If the
seat belt becomes wrapped around a
child’s neck with the ALR mode acti-
vated, the child can be seriously in-
jured or killed if the seat belt retracts
and becomes tight. This can occur
even if the vehicle is parked. Unbuckle
the seat belt to release the child. If the
seat belt cannot be unbuckled or is
already unbuckled, release the child
by cutting the seat belt with a suitable
tool (such as a knife or scissors) to
release the seat belt.
Fastening the seat belts
1. Adjust the seat. For additional informa- tion, refer to “Seats” in this section.
Page 73 of 476
∙ If the booster seat is compatible withyour vehicle, place the child in the
booster seat and check the various ad-
justments to be sure the booster seat is
compatible with the child. Always follow
all recommended procedures.
All U.S. states and Canadian provinces or
territories require that infants and small
children be restrained in an approved
child restraint at all times while the ve-
hicle is being operated.
The instructions in this section apply to
booster seat installation in the rear seats
or the front passenger seat.
Booster seat installation
Page 80 of 476
WARNING
∙ The seat belts, the side air bags andcurtain air bags are most effective
when you are sitting well back and
upright in the seat with both feet on
the floor. The side air bag and curtain
air bag inflate with great force. Do not
allow anyone to place their hand, leg
or face near the side air bag on the
side of the seatback of the front seat
or near the side roof rails. Do not allow
anyone sitting in the front seats or
rear outboard seats to extend their
hand out of the window or lean
against the door. Some examples of
dangerous riding positions are shown
in the previous illustrations.