Page 44 of 476
∙ Do not allow children to play with theseat belts. Most seating positions are
equipped with Automatic Locking Re-
tractor (ALR) mode seat belts. If the
seat belt becomes wrapped around a
child’s neck with the ALR mode acti-
vated, the child can be seriously in-
jured or killed if the seat belt retracts
and becomes tight. This can occur
even if the vehicle is parked. Unbuckle
the seat belt to release the child. If the
seat belt cannot be unbuckled or is
already unbuckled, release the child
by cutting the seat belt with a suitable
tool (such as a knife or scissors) to
release the seat belt.
Fastening the seat belts
1. Adjust the seat. For additional informa- tion, refer to “Seats” in this section.
Page 128 of 476

Intelligent Cruise Control (ICC) indicator
(if so equipped)
This indicator shows the Intelligent Cruise
Control (ICC) system status. The status is
shown by the color. For additional informa-
tion, refer to “Intelligent Cruise Control (ICC)”
in the “Starting and driving” section of this
manual.
Shipping Mode On Push Storage Fuse
This warning may appear if the extended
storage switch is not pushed in. When this
warning appears, push in the extended
storage switch to turn off the warning. For
additional information, refer to “Extended
storage switch” in this section.
Transmission Shif t Position indicator
This indicator shows the transmission shif t
position.
CVT Error: See Owner’s Manual
This warning illuminates when there is a
problem with the CVT system. If this warn-
ing comes on, have the system checked. It
is recommended that you visit a NISSAN
dealer for this service.Unavailable: Front Radar Obstruction (if
so equipped)
This warning appears when the Intelligent
Cruise Control (ICC) system becomes un-
available because the front radar is ob-
structed. For additional information, refer
to “Intelligent Cruise Control (ICC)” or “Auto-
matic Emergency Braking ” in the “Starting
and driving” section of this manual.
Rear Door Alert is activated
When the system is enabled, this message
appears when the Rear Door Alert system
is active and can remind the driver to check
the back seat.
∙ Using the steering wheel switch, a driver can select “Dismiss Message” to clear
the display for a period of time. If no
selection is made, this message auto-
matically turns off af ter a period of time.
∙ Using the steering wheel switch, a driver can select “Disable Alert” to disable the
horn alert for the remainder of the cur-
rent trip.
Page 170 of 476

WARNING
∙ Do not use the HomeLink® UniversalTransceiver with any garage door
opener that lacks safety stop and re-
verse features as required by federal
safety standards. (These standards
became effective for opener models
manufactured af ter April 1, 1982). A
garage door opener which cannot de-
tect an object in the path of a closing
garage door and then automatically
stop and reverse, does not meet cur-
rent federal safety standards. Using a
garage door opener without these
features increases the risk of serious
injury or death.
∙ During the programming procedure your garage door or security gate will
open and close (if the transmitter is
within range). Make sure that people
or objects are clear of the garage door,
gate, etc. that you are programming. ∙ Your vehicle’s engine should be
turned off while programming the
HomeLink® Universal Transceiver. Do
not breathe exhaust gases; they con-
tain colorless and odorless carbon
monoxide. Carbon monoxide is dan-
gerous. It can cause unconsciousness
or death.
PROGRAMMING HOMELINK®
If you have any questions or are having
difficulty programming your HomeLink®
buttons, refer to the HomeLink® web site at:
www.homelink.com or call 1-800-355-3515.
NOTE:
Place the ignition switch in the ACC posi-
tion when programming HomeLink®. It is
also recommended that a new battery
be placed in the hand-held transmitter
of the device being programmed to
HomeLink® for quicker programming
and accurate transmission of the radio
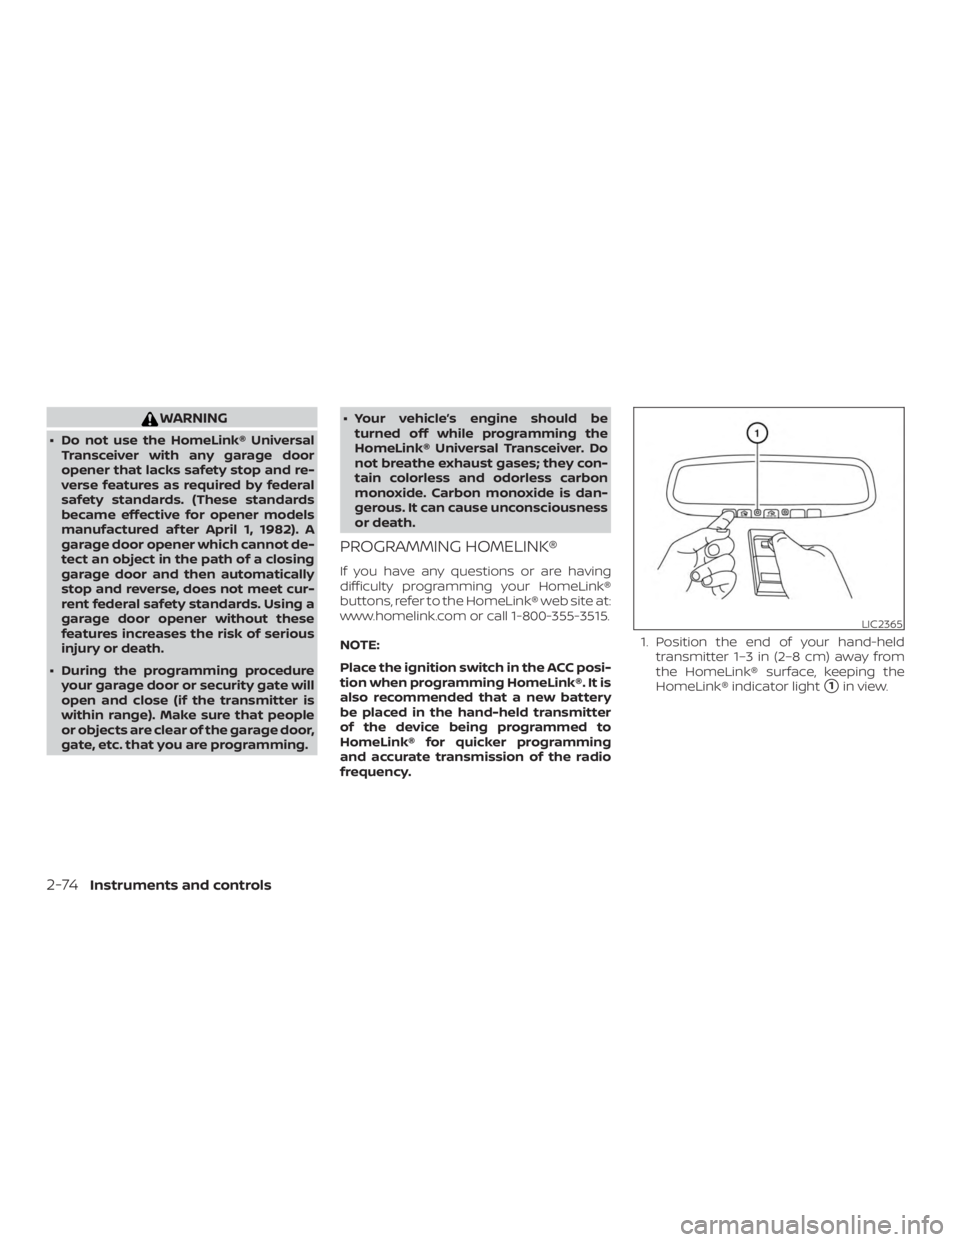
frequency. 1. Position the end of your hand-held
transmitter 1–3 in (2–8 cm) away from
the HomeLink® surface, keeping the
HomeLink® indicator light
�1in view.
Page 209 of 476

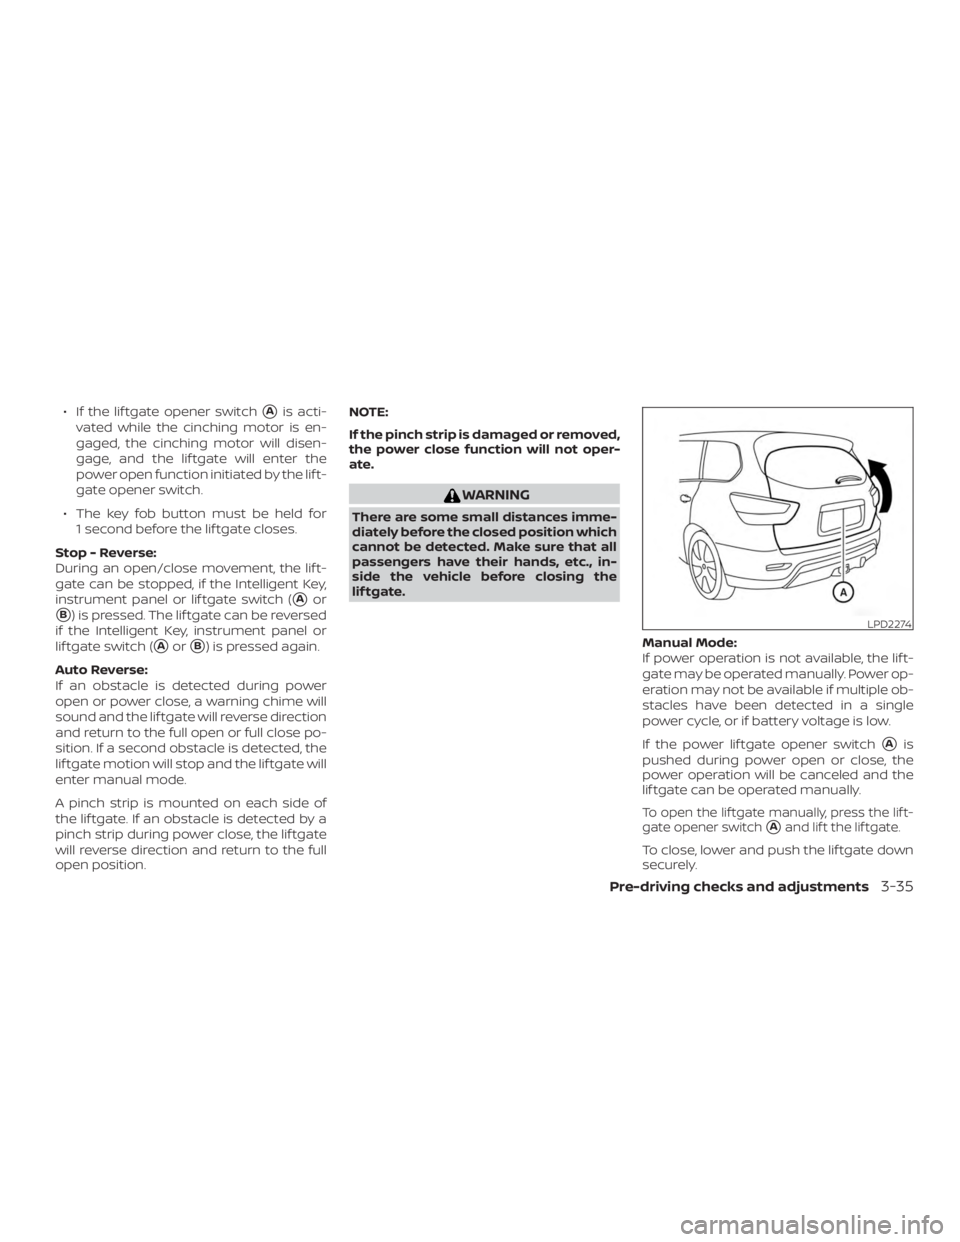
∙ If the lif tgate opener switch�Ais acti-
vated while the cinching motor is en-
gaged, the cinching motor will disen-
gage, and the lif tgate will enter the
power open function initiated by the lif t-
gate opener switch.
∙ The key fob button must be held for 1 second before the lif tgate closes.
Stop - Reverse:
During an open/close movement, the lif t-
gate can be stopped, if the Intelligent Key,
instrument panel or lif tgate switch (
�Aor
�B) is pressed. The lif tgate can be reversed
if the Intelligent Key, instrument panel or
lif tgate switch (
�Aor�B) is pressed again.
Auto Reverse:
If an obstacle is detected during power
open or power close, a warning chime will
sound and the lif tgate will reverse direction
and return to the full open or full close po-
sition. If a second obstacle is detected, the
lif tgate motion will stop and the lif tgate will
enter manual mode.
A pinch strip is mounted on each side of
the lif tgate. If an obstacle is detected by a
pinch strip during power close, the lif tgate
will reverse direction and return to the full
open position. NOTE:
If the pinch strip is damaged or removed,
the power close function will not oper-
ate.
Page 252 of 476
Towing mode (if so equipped):When this
item is turned on, only the rear sonar is off.
The amber markers are displayed at the
rear corners of the vehicle icon.
Show Camera when Sonar Activate (if so
equipped): When this item is turned on, the
camera view is automatically shown on the
display in the case that the distance to the
objects measured by the sonar is becom-
ing short.
SONAR SYSTEM LIMITATIONS
Page 365 of 476
Four-Wheel Drive (4WD) models
with Continuously Variable
Transmission (CVT)
NISSAN recommends that towing dollies
be used when towing your vehicle or place
the vehicle on a flatbed truck as illustrated.
Page 366 of 476
– Place the ignition switch in the OFFposition, and secure the steering
wheel in a straight-ahead position
with a rope or similar device. Never
secure the steering wheel by plac-
ing the ignition switch in the LOCK
position. This may damage the
steering lock mechanism (for
models with a steering lock
mechanism).
VEHICLE RECOVERY (freeing a
stuck vehicle)
Page 372 of 476

∙ Use only Genuine NISSAN floor mats,or equivalent floor mats, that are spe-
cifically designed for use in your ve-
hicle model and model year.
∙ Properly position the mats in the floorwell using the floor mat position-
ing hook. For additional information,
refer to "Floor mat installation" in this
section.
∙ Make sure the floor mat does not in- terfere with pedal operation.
∙ Periodically check the floor mats to make sure they are properly installed.
∙ Af ter cleaning the vehicle interior, check the floor mats to make sure
they are properly installed.
The use of Genuine NISSAN floor mats can
extend the life of your vehicle carpet and
make it easier to clean the interior. Mats
should be maintained with regular clean-
ing and replaced if they become exces-
sively worn.Floor mat installation
Your vehicle is equipped with floor mat po-
sitioning hook(s). The number and shape of
the floor mat positioning hooks for each
seating position varies depending on the
vehicle.
When installing Genuine NISSAN floor mats,
follow the installation instructions provided
with the mat and the following: 1. With the ignition in the OFF position, the shif t lever in P (Park) position (Continu-
ously Variable Transmission models)
and with the parking brake fully applied,
position the floor mat in the floorwell so
that the floor mat grommet holes are
aligned with the hook(s).
2. Secure the grommet holes into the hook(s) and ensure that the floor mat is
properly positioned. 3. Make sure the floor mat does not inter-
fere with pedal operation. With the igni-
tion still in the OFF position, the shif t
lever in the P (Park) position (Continu-
ously Variable Transmission models)
and with the parking brake applied, fully
apply and release all pedals. The floor
mat must not interfere with pedal op-
eration or prevent the pedal from re-
turning to its normal position.
It is recommended that you visit a NISSAN
dealer for details about installing the floor
mats in your vehicle.
7-6Appearance and care