2019 NISSAN PATHFINDER oil type
[x] Cancel search: oil typePage 120 of 476

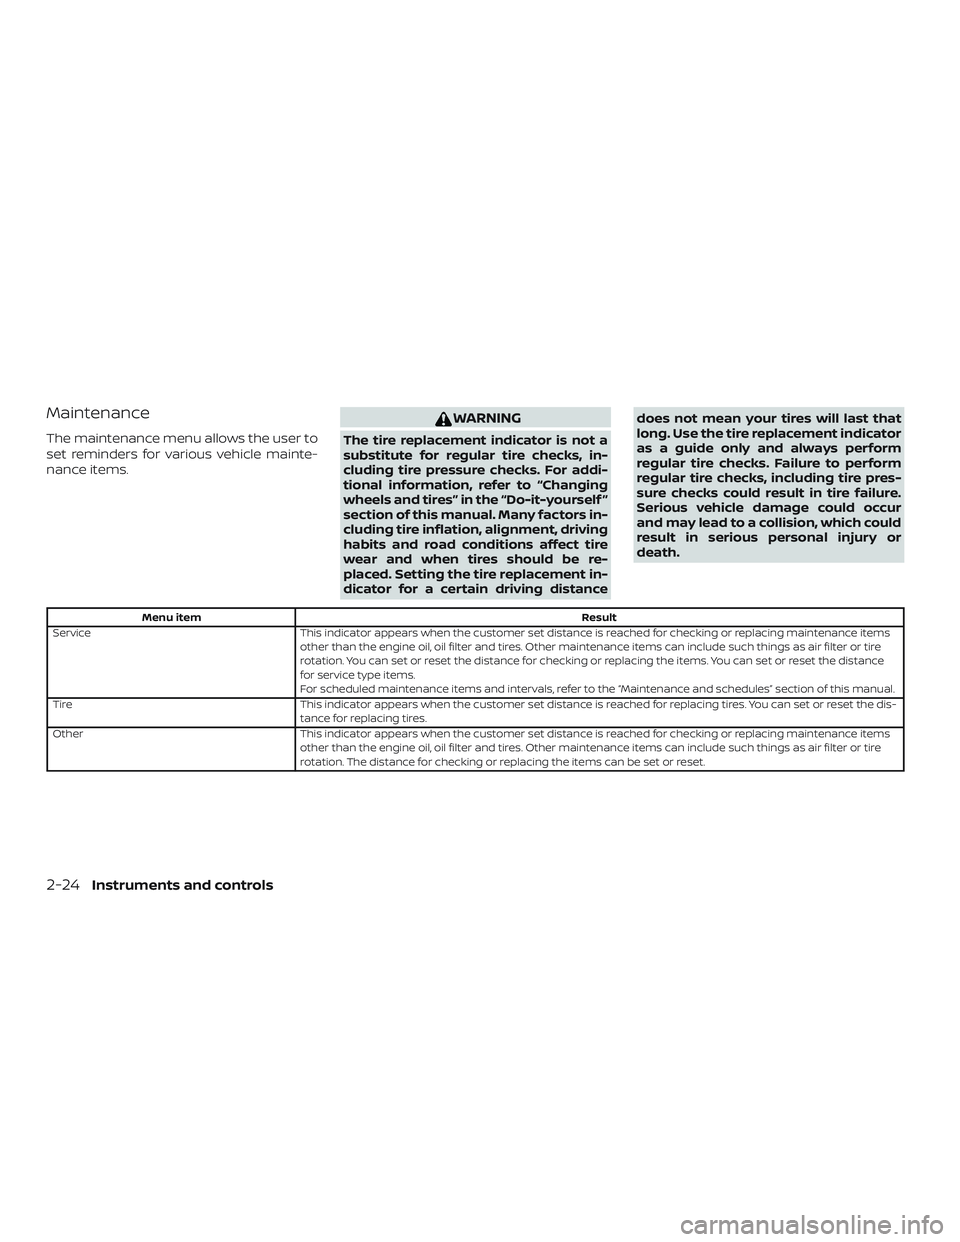
Maintenance
The maintenance menu allows the user to
set reminders for various vehicle mainte-
nance items.
WARNING
The tire replacement indicator is not a
substitute for regular tire checks, in-
cluding tire pressure checks. For addi-
tional information, refer to “Changing
wheels and tires” in the “Do-it-yourself ”
section of this manual. Many factors in-
cluding tire inflation, alignment, driving
habits and road conditions affect tire
wear and when tires should be re-
placed. Setting the tire replacement in-
dicator for a certain driving distancedoes not mean your tires will last that
long. Use the tire replacement indicator
as a guide only and always perform
regular tire checks. Failure to perform
regular tire checks, including tire pres-
sure checks could result in tire failure.
Serious vehicle damage could occur
and may lead to a collision, which could
result in serious personal injury or
death.
Menu item
Result
Service This indicator appears when the customer set distance is reached for checking or replacing maintenance items
other than the engine oil, oil filter and tires. Other maintenance items can include such things as air filter or tire
rotation. You can set or reset the distance for checking or replacing the items. You can set or reset the distance
for service type items.
For scheduled maintenance items and intervals, refer to the “Maintenance and schedules” section of this manual.
Tire This indicator appears when the customer set distance is reached for replacing tires. You can set or reset the dis-
tance for replacing tires.
Other This indicator appears when the customer set distance is reached for checking or replacing maintenance items
other than the engine oil, oil filter and tires. Other maintenance items can include such things as air filter or tire
rotation. The distance for checking or replacing the items can be set or reset.
2-24Instruments and controls
Page 357 of 476

NOTE:
Fully lower the spare tire below the ve-
hicle before attempting to remove the
winch from the spare tire.9. Af ter removing the spare tire from un- der the vehicle, be sure to crank the
cable up by rotating the winch socket
clockwise to stow it.
CAUTION
∙ Make sure safety cable is coiled abovespare tire when reinstalling spare
tire/wheel.
∙ When re-installing the spare tire un- der the vehicle af ter use, be sure to
secure it with the tire stem facing
down toward the ground. If the spare
tire is improperly secured with the tire
stem facing up towards the bottom of
the vehicle, there is an increased risk
of separating from the vehicle in the
event of a crash which may pose a
hazard in traffic or risk of injury to
others.
Jacking up vehicle and removing
the damaged tire
WARNING
∙ Never get under the vehicle while it issupported only by the jack. If it is nec-
essary to work under the vehicle, sup-
port it with safety stands.
∙ Use only the jack provided with your vehicle to lif t the vehicle. Do not use
the jack provided with your vehicle on
other vehicles. The jack is designed
for lif ting only your vehicle during a
tire change.
∙ Use the correct jack-up points. Never use any other part of the vehicle for
jack support.
∙ Never jack up the vehicle more than necessary.
∙ Never use blocks on or under the jack.
∙ Do not start or run the engine while vehicle is on the jack. It may cause the
vehicle to move. This is especially true
for vehicles with limited slip
differentials.
∙ Do not allow passengers to stay in the vehicle while it is on the jack. ∙ Never run the engine with a wheel(s)
off the ground. It may cause the ve-
hicle to move.
Always refer to the illustration for the cor-
rect placement and jack-up points for your
specific vehicle model and jack type.
Carefully read the caution label attached
to the jack body and the following in-
structions.
In case of emergency6-7
Page 370 of 476

If you choose to use a tire dressing, take the
following precautions:∙ Use a water-based tire dressing. The coating on the tire dissolves more easily
than with an oil-based tire dressing.
∙ Apply a light coat of tire dressing to help prevent it from entering the tire
tread/grooves (where it would be diffi-
cult to remove).
∙ Wipe off excess tire dressing using a dry towel. Make sure the tire dressing is
completely removed from the tire
tread/grooves.
∙ Allow the tire dressing to dry as recom- mended by the tire dressing manufac-
turer. Occasionally remove loose dust from the
interior trim, plastic parts and seats using a
vacuum cleaner or sof t bristled brush. Wipe
the vinyl and leather (if so equipped) sur-
faces with a clean, sof t cloth dampened in
mild soap solution, then wipe clean with a
dry, sof t cloth.
Regular care and cleaning is required in
order to maintain the appearance of the
leather (if so equipped).
Before using any fabric protector, read the
manufacturer’s recommendations. Some
fabric protectors contain chemicals that
may stain or bleach the seat material.
Use a cloth dampened only with water to
clean the meter and gauge lens.
WARNING
Do not use water or acidic cleaners (hot
steam cleaners) on the seat. This can
damage the seat or occupant classifi-
cation sensor. This can also affect the
operation of the air bag system and re-
sult in serious personal injury.
CAUTION
∙ Never use benzine, thinner or any
similar material.
∙ Small dirt particles can be abrasive and damaging to leather surfaces
and should be removed promptly. Do
not use saddle soap, car waxes, pol-
ishes, oils, cleaning fluids, solvents,
detergents or ammonia-based clean-
ers as they may damage the leather’s
natural finish.
∙ Never use fabric protectors unless recommended by the manufacturer.
∙ Do not use glass or plastic cleaner on meter or gauge lens covers. It may
damage the lens cover.
AIR FRESHENERS
Most air fresheners use a solvent that
could affect the vehicle interior. If you use
an air freshener, take the following precau-
tions:
∙ Hanging-type air fresheners can cause permanent discoloration when they
contact vehicle interior surfaces. Place
the air freshener in a location that al-
lows it to hang free and not contact an
interior surface.
CLEANING INTERIOR
7-4Appearance and care
Page 371 of 476

∙ Liquid-type air fresheners typically clipon the vents. These products can cause
immediate damage and discoloration
when spilled on interior surfaces.
Carefully read and follow the manufactur-
er’s instructions before using the air fresh-
eners.
POWER MOONROOF (if so
equipped)
The sunshade is made from a tricot material.
CAUTION
To help prevent damaging the moon-
roof while cleaning:
∙ Do not rub the material with a cloth. Doing so can damage the surface of
the material or cause a stain to
spread.
∙ Never use benzine, thinner or any similar chemical to clean the sun-
shade. This may discolor the moon-
roof and damage the surface. ∙ Clean water based stains by patting
the surface with a clean sof t cloth
dampened in warm water. Press a
clean dry cloth onto the surface to re-
move as much dampness as possible
and then let air dry.
∙ Clean oil based stains by patting the surface with a clean sof t cloth damp-
ened in warm water. Press a clean dry
cloth onto the surface to remove as
much dampness as possible and then
let air dry.FLOOR MATS (if so equipped)
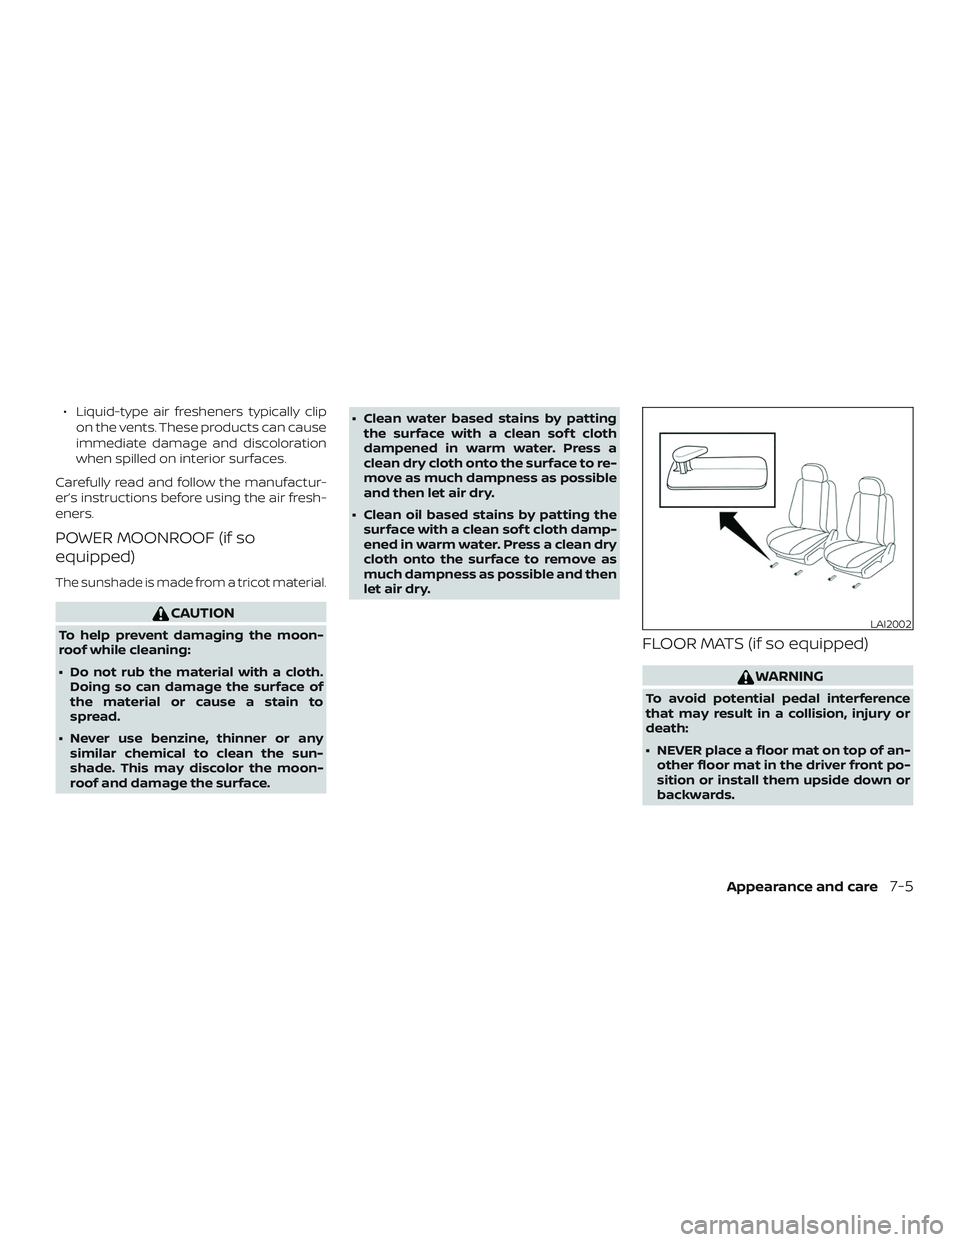
WARNING
To avoid potential pedal interference
that may result in a collision, injury or
death:
∙ NEVER place a floor mat on top of an-other floor mat in the driver front po-
sition or install them upside down or
backwards.
LAI2002
Appearance and care7-5
Page 375 of 476

8 Do-it-yourself
Maintenance precautions.......................8-2
Engine compartment check locations ...........8-3
Engine cooling system ..........................8-4
Checking engine coolant level ................8-5
Changing engine coolant .....................8-5
Engine oil ........................................8-6
Checking engine oil level .....................8-6
Changing engine oil and oil filter ..............8-6
Continuously Variable Transmission (CVT)
fluid ............................................ 8-10
Power Steering Fluid (PSF) ......................8-10
Brake fluid ....................................... 8-11
Windshield-washer fluid .........................8-11
Windshield-washer fluid reservoir .............8-11
Battery......................................... 8-13
Jump starting ............................... 8-14
Drive belt ....................................... 8-15
Spark plugs .................................... 8-15
Replacing spark plugs ....................... 8-15
Air cleaner ...................................... 8-16In-cabin microfilter
.......................... 8-16
Windshield wiper blades ........................8-17
Cleaning .................................... 8-17
Replacing ................................... 8-17
Brakes.......................................... 8-19
Fuses ........................................... 8-19
Engine compartment .......................8-20
Passenger compartment ....................8-21
Battery replacement ........................... 8-22
NISSAN Intelligent Key® ......................8-22
Lights .......................................... 8-24
Headlights ................................... 8-24
Fog lights (if so equipped) ...................8-24
Exterior and interior lights ...................8-25
Wheels and tires ................................ 8-27
Tire pressure ................................ 8-27
Tire labeling ................................. 8-31
Types of tires ................................ 8-33
Tir
e chains .................................. 8-34
Changing wheels and tires ..................8-35
Page 420 of 476

NOTE:
NISSAN does not advocate the use of
non-OEM approved af termarket flush-
ing systems and strongly advises
against performing these services on a
NISSAN product. Many of the af termar-
ket flushing systems use non-OEM ap-
proved chemicals or solvents, the use of
which has not been validated by NISSAN.
For recommended fuel, lubricants, fluids,
grease, and refrigerant, refer to “Recom-
mended fluids/lubricants and capaci-
ties” in the “Technical and consumer in-
formation” section of this manual.
EMISSION CONTROL SYSTEM
MAINTENANCE:
Drive belts*:Check engine drive belts for
wear, fraying or cracking and for proper
tension. Replace any damaged drive belts.
Engine air filter: Replace at specified inter-
vals. When driving for prolonged periods in
dusty conditions, check/replace the filter
more frequently.
Engine coolant*: Replace coolant at the
specified interval. When adding or replac-
ing coolant, be sure to use only Genuine
NISSAN Long Life Antifreeze/Coolant (blue) or equivalent with the proper mixture. (For
additional information on the proper mix-
ture for your area, refer to “Engine cooling
system” in the “Do-it-yourself ” section of
this manual.)
NOTE:
Mixing any other type of coolant or the
use of non-distilled water may reduce
the recommended service interval of the
coolant.
Engine oil and oil filter:
Replace engine oil
and oil filter at the specified intervals. For
recommended oil grade and viscosity, refer
to “Recommended fluids/lubricants and
capacities” in the “Technical and consumer
information” section of this manual.
Engine valve clearance*: Inspect only if
valve noise increases. Adjust valve clear-
ance if necessary.
Evaporative emissions control vapor
lines*: Check vapor lines for leaks or loose-
ness. Tighten connections or replace parts
as necessary.
Fuel lines*: Check the fuel hoses, piping
and connections for leaks, looseness, or
deterioration. Tighten connections or re-
place parts as necessary. Spark plugs:
Replace at specified intervals.
Install new plugs of the same type as origi-
nally equipped.
CHASSIS AND BODY
MAINTENANCE:
Brake lines and cables: Visually inspect for
proper installation. Check for chafing,
cracks, deterioration, and signs of leaking.
Replace any deteriorated or damaged
parts immediately.
Brake pads and rotors: Check for wear,
deterioration and fluid leaks. Replace any
deteriorated or damaged parts immedi-
ately.
Exhaust system: Visually inspect the ex-
haust pipes, muffler and hangers for leaks,
cracks, deterioration, and damage. Tighten
connections or replace parts as necessary.
In-cabin microfilter: Replace at specified
intervals. When driving for prolonged peri-
ods in dusty conditions, replace the filter
more frequently.
Propeller shaf t(s): Check for damage,
looseness, and grease leakage.
9-6Maintenance and schedules
Page 423 of 476

MAINTENANCE OPERATION
Perform at number of miles, kilometers or months, whichever comes first. miles x 1,000
(km x 1,000) Months MAINTENANCE INTERVAL
65
(104) 78 70
(112) 84 75
(120) 90 80
(128) 96 85
(136) 102 90
(144) 108 95
(152) 114 100
(160) 120 105
(168) 126 110
(176) 132 115
(184) 138 120
(192) 144
Drive belts See NOTE (1)I*I*I*I*I*I*
Air cleaner filter See NOTE (2) RR
EVAP vapor lines I*I*I*
Fuel lines I*I*I*
Fuel filter See NOTE (3)
Engine coolant* See NOTE (4)(5)
Engine oil Replace every 5,000 miles (8,000 km) or 6 months
Engine oil filter Replace every 5,000 miles (8,000 km) or 6 months
Spark plugs See NOTE (6)Replace every 105,000 miles (168,000 km)
Intake and exhaust valve clearances* See NOTE (7)
NOTE:
(1) Af ter 40,000 miles (64,000 km) or 48 months, inspect every 10,000 miles (16,000 km) or 12 months. Replace the drive belts if
found damaged.
(2) If operating mainly in dusty conditions, more frequent maintenance may be required.
(3) Periodic maintenance is not required.
(4) First replacement interval is 105,000 miles (168,000 km) or 84 months. Af ter first replacement, replace every 75,000 miles
(120,000 km) or 60 months.
(5) Use only Genuine NISSAN Long Life Antifreeze/Coolant (blue) or equivalent with proper mixture ratio of 50% antifreeze and 50%
demineralized or distilled water. Mixing any other type of coolant or the use of non-distilled water may reduce the life expectancy
of the factory fill coolant.
(6) Replace spark plug when the plug gap exceeds 0.053 in (1.35 mm) even if within specified periodic replacement mileage.
(7) Periodic maintenance is not required. However, if valve noise increased, inspect valve clearance.
* Maintenance items and intervals with “*” are recommended by NISSAN for reliable vehicle operation. The owner need not perform
such maintenance in order to maintain the emission warranty or manufacturer recall liability. Other maintenance items and
intervals are required.
Maintenance and schedules9-9
Page 432 of 476

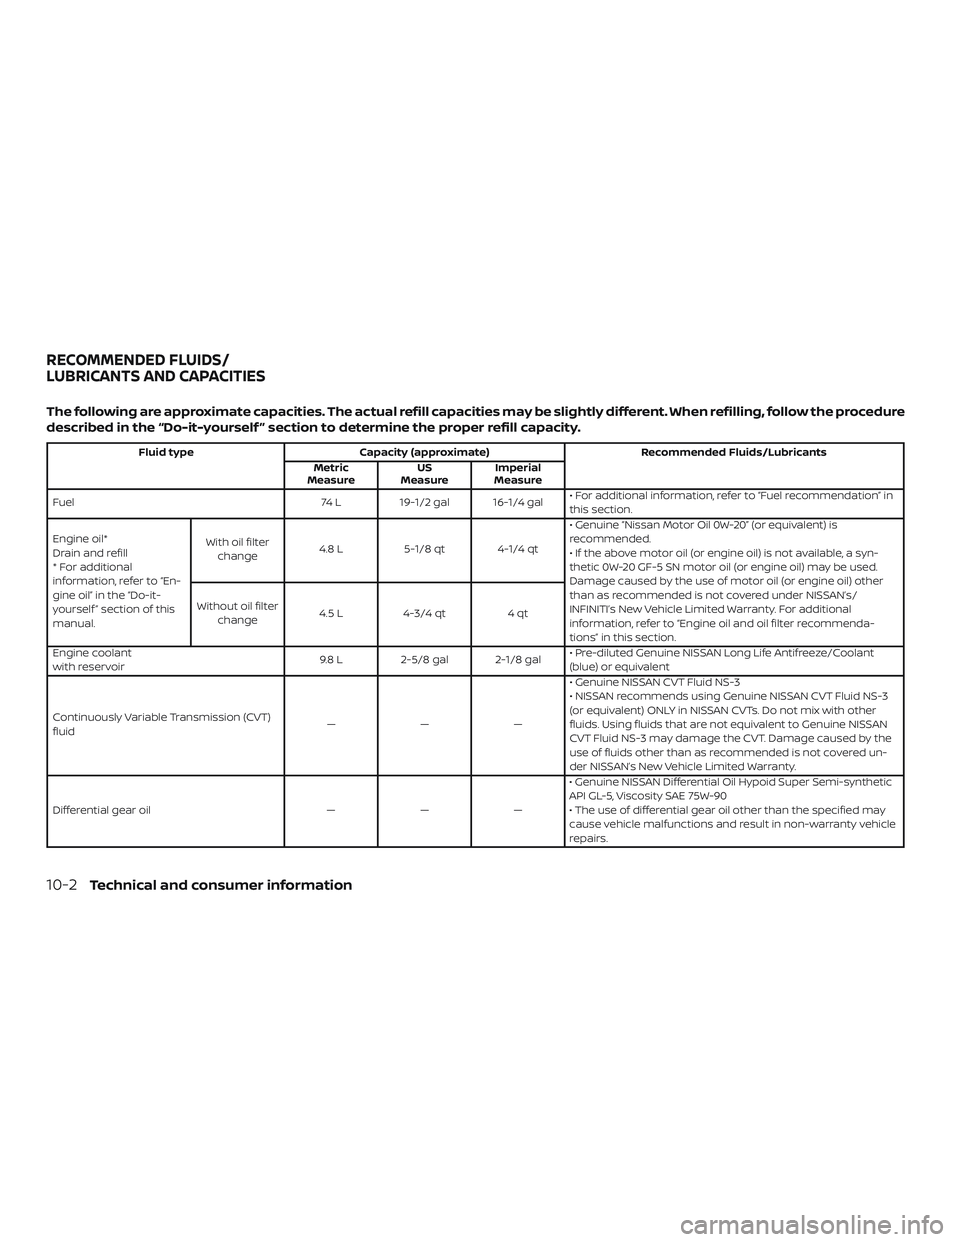
The following are approximate capacities. The actual refill capacities may be slightly different. When refilling, follow the procedure
described in the “Do-it-yourself ” section to determine the proper refill capacity.
Fluid typeCapacity (approximate) Recommended Fluids/Lubricants
Metric
Measure US
Measure Imperial
Measure
Fuel 74 L19-1/2 gal 16-1/4 gal • For additional information, refer to “Fuel recommendation” in
this section.
Engine oil*
Drain and refill
* For additional
information, refer to “En-
gine oil” in the “Do-it-
yourself ” section of this
manual. With oil filter
change 4.8 L
5-1/8 qt 4-1/4 qt • Genuine “Nissan Motor Oil 0W-20” (or equivalent) is
recommended.
• If the above motor oil (or engine oil) is not available, a syn-
thetic 0W-20 GF-5 SN motor oil (or engine oil) may be used.
Damage caused by the use of motor oil (or engine oil) other
than as recommended is not covered under NISSAN’s/
INFINITI’s New Vehicle Limited Warranty. For additional
information, refer to “Engine oil and oil filter recommenda-
tions” in this section.
Without oil filter
change 4.5 L
4-3/4 qt 4 qt
Engine coolant
with reservoir 9.8 L
2-5/8 gal 2-1/8 gal • Pre-diluted Genuine NISSAN Long Life Antifreeze/Coolant
(blue) or equivalent
Continuously Variable Transmission (CVT)
fluid ———• Genuine NISSAN CVT Fluid NS-3
• NISSAN recommends using Genuine NISSAN CVT Fluid NS-3
(or equivalent) ONLY in NISSAN CVTs. Do not mix with other
fluids. Using fluids that are not equivalent to Genuine NISSAN
CVT Fluid NS-3 may damage the CVT. Damage caused by the
use of fluids other than as recommended is not covered un-
der NISSAN’s New Vehicle Limited Warranty.
Differential gear oil ———• Genuine NISSAN Differential Oil Hypoid Super Semi-synthetic
API GL-5, Viscosity SAE 75W-90
• The use of differential gear oil other than the specified may
cause vehicle malfunctions and result in non-warranty vehicle
repairs.
RECOMMENDED FLUIDS/
LUBRICANTS AND CAPACITIES
10-2Technical and consumer information