Page 136 of 507
. TheHigh Beam
Assist indicator")
High Beam Assist operation
To activate the High Beam Assist system,
turn the headlight switch to the AUTO po-
sition
�1and push the lever forward�2
(high beam position). TheHigh Beam
Assist indicator light in the meter will illumi-
nate while the headlights are turned on.
If the High Beam Assist indicator light does
not illuminate in the above condition, it may
indicate that the system is not functioning
properly. Have the system checked, it is
recommended that you visit a NISSAN
dealer for this service. When the vehicle speed lowers to less than
approximately 16 mph (25 km/h), the head-
light uses the low beam.
To turn off the High Beam Assist system,
turn the headlight switch to the
posi-
tion or select the low beam position by
placing the lever in the neutral position.
Ambient image sensor maintenance
The ambient image sensor
�1for the High
Beam Assist system is located in front of
the inside mirror. To maintain the proper
operation of the high beam assist system
and prevent a system malfunction, be sure
to observe the following:
∙ Always keep the windshield clean.
∙ Do not attach a sticker (including trans- parent material) or install an accessory
near the ambient image sensor.
LIC4115LSD2712
2-42Instruments and controls
Page 137 of 507

∙ Do not strike or damage the areasaround the ambient image sensor. Do
not touch the sensor lens that is lo-
cated on the ambient image sensor.
If the ambient image sensor is damaged
due to an accident, it is recommended that
you visit a NISSAN dealer.
Battery saver system
The battery saver system automatically
turns off the following lights af ter a period
of time when the ignition switch is placed in
the OFF position and the doors are closed:
∙ Headlights, when the headlight switch is in the
orposition
∙ Interior lights, when lef t in the ON posi- tion
Af ter the headlights automatically turn off
with the headlight switch in the
orposition, the headlights will illumi-
nate again if the headlight switch is moved
to the OFF position and then turned to
the
orposition.
CAUTION
Even though the battery saver feature
automatically turns off the headlights
af ter a period of time, you should turn
the headlight switch to the OFF position
when the engine is not running to avoid
discharging the vehicle battery.
LED DAYTIME RUNNING LIGHTS
(DRL) SYSTEM
The LED portion of the headlights auto-
matically illuminate at 100% intensity when
the engine is started with the parking
brake released. The LED DRL operate with
the headlight switch in the OFF position or
in the
position. Turn the headlight
switch to the
position for full illumina-
tion when driving at night.
If the parking brake is applied before the
engine is started, the LED DRL do not illumi-
nate. The LED DRL illuminate when the
parking brake is released. The LED DRL will
remain on until the ignition switch is placed
in the OFF position.
WARNING
When the LED DRL system is active, tail
lights on your vehicle are not on. It is
necessary at dusk to turn on your head-
lights. Failure to do so could cause an
accident injuring yourself and others.
Instruments and controls2-43
Page 139 of 507
FOG LIGHT SWITCH (if so
equipped)
To turn the fog lights on, turn the headlight
switch to the
position, then turn the
fog light switch to the
position.
To turn the fog lights on with the headlight
switch in the AUTO position, the headlights
must be on, then turn the fog light switch to
the
position.
To turn the fog lights off, turn the fog light
switch to the OFF position. The headlights must be on and the low
beams selected for the fog lights to oper-
ate. The fog lights automatically turn off
when the high beam headlights are se-
lected.
To sound the horn, push near the horn icon
on the steering wheel.
WARNING
Do not disassemble the horn. Doing so
could affect proper operation of the
supplemental front air bag system.
Tampering with the supplemental front
air bag system may result in serious
personal injury.
LIC3256LIC2227
HORN
Instruments and controls2-45
Page 148 of 507
∙ Do not use double adapters or morethan one electrical accessory.
∙ Use power outlets with the engine running to avoid discharging the ve-
hicle battery.
∙ Avoid using power outlets when the air conditioner, headlights or rear win-
dow defroster is on.
∙ Before inserting or disconnecting a plug, be sure the electrical accessory
being used is turned off. ∙ Push the plug in as far as it will go. If
good contact is not made, the plug
may overheat or the internal tem-
perature fuse may open.
∙ When not in use, be sure to close the cap. Do not allow water or any other
liquid to contact the outlet.
Cargo Area
LIC3199LDI2758
EXTENDED STORAGE SWITCH
2-54Instruments and controls
Page 162 of 507
, step lights (if so
equipped), map lights and rear personal
lights will automatically turn on and stay on
for a period of time whe")
When the ON switch�1is pushed, the foot-
well lights (if so equipped), step lights (if so
equipped), map lights and rear personal
lights will automatically turn on and stay on
for a period of time when:
∙ The doors are unlocked by the Intelli- gent Key, a key or the request switch (if
so equipped) while all doors are closed
and the ignition switch is in the OFF
position.
∙ The driver’s door is opened and then closed while the ignition switch is in the
OFF position.
∙ Individually pushed. When the OFF switch
�2is pushed, the in-
terior lights will illuminate when pushed.
When the DOOR/OFF switch is pushed and
the ON switch is pushed, all of the lights will
come on.
NOTE:
The footwell lights (if so equipped) and
step lights (if so equipped) illuminate
when the driver and passenger doors
are open regardless of the interior light
switch position. These lights will turn off
automatically af ter a period of time
while doors are open to prevent the bat-
tery from becoming discharged.
CAUTION
Do not use for extended periods of time
with the engine stopped. This could re-
sult in a discharged battery.
CONSOLE LIGHT (if so equipped)
The console light will turn on whenever the
parking lights or headlights are illuminated.
The console light brightness can be ad-
justed with the illumination brightness
control in the vehicle information display.
LIC2302LIC2303
INTERIOR LIGHTS
2-68Instruments and controls
Page 185 of 507

∙ Switching the room light switch to theoff position.
∙ Switching the Light Off Delay to 0 in “Ve- hicle Settings” of the vehicle informa-
tion display. For additional information,
refer to “Vehicle information display” in
the “Instruments and controls” section
of this manual.
Opening windows
The Intelligent Key allows you to simultane-
ously open windows equipped with auto-
matic operation.
∙ To open the windows, press and hold the
button on the Intelligent Key
for longer than 3 seconds.
The door windows will lower while holding
down the
button on the Intelligent
Key.
NOTE:
The windows will stop lowering at the
time the
button is released.
However, the Intelligent Key cannot be
used from inside the vehicle to lower the
windows. The door windows cannot be
closed with the Intelligent Key.
Releasing the rear lif tgate (if so
equipped)
The rear lif tgate can be opened and closed
by performing the following:
∙ Press the
button for longer than
1 second to open the rear lif tgate.
∙ Press the
button again for longer
than 1 second to close the rear lif tgate.
When the
button is pressed during
the open or close process the lif tgate will
pause. When the
is pressed again
and held for longer than 1 second, the lif t-
gate will reverse.
Using the panic alarm
If you are near your vehicle and feel threat-
ened, you may activate the panic alarm to
call attention by pressing and holding
the
button on the Intelligent Key for
longer than 1 second.
The headlights will flash and the panic
alarm will stay on for a period of time.
The panic alarm stops when:
∙ It has run for a period of time.
∙ Any button is pressed on the Intelligent Key.
WPD0414WPD0415
Pre-driving checks and adjustments3-15
Page 206 of 507
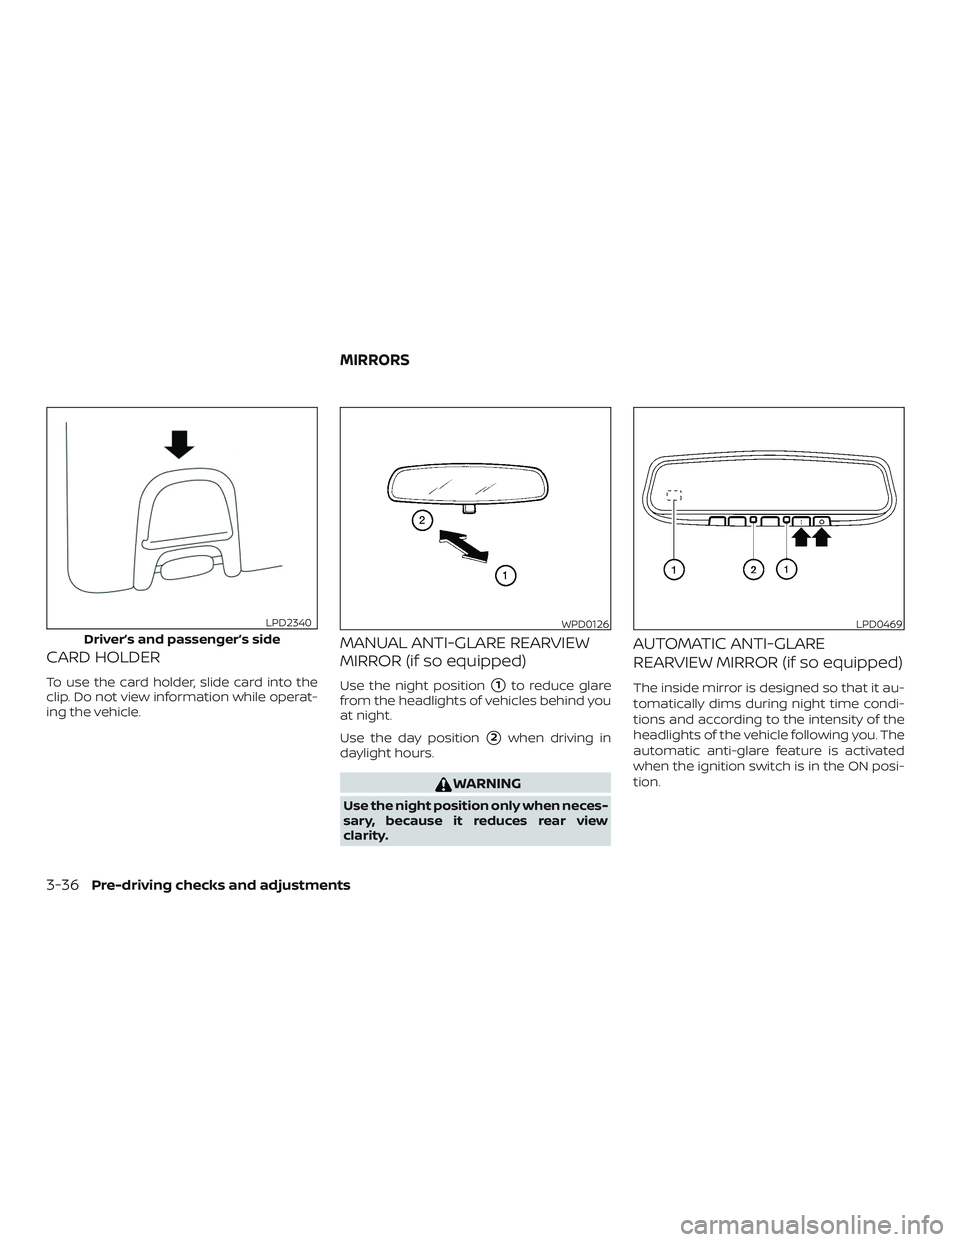
CARD HOLDER
To use the card holder, slide card into the
clip. Do not view information while operat-
ing the vehicle.
MANUAL ANTI-GLARE REARVIEW
MIRROR (if so equipped)
Use the night position�1to reduce glare
from the headlights of vehicles behind you
at night.
Use the day position
�2when driving in
daylight hours.
WARNING
Use the night position only when neces-
sary, because it reduces rear view
clarity.
AUTOMATIC ANTI-GLARE
REARVIEW MIRROR (if so equipped)
The inside mirror is designed so that it au-
tomatically dims during night time condi-
tions and according to the intensity of the
headlights of the vehicle following you. The
automatic anti-glare feature is activated
when the ignition switch is in the ON posi-
tion.
Driver’s and passenger’s side
LPD2340WPD0126LPD0469
MIRRORS
3-36Pre-driving checks and adjustments
Page 271 of 507
 system
displays the following types of road signs:
�ASpeed sign detected (in Canada)
�BSpeed sign detected (in USA)
�CSpeed sign detected (no speed")
SYSTEM OPERATION
The Traffic Sign Recognition (TSR) system
displays the following types of road signs:
�ASpeed sign detected (in Canada)
�BSpeed sign detected (in USA)
�CSpeed sign detected (no speed limit
detected)
�D“Do not pass” sign detected
CAUTION
∙ The TSR system is intended as an aid to careful driving. It is the driver’s re-
sponsibility to stay alert, drive safely,
and observe all road regulations that
currently apply, including looking out
for road signs.
∙ The TSR system may not function properly under the following
conditions:
– When the road sign is not clearly visible, for example, due to dam-
age or weather conditions.
– When rain, snow or dirt adheres to the windshield in front of the multi-
sensing camera unit.
– When the headlights are not bright due to dirt on the lens or if the aim-
ing is not adjusted properly.
– When strong light enters the cam- era unit. (For example, the light di-
rectly shines on the front of the ve-
hicle at sunrise or sunset.)
– When a sudden change in bright- ness occurs. (For example, when
the vehicle enters or exits a tunnel
or under a bridge.)
LSD3377LSD3378
Starting and driving5-25

To turn the fog lights on, turn the headlight
switch to the
position, then turn the
fog light switch to the
position.
To turn the fog lights on with the headlight
swi")