Page 39 of 610

NOTE:
•For additional information, refer to
“Range” in this section.
• Before driving, compare the driving dis-
tance to the destination displayed on
the navigation system screen (if so
equipped) with the estimated driving
range shown on the meter. Determine if
it will be necessary to charge the Li-ion
battery before or while driving to your
planned destination.
• If it is necessary to charge the Li-ion
battery, use the navigation system (if so
equipped) to search for available charg-
ing stations on your planned driving
route.
DRIVING THE VEHICLE
1. Depress the brake pedal�1.
2. Release the parking brake
�2.
3. Move the shif t lever
�3into the D (Drive)
position. When released, the shif t lever
returns to its original center position. 4. Confirm that the vehicle is in the D (Drive)
position. The indicator next to the “D” by
the shif t lever illuminates and “D” is dis-
played on the meter.
5. Release the brake pedal.
6. Depress the accelerator pedal and start driving.
EV-18EV Overview
Page 40 of 610
These are the following gear positions for
driving the vehicle forward:
• Use the D (Drive) position for optimumdriving performance.
• Use the B mode for downhill driving. When the B mode is used, more regenerative
brake is applied when the accelerator
pedal is released in comparison to the D
(Drive) position. For additional information, refer to “Driving
the vehicle” in the “Starting and driving” sec-
tion of this manual.
NOTE:
The regenerative brake converts the ve-
hicle's forward motion to electric power
to help slow the vehicle.
Use the ECO mode for maximum vehicle
range and for city driving. The ECO mode
helps reduce power consumption by re-
ducing acceleration when compared to
the same accelerator pedal position in the
D (Drive) position (normal mode).
EV OverviewEV-19
Page 42 of 610
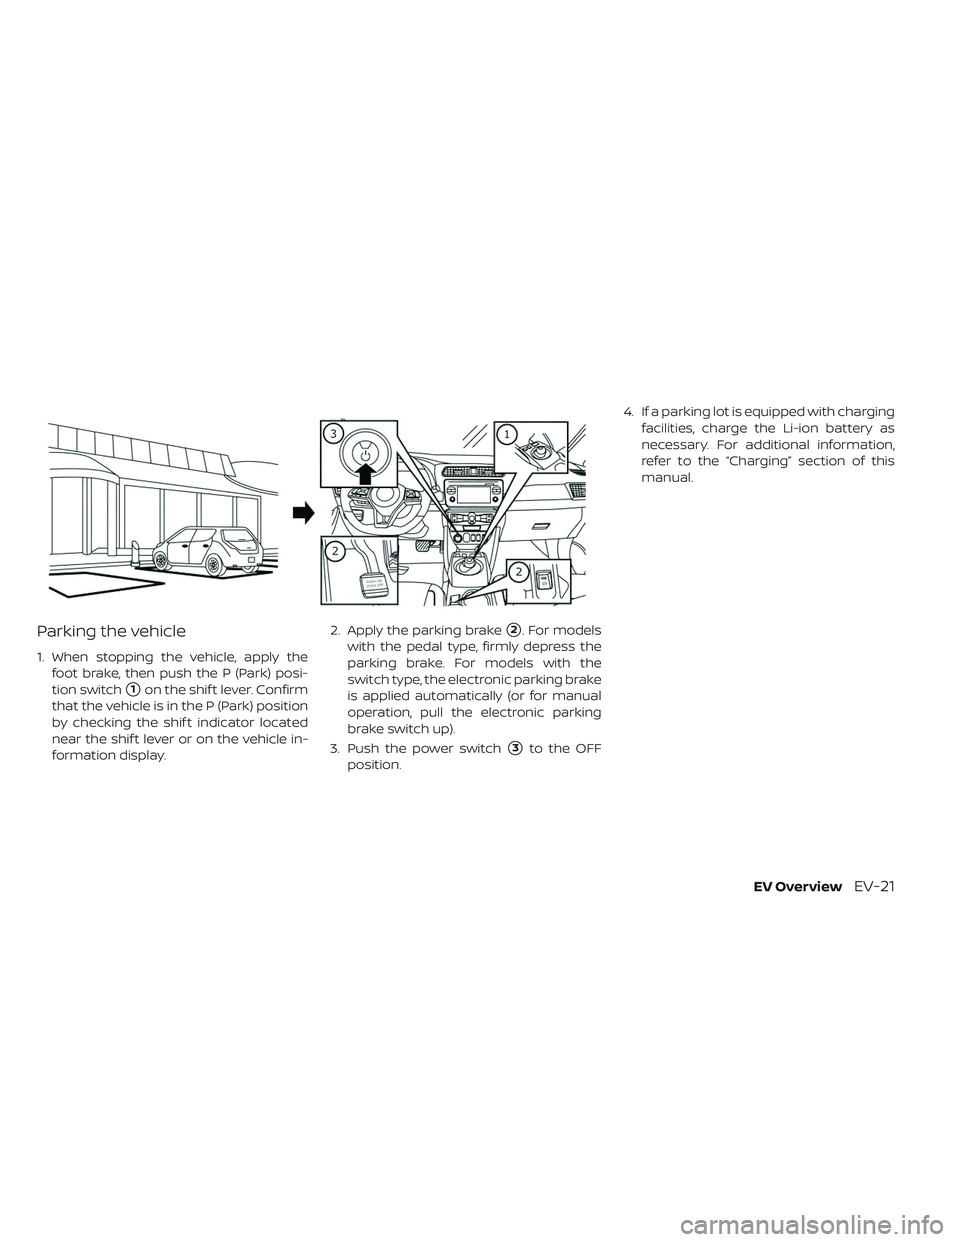
Parking the vehicle
1. When stopping the vehicle, apply thefoot brake, then push the P (Park) posi-
tion switch
�1on the shif t lever. Confirm
that the vehicle is in the P (Park) position
by checking the shif t indicator located
near the shif t lever or on the vehicle in-
formation display. 2. Apply the parking brake
�2. For models
with the pedal type, firmly depress the
parking brake. For models with the
switch type, the electronic parking brake
is applied automatically (or for manual
operation, pull the electronic parking
brake switch up).
3. Push the power switch
�3to the OFF
position. 4. If a parking lot is equipped with charging
facilities, charge the Li-ion battery as
necessary. For additional information,
refer to the “Charging” section of this
manual.
EV OverviewEV-21
Page 45 of 610

• Use the air conditioner/heater and closewindows to reduce drag when cruising at
highway speed.
• Vehicle range may be substantially re- duced in extremely cold conditions (for ex-
ample, -4°F (-20°C)).
• Using the climate control system to heat the cabin when the outside temperature
is below 32°F (0°C) uses more electricity
and affects vehicle range more than when
using the heater when the temperature is
above 32°F (0°C).
• When it is cold, use the steering wheel heater in substitution for the heater/air
conditioner. The steering wheel heater
consumes less power than the heater/air
conditioner.
• Release the accelerator pedal to slow down and do not apply the brakes when
traffic and road conditions allow. – This vehicle is equipped with a regen-erative brake system. The primary pur-
pose of the regenerative brake system
is to provide some power to recharge
the Li-ion battery and extend driving
range. A secondary benefit is “engine
braking” that operates based on Li-ion battery conditions. In the D (Drive) posi-
tion, when the accelerator is released,
the regenerative brake system pro-
vides some deceleration and some
power to the Li-ion battery.
LI-ION BATTERY LIFE
The Li-ion battery's ability to hold a charge,
like all batteries, decreases with battery
age and usage which results in decreased
vehicle range when compared to the ve-
hicle range when the vehicle was new. This
is normal and expected, and does not indi-
cate a malfunction of the vehicle or Li-ion
battery.
The Li-ion battery's ability to hold a charge
can be affected by how you drive the ve-
hicle, store the vehicle, how you charge the
Li-ion battery and Li-ion battery tempera-
ture during vehicle operation and charging.
To maximize the battery's useful life, use
the following driving and charging habits
where possible:
• Avoid exposing a vehicle to extreme am-
bient temperatures for extended periods. • Avoid storing a vehicle in temperatures
below −13°F (−25°C) for more than seven
days.
• Avoid leaving your vehicle for more than 14 days where the Li-ion battery available
charge gauge reaches a zero or near zero
(state of charge).
• Allow the vehicle and Li-ion battery to cool down af ter use before charging.
• Park/store your vehicle in cool locations out of direct sunlight and away from heat
sources.
• Avoid sustained high battery tempera- tures (caused, for example, by exposure to
very high ambient temperatures or ex-
tending highway driving with multiple
quick charges [if so equipped]) .
• Use the normal charging or trickle charg- ing methods to charge the Li-ion battery
and minimize the use of public Fast
Charge or Quick Charger.
• Moderate driving.
• Use of ECO mode.
EV-24EV Overview
Page 47 of 610
Li-ion battery temperature gauge:
This gauge
�2displays the temperature of
the Li-ion battery.
For additional information, refer to “Li-ion
battery temperature gauge” in the “Instru-
ments and controls” section of this manual. Power meter:
This meter displays the actual traction mo-
tor power consumption and the regenera-
tive brake power provided to the Li-ion bat-
tery.
For additional information, refer to “Power
meter” in the “Instruments and controls”
section of this manual.Driving range:
This indicator displays the estimated driv-
ing range (calculated based on a program
that accounts for current driving style and
operational conditions) that can be driven
before recharging is necessary.
For additional information, refer to “Driving
range” in the “Instruments and controls”
section of this manual.
EV-26EV Overview
Page 48 of 610

Li-ion battery available charge gauge:
This indicator displays the available Li-ion
battery capacity remaining to drive the ve-
hicle.
For additional information, refer to “Li-ion
battery available charge gauge” in the “In-
struments and controls” section of this
manual.
The EV unique information is displayed on
the vehicle information display as well. For
additional information, refer to “Vehicle in-
formation display” in the “Instruments and
controls” section of this manual.
Warning and indicator lights
The EV system uses the following EV spe-
cific warning and indicator lights:
1. Master warning light (red)
2. Master warning light (yellow)3. 12-volt battery charge warning light
4. Plug-in indicator light
5. READY to Drive indicator light
6. Power limitation indicator light
7. EV system warning light
8. Electric shif t control system warning
light
9. Brake system warning light (yellow)
10. Approaching Vehicle Sound for Pedes- trians (VSP) system OFF warning light
For additional information, refer to “Warn-
ing lights, indicator lights and audible re-
minders” in the “Instruments and controls”
section of this manual.
EV OverviewEV-27
Page 61 of 610
 BY CHARGING
DEVICE
WARNING
• If you use any medical electric de- vices, such as an implantable car-
diac pacemaker or an implantable
cardiovascular defibrill")
HOW TO NORMAL CHARGE
(AC 220–240 VOLT) BY CHARGING
DEVICE
WARNING
• If you use any medical electric de- vices, such as an implantable car-
diac pacemaker or an implantable
cardiovascular defibrillator, check
with the electric medical device
manufacturer concerning the ef-
fects that charging may have on im-
planted devices before starting the
charge operation. Charging may af-
fect the operation.
• Be sure to follow the precautions for using the charging device that can
be installed in your home. Failing to
do so could result in serious injury or
death.
CAUTION
• Do not use any charging equipment that is not compatible with the LEAF.
Doing so could prevent the Li-ion
battery from charging properly or
could result in damage to the vehicle
or Li-ion battery.
• Normal charge uses the charging device (AC 220 - 240 volt, 16A or 32A) that can be
installed in your home to charge the Li-ion
battery.
• Immediate charge, charging timer and re- mote charge (models with Navigation
System) can be performed in the normal
charge mode. For additional information,
refer to “Charging methods” in this
section.
• The charging equipment communicates with the vehicle before Li-ion battery
charging starts. If this communication
does not occur because other equipment
is used, the Li-ion battery will not charge. • NISSAN recommends that you connect
the charging device when getting out of
the vehicle, even if it is not going to be
used. By doing this, you can get the most
out of the remote climate control (models
with Navigation System) and Climate Ctrl.
Timer functions the next time you use the
vehicle.
To start normal charge:
1. Push the P (Park) position switch to place the vehicle in the P (Park) position and
apply the parking brake.
2. When charging the Li-ion battery, place the power switch in the OFF position.
When the power switch is in the ON po-
sition, the Li-ion battery will not start
charging.
3. Open the charge port lid and charge port cap. For additional information, re-
fer to “Charge port lid” and “Charge port
cap” in the “Pre-driving checks and ad-
justments” section of this manual.
CH-10Charging
Page 65 of 610
 and immediate
charge can be performed in the trickle
charge mode. For additional informa-
tion, refer to")
To start trickle charging:
NOTE:
Charging timer, remote charge (models
with navigation system) and immediate
charge can be performed in the trickle
charge mode. For additional informa-
tion, refer to “Charging methods” in this
section.
1. Push the P (Park) position switch to placethe vehicle in the P (Park) position and
apply the parking brake. 2. When charging the Li-ion battery, place
the power switch in the OFF position.
When the power switch is in the ON po-
sition, the Li-ion battery will not start
charging.
3. Open the charge port lid. For additional information, refer to “Charge port lid” in
the “Pre-driving checks and adjust-
ments” section of this manual.
4. Take out the EVSE from the rear hatch. 5. Connect the electrical plug to the AC 110
- 120 volt, 15A dedicated electrical outlet.
If it is connected normally, the green light
on the EVSE control box indicator light
illuminates.
NOTE:
You can pass a rope through the
holes
�Ain the control box in order
to hang it up while the Li-ion battery
is charging. Use the EVSE with the
plug in an upright position (the cord
should extend down from the out-
let).
6. Open the charge port cap. For additional
information, refer to “Charge port cap” in
the “Pre-driving checks and adjust-
ments” section of this manual.
CH-14Charging
 position for optimumdriving performance.
• Use the B mode for downhill driving. When the B mode is used,")