2019 NISSAN KICKS horn
[x] Cancel search: hornPage 14 of 444
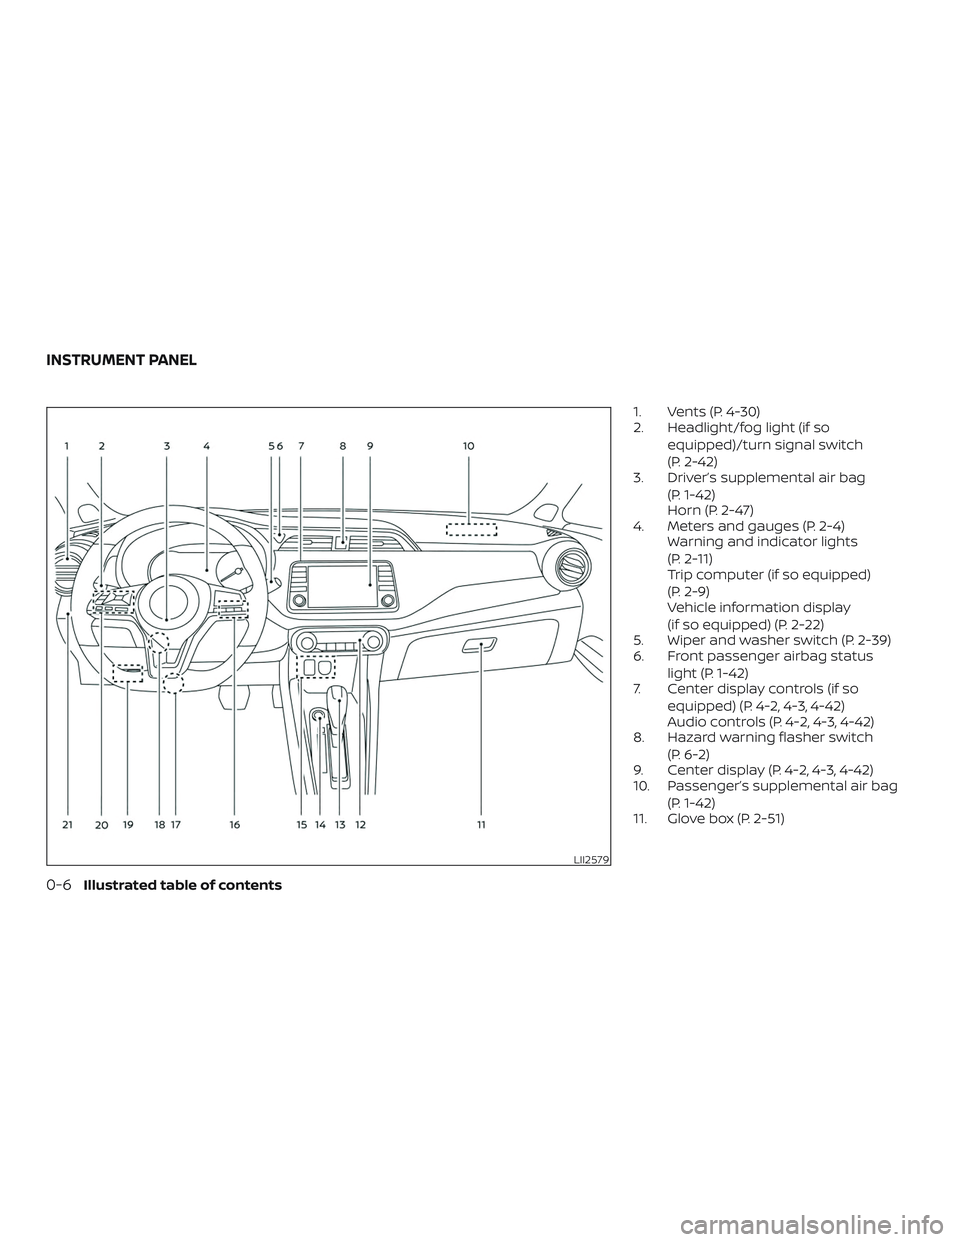
1. Vents (P. 4-30)
2. Headlight/fog light (if soequipped)/turn signal switch
(P. 2-42)
3. Driver’s supplemental air bag
(P. 1-42)
Horn (P. 2-47)
4. Meters and gauges (P. 2-4) Warning and indicator lights
(P. 2-11)
Trip computer (if so equipped)
(P. 2-9)
Vehicle information display
(if so equipped) (P. 2-22)
5. Wiper and washer switch (P. 2-39)
6. Front passenger airbag status
light (P. 1-42)
7. Center display controls (if so
equipped) (P. 4-2, 4-3, 4-42)
Audio controls (P. 4-2, 4-3, 4-42)
8. Hazard warning flasher switch
(P. 6-2)
9. Center display (P. 4-2, 4-3, 4-42)
10. Passenger’s supplemental air bag
(P. 1-42)
11. Glove box (P. 2-51)
LII2579
INSTRUMENT PANEL
0-6Illustrated table of contents
Page 84 of 444
2 Instruments and controls
Instrument panel................................2-2
Meters and gauges ..............................2-4
Speedometer and odometer .................2-5
Tachometer .................................. 2-7
Fuel gauge ...................................2-8
Distance To Empty (DTE) ......................2-8
Trip computer (if so equipped) ................2-9
Warning lights, indicator lights and audible
reminders ....................................... 2-11
Checking lights .............................. 2-12
Warning lights ............................... 2-12
Indicator lights .............................. 2-18
Audible reminders ........................... 2-21
Vehicle information display (if so equipped) .....2-22
How to use the vehicle information
display ...................................... 2-22
Startup display .............................. 2-23
Settings ..................................... 2-23
Vehicle information display warnings
and indicators ............................... 2-31
Security systems (if so equipped) ...............2-35
Vehicle security system .....................2-35
NISSAN Anti-Thef t System (NATS)
(if so equipped) .............................. 2-37NISSAN Vehicle Immobilizer System
(if so equipped)
.............................. 2-37
Wiper and washer switch .......................2-39
Switch operation ............................ 2-39
Rear switch operation .......................2-40
Rear window or outside mirror defroster
switch (if so equipped) .......................... 2-41
Headlight and turn signal switch ...............2-42
Headlight control switch .....................2-42
Daytime Running Lights (DRL) system
(if so equipped) .............................. 2-45
Instrument brightness control ...............2-45
Turn signal switch ........................... 2-46
Fog light switch (if so equipped) .............2-46
Horn ...........................................2-47
Heated seat switches (if so equipped) ..........2-47
Automatic Emergency Braking (AEB) switch
(if so equipped) ................................. 2-48
Vehicle Dynamic Control (VDC) OFF switch ......2-48
P
ower outlets .................................. 2-49
12v outlets ................................... 2-49
Extended storage switch .......................2-50
Storage ........................................ 2-51
Seatback pockets ........................... 2-51
Page 86 of 444
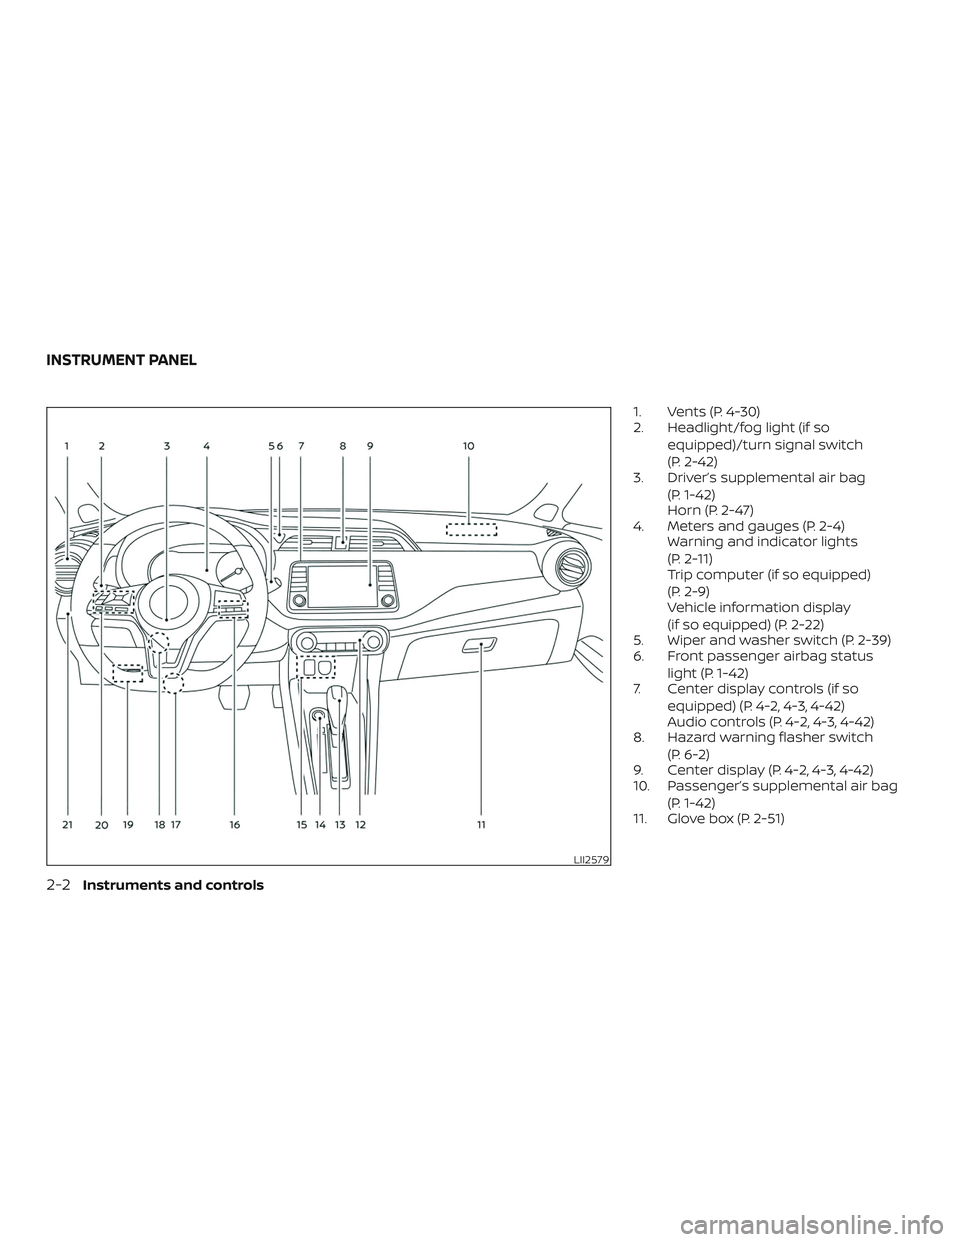
1. Vents (P. 4-30)
2. Headlight/fog light (if soequipped)/turn signal switch
(P. 2-42)
3. Driver’s supplemental air bag
(P. 1-42)
Horn (P. 2-47)
4. Meters and gauges (P. 2-4) Warning and indicator lights
(P. 2-11)
Trip computer (if so equipped)
(P. 2-9)
Vehicle information display
(if so equipped) (P. 2-22)
5. Wiper and washer switch (P. 2-39)
6. Front passenger airbag status
light (P. 1-42)
7. Center display controls (if so
equipped) (P. 4-2, 4-3, 4-42)
Audio controls (P. 4-2, 4-3, 4-42)
8. Hazard warning flasher switch
(P. 6-2)
9. Center display (P. 4-2, 4-3, 4-42)
10. Passenger’s supplemental air bag
(P. 1-42)
11. Glove box (P. 2-51)
LII2579
INSTRUMENT PANEL
2-2Instruments and controls
Page 111 of 444
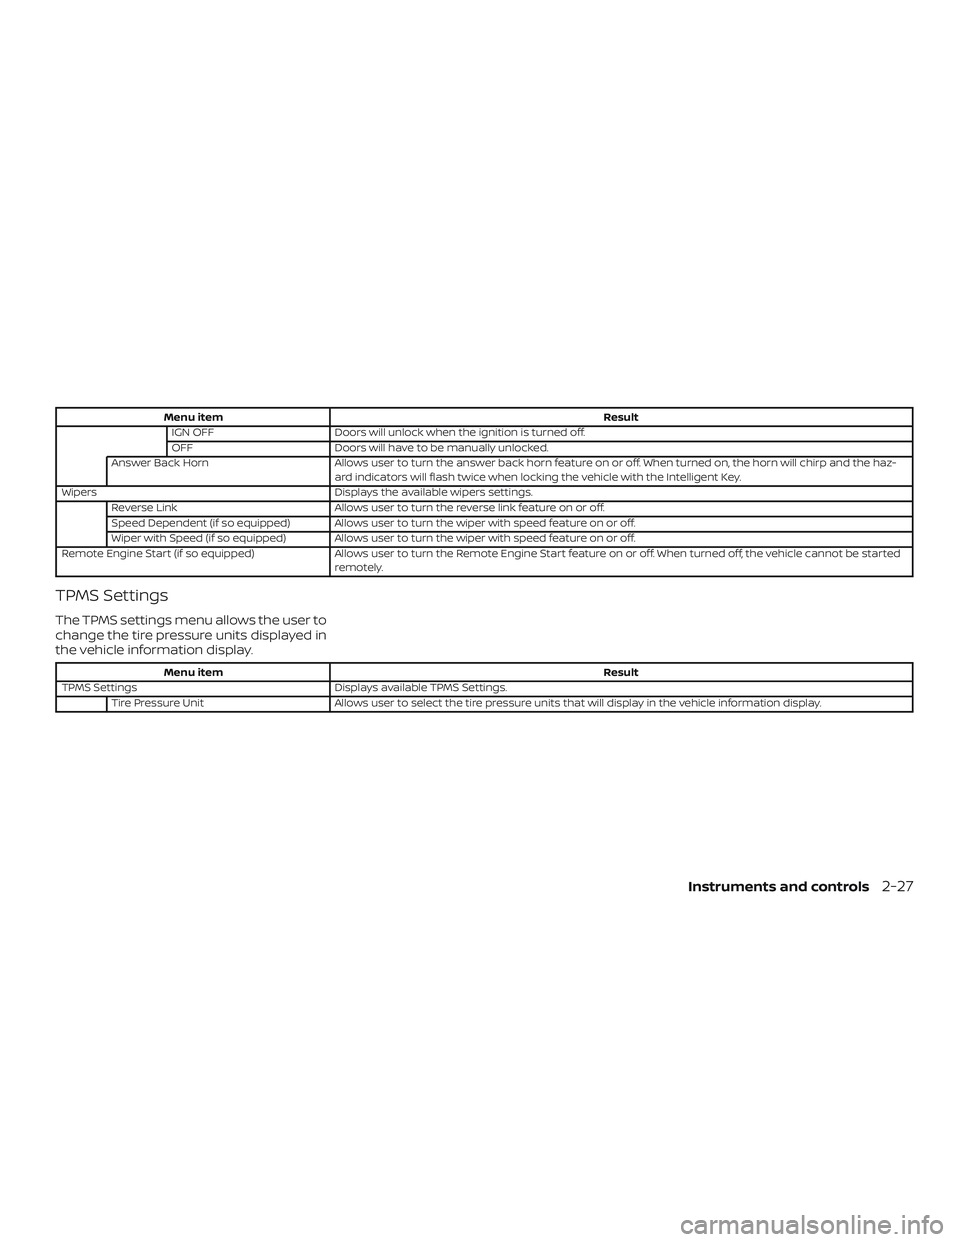
Menu itemResult
IGN OFF Doors will unlock when the ignition is turned off.
OFF Doors will have to be manually unlocked.
Answer Back Horn Allows user to turn the answer back horn feature on or off. When turned on, the horn will chirp and the haz-
ard indicators will flash twice when locking the vehicle with the Intelligent Key.
Wipers Displays the available wipers settings.
Reverse Link Allows user to turn the reverse link feature on or off.
Speed Dependent (if so equipped) Allows user to turn the wiper with speed feature on or off.
Wiper with Speed (if so equipped) Allows user to turn the wiper with speed feature on or off.
Remote Engine Start (if so equipped) Allows user to turn the Remote Engine Start feature on or off. When turned off, the vehicle cannot be started
remotely.
TPMS Settings
The TPMS settings menu allows the user to
change the tire pressure units displayed in
the vehicle information display.
Menu item Result
TPMS Settings Displays available TPMS Settings.
Tire Pressure Unit Allows user to select the tire pressure units that will display in the vehicle information display.
Instruments and controls2-27
Page 120 of 444
The system helps deter vehicle thef t but
cannot prevent it, nor can it prevent the
thef t of interior or exterior vehicle compo-
nents in all situations. Always secure your
vehicle even if parking for a brief period.
Never leave your keys in the vehicle, and
always lock the vehicle when unattended.
Be aware of your surroundings, and park in
secure, well-lit areas whenever possible.
Many devices offering additional protection,
such as component locks, identification
markers, and tracking systems, are available
at auto supply stores and specialty shops. A
NISSAN dealer may also offer such equip-
ment. Check with your insurance company
to see if you may be eligible for discounts for
various thef t protection features.
How to arm the vehicle security
system
1. Close all windows.(The system can be
armed even if the windows are open.)
2. Remove the keys from the vehicle.
3. Close all doors, hood and lif tgate. Lock all doors. The doors can be locked with
the key fob (if so equipped), Intelligent
Key (if so equipped), door handle re-
quest switch, or mechanical key (if so
equipped). 4. Confirm that the
security indica-
tor light stays on for about 30 seconds.
The vehicle security system is now pre-
armed. The vehicle security system will
automatically shif t into the armed
phase. The
security light begins
to flash once every three seconds. If
during the pre-armed phase one of the
following occurs, the system will not
arm:
∙ Any door is unlocked with the key fob (if so equipped), the Intelligent Key (if so
equipped), mechanical key (if so
equipped), or door request switch.
∙ Ignition switch is placed in the ON posi- tion.
∙ Even when the driver and/or passen-
gers are in the vehicle, the system will
activate with all the doors, hood and
lif tgate locked with the ignition
switch placed in the LOCK position.
When placing the ignition switch in
the ON position, the system will be
released.
Vehicle security system activation
The vehicle security system will give the
following alarm:
∙ The headlights or turn lamps blink and the horn sounds intermittently but syn-
chronously.
∙ The alarm automatically turns off af ter a period of time. However, the alarm
reactivates if the vehicle is tampered
with again.
The alarm is activated by: ∙ opening any door, hood or the lif tgate without using the key or Intelligent Key
(even if the door is unlocked by releas-
ing the door inside lock knob).
How to stop an activated alarm
The alarm stops only by unlocking a door
or the lif tgate with the key fob (if so
equipped), pressing the
button on
the Intelligent Key (if so equipped), or push-
ing the request switch on the driver’s or
passenger’s door with the Intelligent Key (if
so equipped) in range of the door handle.
2-36Instruments and controls
Page 131 of 444
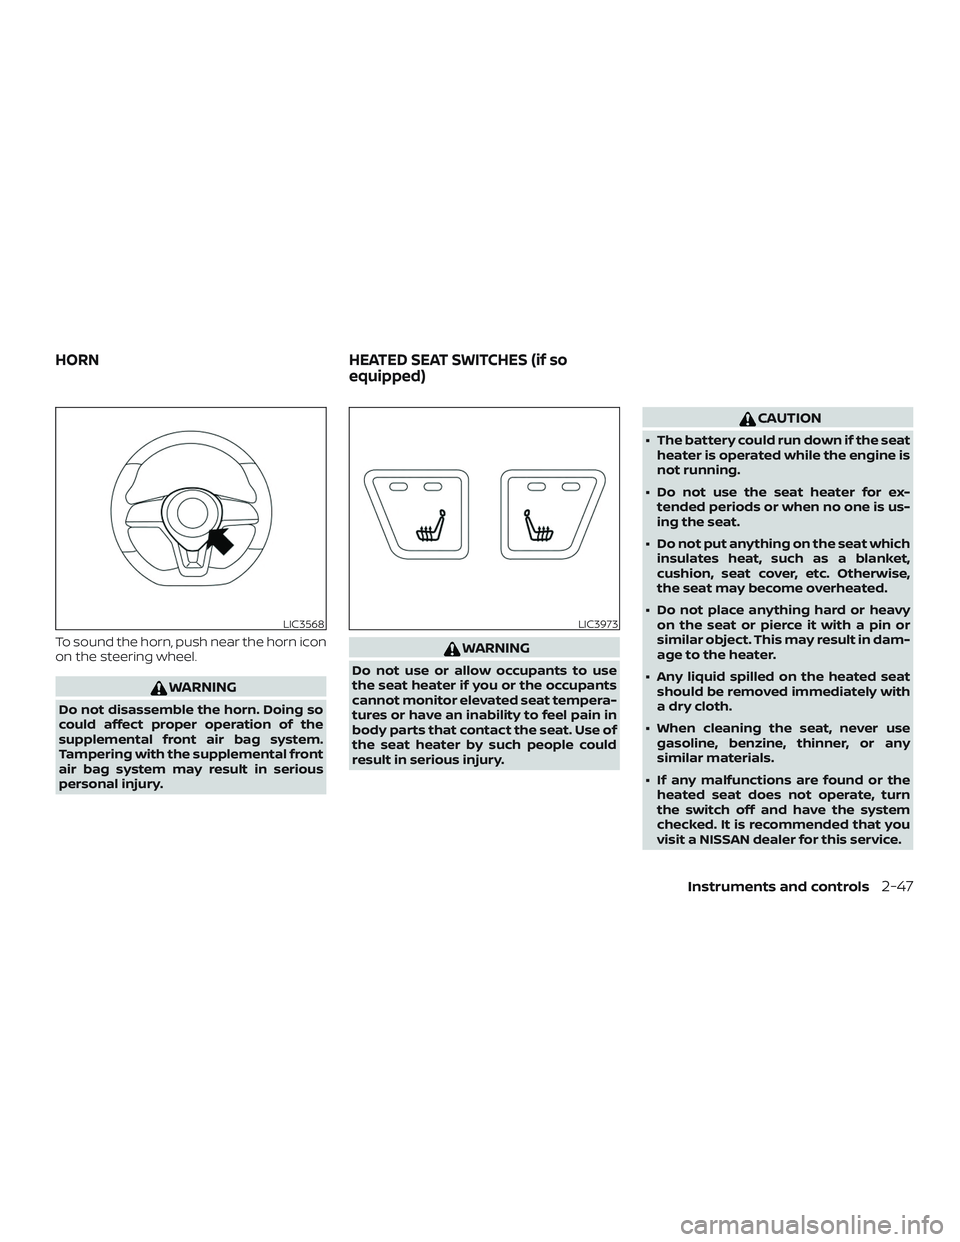
To sound the horn, push near the horn icon
on the steering wheel.
WARNING
Do not disassemble the horn. Doing so
could affect proper operation of the
supplemental front air bag system.
Tampering with the supplemental front
air bag system may result in serious
personal injury.
WARNING
Do not use or allow occupants to use
the seat heater if you or the occupants
cannot monitor elevated seat tempera-
tures or have an inability to feel pain in
body parts that contact the seat. Use of
the seat heater by such people could
result in serious injury.
CAUTION
∙ The battery could run down if the seatheater is operated while the engine is
not running.
∙ Do not use the seat heater for ex- tended periods or when no one is us-
ing the seat.
∙ Do not put anything on the seat which insulates heat, such as a blanket,
cushion, seat cover, etc. Otherwise,
the seat may become overheated.
∙ Do not place anything hard or heavy on the seat or pierce it with a pin or
similar object. This may result in dam-
age to the heater.
∙ Any liquid spilled on the heated seat should be removed immediately with
a dry cloth.
∙ When cleaning the seat, never use gasoline, benzine, thinner, or any
similar materials.
∙ If any malfunctions are found or the heated seat does not operate, turn
the switch off and have the system
checked. It is recommended that you
visit a NISSAN dealer for this service.
LIC3568LIC3973
HORN HEATED SEAT SWITCHES (if so
equipped)
Instruments and controls2-47
Page 272 of 444
The low tire pressure warning light may
illuminate in the following cases:∙ If the vehicle is equipped with a wheel and tire without TPMS.
∙ If the TPMS has been replaced and the ID has not been registered.
∙ If the wheel is not originally specified by NISSAN.
FCC Notice:
For USA:
This device complies with Part 15 of the
FCC Rules. Operation is subject to the fol-
lowing two conditions: (1) This device
may not cause harmful interference, and
(2) this device must accept any interfer-
ence received, including interference
that may cause undesired operation.
NOTE:
Changes or modifications not expressly
approved by the party responsible for
compliance could void the user’s author-
ity to operate the equipment. For Canada:
This device complies with Industry
Canada licence-exempt RSS standard(s).
Operation is subject to the following two
conditions: (1) this device may not cause
interference, and (2) this device must ac-
cept any interference, including interfer-
ence that may cause undesired opera-
tion of the device.
TPMS with Easy-Fill Tire Alert
When adding air to an under-inflated tire,
the TPMS with Easy-Fill Tire Alert provides
visual and audible signals outside the ve-
hicle to help you inflate the tires to the rec-
ommended COLD tire pressure.
Vehicle set-up
1. Park the vehicle in a safe and level place.
2. Apply the parking brake and place the shif t lever in the P (Park) position.
3. Place the ignition switch in the ON po- sition. Do not start the engine. Operation
1. Add air to the tire.
2. Af ter a few seconds, the hazard indica- tors will start flashing.
3. When the designated pressure is reached, the horn beeps once and the
hazard indicators stop flashing.
4. Perform the above steps for each tire. ∙ If the tire is over-inflated more thanapproximately 4 psi (30 kPa), the horn
beeps and the hazard indicators
flash three times. To correct the pres-
sure, push the core of the valve stem
on the tire briefly to release pressure.
When the pressure reaches the des-
ignated pressure, the horn beeps
once.
∙ If the hazard indicator does not flash within approximately 15 seconds af-
ter starting to inflate the tire, it indi-
cates that the Easy-Fill Tire Alert is
not operating.
∙ The TPMS will not activate the Easy- Fill Tire Alert under the following con-
ditions:
– If there is interference from an exter- nal device or transmitter.
5-6Starting and driving
Page 273 of 444
– The air pressure from the inflationdevice is not sufficient to inflate the
tire.
– There is a malfunction in the TPMS.
– There is a malfunction in the horn or hazard indicators.
– The identification code of the tire pressure sensor is not registered to
the system.
– The battery of the tire pressure sen- sor is low.
∙ If the Easy-Fill Tire Alert does not op- erate due to TPMS interference, move
the vehicle about 3 f t (1 m) backward
or forward and try again.
If the Easy-Fill Tire Alert is not working, use a
tire pressure gauge.
ON-PAVEMENT AND OFF-ROAD
DRIVING PRECAUTIONS
Utility vehicles have a significantly
higher rollover rate than other types of
vehicles.
They have higher ground clearance than
passenger cars to make them capable of
performing in a variety of on-pavement
and off-road applications. This gives them a higher center of gravity than ordinary ve-
hicles. An advantage of higher ground
clearance is a better view of the road, allow-
ing you to anticipate problems. However,
they are not designed for cornering at the
same speeds as conventional 2-wheel
drive vehicles any more than low-slung
sports cars are designed to perform satis-
factorily under off-road conditions. If at all
possible, avoid sharp turns at high speeds.
As with other vehicles of this type, failure to
operate this vehicle correctly may result in
loss of control or vehicle rollover. In a roll-
over crash, an unbelted person is signifi-
cantly more likely to die than a person
wearing a seat belt.
AVOIDING COLLISION AND
ROLLOVER
WARNING
Failure to operate this vehicle in a safe
and prudent manner may result in loss
of control or an accident.
Be alert and drive defensively at all times.
Obey all traffic regulations. Avoid excessive
speed, high speed cornering, or sudden
steering maneuvers, because these driving
practices could cause you to lose control of
your vehicle. As with any vehicle, loss of control could
result in a collision with other vehicles or
objects or cause the vehicle to roll over,
particularly if the loss of control causes
the vehicle to slide sideways.
Be attentive at all times, and avoid driving
when tired. Never drive when under the in-
fluence of alcohol or drugs (including pre-
scription or over-the-counter drugs which
may cause drowsiness). Always wear your
seat belt as outlined in the “Safety – Seats,
seat belts and supplemental restraint sys-
tem” section of this manual, and also in-
struct your passengers to do so.
Seat belts help reduce the risk of injury in
collisions and rollovers.
In a rollover crash,
an unbelted or improperly belted person
is significantly more likely to be injured
or killed than a person properly wearing
a seat belt.OFF-ROAD RECOVERY
While driving, the right side or lef t side
wheels may unintentionally leave the road
surface. If this occurs, maintain control of
the vehicle by following the procedure be-
low. Please note that this procedure is only
a general guide. The vehicle must be driven
as appropriate based on the conditions of
the vehicle, road and traffic.
Starting and driving5-7