Page 182 of 444

Refer to the NissanConnect® Owner’s
Manual that includes the following infor-
mation.∙ Audio system
∙ Apple CarPlay
TM
∙ Android AutoTM
∙ Bluetooth® Hands-Free Phone system
∙ Viewing information
∙ Other settings
∙ Voice Recognition (if so equipped)
∙ General system information
WARNING
∙ Positioning of the heating or air con- ditioning controls and display con-
trols should not be done while driving
in order that full attention may be
given to the driving operation.
∙ Do not disassemble or modif y this system. If you do, it may result in acci-
dents, fire, or electrical shock. ∙ Do not use this system if you notice
any abnormality, such as a frozen
screen or lack of sound. Continued
use of the system may result in acci-
dent, fire or electric shock.
∙ In case you notice any foreign object in the system hardware, spill liquid on
it, or notice smoke or smell coming
from it, stop using the system imme-
diately. Ignoring such conditions may
lead to accidents, fire or electrical
shock. It is recommended that you
visit a NISSAN dealer for servicing.
NISSANCONNECT® OWNER’S
MANUAL (if so equipped)
4-2Monitor, climate, audio, phone and voice recognition systems
Page 184 of 444

HOW TO USE THE TOUCH-SCREEN
CAUTION
∙ The glass display screen may break ifit is hit with a hard or sharp object. If
the glass screen breaks, do not touch
it. Doing so could result in an injury.
∙ To clean the display, never use a rough cloth, alcohol, benzine, thinner or any
kind of solvent or paper towel with a
chemical cleaning agent. They will
scratch or deteriorate the panel.
∙ Do not splash any liquid such as water or car fragrance on the display. Con-
tact with liquid will cause the system
to malfunction. To help ensure safe driving, some functions
cannot be operated while driving.
The on-screen functions that are not avail-
able while driving will be “grayed out” or
muted.
WARNING
∙ ALWAYS give your full attention to
driving.
∙ Avoid using vehicle features that could distract you. If distracted, you
could lose control of your vehicle and
cause an accident.
Touch-screen operation
Menu Item Result
Selecting the item Touch an item to select. To select the “Phone” key, touch the “Phone” key on the screen. Touch the “
”keyto
return to the previous screen.
Adjusting the item Touch the “+” key or the “�” key to adjust the settings of an item. Touch the up arrow to scroll up the page one
item at a time. Touch the down arrow to scroll down the page one item at a time.
Inputting characters Touch the number key. There are some options available when inputting characters.
123 Touch to manually enter numbers.
OK Completes the character input.
LHA4700
4-4Monitor, climate, audio, phone and voice recognition systems
Page 185 of 444
Touch-screen maintenance
If you clean the display screen, use a dry,
sof t cloth. If additional cleaning is neces-
sary, use a small amount of neutral deter-
gent with a sof t cloth. Never spray the
screen with water or detergent. Dampen
the cloth first and then wipe the screen.
HOW TO USE THEMENU
BUTTON
To select and/or adjust several functions,
features and modes that are available for
your vehicle:
1. Press the
MENU button.
2. Touch the “Settings” key.
3. Touch the desired item.
LHA4706LHA4700
Monitor, climate, audio, phone and voice recognition systems4-5
Page 186 of 444

Menu itemResult
Settings Touch to change the following settings.
Connections Touch this key to select either Bluetooth® phone, Bluetooth® audio or USB audio options. For additional
information, refer to “USB connections screen” and “Bluetooth® connections screen” in this section.
Phone For additional information, refer to “Bluetooth® Hands-Free Phone System” in this section.
Sound For additional information, refer to “Audio system” in this section.
Volume & Beeps For additional information, refer to “Volume & beeps” in this section.
Clock Touch this key to adjust clock settings.
On-screen Clock Touch to toggle ON or OFF the clock display on the upper right corner of the display screen.
Clock Format Touch to set the clock to 12–hour or 24–hour format.
Daylight Savings Time Touch to adjust the daylight savings time to on or off.
Set Clock Manually Touch to adjust the clock manually; then touch to change between AM and PM, the hour and the
minutes.
System Voice For additional information, refer to “Settings” in this section.
Camera Touch this key to change the camera settings.
Others Touch this key to select and/or adjust various functions of this system. A screen with additional options
will appear.
Display Touch this key to toggle the display off or to adjust the appearance of the display. For additional
information, refer to “Adjusting the screen” in this section.
Language Touch this key to change the language on the display.
OSS Licenses Touch this key to display sof tware licensing information.
Return All Settings To Default Touch this key to return all settings to default and to clear the memory.
4-6Monitor, climate, audio, phone and voice recognition systems
Page 187 of 444
(brightness control) BUTTON
To change the display brightness, press
the
button. Pressing the button again
will change the display to the day or the
night display.
Press and hold the
button for more
than 2 seconds to turn the display off. Press
and hold the button again to turn the dis-
play on.
HOW TO USE THE VOL (volume)
KNOB / PUSH
(power)
BUTTON
Press the PUSH(power) button to
turn audio function on and off. Turn the VOL
(volume) knob to adjust audio volume.SELECTING MENU FROM LAUNCH
BAR
Various system functions can be accessed
by touching the items on the Launch Bar
�1which is displayed on most of the main
menu screens (the Launch Bar does not
appear on some screens such as keyboard
screens, camera screens, etc.)
Touch the keys on the Launch Bar to dis-
play the corresponding menu screens. The following menu items are available on
the Launch Bar:
∙AM
∙FM
∙ USB/iPod
∙ Bluetooth
∙AUX
∙ Settings
LHA4707
Monitor, climate, audio, phone and voice recognition systems4-7
Page 192 of 444
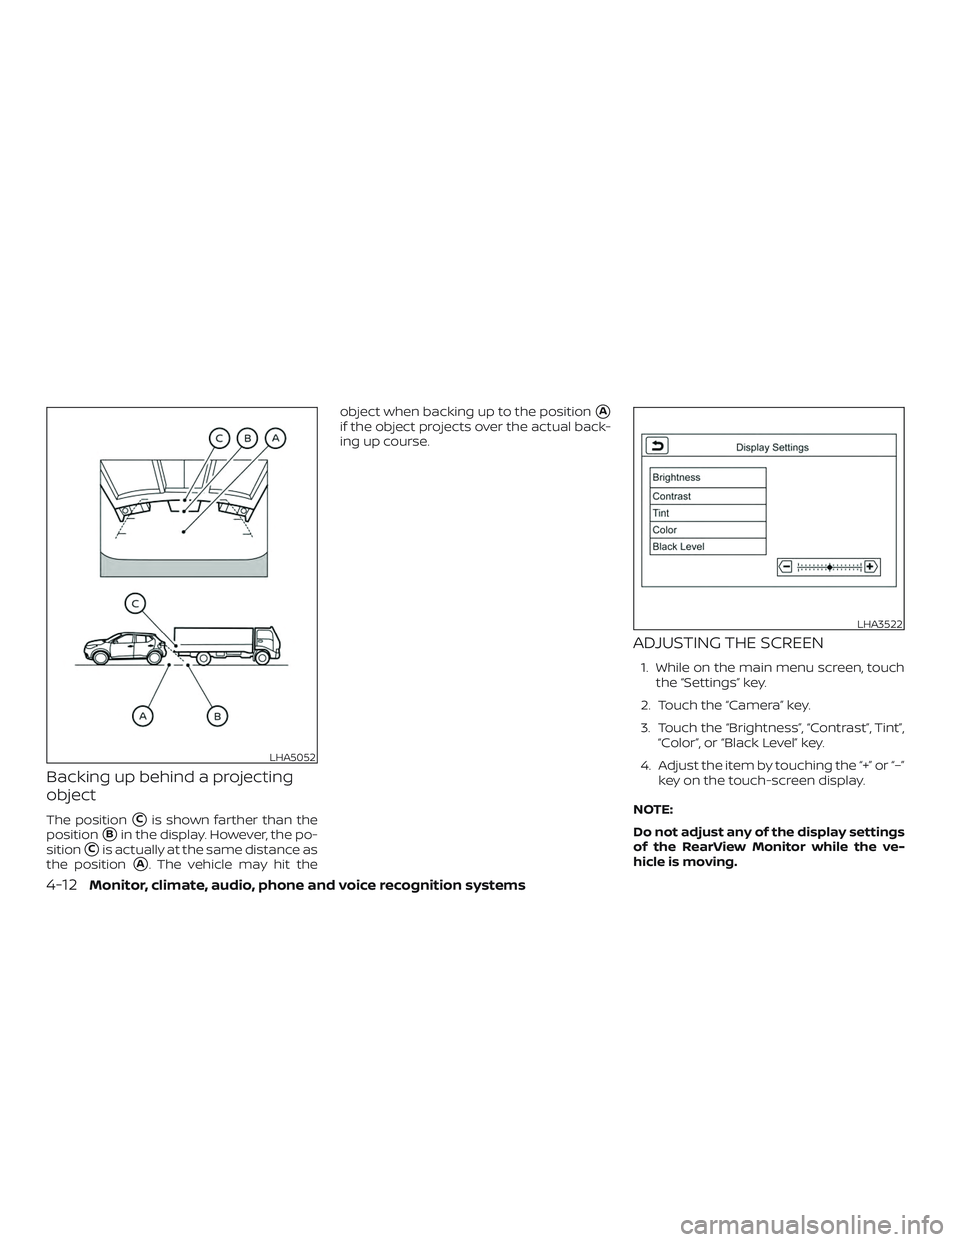
Backing up behind a projecting
object
The position�Cis shown farther than the
position
�Bin the display. However, the po-
sition
�Cis actually at the same distance as
the position
�A. The vehicle may hit the object when backing up to the position
�A
if the object projects over the actual back-
ing up course.
ADJUSTING THE SCREEN
1. While on the main menu screen, touch
the “Settings” key.
2. Touch the “Camera” key.
3. Touch the “Brightness”, “Contrast”, Tint”, “Color”, or “Black Level” key.
4. Adjust the item by touching the “+” or “–” key on the touch-screen display.
NOTE:
Do not adjust any of the display settings
of the RearView Monitor while the ve-
hicle is moving.
LHA5052
LHA3522
4-12Monitor, climate, audio, phone and voice recognition systems
Page 203 of 444
ADJUSTING THE SCREEN
1. While on the main menu screen, touchthe “Settings” key.
2. Use the arrow to tab to the next screen and touch the “Camera” key.
3. Touch the “Display Settings” key.
4. Touch the “Brightness”, “Contrast”, Tint”, “Color”, or “Black Level” key.
5. Adjust the item by touching the “+” or “–” key on the touch-screen display. NOTE:
Do not adjust any of the display settings
of the RearView Monitor while the ve-
hicle is moving. Make sure the parking
brake is firmly applied.
INTELLIGENT AROUND VIEW
MONITOR SYSTEM LIMITATIONS
LHA3522
LHA4117
Monitor, climate, audio, phone and voice recognition systems4-23
Page 208 of 444
position and the vehicle speed is below
approximately 5 mph (8 km/h), the MOD
system detects moving objects in the
front view.
∙ When the shif t lever is")
∙ When the shif t lever is in the D (Drive)position and the vehicle speed is below
approximately 5 mph (8 km/h), the MOD
system detects moving objects in the
front view.
∙ When the shif t lever is in the R (Reverse) position and the vehicle speed is below
approximately 5 mph (8 km/h), the MOD
system detects moving objects in the
rear view. The MOD system will not op-
erate if the lif tgate is open. The MOD system does not detect moving
objects in the front-side view. The MOD
icon is not displayed on the screen when in
this view.
When the MOD system detects moving ob-
jects near the vehicle, a chime will be heard
when in front or rear view and a yellow
frame will be displayed on the view where
the objects are detected. While the MOD
system continues to detect moving ob-
jects, the yellow frame continues to be dis-
played. In the bird’s-eye view, the yellow frame
�1is
displayed on each camera image (front,
rear, right, lef t) depending on where mov-
ing objects are detected.
The yellow frame
�2is displayed on each
view in the front view and rear view modes.
A blue MOD icon
�3is displayed in the view
where the MOD system is operative. A gray
MOD icon is displayed in the view where the
MOD system is not operative.
If the MOD system is turned off, the MOD
icon
�3is not displayed.
TURNING MOD ON AND OFF (if so
equipped)
Some vehicles include the option to allow
the MOD system to be turned on or off in
the vehicle information display.
To turn the MOD system on or off:
1. Using
buttons on the steer-
ing wheel to select “Settings”.
2. Select “Driver Assistance” and press the OK button.
3. Select “Parking Aids”.
4. Toggle ON or OFF “Moving Object” us- ing the OK button.
Rear and bird’s-eye views
LHA4191
Rear and front-side views
LHA4997
4-28Monitor, climate, audio, phone and voice recognition systems

 BUTTON
To change the display brightness, press
the
button. Pressing the button again
will change the display to the day or the
night display.
Press and hold the
button for more
th")