Page 41 of 516
∙ Do not allow children to play with theseat belts. Most seating positions are
equipped with Automatic Locking Re-
tractor (ALR) mode seat belts. If the
seat belt becomes wrapped around a
child’s neck with the ALR mode acti-
vated, the child can be seriously in-
jured or killed if the seat belt retracts
and becomes tight. This can occur
even if the vehicle is parked. Unbuckle
the seat belt to release the child. If the
seat belt cannot be unbuckled or is
already unbuckled, release the child
by cutting the seat belt with a suitable
tool (such as a knife or scissors) to
release the seat belt.
Fastening the seat belts (front
seats all models and rear seats
Crew Cab models)
Page 51 of 516

– For forward-facing child seats andboosters, DO NOT install if the child
restraint base extends past the
forward edge of the seat cushion
(King Cab® models).
– The child restraint must be used and installed properly. Always fol-
low all of the child restraint manu-
facturer’s instructions for installa-
tion and use.
– Infants and children should never be held on anyone’s lap. Even the
strongest adult cannot resist the
forces of a collision.
– Do not put a seat belt around both a child and another passenger.
– NISSAN recommends that all child restraints be installed in the rear
seat. Studies show that children
are safer when properly restrained
in the rear seat than in the front
seat. If you must install a forward-
facing child restraint in the front
seat, refer to “Forward-facing child
restraint installation using the seat
belts” in this section. – Even with the NISSAN Advanced Air
Bag System, never install a rear-
facing child restraint in the front
seat. An inflating air bag could se-
riously injure or kill a child. A rear-
facing child restraint must only be
used in the rear seat.
– Be sure to purchase a child re- straint that will fit the child and ve-
hicle. Some child restraints may
not fit properly in your vehicle.
– Child restraint anchorages are de- signed to withstand only those
loads imposed by correctly fitted
child restraints. Under no circum-
stances are they to be used to at-
tach adult seat belts, or other items
or equipment to the vehicle. Doing
so could damage the child re-
straint anchorages. The child re-
straint will not be properly in-
stalled using the damaged
anchorage, and a child could be se-
riously injured or killed in a
collision.
– Never use the anchor points for adult seat belts, or other items. – A child restraint with a top tether
strap should not be used in the
front passenger seat (King Cab®
models).
– Keep seatbacks as upright as pos- sible af ter fitting the child
restraint.
– Infants and children should always be placed in an appropriate child
restraint while in the vehicle.
∙ When the child restraint is not in use, keep it secured with the LATCH system
or a seat belt. In a sudden stop or col-
lision, loose objects can injure occu-
pants or damage the vehicle.
Page 73 of 516

1. Top tether strap
2. Tether strap
3. Tether anchor point
Before securing the child restraint with the
LATCH lower anchors (rear outboard seat-
ing positions for Crew Cab models) follow
these steps.1. If necessary, raise or remove the head restraint/headrest to position the top
tether strap as shown. If the head
restraint/headrest is removed, store it
in a secure place. Be sure to reinstall the
head restraint/headrest when the child
restraint is removed. For additional in-
formation, refer to “Head
restraints/headrests” in this section.
2. Position the top tether strap as shown.
3. Secure the tether strap to the tether anchor point as shown.
4. Return the seatback to the locked po- sition.
5. Refer back to child restraint installation steps before tightening the tether
strap.
If you have any questions when install-
ing a top tether strap, it is recommended
that you visit a NISSAN dealer for this
service.
FORWARD-FACING CHILD
RESTRAINT INSTALLATION USING
LATCH — JUMP SEAT (King Cab®
models)
Page 78 of 516
1. Pull the cover plate off to access the toptether strap routing bracket for the
jump seat.
2. Route the top tether strap through the routing bracket.
3. Secure the top tether strap to the tether anchor point as shown.
4. Refer back to child restraint installation steps before tightening the tether
strap.
If you have any questions when install-
ing a top tether strap, it is recommended
that you visit a NISSAN dealer for this
service.FORWARD-FACING CHILD
RESTRAINT INSTALLATION USING
THE SEAT BELTS — FRONT
PASSENGER AND REAR BENCH
SEAT (Crew Cab models)
Page 83 of 516
First, secure the child restraint with the seat
belt.1. If necessary, raise or remove the head restraint/headrest to position the top
tether strap as shown. If the head
restraint/headrest is removed, store it
in a secure place. Be sure to reinstall the
head restraint/headrest when the child
restraint is removed. For additional in-
formation, refer to “Head
restraints/headrests” in this section.
2. Position the top tether strap as shown.
3. Secure the tether strap to the tether anchor point as shown.
4. Return the seatback to the locked po- sition.
5. Refer back to child restraint installation steps before tightening the tether
strap.
If you have any questions when install-
ing a top tether strap, it is recommended
that you visit a NISSAN dealer for this
service.
FORWARD-FACING CHILD
RESTRAINT INSTALLATION USING
THE SEAT BELTS — FRONT
PASSENGER AND JUMP SEATS
(King Cab® models)
Page 89 of 516
restraint/headrest when the child re-
straint is removed. For additional infor-
mation, refer to “Head
restraints/headrests” in this section.
2. Position the top tether strap as shown.
3. Secure the tether strap to the tether anchor point as shown.
4. Tighten the tether strap according to the manufacturer’s instructions to re-
move any slack.
If you have any questions when install-
ing a top tether strap, it is recommended
that you visit a NISSAN dealer for this
service.
1. Top tether strap
2. Routing bracket
3. Tether anchor point
Installing top tether strap — jump
seat (King Cab® models)
Page 91 of 516

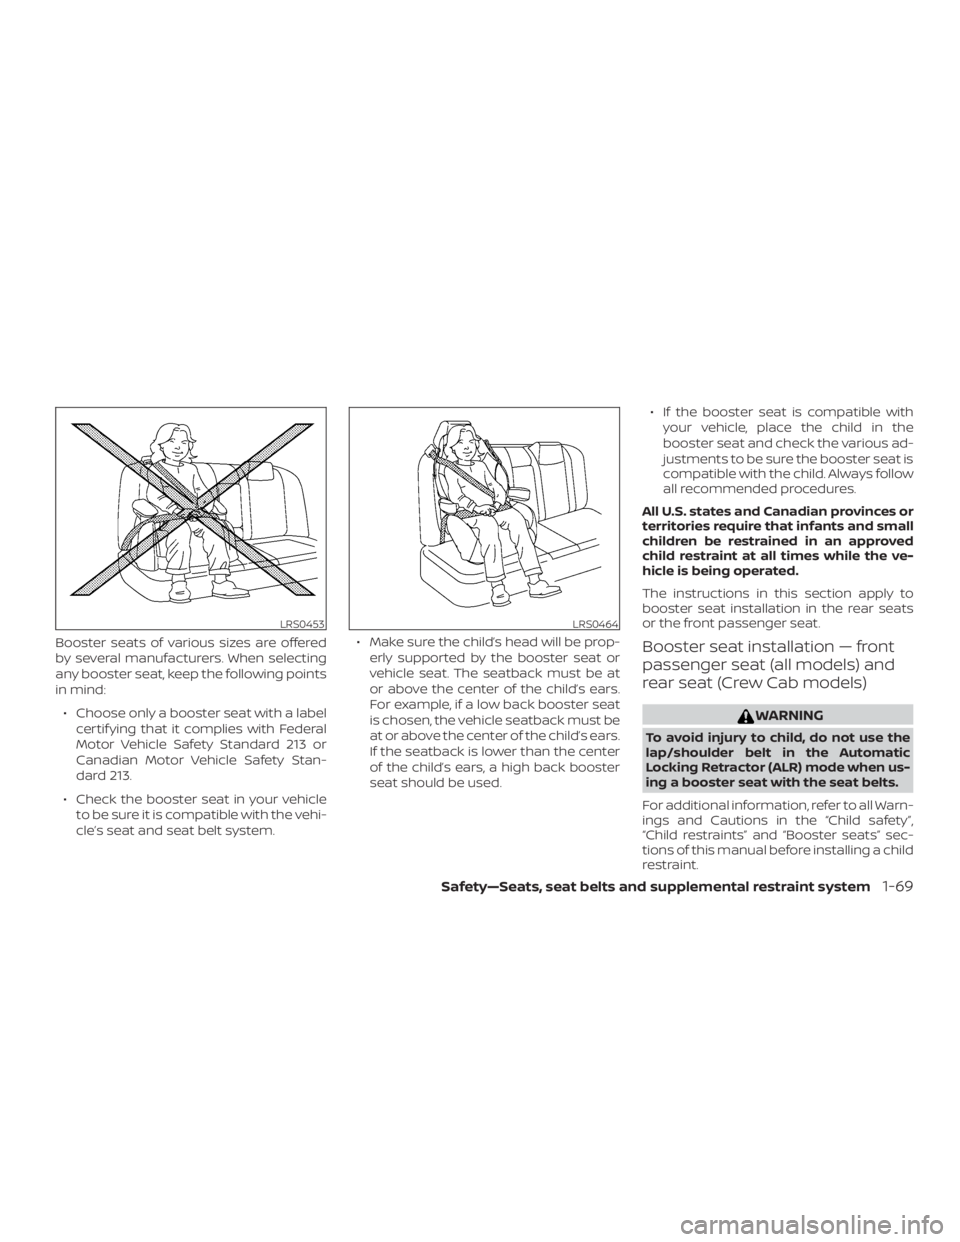
Booster seats of various sizes are offered
by several manufacturers. When selecting
any booster seat, keep the following points
in mind:∙ Choose only a booster seat with a label certif ying that it complies with Federal
Motor Vehicle Safety Standard 213 or
Canadian Motor Vehicle Safety Stan-
dard 213.
∙ Check the booster seat in your vehicle to be sure it is compatible with the vehi-
cle’s seat and seat belt system. ∙ Make sure the child’s head will be prop-
erly supported by the booster seat or
vehicle seat. The seatback must be at
or above the center of the child’s ears.
For example, if a low back booster seat
is chosen, the vehicle seatback must be
at or above the center of the child’s ears.
If the seatback is lower than the center
of the child’s ears, a high back booster
seat should be used. ∙ If the booster seat is compatible with
your vehicle, place the child in the
booster seat and check the various ad-
justments to be sure the booster seat is
compatible with the child. Always follow
all recommended procedures.
All U.S. states and Canadian provinces or
territories require that infants and small
children be restrained in an approved
child restraint at all times while the ve-
hicle is being operated.
The instructions in this section apply to
booster seat installation in the rear seats
or the front passenger seat.Booster seat installation — front
passenger seat (all models) and
rear seat (Crew Cab models)
Page 164 of 516

∙ To help avoid risk of injury or deaththrough unintended operation of the
vehicle and/or its systems, including
entrapment in windows or inadver-
tent door lock activation, do not leave
children, people who require the as-
sistance of others or pets unattended
in your vehicle. Additionally, the tem-
perature inside a closed vehicle on a
warm day can quickly become high
enough to cause a significant risk of
injury or death to people and pets.
The power windows operate when the ig-
nition switch is placed in the ON position or
for a period of time af ter the ignition switch
is placed in the ACC or OFF position. If the
driver’s or passenger’s door is opened dur-
ing this period of time, the power to the
windows is canceled.
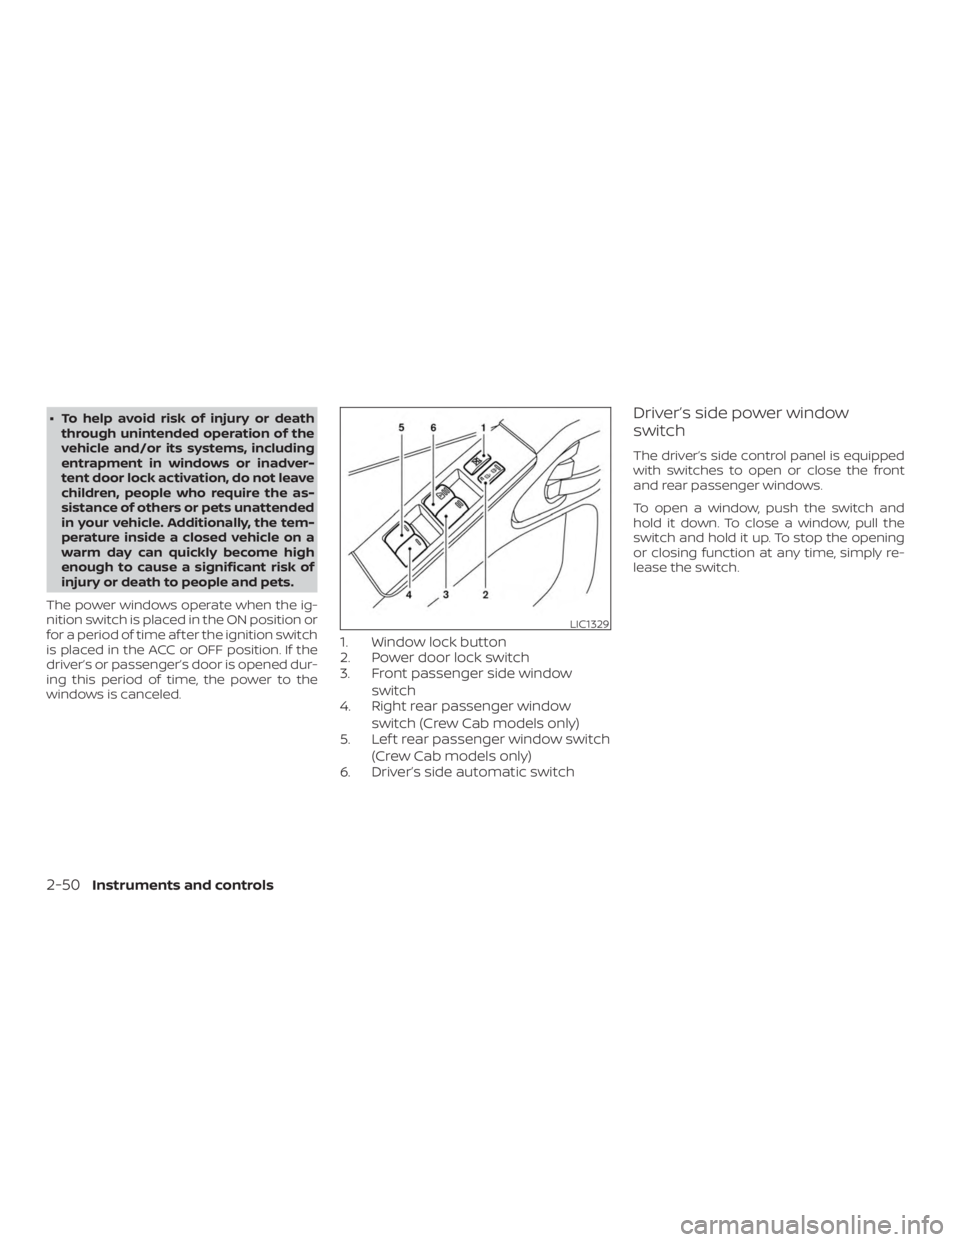
1. Window lock button
2. Power door lock switch
3. Front passenger side window switch
4. Right rear passenger window
switch (Crew Cab models only)
5. Lef t rear passenger window switch
(Crew Cab models only)
6. Driver’s side automatic switch
Driver’s side power window
switch
The driver’s side control panel is equipped
with switches to open or close the front
and rear passenger windows.
To open a window, push the switch and
hold it down. To close a window, pull the
switch and hold it up. To stop the opening
or closing function at any time, simply re-
lease the switch.