Page 371 of 516
∙ Do not start or run the engine whilevehicle is on the jack. It may cause the
vehicle to move. This is especially true
for vehicles with limited slip
differentials.
∙ Do not allow passengers to stay in the vehicle while it is on the jack.
∙ Never run the engine with a wheel(s) off the ground. It may cause the ve-
hicle to move.
Always refer to the illustration for the cor-
rect placement and jack-up points for your
specific vehicle model and jack type.
Carefully read the caution label attached
to the jack body and the following in-
structions. 1. Loosen each wheel nut 1 or 2 turns by
turning counterclockwise with the
wheel nut wrench. Do not remove the
wheel nuts until the tire is off the
ground.
WCE0152
In case of emergency6-9
Page 400 of 516
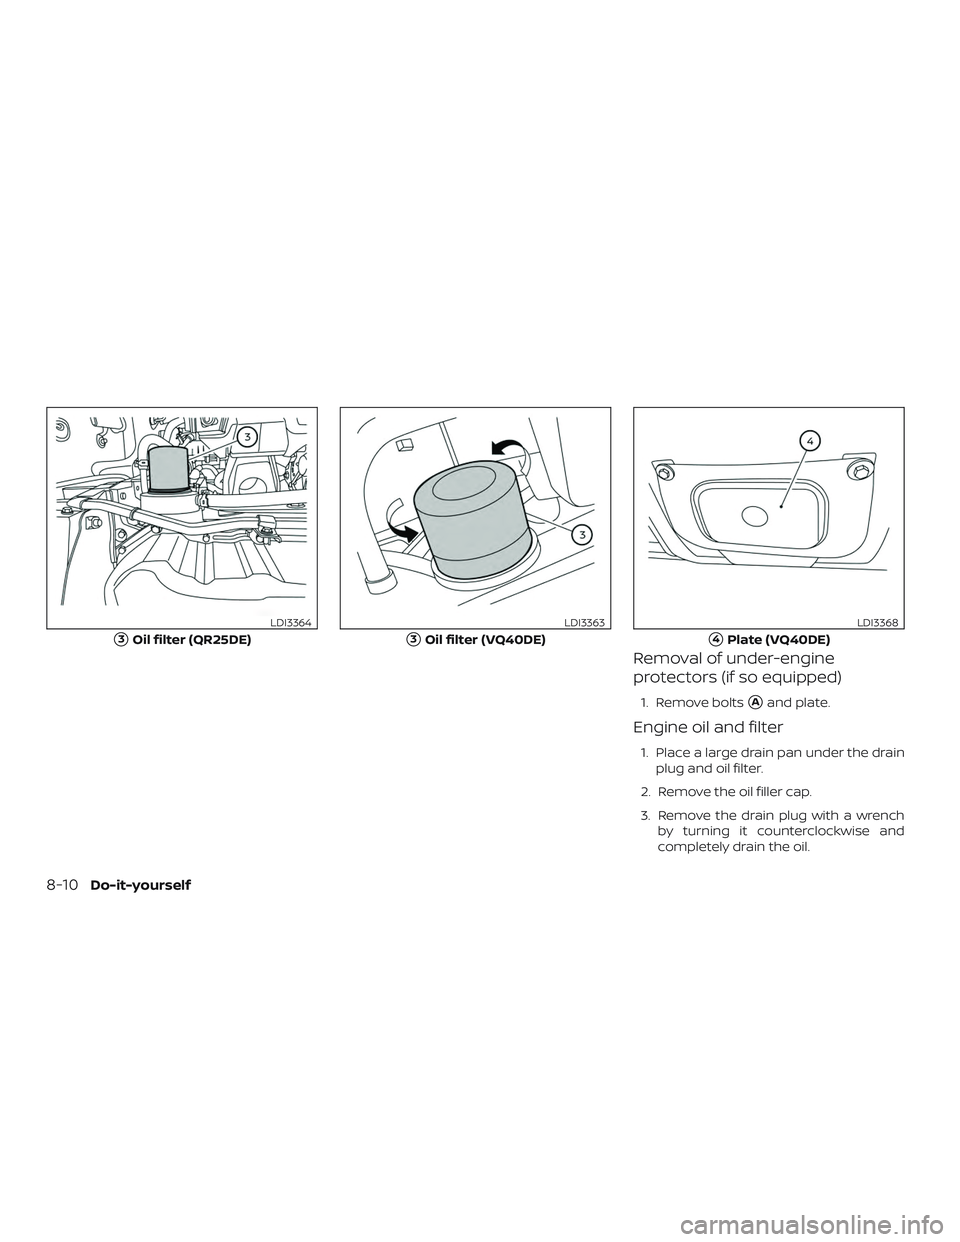
Removal of under-engine
protectors (if so equipped)
1. Remove bolts�Aand plate.
Engine oil and filter
1. Place a large drain pan under the drainplug and oil filter.
2. Remove the oil filler cap.
3. Remove the drain plug with a wrench by turning it counterclockwise and
completely drain the oil.
�3Oil filter (QR25DE)
LDI3364
�3Oil filter (VQ40DE)
LDI3363
�4Plate (VQ40DE)
LDI3368
8-10Do-it-yourself
Page 401 of 516

CAUTION
Be careful not to burn yourself, as the
engine oil is hot.
WARNING
∙Prolonged and repeated contact with
used engine oil may cause skin cancer.
∙ Try to avoid direct skin contact withused oil. If skin contact is made, wash
thoroughly with soap or hand cleaner
as soon as possible.
∙ Keep used engine oil out of reach of children. 4. Loosen the oil filter with an oil filter
wrench by turning it counterclockwise.
Remove the oil filter by turning it by
hand.
5. Wipe the engine oil filter mounting sur- face with a clean rag.
CAUTION
Be sure to remove any old gasket mate-
rial remaining on the sealing surface of
the engine. Failure to do so could lead to
an oil leak and engine damage.
∙ The dipstick must be inserted in placeto prevent oil spillage from the dip-
stick hole when filling the engine with
oil.
6. Coat the gasket on the new filter with clean engine oil.
7. Screw in the oil filter clockwise until a slight resistance is felt, then tighten ad-
ditionally more than 2/3 turn.
Oil filter tightening torque: 11 to 15 f t-lb (14.7 to 20.6 N·m) 8. Clean and re-install the drain plug with
a new washer. Securely tighten the
drain plug with a wrench. Do not use
excessive force.
Drain plug tightening torque: 22 to 29 f t-lb (29 to 39 N·m)
9. Refill the engine with the recom- mended oil through the oil filler open-
ing, and install the oil filler cap securely.
For additional information about drain and
refill capacity, refer to “Recommended
fluids/lubricants and capacities” in the
“Technical and consumer information” sec-
tion of this manual. The drain and refill ca-
pacity depends on the oil temperature and
drain time. Use these specifications for ref-
erence only. Always use the dipstick to de-
termine the proper amount of oil in the
engine.
10. Start the engine and check for leakage around the drain plug and the oil filter.
Correct as required. Turn the engine off
and wait more than 15 minutes. Check
the oil level with the dipstick. Add en-
gine oil if necessary.
LDI3366
Do-it-yourself8-11
Page 419 of 516
 batterycable. 3. Disconnect the electrical connector
from the rear end of the bulb.
4. Turn the bulb retaining ring
�Acount")
Removing the headlight bulb
1. Open the hood.
2. Disconnect the negative (-) batterycable. 3. Disconnect the electrical connector
from the rear end of the bulb.
4. Turn the bulb retaining ring
�Acounter-
clockwise until it is free from the head-
light reflector and then remove it.
5. Carefully remove the headlight bulb. Do not shake or rotate the bulb
�Bwhen
removing it.
Replacing the headlight bulb
1. Insert the bulb.
DO NOT TOUCH THE BULB WITH BARE
HANDS.
2. Install and tighten the bulb retainer. ∙ Be sure the lip of the bulb socket con-tacts the headlight body.
3. Push the electrical connector into the bulb plastic base until it snaps and
stops.
4. Connect the negative (-) battery cable.
5. Close the hood.
FOG LIGHTS (if so equipped)
For additional information on fog light bulb
replacement, refer to the instructions out-
lined in this section.
Replacing the fog light bulb
If fog light bulb replacement is required, it is
recommended that you visit a NISSAN
dealer for this service.
CAUTION
∙ High pressure halogen gas is sealed inside the halogen bulb. The bulb may
break if the glass envelope is
scratched or the bulb is dropped.
∙ When handling the bulb, do not touch the glass envelope.
∙ Use the same number and wattage as originally installed as shown in the
chart.
∙ Do not leave the bulb out of the fog light for a long period of time as dust,
moisture and smoke may enter the
fog light body and affect the perfor-
mance of the fog light.
WDI0294
Do-it-yourself8-29
Page 475 of 516
Check the tightness of the tie-down cleat
periodically during a trip to make sure the
center bolt has not become loose.
Install the tie-down cleat as follows:1. Remove the side channels by sliding them out the back of the truck bed.
Properly store the side channels.
2. Loosen the center bolt completely.
3. Insert the cleat into the channel per-pendicular to the channel as shown.
Then rotate the cleat clockwise 90° and
slide it to the desired location.
4. Position the cleat so the nubs on thebottom fully seat into the channel de-
tents.
LTI0103
LTI0104
Technical and consumer information10-23
Page 502 of 516

Brakes......................8-22
Brake system..................5-35
Break-in schedule ...............5-24
Brightness/contrast button ......4-9,4-15
Brightness control Instrument panel .............2-32
Bulb check/instrument panel ........2-15
Bulb replacement ...............8-30
C
Capacities and recommended fuel/
lubricants....................10-2
Cargolampswitch..............2-33
Cargo
(See vehicle loading information) .....10-19
Car phone or CB radio ............4-83
CDcareandcleaning.............4-74
CD player (See audio system) ........4-56
Childrestraints........1-25, 1-26, 1-28, 1-30 LATCH (Lower Anchors and Tethers for
CHildren)System..............1-30
Precautions on child
restraints.........1-28, 1-40, 1-56, 1-68
Top tether strap anchor point
locations...................1-33
Child restraint with top tether strap . . . .1-33
Child safety rear door lock ..........3-6
Chimes, audible reminders .........2-24
Cleaningexteriorandinterior......7-2,7-4
Clock set/adjustment ..........4-7,4-13
Clock setting (models with Navigation
System) .....................4-13
Clutch Clutchfluid.................8-14 Clutch interlock (clutch start) switch . . .2-38
C.M.V.S.S. certification label
.........10-16
Cold weather driving .............5-43
Compact disc (CD) player ..........4-56
Compass .....................2-11
Compass and outside temperature
display......................2-10
Compass display ................2-11
Connect phone ................4-76
Console box ..................2-45
Control panel buttons ..........4-4,4-10
Back button .................4-13
Brightness/contrast button ....4-9,4-15
Enterbutton..............4-4,4-10
Settingbutton.............4-7,4-13
Withnavigationsystem.......4-10,4-11
Controls Audio controls (steering wheel) .....4-74
Heater and air conditioner
controls................4-23,4-35
Coolant Capacities and recommended
fuel/lubricants...............10-2
Changing engine coolant .........8-6
Checking engine coolant level ......8-6
Engine coolant temperature gauge . .2-6
Corrosionprotection..............7-8
Cruisecontrol .................5-22
Cupholders ..................2-46
Curtain side-impact and rollover air
bag........................1-87
D
Daytime Running Lights (DRL) system . . .2-31 Defroster switch
Rear window and outside mirror
defrosterswitch..............2-28
Rearwindowdefrosterswitch.....2-28
Dimensions and weights ..........10-14
Dimmer switch for instrument panel . . .2-32
Display controls
(see control panel buttons) .......4-4,4-10
Door locks ....................3-3
Door open warning light ...........2-17
Drivebelt.....................8-17
Driving Coldweatherdriving...........5-43
Driving with automatic
transmission ................5-14
Driving with manual transmission . . .5-19
Precautions when starting and
driving .....................5-2
Driving the vehicle ...............5-14
E
Economy - fuel .................5-25
Electronic locking rear differential (E-Lock)
system......................5-33
Electronic locking rear differential (E-Lock)
systemswitch.................2-37
Emission control information label ....10-17
Emission control system warranty . . . .10-44
Engine Before starting the engine ........5-13
Capacities and recommended
fuel/lubricants...............10-2
Changing engine
coolant.........8-6
Changing engine oil ............8-8
11-2