2019 NISSAN ARMADA light
[x] Cancel search: lightPage 415 of 536
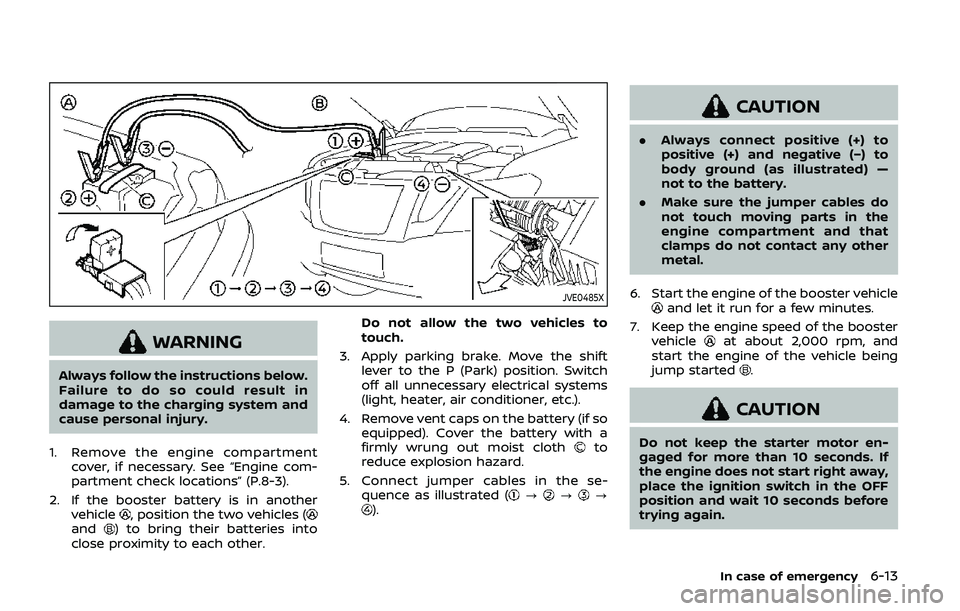
JVE0485X
WARNING
Always follow the instructions below.
Failure to do so could result in
damage to the charging system and
cause personal injury.
1. Remove the engine compartment cover, if necessary. See “Engine com-
partment check locations” (P.8-3).
2. If the booster battery is in another vehicle
, position the two vehicles (and) to bring their batteries into
close proximity to each other. Do not allow the two vehicles to
touch.
3. Apply parking brake. Move the shift lever to the P (Park) position. Switch
off all unnecessary electrical systems
(light, heater, air conditioner, etc.).
4. Remove vent caps on the battery (if so equipped). Cover the battery with a
firmly wrung out moist cloth
to
reduce explosion hazard.
5. Connect jumper cables in the se- quence as illustrated (
???).
CAUTION
.Always connect positive (+) to
positive (+) and negative (−) to
body ground (as illustrated) —
not to the battery.
. Make sure the jumper cables do
not touch moving parts in the
engine compartment and that
clamps do not contact any other
metal.
6. Start the engine of the booster vehicle
and let it run for a few minutes.
7. Keep the engine speed of the booster vehicle
at about 2,000 rpm, and
start the engine of the vehicle being
jump started
.
CAUTION
Do not keep the starter motor en-
gaged for more than 10 seconds. If
the engine does not start right away,
place the ignition switch in the OFF
position and wait 10 seconds before
trying again.
In case of emergency6-13
Page 422 of 536
6-20In case of emergency
4. Slowly rock the vehicle forward andbackward.
.Shift back and forth between R(Reverse) and D (Drive).
.Apply the accelerator as little as possible to maintain the rocking
motion.
.Release the accelerator pedal be-
fore shifting between R and D.
.Do not spin the tires above 35 MPH(55 km/h).
5. If the vehicle cannot be freed after a few tries, contact a professional tow-
ing service to remove the vehicle. This section describes the procedure for
manually shifting the vehicle into the 4WD
mode (4L position) in case of an emer-
gency.
WHEN 4WD WARNING LIGHT ILLU-
MINATES
If the 4WD warning light illuminates while
driving, there may be a malfunction in the
4WD system. Stop the vehicle and have
the vehicle checked as soon as possible. It
is recommended you contact a NISSAN
dealer for this service. (See “NISSAN all-
mode 4WD®” (P.5-121).)
When the vehicle is stuck on an uneven
road (desert, mud, etc.) and the 4WD
warning light is illuminated, be sure to
place the 4WD shift switch in the 4L
position. If only the rear wheels are
spinning, this means that the transfer
has not switched to the 4L position
electrically.
If this situation occurs, contact a dealer or
road assistance service for help. If an
immediate service is not available, per-
form the following procedure to switch to
the 4L position manually and free the
vehicle.
CAUTION
Only perform this procedure in an
emergency.
If the vehicle is driven for a long
period of time over a long distance
with a component detached, foreign
material such as water, sand, etc.
may enter from the opening and this
may cause a malfunction in the
drivetrain system. After freeing a
vehicle that has become stuck, it is
recommended you contact a NISSAN
dealer for inspection and repair.
WARNING
.
Ensure your safety before per-
forming the operations. The ve-
hicle may move unexpectedly.
. Place the ignition switch in the
OFF position, apply the parking
brake and let the vehicle cool
down.
. Do not perform the following
procedure immediately after
driving the vehicle. Parts such as
exhaust components, the trans-
FOUR-WHEEL DRIVE (4WD)
MANUAL SHIFTING (4WD models)
Page 428 of 536
7-2Appearance and care
In order to maintain the appearance of
your vehicle, it is important to take proper
care of it.
To protect the paint surface, wash your
vehicle as soon as you can:
.after a rainfall to prevent possible
damage from acid rain
. after driving on coastal roads
. when contaminants such as soot, bird
droppings, tree sap, metal particles or
bugs get on the paint surface
. when dust or mud builds up on the
surface
Whenever possible, store or park your
vehicle inside a garage or in a covered
area.
When it is necessary to park outside, park
in a shady area or protect the vehicle with
a body cover.
Be careful not to scratch the paint
surface when putting on or removing
the body cover.
WASHING
Wash dirt off the vehicle with a wet
sponge and plenty of water. Clean the
vehicle thoroughly using a mild soap, a
special vehicle soap or general purpose
dishwashing liquid mixed with clean, lu-
kewarm (never hot) water.
CAUTION
. Do not use car washes that use
acid in the detergent. Some car
washes, especially brushless
ones, use some acid for cleaning.
The acid may react with some
plastic vehicle components, caus-
ing them to crack. This could
affect their appearance, and also
could cause them not to function
properly. Always check with your
car wash to confirm that acid is
not used.
. Do not wash the vehicle with
strong household soap, strong
chemical detergents, gasoline or
solvents.
. Do not wash the vehicle in direct
sunlight or while the vehicle body
is hot, as the surface may become
water-spotted.
. Avoid using tight-napped or
rough cloths, such as washing
mitts. Care must be taken when
removing caked-on dirt or other
foreign substances so the paint
surface is not scratched or da-
maged. .
Lock all doors before going
through automatic car wash.
Locking doors helps prevent
fuel-filler door from opening and
becoming damaged.
Rinse the vehicle again with plenty of
clean water.
Inside flanges, seams and folds on the
doors, hatches and hood are particularly
vulnerable to the effects of road salt.
Therefore, these areas must be regularly
cleaned. Make sure that the drain holes in
the lower edge of the door are open.
Spray water under the body and in the
wheel wells to loosen the dirt and wash
away road salt.
Avoid leaving water spots on the paint
surface by using a damp chamois to dry
the vehicle.
WAXING
Regular waxing protects the paint surface
and helps retain new vehicle appearance.
Polishing is recommended to remove
built-up wax residue and to avoid a
weathered appearance before reapplying
wax.
A NISSAN dealer can assist you in choos-
ing the proper product.
CLEANING EXTERIOR
Page 430 of 536
7-4Appearance and care
.Rinse the wheel to completely
remove the cleaner within 15
minutes after the cleaner is ap-
plied.
Bright wheels (if so equipped)
The bright wheels use a different coating
process than typical aluminum alloy
wheel and they are not plated wheels.
These wheels are clear-coated and re-
quire the following special cleaning. They
should be regularly washed with a soft
sponge soaked in a lot of water. After
washing with water, wipe clean with a
dry, soft cloth and dry completely. When
there is chemical or tire wax, or dirt such
as an antifreeze agent on the surface,
wash them with water as soon as possi-
ble.
CAUTION
.The surfaces of the wheels use a
different coating process than
typical aluminum alloy wheels.
Do not use aluminum alloy wheel
cleaners or abrasive cleaners to
clean the wheels. Using such
cleaners could damage the wheel
surfaces. .
Do not use an automatic car wash
if the vehicle is equipped with
bright wheels. The wheel coating
may be damaged.
. Do not use a brush to wash the
wheels if the vehicle is equipped
with bright wheels. The wheel
coating may be damaged.
CHROME PARTS
Clean chrome parts regularly with a non-
abrasive chrome polish to maintain the
finish.
TIRE DRESSING
NISSAN does not recommend the use of
tire dressings. Tire manufacturers apply a
coating to the tires to help reduce dis-
coloration of the rubber. If a tire dressing
is applied to the tires, it may react with
the coating and form a compound. This
compound may come off the tire while
driving and stain the vehicle paint.
If you choose to use a tire dressing, take
the following precautions:
.Use a water-based tire dressing. The
coating on the tire dissolves more
easily with an oil-based tire dressing.
. Apply a light coat of tire dressing to
help prevent it from entering the tire
tread/grooves (where it would be difficult to remove).
. Wipe off excess tire dressing using a
dry towel. Make sure the tire dressing
is completely removed from the tire
tread/grooves.
. Allow the tire dressing to dry as
recommended by tire dressing manu-
facturer.
Page 435 of 536

8 Do-it-yourself
Maintenance precautions ...................................................... 8-2
Engine compartment check locations ........................ 8-3VK56VD engine ....................................................................... 8-3
Engine cooling system ............................................................. 8-4 Checking engine coolant level .................................... 8-5
Changing engine coolant ................................................ 8-5
Engine oil ........................................................................\
..................... 8-6 Checking engine oil level ................................................. 8-6
Changing engine oil and filter ..................................... 8-6
Automatic Transmission Fluid (ATF) ............................. 8-8
Power steering fluid ................................................................... 8-8
Brake fluid ........................................................................\
.................. 8-9
Window washer fluid .............................................................. 8-10
Battery ........................................................................\
........................ 8-11 Jump starting ........................................................................\
. 8-13
Variable voltage control system ................................... 8-13
Drive belts ........................................................................\
................ 8-13
Spark plugs ........................................................................\
............. 8-14 Replacing spark plugs ..................................................... 8-14
Air cleaner ........................................................................\
............... 8-15 Windshield wiper blades ..................................................... 8-16
Cleaning ........................................................................\
........... 8-16
Replacing ........................................................................\
........ 8-16
Rear window wiper blades ............................................... 8-17
Brakes ........................................................................\
........................ 8-17 Self-adjusting brakes ..................................................... 8-17
Brake pad wear warning ............................................ 8-17
Brake booster ...................................................................... 8-17
Fuses ........................................................................\
........................... 8-18 Engine compartment .................................................... 8-18
Passenger compartment ........................................... 8-20
Intelligent Key battery replacement .......................... 8-21
Lights ........................................................................\
.......................... 8-24
Headlights ........................................................................\
...... 8-24
Exterior and interior lights ........................................ 8-26
Wheels and tires ........................................................................\
8-30
Tire pressure ........................................................................\
8-30
Tire labeling ........................................................................\
.. 8-34
Types of tires ....................................................................... 8-36
Tire chains ........................................................................\
...... 8-37
Changing wheels and tires ...................................... 8-37
Page 441 of 536
SDI2528
Engine oil and filter
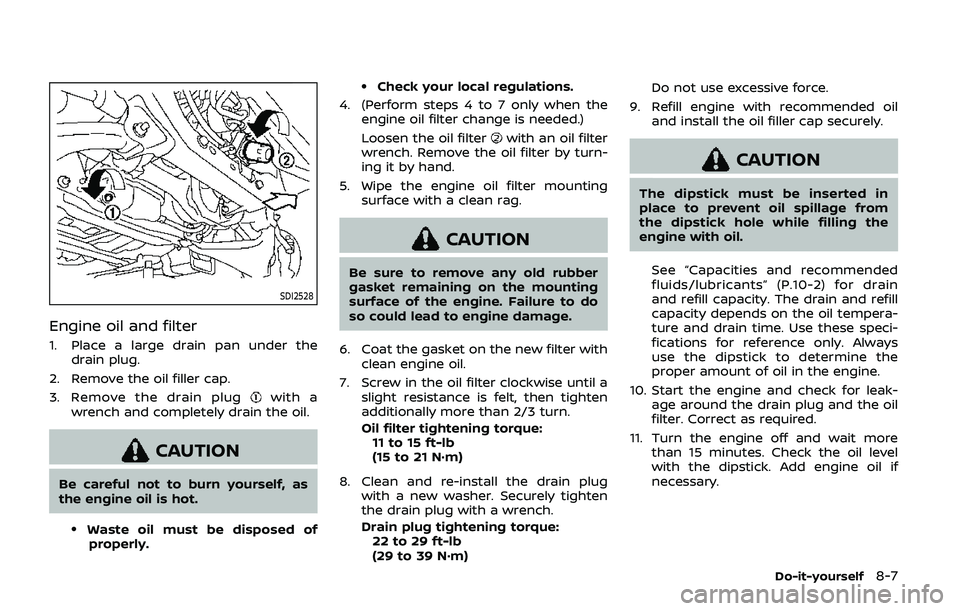
1. Place a large drain pan under thedrain plug.
2. Remove the oil filler cap.
3. Remove the drain plug
with a
wrench and completely drain the oil.
CAUTION
Be careful not to burn yourself, as
the engine oil is hot.
.Waste oil must be disposed of properly.
.Check your local regulations.
4. (Perform steps 4 to 7 only when the engine oil filter change is needed.)
Loosen the oil filter
with an oil filter
wrench. Remove the oil filter by turn-
ing it by hand.
5. Wipe the engine oil filter mounting surface with a clean rag.
CAUTION
Be sure to remove any old rubber
gasket remaining on the mounting
surface of the engine. Failure to do
so could lead to engine damage.
6. Coat the gasket on the new filter with clean engine oil.
7. Screw in the oil filter clockwise until a slight resistance is felt, then tighten
additionally more than 2/3 turn.
Oil filter tightening torque:11 to 15 ft-lb
(15 to 21 N·m)
8. Clean and re-install the drain plug with a new washer. Securely tighten
the drain plug with a wrench.
Drain plug tightening torque:22 to 29 ft-lb
(29 to 39 N·m) Do not use excessive force.
9. Refill engine with recommended oil and install the oil filler cap securely.
CAUTION
The dipstick must be inserted in
place to prevent oil spillage from
the dipstick hole while filling the
engine with oil.
See “Capacities and recommended
fluids/lubricants” (P.10-2) for drain
and refill capacity. The drain and refill
capacity depends on the oil tempera-
ture and drain time. Use these speci-
fications for reference only. Always
use the dipstick to determine the
proper amount of oil in the engine.
10. Start the engine and check for leak- age around the drain plug and the oil
filter. Correct as required.
11. Turn the engine off and wait more than 15 minutes. Check the oil level
with the dipstick. Add engine oil if
necessary.
Do-it-yourself8-7
Page 444 of 536
8-10Do-it-yourself
SDI2513
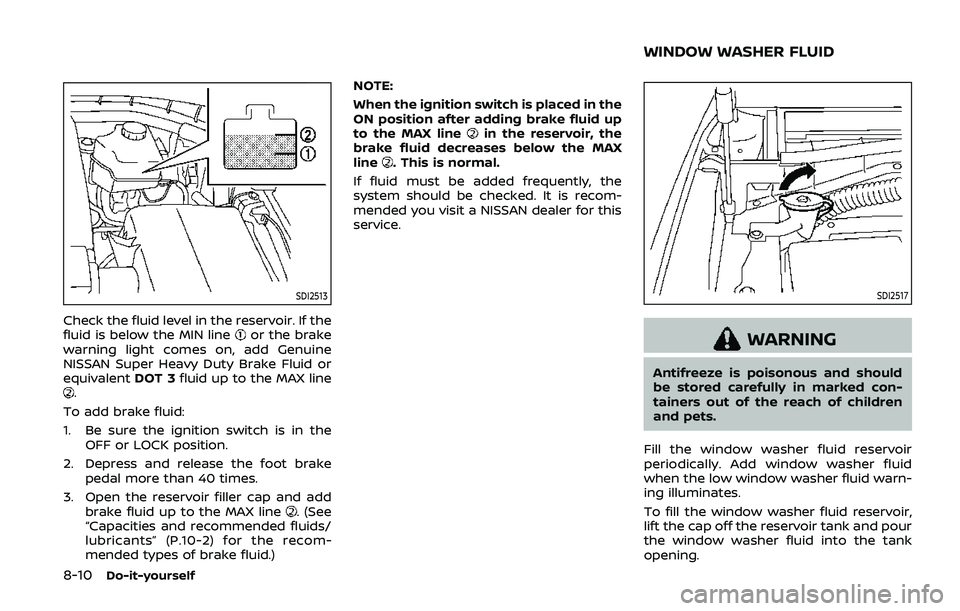
Check the fluid level in the reservoir. If the
fluid is below the MIN lineor the brake
warning light comes on, add Genuine
NISSAN Super Heavy Duty Brake Fluid or
equivalent DOT 3fluid up to the MAX line
.
To add brake fluid:
1. Be sure the ignition switch is in the OFF or LOCK position.
2. Depress and release the foot brake pedal more than 40 times.
3. Open the reservoir filler cap and add brake fluid up to the MAX line
. (See
“Capacities and recommended fluids/
lubricants” (P.10-2) for the recom-
mended types of brake fluid.) NOTE:
When the ignition switch is placed in the
ON position after adding brake fluid up
to the MAX line
in the reservoir, the
brake fluid decreases below the MAX
line
. This is normal.
If fluid must be added frequently, the
system should be checked. It is recom-
mended you visit a NISSAN dealer for this
service.
SDI2517
WARNING
Antifreeze is poisonous and should
be stored carefully in marked con-
tainers out of the reach of children
and pets.
Fill the window washer fluid reservoir
periodically. Add window washer fluid
when the low window washer fluid warn-
ing illuminates.
To fill the window washer fluid reservoir,
lift the cap off the reservoir tank and pour
the window washer fluid into the tank
opening.
WINDOW WASHER FLUID
Page 451 of 536
It is recommended you visit a NISSAN
dealer if checking or replacement is
required.If the brakes do not operate properly,
have the brakes checked. It is recom-
mended that you visit a NISSAN dealer for
this service.
SELF-ADJUSTING BRAKES
Your vehicle is equipped with self-adjust-
ing brakes.
The disc-type brakes self-adjust every
time the brake pedal is applied.
WARNING
Have your brake system checked if
the brake pedal height does not
return to normal. It is recommended
you visit a NISSAN dealer for this
service.
BRAKE PAD WEAR WARNING
The disc brake pads have audible wear
warnings. When a brake pad requires
replacement, it will make a high pitched
scraping sound when the vehicle is in
motion. This scraping sound will first
occur only when the brake pedal is
depressed. After more wear of the brake
pad, the sound will always be heard even
if the brake pedal is not depressed. Have
the brakes checked as soon as possible if
the wear warning sound is heard.Under some driving or climate conditions,
occasional brake squeak, squeal or other
noise may be heard. Occasional brake
noise during light to moderate stops is
normal and does not affect the function
or performance of the brake system.
Proper brake inspection intervals
should be followed.
For additional infor-
mation, see the maintenance schedule
shown in the “9. Maintenance and sche-
dules” section.
BRAKE BOOSTER
Check the brake booster function as
follows:
1. With the engine off, depress and release the foot brake pedal more
than 20 times. When the foot brake
pedal movement (distance of travel)
remains the same from one pedal
application to the next, continue on
to the next step.
2. While depressing the foot brake pedal, start the engine.
3. With the foot brake pedal depressed, stop the engine. Keep the pedal de-
pressed for about 30 seconds.
4. Run the engine for 1 minute without depressing the foot brake pedal, then
turn it off. Depress the foot brake
pedal several times. The pedal travel
distance will decrease gradually with
Do-it-yourself8-17
REAR WINDOW WIPER BLADES BRAKES