2019 NISSAN ARMADA headrest
[x] Cancel search: headrestPage 66 of 536
1-46Safety — seats, seat belts and supplemental restraint system
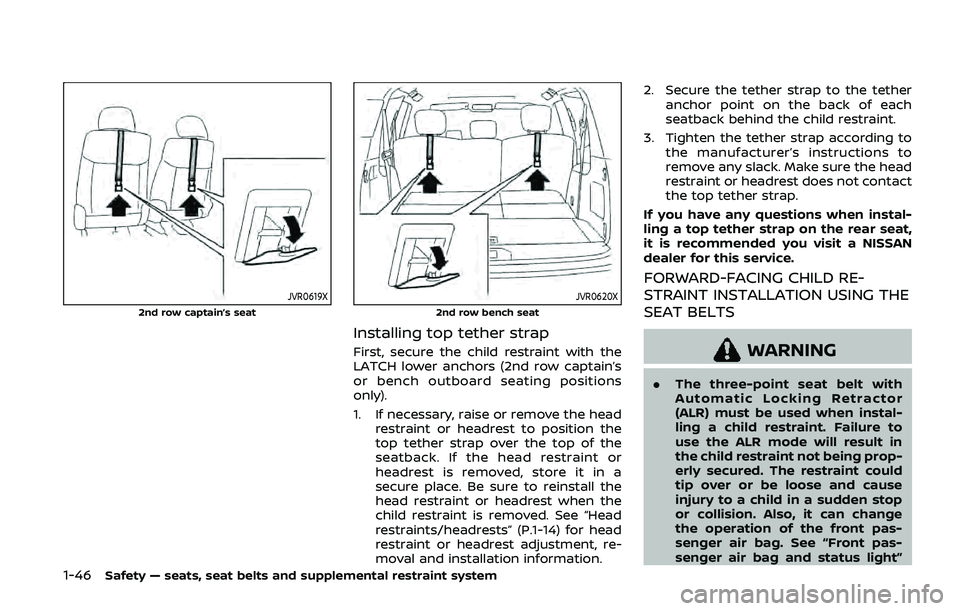
JVR0619X
2nd row captain’s seat
JVR0620X
2nd row bench seat
Installing top tether strap
First, secure the child restraint with the
LATCH lower anchors (2nd row captain’s
or bench outboard seating positions
only).
1. If necessary, raise or remove the headrestraint or headrest to position the
top tether strap over the top of the
seatback. If the head restraint or
headrest is removed, store it in a
secure place. Be sure to reinstall the
head restraint or headrest when the
child restraint is removed. See “Head
restraints/headrests” (P.1-14) for head
restraint or headrest adjustment, re-
moval and installation information. 2. Secure the tether strap to the tether
anchor point on the back of each
seatback behind the child restraint.
3. Tighten the tether strap according to the manufacturer’s instructions to
remove any slack. Make sure the head
restraint or headrest does not contact
the top tether strap.
If you have any questions when instal-
ling a top tether strap on the rear seat,
it is recommended you visit a NISSAN
dealer for this service.
FORWARD-FACING CHILD RE-
STRAINT INSTALLATION USING THE
SEAT BELTS
WARNING
. The three-point seat belt with
Automatic Locking Retractor
(ALR) must be used when instal-
ling a child restraint. Failure to
use the ALR mode will result in
the child restraint not being prop-
erly secured. The restraint could
tip over or be loose and cause
injury to a child in a sudden stop
or collision. Also, it can change
the operation of the front pas-
senger air bag. See “Front pas-
senger air bag and status light”
Page 67 of 536
(P.1-63)
. When installing a child restraint
system in the 3rd center position,
both the center seat belt connec-
tor tongue and buckle tongue
must be secured. See “3rd row
center seat belt” (P.1-26).
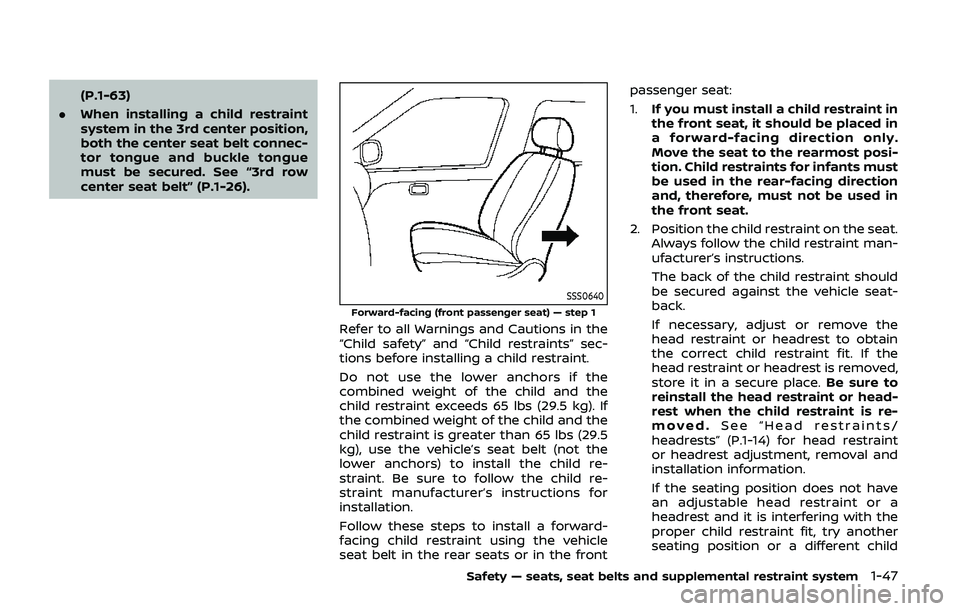
SSS0640
Forward-facing (front passenger seat) — step 1
Refer to all Warnings and Cautions in the
“Child safety” and “Child restraints” sec-
tions before installing a child restraint.
Do not use the lower anchors if the
combined weight of the child and the
child restraint exceeds 65 lbs (29.5 kg). If
the combined weight of the child and the
child restraint is greater than 65 lbs (29.5
kg), use the vehicle’s seat belt (not the
lower anchors) to install the child re-
straint. Be sure to follow the child re-
straint manufacturer’s instructions for
installation.
Follow these steps to install a forward-
facing child restraint using the vehicle
seat belt in the rear seats or in the front passenger seat:
1.
If you must install a child restraint in
the front seat, it should be placed in
a forward-facing direction only.
Move the seat to the rearmost posi-
tion. Child restraints for infants must
be used in the rear-facing direction
and, therefore, must not be used in
the front seat.
2. Position the child restraint on the seat. Always follow the child restraint man-
ufacturer’s instructions.
The back of the child restraint should
be secured against the vehicle seat-
back.
If necessary, adjust or remove the
head restraint or headrest to obtain
the correct child restraint fit. If the
head restraint or headrest is removed,
store it in a secure place. Be sure to
reinstall the head restraint or head-
rest when the child restraint is re-
moved. See “Head restraints/
headrests” (P.1-14) for head restraint
or headrest adjustment, removal and
installation information.
If the seating position does not have
an adjustable head restraint or a
headrest and it is interfering with the
proper child restraint fit, try another
seating position or a different child
Safety — seats, seat belts and supplemental restraint system1-47
Page 71 of 536
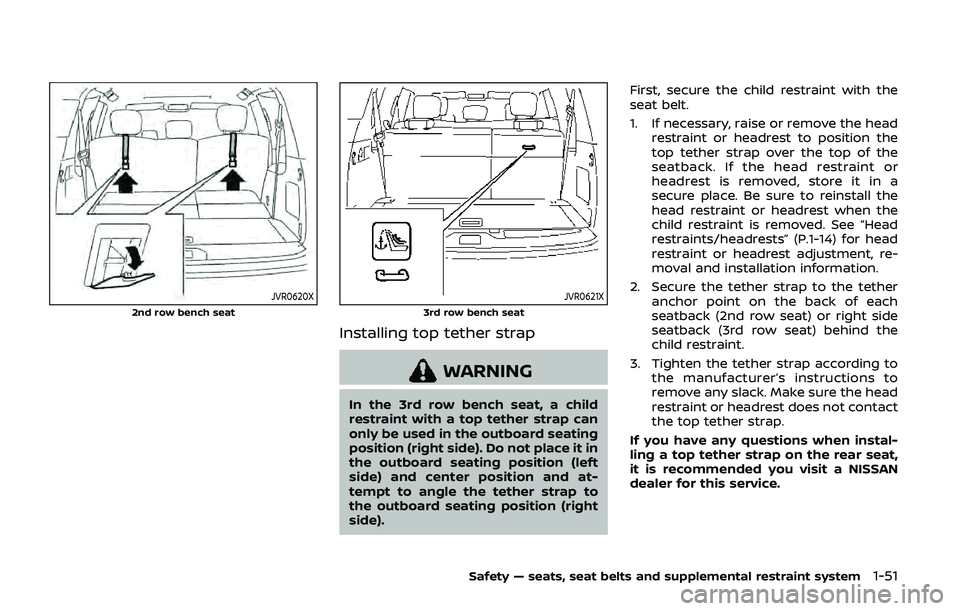
JVR0620X
2nd row bench seat
JVR0621X
3rd row bench seat
Installing top tether strap
WARNING
In the 3rd row bench seat, a child
restraint with a top tether strap can
only be used in the outboard seating
position (right side). Do not place it in
the outboard seating position (left
side) and center position and at-
tempt to angle the tether strap to
the outboard seating position (right
side).First, secure the child restraint with the
seat belt.
1. If necessary, raise or remove the head
restraint or headrest to position the
top tether strap over the top of the
seatback. If the head restraint or
headrest is removed, store it in a
secure place. Be sure to reinstall the
head restraint or headrest when the
child restraint is removed. See “Head
restraints/headrests” (P.1-14) for head
restraint or headrest adjustment, re-
moval and installation information.
2. Secure the tether strap to the tether anchor point on the back of each
seatback (2nd row seat) or right side
seatback (3rd row seat) behind the
child restraint.
3. Tighten the tether strap according to the manufacturer’s instructions to
remove any slack. Make sure the head
restraint or headrest does not contact
the top tether strap.
If you have any questions when instal-
ling a top tether strap on the rear seat,
it is recommended you visit a NISSAN
dealer for this service.
Safety — seats, seat belts and supplemental restraint system1-51
Page 74 of 536
1-54Safety — seats, seat belts and supplemental restraint system
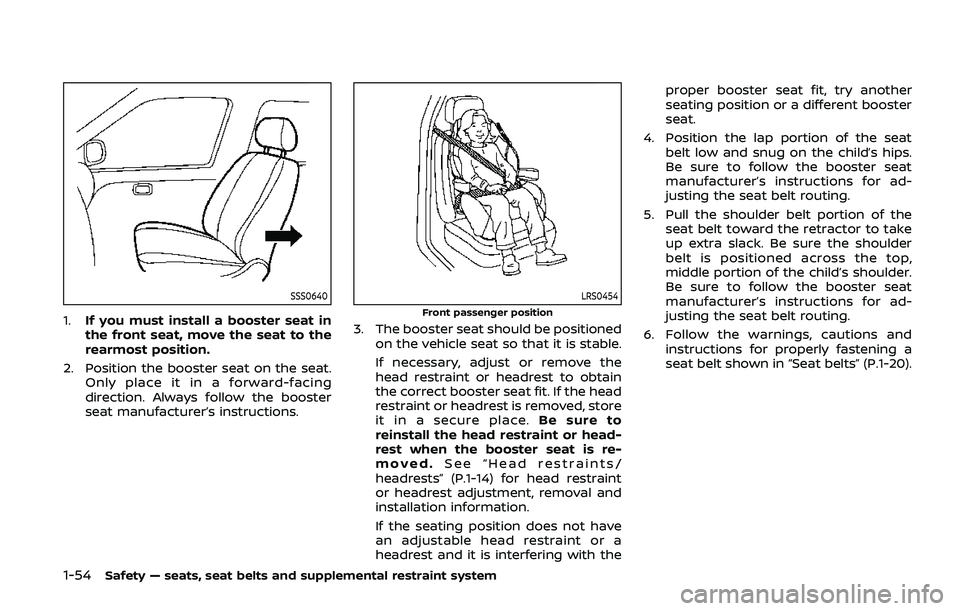
SSS0640
1.If you must install a booster seat in
the front seat, move the seat to the
rearmost position.
2. Position the booster seat on the seat. Only place it in a forward-facing
direction. Always follow the booster
seat manufacturer’s instructions.
LRS0454
Front passenger position
3. The booster seat should be positioned
on the vehicle seat so that it is stable.
If necessary, adjust or remove the
head restraint or headrest to obtain
the correct booster seat fit. If the head
restraint or headrest is removed, store
it in a secure place. Be sure to
reinstall the head restraint or head-
rest when the booster seat is re-
moved. See “Head restraints/
headrests” (P.1-14) for head restraint
or headrest adjustment, removal and
installation information.
If the seating position does not have
an adjustable head restraint or a
headrest and it is interfering with the proper booster seat fit, try another
seating position or a different booster
seat.
4. Position the lap portion of the seat belt low and snug on the child’s hips.
Be sure to follow the booster seat
manufacturer’s instructions for ad-
justing the seat belt routing.
5. Pull the shoulder belt portion of the seat belt toward the retractor to take
up extra slack. Be sure the shoulder
belt is positioned across the top,
middle portion of the child’s shoulder.
Be sure to follow the booster seat
manufacturer’s instructions for ad-
justing the seat belt routing.
6. Follow the warnings, cautions and instructions for properly fastening a
seat belt shown in “Seat belts” (P.1-20).
Page 276 of 536
5-16Starting and driving
.Make sure the area around the vehicle
is clear.
. Check fluid levels such as engine oil,
coolant, brake fluid and window
washer fluid as frequently as possible,
or at least whenever you refuel.
. Check that all windows and lights are
clean.
. Visually inspect tires for their appear-
ance and condition. Also check tires
for proper inflation.
. Lock all doors.
. Position seat and adjust head re-
straints/headrests.
. Adjust inside and outside mirrors.
. Fasten seat belts and ask all passen-
gers to do likewise.
. Check the operation of warning lights
when the ignition switch is pushed to
the ON position. (See “Warning lights,
indicator lights and audible remin-
ders” (P.2-10).) 1. Apply the parking brake.
2. Move the shift lever to the P (Park) or N
(Neutral) position. (P is recommended.)
The starter is designed not to operate
unless the shift lever is in either of the
above positions.
3. Push the ignition switch to the ON position. Firmly depress the brake
pedal and push the ignition switch to
start the engine.
To start the engine immediately, push
and release the ignition switch while
depressing the brake pedal with the
ignition switch in any position.
.If the engine is very hard to start inextremely cold weather or when
restarting, depress the accelerator
pedal a little (approximately 1/3 to
the floor) and while holding, crank
the engine. Release the accelerator
pedal when the engine starts.
.If the engine is very hard to startbecause it is flooded, depress the
accelerator pedal all the way to the
floor and hold it. Push the ignition
switch to the ON position to start
cranking the engine. After 5 or 6
seconds, stop cranking by pushing
the ignition switch to OFF. After
cranking the engine, release the
accelerator pedal. Crank the engine
with your foot off the accelerator pedal
by depressing the brake
pedal and pushing the push-button
ignition switch to start the engine.
If the engine starts, but fails to run,
repeat the above procedure.
CAUTION
Do not operate the starter for more
than 15 seconds at a time. If the
engine does not start, push the
ignition switch to OFF and wait 10
seconds before cranking again,
otherwise the starter could be da-
maged.
4. Warm-up
Allow the engine to idle for at least 30
seconds after starting. Do not race the
engine while warming it up. Drive at
moderate speed for a short distance
first, especially in cold weather. In cold
weather, keep the engine running for
a minimum of 2 - 3 minutes before
shutting it off. Starting and stopping
the engine over a short period of time
may make the vehicle more difficult to
start.
When racing the engine up to 4,000
rpm or more under the no load
condition, the engine will enter the
BEFORE STARTING THE ENGINE STARTING THE ENGINE
Page 529 of 536

Fuel-filler cap............................................................ 3-26
Fuel-filler door......................................................... 3-26
Gauge........................................................................\
........ 2-8
LOOSE FUEL CAP warning............................. 3-29
Fuel efficient driving tips .................................... 5-120
Fuses........................................................................\
.............. 8-18
Fusible links...................................................................... 8-19
G
Garage door opener HomeLink®
Universal Transceiver ......................... 2-71, 2-75
Gas cap........................................................................\
........ 3-26
Gauge........................................................................\
................ 2-5 Engine coolant temperature gauge......... 2-7
Engine oil pressure gauge ............................... 2-8
Fuel gauge .................................................................... 2-8
Odometer....................................................................... 2-6
Speedometer .............................................................. 2-6
Tachometer.................................................................. 2-7
Trip computer ......................................................... 2-28
General maintenance................................................... 9-2
Glove box ........................................................................\
... 2-57
H
Hazard warning flasher switch ............................ 6-2
Head restraints/headrests................................... 1-14
Headlights Aiming control ........................................................ 2-40
Bulb replacement ................................................. 8-24
Headlight switch ................................................... 2-37
Heated seats ................................................................... 2-43
Heated steering wheel ............................................ 2-42
Heater Automatic air conditioner ............................. 4-35 Engine block heater ....................................... 5-141
Heater and air
conditioner operation....................................... 4-34
Hill start assist system ......................................... 5-129
HomeLink® Universal Transceiver ..... 2-71, 2-75
Hood release ................................................................... 3-21
Hook Coat hooks ................................................................ 2-60
Luggage hook ......................................................... 2-60
Horn........................................................................\
................ 2-43
I
Ignition switch (Push-button)............................ 5-13
Immobilizer system.................................................... 2-32
In-cabin microfilter ..................................................... 4-42
Indicator Lights..................................................................\
............ 2-17
Vehicle information display.......................... 2-20
Inside mirror .................................................................... 3-31
Inspection/Maintenance (I/M) test............. 10-32
Instrument brightness control ......................... 2-41
Instrument panel ............................................................. 2-4
Intelligent Around View Monitor ..................... 4-10
Intelligent Auto Headlight system ................. 2-38
Intelligent Back-up Intervention (I-BI) ......... 5-57
Intelligent Blind Spot
Intervention (I-BSI) ...................................................... 5-43
Intelligent Blind Spot Intervention (I-BSI)
ON indicator light ........................................................ 2-18
Intelligent Cruise Control (ICC) ........................ 5-67
Intelligent Cruise Control (ICC) system main switch indicator ....................................... 2-25
Intelligent Cruise Control (ICC) system
warning light ................................................................... 2-14
Intelligent Distance Control (I-DC) ................. 5-89 Intelligent Distance Control (I-DC) system
warning light ................................................................... 2-13
Intelligent Forward Collision
Warning (I-FCW).......................................................... 5-111
Intelligent Key..................................................................... 3-2
Intelligent Key system ................................................. 3-7
Battery replacement.......................................... 8-21
Key operating range ............................................. 3-9
Key operation .......................................................... 3-10
Warning light............................................................ 2-14
Warning signals...................................................... 3-12
Intelligent Key warning light .............................. 2-14
Intelligent Lane Intervention (I-LI) .................. 5-23
Intelligent Lane Intervention (I-LI) ON
indicator light (green) .............................................. 2-18
Intelligent Rear View Mirror................................. 3-32
Interior light replacement..................................... 8-26
Interior light switch.................................................... 2-69
Interior lights................................................................... 2-69
ISOFIX child restraint ................................................ 1-35
J
Jump starting ................................................................. 6-12
K
Keyless entry (See remote keyless
entry system) .................................................................. 3-15
Keys ........................................................................\
.................... 3-2 For Intelligent Key system................................ 3-7
L
LabelsAir bag warning labels ..................................... 1-71
Air conditioner specification label....... 10-12
11-3