Page 192 of 592
Lockout protection
To prevent the Intelligent Key from being
accidentally locked in the trunk, lockout
protection is equipped with the Intelligent
Key.
When all doors are locked and the trunk lid
is closed with the Intelligent Key inside the
trunk, the outside buzzer will sound and the
trunk will open.
HOW TO USE THE REMOTE
KEYLESS ENTRY FUNCTION
The remote keyless entry function can op-
erate all door locks using the remote key-
less function of the Intelligent Key. The re-
mote keyless function can operate at a
distance of 33 f t (10 m) away from the ve-
hicle. The operating distance depends
upon the conditions around the vehicle.
The remote keyless entry function may not
function under the following conditions:∙ When the Intelligent Key is not within the operational range.
∙ When the doors or the trunk are open or not closed securely.
∙ When the Intelligent Key battery is dis- charged.
Page 193 of 592
CAUTION
Af ter locking the doors using the Intel-
ligent Key, be sure that the doors have
been securely locked by operating the
door handles.
Unlocking doors
1. Press the
Page 202 of 592
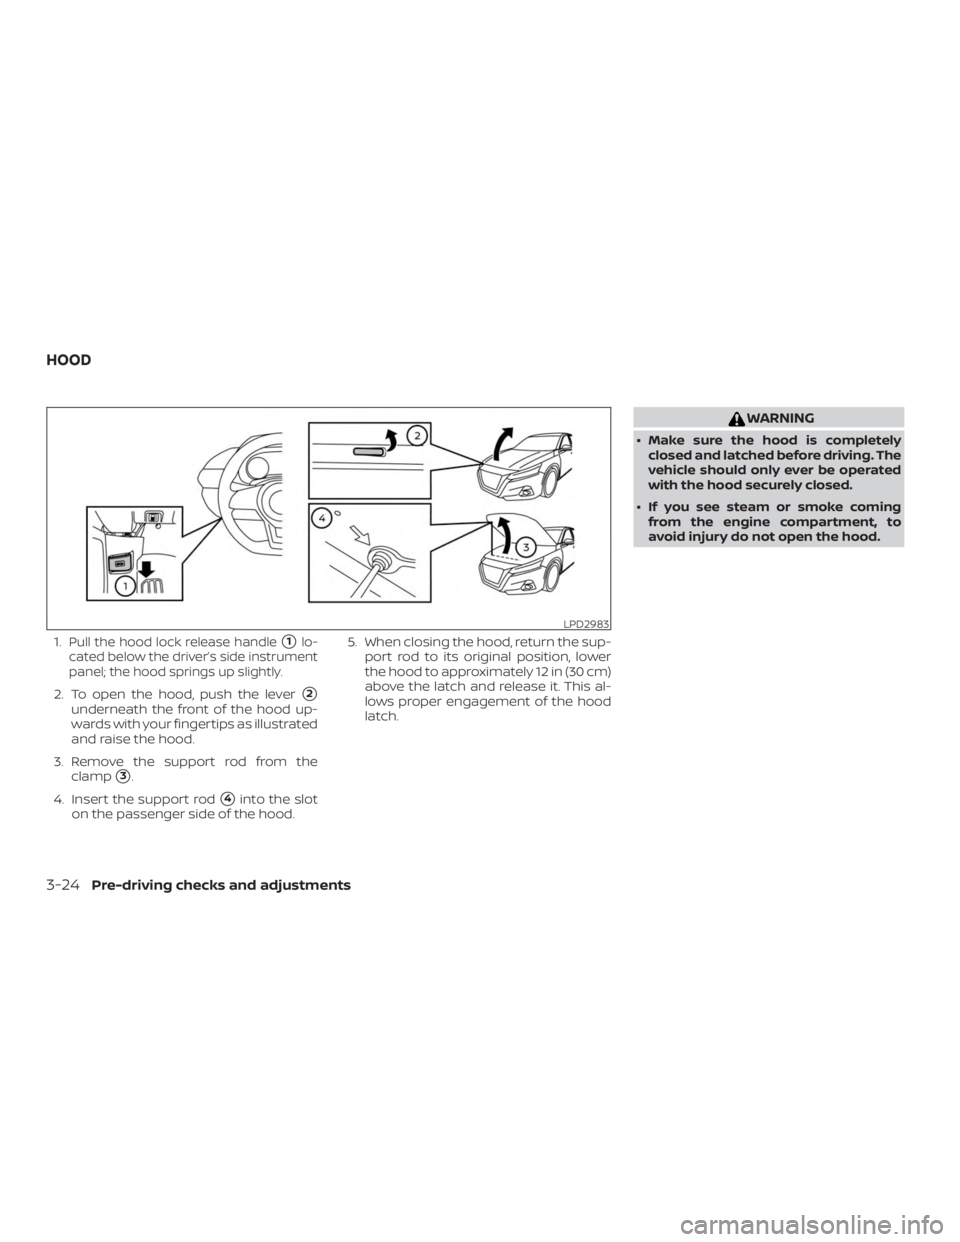
1.Pull the hood lock release handle�1lo-
cated below the driver’s side instrument
panel; the hood springs up slightly.
2. To open the hood, push the lever�2
underneath the front of the hood up-
wards with your fingertips as illustrated
and raise the hood.
3. Remove the support rod from the clamp
�3.
4. Insert the support rod
�4into the slot
on the passenger side of the hood. 5. When closing the hood, return the sup-
port rod to its original position, lower
the hood to approximately 12 in (30 cm)
above the latch and release it. This al-
lows proper engagement of the hood
latch.
Page 204 of 592
NOTE:
Request switches for all doors and trunk
can be deactivated when the I-Key Door
Lock setting is switched to OFF in the
“Vehicle Settings” of the vehicle informa-
tion display. For additional information,
refer to “Vehicle information display ” in
the “Instruments and controls” section
of the manual.
INTERIOR TRUNK LID RELEASE
Page 205 of 592

WARNING
∙ Never allow anyone to ride in thecargo area or on the rear seat when it
is in the fold-down position. Use of
these areas by passengers without
proper restraints could result in seri-
ous injury or death in an accident or
sudden stop.
∙ Properly secure all cargo with ropes or straps to help prevent it from sliding
or shif ting. Do not place cargo higher
than the seatbacks. In a sudden stop
or collision, unsecured cargo could
cause personal injury.
∙ When returning the seatbacks to the upright position, be certain they are
completely secured in the latched po-
sition. If they are not completely se-
cured, passengers may be injured in
an accident or sudden stop.
∙ Closely supervise children when they are around cars to prevent them from
playing and becoming locked in the
trunk where they could be seriously
injured. Keep the car locked, with the
rear seatback and trunk lid securely
latched when not in use, and prevent
children’s access to car keys.
OPENER OPERATION
The fuel-filler door release is located below
the instrument panel. To open the fuel-filler
door, pull the release. To lock, close the fuel-
filler door securely.
FUEL-FILLER CAP
Page 207 of 592
To remove the fuel-filler cap:1. Turn the fuel-filler cap counterclock- wise to remove.
2. Put the fuel-filler cap on the cap holder
�1while refueling.
To install the fuel-filler cap: 1. Insert the fuel-filler cap straight into the fuel-filler tube.
2. Turn the fuel-filler cap clockwise until a single click is heard.
Loose Fuel Cap warning
The Loose Fuel Cap warning�Aappears in
the vehicle information display when the
fuel-filler cap is not tightened correctly af-
ter the vehicle has been refueled. It may
take a few driving trips for the message to
be displayed. To turn off the warning, per-
form the following:
1. Remove and install the fuel-filler cap as soon as possible. For additional infor-
mation, refer to “Fuel-filler cap” in this
section.
2. Tighten the fuel-filler cap until it clicks.
Page 209 of 592
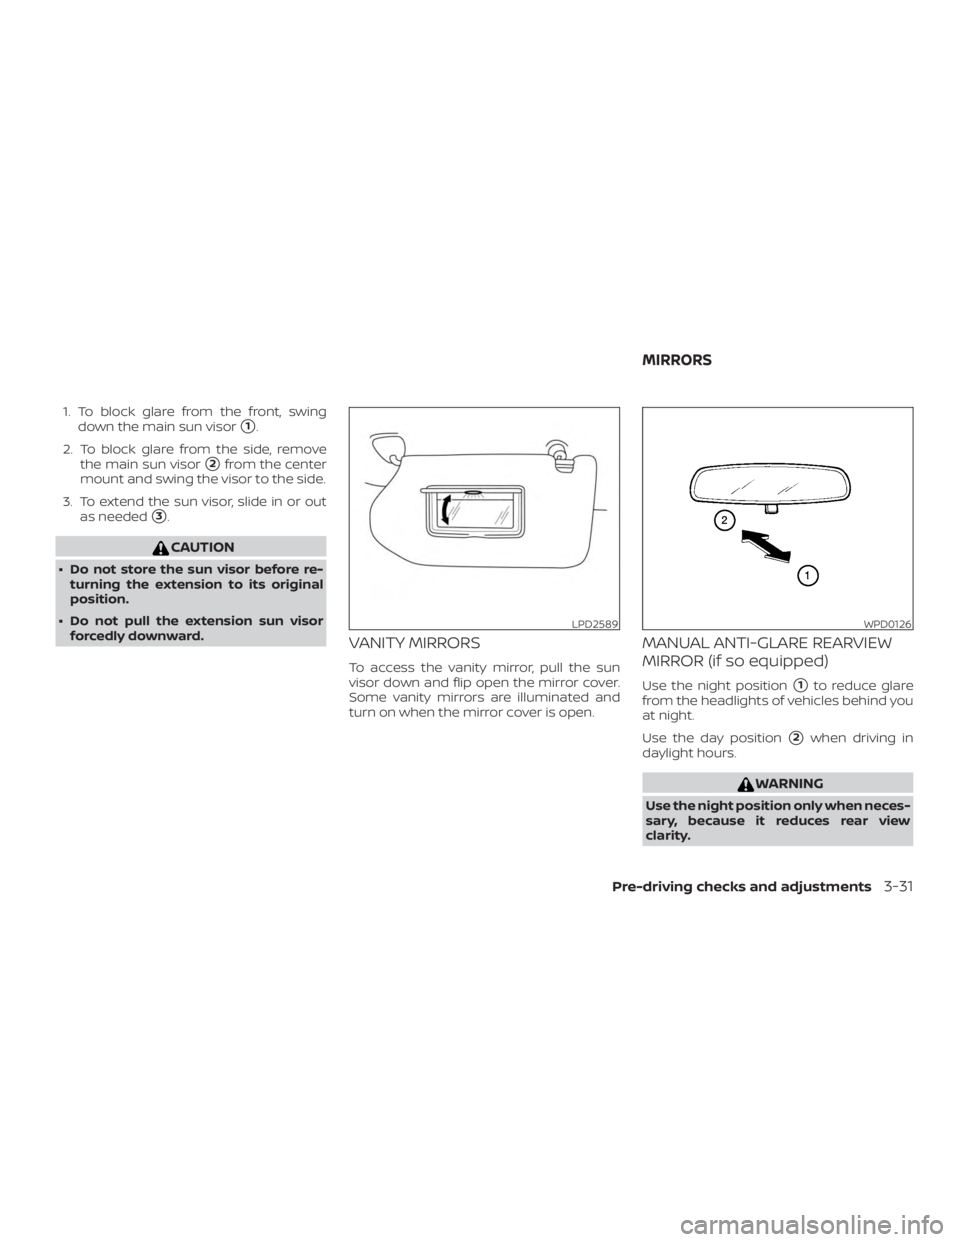
1. To block glare from the front, swingdown the main sun visor
�1.
2. To block glare from the side, remove the main sun visor
�2from the center
mount and swing the visor to the side.
3. To extend the sun visor, slide in or out as needed
�3.
Page 241 of 592
NOTE:
The blue MOD icon will change to orange
if one of the following has occurred:∙ When the system is malfunctioning.
∙ When the component temperature reaches a high level (icon will blink).
∙ When the RearView camera has de- tected a blockage (icon will blink).
If the icon light continues to illuminate
orange, have the MOD system checked. It
is recommended that you visit a NISSAN
dealer for this service.
SYSTEM MAINTENANCE


.
∙")