Page 126 of 592

The OK,andbuttons also
control audio and control panel functions
in some conditions. Most screens and
menus offer instruction prompts of the
steering switch buttons to indicate how to
control the vehicle information display.
Dots on the right side of the vehicle infor-
mation display will appear if there is more
than one page of menu items or warning
messages. The OK button changes the
audio source and the
buttons
also control voice recognition manual
mode. The OK button can be used to
change the audio source when the audio
screen is displayed. The
but-
tons can be used when controlling voice
recognition prompts manually. For addi-
tional information, refer to the separate
NissanConnect® Owner’s Manual.
STARTUP DISPLAY
When the vehicle in placed in the ON position
the vehicle information display may display
the following screens (if so equipped):
∙ Home
∙ Drive Computer — Speed, Fuel Economy, Trip Distance & Time ∙ Convenience
∙ Digital speed and average speed
∙ Instant fuel economy/ average fuel
economy
∙ Traffic Sign Recognition
∙ Tire Pressure
∙ Variable Compression Turbo
∙ Speed Limit Sign
∙ Compass and Navigation
∙ Audio/telephone
∙ Intelligent Cruise Control (ICC)
∙ ProPILOT
∙ Driving Aids
∙ Settings
∙ Warnings*
*Warnings will only display if there are any
present. For additional information, refer to
“Vehicle information display warnings and
indicators” in this section.
To control what items display in the vehicle
information display, refer to “How to use the
vehicle information display” in this section.
RESETTING THE DRIVE COMPUTER
The drive computer is divided across three
screens: ∙ Average Speed
∙ Average Fuel Economy
∙ Trip Distance & Time
1. Press the
but-
tons until you reach the desired drive
computer mode.
2. Press and hold the OK button for ap- proximately 1 second to reset the infor-
mation on the currently displayed
screen.
NOTE:
If you wish to reset all drive computer
values at once, press and hold the OK
button for approximately 3 seconds until
a reset menu appears; and follow the
instructions.
2-20Instruments and controls
Page 149 of 592

To defrost the rear window glass and out-
side mirrors (if so equipped), place the igni-
tion switch in the ON position and push the
rear window defroster switch on. The rear
window defroster indicator light on the
switch comes on. Push the switch again to
turn the defroster off.
The rear window defroster automatically
turns off af ter approximately 15 minutes.
CAUTION
When cleaning the inner side of the rear
window, be careful not to scratch or
damage the rear window defroster.NOTE:
The top and bottom few rows of wires on
the rear window are not part of the rear
window defroster system. These wires
make up the antenna for the audio sys-
tem.
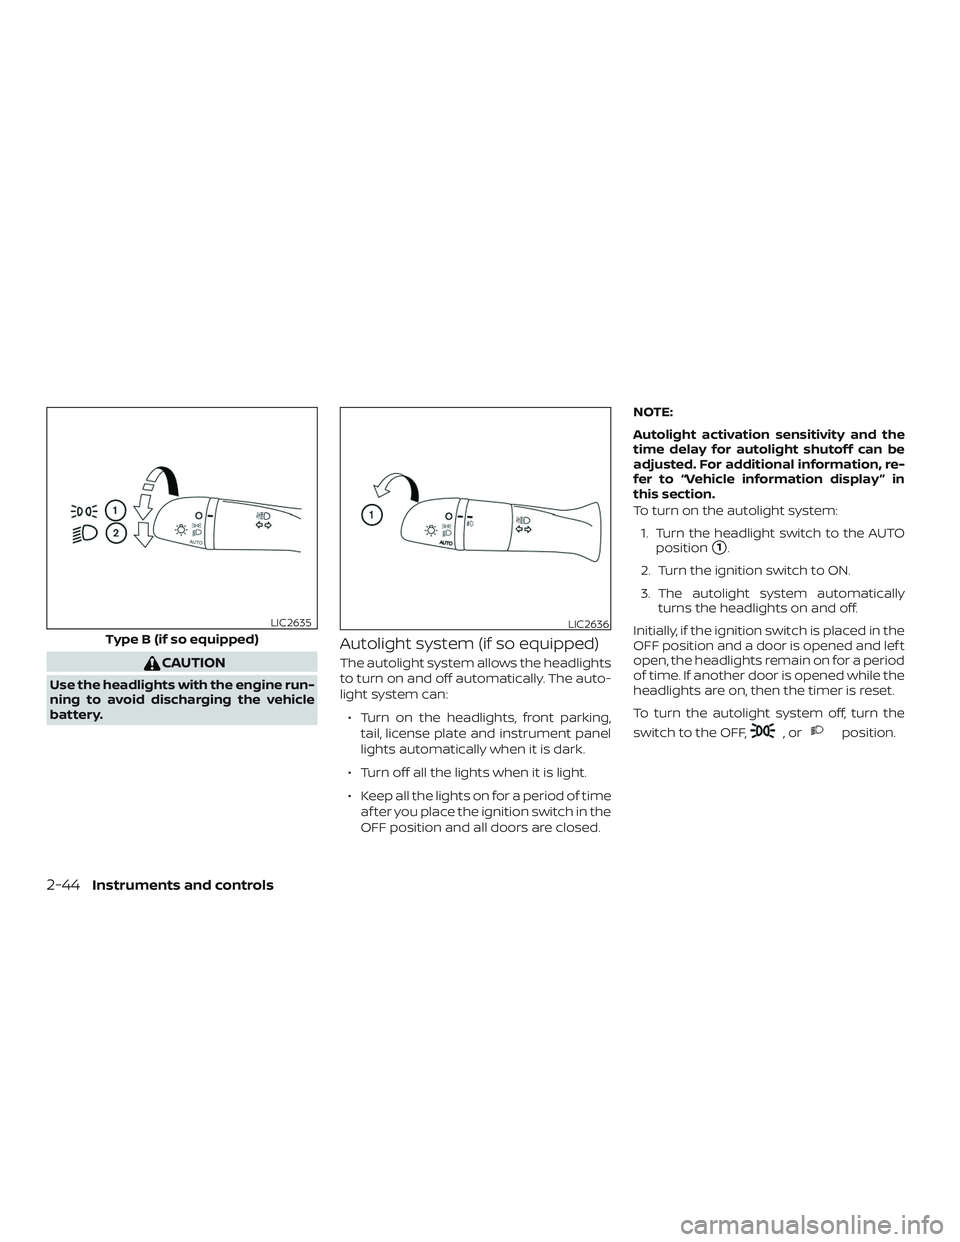
HEADLIGHT CONTROL SWITCH
Lighting
�1Rotate the switch to theposition,
and the front parking, tail, license plate,
and instrument panel lights will come
on. The
will illuminate in the me-
ter.
�2Rotate the switch to theposition,
and the headlights will come on and all
the other lights remain on.
LIC4039
Type A (if so equipped)
LIC2634
REAR WINDOW AND OUTSIDE
MIRROR (if so equipped)
DEFROSTER SWITCH HEADLIGHT AND TURN SIGNAL
SWITCH
Instruments and controls2-43
Page 150 of 592

CAUTION
Use the headlights with the engine run-
ning to avoid discharging the vehicle
battery.
Autolight system (if so equipped)
The autolight system allows the headlights
to turn on and off automatically. The auto-
light system can:∙ Turn on the headlights, front parking, tail, license plate and instrument panel
lights automatically when it is dark.
∙ Turn off all the lights when it is light.
∙ Keep all the lights on for a period of time af ter you place the ignition switch in the
OFF position and all doors are closed. NOTE:
Autolight activation sensitivity and the
time delay for autolight shutoff can be
adjusted. For additional information, re-
fer to “Vehicle information display ” in
this section.
To turn on the autolight system:
1. Turn the headlight switch to the AUTO position
�1.
2. Turn the ignition switch to ON.
3. The autolight system automatically turns the headlights on and off.
Initially, if the ignition switch is placed in the
OFF position and a door is opened and lef t
open, the headlights remain on for a period
of time. If another door is opened while the
headlights are on, then the timer is reset.
To turn the autolight system off, turn the
switch to the OFF,
,orposition.
Type B (if so equipped)
LIC2635LIC2636
2-44Instruments and controls
Page 151 of 592

Be sure you do not put anything on top
of the autolight sensor located in the top
side
�1of the instrument panel. The au-
tolight sensor controls the autolight; if it
is covered, the autolight sensor reacts as
if it is dark out and the headlights will
illuminate. If this occurs while parked
with the engine off and the ignition
switch placed in the ON position, your
vehicle’s battery could become dis-
charged.
Headlight beam select
�1To select the high beam function, push
the lever forward. The high beam lights
come on and the
light illumi-
nates in the meter.
�2Pull the lever back to select the low
beam.
�3Pulling and releasing the lever flashes
the headlight high beams on and off.
High Beam Assist (if so equipped)
The High Beam Assist system will operate
when the vehicle is driven at speeds of ap-
proximately 25 mph (40 km/h) and above. If
an oncoming vehicle or leading vehicle ap-
pears in front of your vehicle when the
headlight high beam is on, the headlight
will be switched to the low beam automati-
cally.
WARNING
∙ The High Beam Assist system is a con- venience but it is not a substitute for
safe driving operation. The driver
should remain alert at all times, en-
sure safe driving practices and switch
the high beams and low beam manu-
ally when necessary.
∙ The high beam or low beam may not switch automatically under the fol-
lowing conditions. Switch the high
beam and low beam manually.
– During bad weather (rain, fog, snow, wind, etc.).
– When a light source similar to a headlight or tail light is in the vicin-
ity of the vehicle.
LIC3051LIC2637
Instruments and controls2-45
Page 155 of 592
INSTRUMENT BRIGHTNESS
CONTROL
Press the “+” button to increase the bright-
ness of instrument panel lights.
Press the “-” button to decrease the bright-
ness of instrument panel lights.
TURN SIGNAL SWITCH
Turn signal
�1Move the lever up or down to signal the
turning direction. When the turn is
completed, the turn signal cancels au-
tomatically.
Lane change signal
�2Move the lever up or down until the
turn signal begins to flash, but the lever
does not latch, to signal a lane change.
Hold the lever until the lane change is
completed. Move the lever up or down until the
turn signal begins to flash, but the lever
does not latch, and release the lever.
The turn signal will automatically flash
three times.
Choose the appropriate method to signal
a lane change based on road and traffic
conditions.
NOTE:
The 3 flash pass feature may be disabled.
For additional information, refer to “Ve-
hicle information display ” in this section.
LIC3176LIC2638
Instruments and controls2-49
Page 160 of 592

∙ If the alert is enabled when a driver exitsthe vehicle, a message will appear in the
vehicle information display that states
“Check Back Seat for All Articles.”
If “Horn & Alert” setting is selected:
∙ An audible horn sound will occur af- ter a short time unless a rear door is
opened and closed within a short
time to deactivate the alert.
∙ If the doors are locked before the alert is deactivated by opening a rear
door, the horn will sound.
∙ If the trunk is opened before a rear door is opened, the horn will be de-
layed until af ter the trunk is closed.
NOTE:
If “Alert Only ” setting is selected, the
message alert will still be shown in the
vehicle information display but the horn
will not sound.WARNING
∙ If the driver selects “Disable Alert”, no audible alert will be provided regard-
less of rear door open/close status.
∙ There may be times when there is an object or passenger in the rear seat(s)
but the audible alert does not sound.
For example, this may occur if the en-
gine is turned off and then on again in
a short period of time during a trip, or
if rear seat passengers enter or exit
the vehicle during a trip.
∙ The system does not directly detect objects or passengers in the rear
seat(s). Instead, it can detect when a
rear door is opened and closed, indi-
cating that there may be something in
the rear seat(s).
NOTE:
There may be times when the horn
sounds but there are no objects or pas-
sengers in the rear seat(s).
For additional information, refer to “Rear
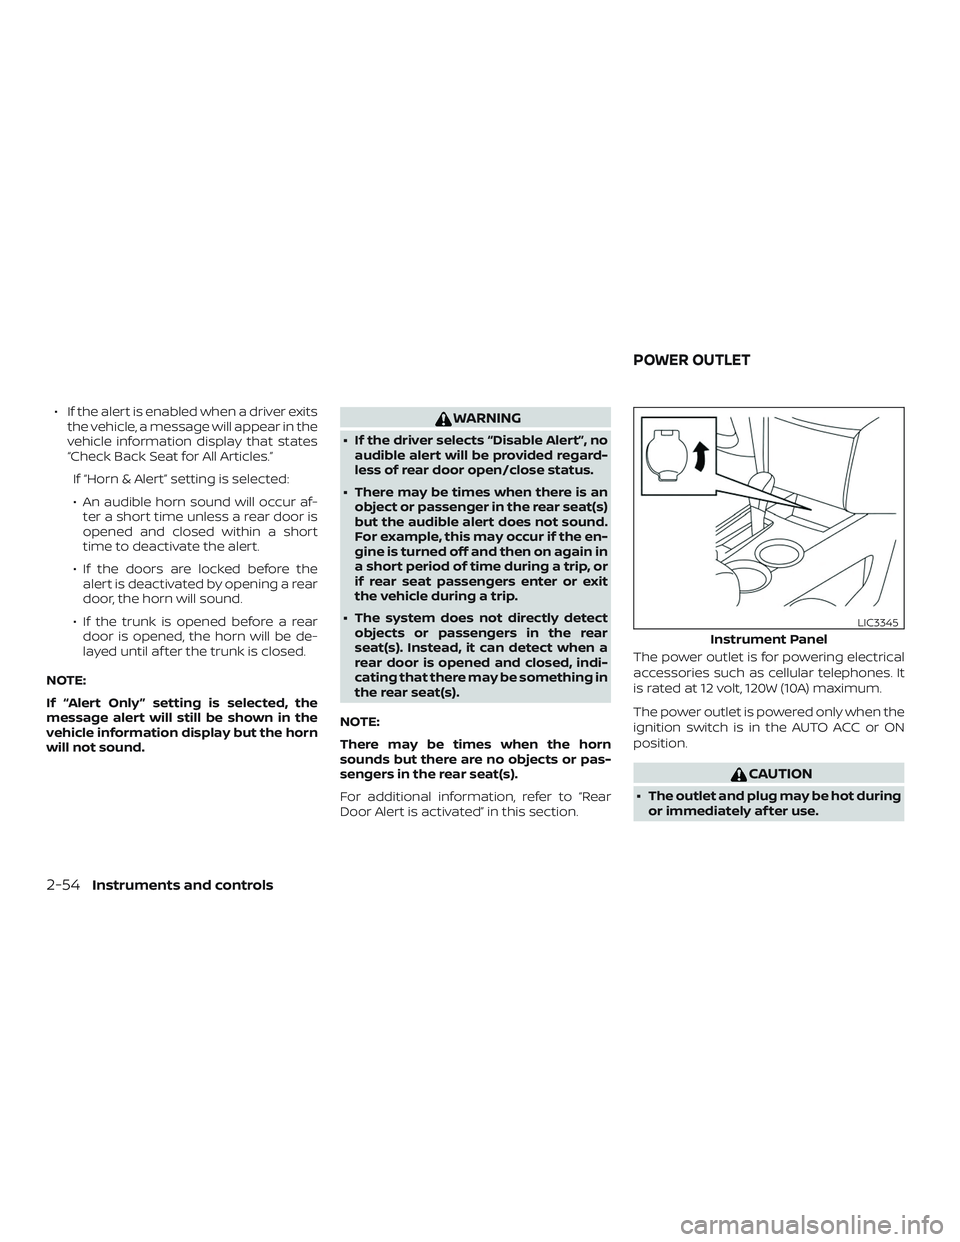
Door Alert is activated” in this section. The power outlet is for powering electrical
accessories such as cellular telephones. It
is rated at 12 volt, 120W (10A) maximum.
The power outlet is powered only when the
ignition switch is in the AUTO ACC or ON
position.
CAUTION
∙ The outlet and plug may be hot during
or immediately af ter use.
Instrument Panel
LIC3345
POWER OUTLET
2-54Instruments and controls
Page 162 of 592
The extended storage switch is used when
shipping the vehicle. It is located in the fuse
panel to the lef t of the steering wheel on
the instrument panel. If any electrical
equipment does not operate, ensure the
extended storage switch is pushed fully in
place, as shown.FRONT-DOOR POCKETSSEATBACK POCKETS
The seatback pockets may be located on
the back of the driver’s and/or passenger’s
seats. The pockets can be used to store
maps.
Pushed position
LIC3268LIC4088LIC1328
STORAGE
2-56Instruments and controls
Page 166 of 592

POWER WINDOWS
WARNING
∙ Make sure that all passengers havetheir hands, etc., inside the vehicle
while it is in motion and before closing
the windows. Use the window lock
switch to prevent unexpected use of
the power windows.
∙ To help avoid risk of injury or death through unintended operation of the
vehicle and/or its systems, including
entrapment in windows or inadver-
tent door lock activation, do not leave
children, people who require the as-
sistance of others or pets unattended
in your vehicle. Additionally, the tem-
perature inside a closed vehicle on a
warm day can quickly become high
enough to cause a significant risk of
injury or death to people and pets.
The power windows operate when the ig-
nition switch is placed in the ON position or
for a period of time af ter the ignition switch
is placed in the OFF position. If the driver’s
or passenger’s door is opened during this
period of time, the power to the windows is
canceled.
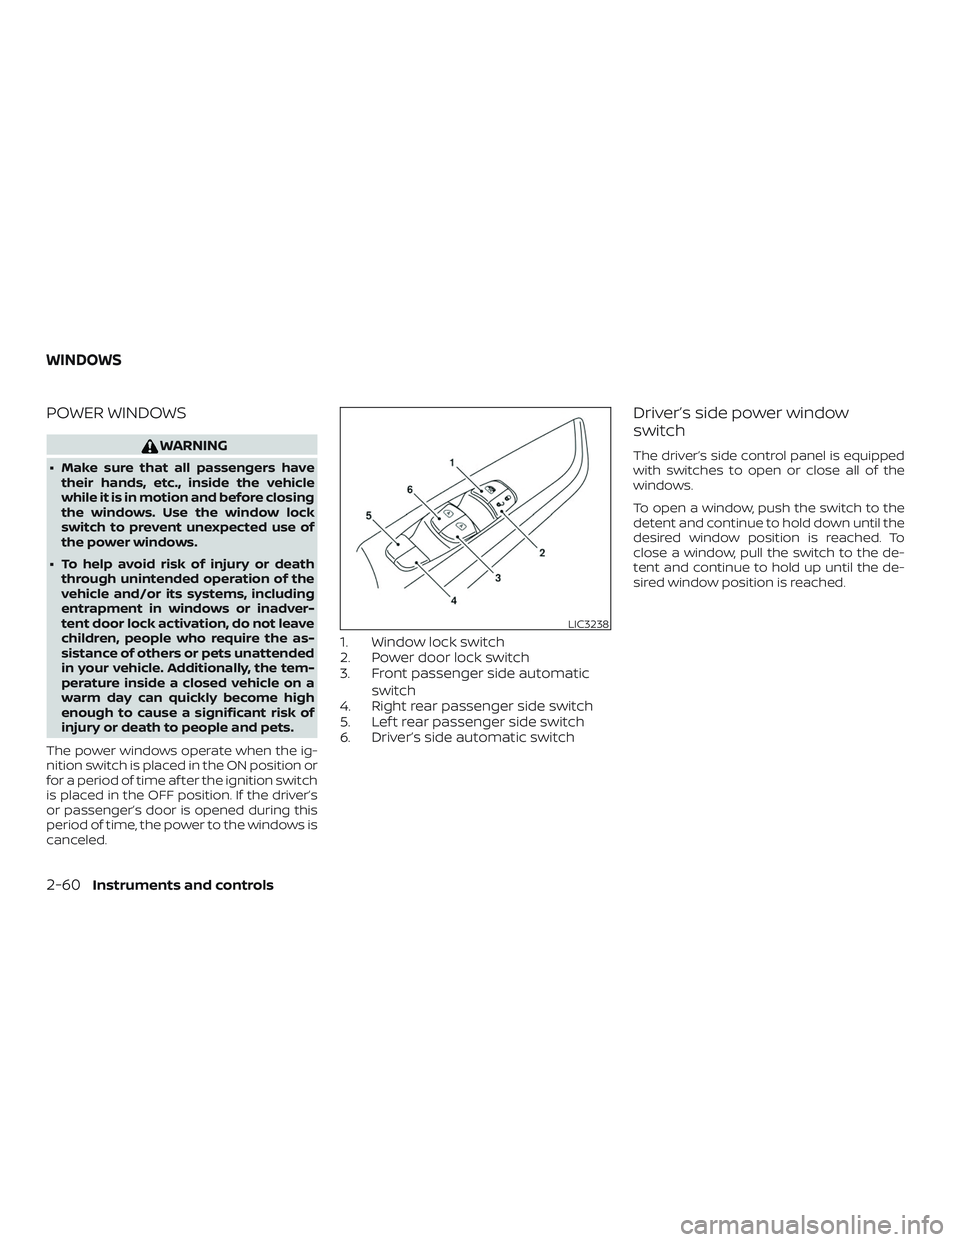
1. Window lock switch
2. Power door lock switch
3. Front passenger side automatic switch
4. Right rear passenger side switch
5. Lef t rear passenger side switch
6. Driver’s side automatic switch
Driver’s side power window
switch
The driver’s side control panel is equipped
with switches to open or close all of the
windows.
To open a window, push the switch to the
detent and continue to hold down until the
desired window position is reached. To
close a window, pull the switch to the de-
tent and continue to hold up until the de-
sired window position is reached.
LIC3238
WINDOWS
2-60Instruments and controls