2019 NISSAN 370Z air filter
[x] Cancel search: air filterPage 108 of 460

2-40Instruments and controls
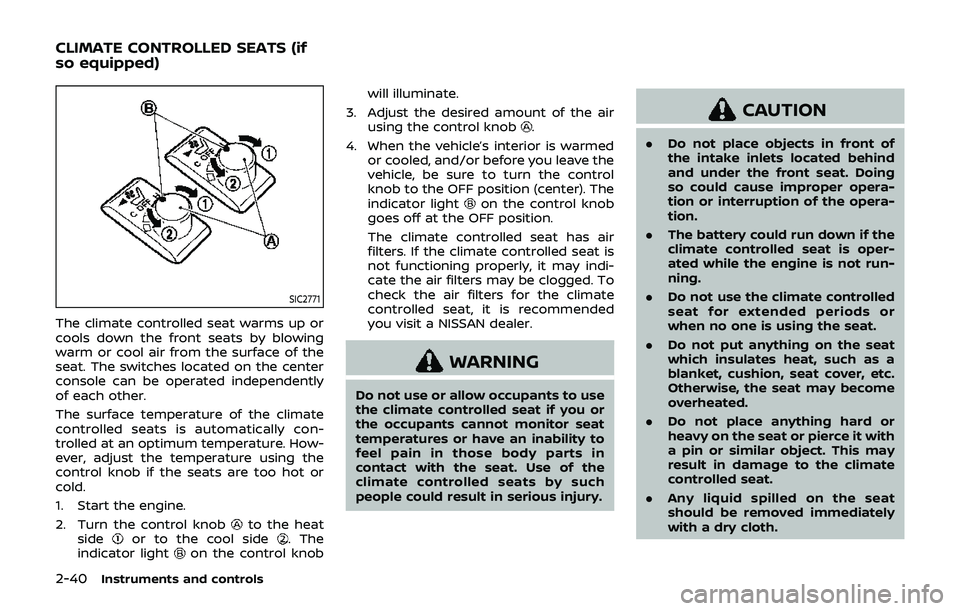
SIC2771
The climate controlled seat warms up or
cools down the front seats by blowing
warm or cool air from the surface of the
seat. The switches located on the center
console can be operated independently
of each other.
The surface temperature of the climate
controlled seats is automatically con-
trolled at an optimum temperature. How-
ever, adjust the temperature using the
control knob if the seats are too hot or
cold.
1. Start the engine.
2. Turn the control knob
to the heat
sideor to the cool side. The
indicator lighton the control knob will illuminate.
3. Adjust the desired amount of the air using the control knob
.
4. When the vehicle’s interior is warmed or cooled, and/or before you leave the
vehicle, be sure to turn the control
knob to the OFF position (center). The
indicator light
on the control knob
goes off at the OFF position.
The climate controlled seat has air
filters. If the climate controlled seat is
not functioning properly, it may indi-
cate the air filters may be clogged. To
check the air filters for the climate
controlled seat, it is recommended
you visit a NISSAN dealer.
WARNING
Do not use or allow occupants to use
the climate controlled seat if you or
the occupants cannot monitor seat
temperatures or have an inability to
feel pain in those body parts in
contact with the seat. Use of the
climate controlled seats by such
people could result in serious injury.
CAUTION
. Do not place objects in front of
the intake inlets located behind
and under the front seat. Doing
so could cause improper opera-
tion or interruption of the opera-
tion.
. The battery could run down if the
climate controlled seat is oper-
ated while the engine is not run-
ning.
. Do not use the climate controlled
seat for extended periods or
when no one is using the seat.
. Do not put anything on the seat
which insulates heat, such as a
blanket, cushion, seat cover, etc.
Otherwise, the seat may become
overheated.
. Do not place anything hard or
heavy on the seat or pierce it with
a pin or similar object. This may
result in damage to the climate
controlled seat.
. Any liquid spilled on the seat
should be removed immediately
with a dry cloth.
CLIMATE CONTROLLED SEATS (if
so equipped)
Page 109 of 460

.The climate controlled seat has
air filters. Do not operate the
climate controlled seat without
the air filters. This may result in
damage to the system.
. When cleaning the seat, never use
gasoline, thinner, or any similar
materials.
. If any malfunctions are found or
the climate controlled seat does
not operate, turn the switch off
and have the system checked. It
is recommended you visit a
NISSAN dealer for this service.
SSD1161
The vehicle should be driven with the
Vehicle Dynamic Control (VDC) system on
for most driving conditions.
If the vehicle is stuck in mud or snow, the
VDC system reduces the engine output to
reduce wheel spin. The engine speed will
be reduced even if the accelerator is
depressed to the floor. If maximum en-
gine power is needed to free a stuck
vehicle, turn the VDC system off.
To turn off the VDC system, push the VDC
OFF switch. The
indicator light will
illuminate. Push the VDC OFF switch again or restart
the engine to turn on the system. (See
“Vehicle Dynamic Control (VDC) system”
(P.5-30).)
Instruments and controls2-41
VEHICLE DYNAMIC CONTROL (VDC)
OFF SWITCH
Page 167 of 460

4 Center display, heater, air conditioner,audio, phone and voice recognition sys-
tems
Safety note ........................................................................\
................ 4-3
Center multi-function control panel (models with
navigation system) ...................................................................... 4-4
How to use multi-function controller .................... 4-4
How to use touch screen ................................................ 4-5
Menu options ........................................................................\
.... 4-7
How to select menus on the screen ...................... 4-7
Vehicle information and settings (models with
navigation system) ...................................................................... 4-8 How to use STATUS button .......................................... 4-8
How to use brightness control and display
ON/OFF button ........................................................................\
4-8
How to use INFO button .................................................. 4-8
How to use SETTING button ...................................... 4-11
RearView monitor (mirror display type) .................. 4-17 RearView Monitor system operation .................. 4-18
How to read displayed lines ....................................... 4-18
Difference between predictive and
actual distances ................................................................... 4-19
Display settings (Type A) (if so equipped) ....... 4-21
Display settings (Type B) (if so equipped) ....... 4-21
RearView Monitor system limitations ................. 4-22
System maintenance ....................................................... 4-23 RearView Monitor (center display type) (if
so equipped) ........................................................................\
......... 4-24
RearView Monitor system operation ................ 4-24
How to read displayed lines .................................... 4-25
How to park with predictive course lines ...... 4-25
Difference between predictive and
actual distances ................................................................ 4-26
Adjusting the screen ...................................................... 4-28
Predictive course line settings ............................... 4-28
RearView Monitor system limitations .............. 4-29
System maintenance .................................................... 4-30
Ventilators ........................................................................\
.............. 4-30 Center ventilators ............................................................ 4-30
Side ventilators .................................................................. 4-31
Heater and air conditioner ................................................ 4-31 Automatic air conditioner (Type A) (if
so equipped) ........................................................................\
. 4-32
Automatic air conditioner (Type B) (if
so equipped) ........................................................................\
. 4-34
Operating tips ..................................................................... 4-36
In-cabin microfilter .......................................................... 4-36
Servicing air conditioner ............................................. 4-36
Page 176 of 460

4-10Center display, heater, air conditioner, audio, phone and voice recognition systems
SAA2481
Maintenance information
The maintenance intervals can be dis-
played for the engine oil, oil filter, tire and
other reminders.
To set a maintenance interval, select a
preferred item from the list.
You can also set to display a message to
remind you that the maintenance needs
to be performed.
The following example shows how to set
the engine oil maintenance information.
Use the same steps to set the other
maintenance information.
SAA2482
1. Set the interval (mileage) of the main-tenance schedule. To determine the
recommended maintenance interval,
refer to the “9. Maintenance and
schedules” section.
2. To display the reminder automatically when the desired distance is reached,
select the “Reminder” key.
3. Reset the driving distance to the new maintenance schedule.
4. To return to the previous screen, push the BACK button.
The unit can be converted between “US”
and “Metric”. (See “How to use SETTING
button” (P.4-11).)
SAA3003
Example
The Reminder will be automatically dis-
played when the specified distance has
been driven and every time the ignition
switch is pushed to the ACC or ON
position. The reminder will not appear
while driving.
Select the “OK” key to hide the reminder
for the rest of the current drive.
To stop the reminder from appearing,
perform one of the following actions:
. Select the “Reset Distance”.
. Deactivate the “Reminder”.
. Increase the “Interval” distance to be
more than the current distance being
tracked.
Page 202 of 460

4-36Center display, heater, air conditioner, audio, phone and voice recognition systems
SAA2324
SAA2315
OPERATING TIPS
When the engine coolant temperature
and outside air temperature are low, the
air flow from the foot outlets may not
operate. This is not a malfunction. After
the coolant temperature warms up, air
will flow normally from the foot outlets.
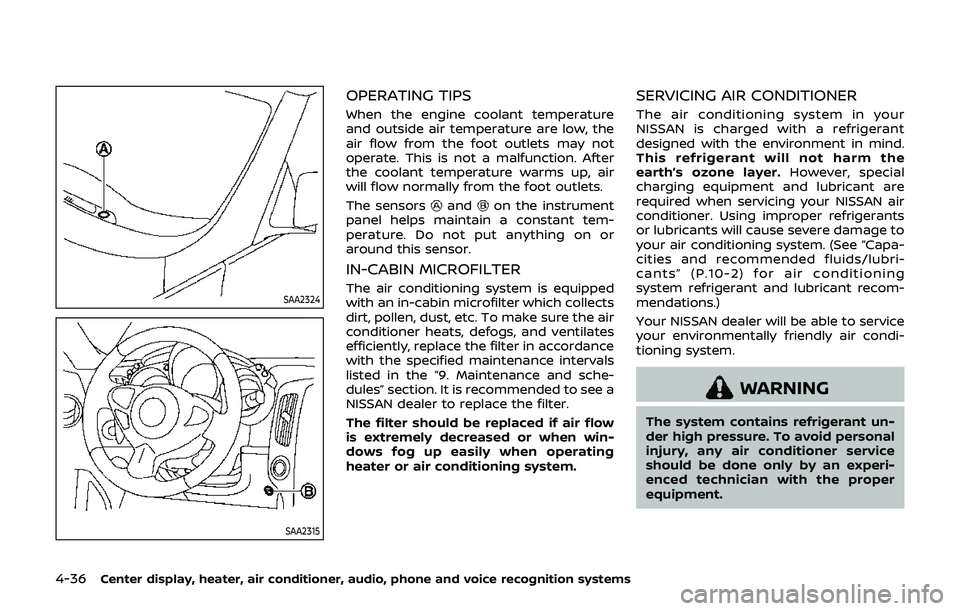
The sensors
andon the instrument
panel helps maintain a constant tem-
perature. Do not put anything on or
around this sensor.
IN-CABIN MICROFILTER
The air conditioning system is equipped
with an in-cabin microfilter which collects
dirt, pollen, dust, etc. To make sure the air
conditioner heats, defogs, and ventilates
efficiently, replace the filter in accordance
with the specified maintenance intervals
listed in the “9. Maintenance and sche-
dules” section. It is recommended to see a
NISSAN dealer to replace the filter.
The filter should be replaced if air flow
is extremely decreased or when win-
dows fog up easily when operating
heater or air conditioning system.
SERVICING AIR CONDITIONER
The air conditioning system in your
NISSAN is charged with a refrigerant
designed with the environment in mind.
This refrigerant will not harm the
earth’s ozone layer. However, special
charging equipment and lubricant are
required when servicing your NISSAN air
conditioner. Using improper refrigerants
or lubricants will cause severe damage to
your air conditioning system. (See “Capa-
cities and recommended fluids/lubri-
cants” (P.10-2) for air conditioning
system refrigerant and lubricant recom-
mendations.)
Your NISSAN dealer will be able to service
your environmentally friendly air condi-
tioning system.
WARNING
The system contains refrigerant un-
der high pressure. To avoid personal
injury, any air conditioner service
should be done only by an experi-
enced technician with the proper
equipment.
Page 321 of 460

.Recirculating the cool air in thecabin when the A/C is on reduces
cooling load.
4. Drive at economical speeds and dis- tances.
.Observing the speed limit and notexceeding 60 MPH (97 km/h)
(where legally allowed) can improve
fuel efficiency due to reduced aero-
dynamic drag.
.Maintaining a safe following dis-tance behind other vehicles re-
duces unnecessary braking.
.Safely monitoring traffic to antici- pate changes in speed permits
reduced braking and smooth accel-
eration changes.
.Select a gear range suitable to roadconditions.
5. Use cruise control.
.Using cruise control during highway driving helps maintain a steady
speed.
.Cruise control is particularly effec-tive in providing fuel savings when
driving on flat terrains.
6. Plan for the shortest route.
.Utilize a map or navigation system to determine the best route to save
time. 7. Avoid idling.
.Shutting off your engine when safe
for stops exceeding 30-60 seconds
saves fuel and reduces emissions.
8. Buy an automated pass for toll roads.
.Automated passes permit drivers to use special lanes to maintain cruis-
ing speed through the toll and
avoid stopping and starting.
9. Winter warm up.
.Limit idling time to minimize impact to fuel economy.
.Vehicles typically need no morethan 30 seconds of idling at start-
up to effectively circulate the en-
gine oil before driving.
.Your vehicle will reach its ideal
operating temperature more
quickly while driving versus idling.
10. Keeping your vehicle cool.
.Park your vehicle in a covered parking area or in the shade when-
ever possible.
.When entering a hot vehicle, open- ing the windows will help to reduce
the inside temperature faster, re-
sulting in reduced demand on your
A/C system. .
Keep your engine tuned up.
. Follow the recommended scheduled
maintenance.
. Keep the tires inflated to the correct
pressure. Low tire pressure increases
tire wear and lowers fuel economy.
. Keep the wheels in correct alignment.
Improper alignment increases tire
wear and lowers fuel economy.
. Use the recommended viscosity en-
gine oil. (See “Engine oil and oil filter
recommendation” (P.10-7).)
Starting and driving5-25
INCREASING FUEL ECONOMY
Page 367 of 460

8 Do-it-yourself
Maintenance precautions ...................................................... 8-2
Engine compartment check locations ........................ 8-3VQ37VHR engine model .................................................. 8-3
Engine cooling system ............................................................. 8-4 Checking engine coolant level .................................... 8-5
Changing engine coolant ................................................ 8-5
Engine oil ........................................................................\
..................... 8-6 Checking engine oil level ................................................. 8-6
Changing engine oil and filter ..................................... 8-6
Automatic Transmission Fluid (ATF) ............................. 8-8
Power steering fluid ................................................................... 8-8
Brake and clutch fluid ............................................................... 8-9 Brake fluid ........................................................................\
............ 8-9
Clutch fluid (Manual
transmission models) ...................................................... 8-10
Window washer fluid .............................................................. 8-10
Battery ........................................................................\
........................ 8-11 Jump starting ........................................................................\
. 8-13
Variable voltage control system ................................... 8-13
Drive belts ........................................................................\
................ 8-14
Spark plugs ........................................................................\
............. 8-14 Replacing spark plugs ..................................................... 8-15
Air cleaner ........................................................................\
............... 8-15 Windshield wiper blades ..................................................... 8-16
Cleaning ........................................................................\
........... 8-16
Replacing ........................................................................\
........ 8-16
Brakes ........................................................................\
........................ 8-17 Self-adjusting brakes ..................................................... 8-17
Brake pad wear warning ............................................ 8-17
Fuses ........................................................................\
........................... 8-18 Engine compartment .................................................... 8-18
Passenger compartment ........................................... 8-19
Intelligent Key battery replacement .......................... 8-20
Lights ........................................................................\
.......................... 8-22 Coupe ........................................................................\
................ 8-22
Roadster ........................................................................\
.......... 8-23
Headlights ........................................................................\
...... 8-23
Exterior and interior lights ........................................ 8-24
Wheels and tires ........................................................................\
8-26
Tire pressure ........................................................................\
8-26
Tire labeling ........................................................................\
.. 8-30
Types of tires ....................................................................... 8-32
Tire chains ........................................................................\
...... 8-33
Changing wheels and tires ...................................... 8-34
Emergency tire puncture repair kit (if
so equipped) ........................................................................\
. 8-37
Page 368 of 460

8-2Do-it-yourself
When performing any inspection or main-
tenance work on your vehicle, always
take care to prevent serious accidental
injury to yourself or damage to the
vehicle. The following are general precau-
tions which should be closely observed.
WARNING
.Park the vehicle on a level sur-
face, apply the parking brake
securely and block the wheels to
prevent the vehicle from moving.
For manual transmission models,
move the shift lever to N (Neutral).
For automatic transmission mod-
els, move the shift lever to P
(Park).
. Be sure the ignition switch is in
the OFF or LOCK position when
performing any parts replace-
ment or repairs.
. Never connect or disconnect the
battery or any transistorized
component while the ignition
switch is in the ON position.
. Never leave the engine or auto-
matic transmission related com-
ponent harnesses disconnected
while the ignition switch is in the
ON position. .
If you must work with the engine
running, keep your hands, cloth-
ing, hair and tools away from
moving fans, belts and any other
moving parts.
. It is advisable to secure or re-
move any loose clothing and
remove any jewelry, such as
rings, watches, etc. before work-
ing on your vehicle.
. Always wear eye protection
whenever you work on your ve-
hicle.
. If you must run the engine in an
enclosed space such as a garage,
be sure there is proper ventilation
for exhaust gases to escape.
. Never get under the vehicle while
it is supported only by a jack. If it
is necessary to work under the
vehicle, support it with safety
stands.
. Keep smoking materials, flame
and sparks away from fuel tank
and the battery.
. Your vehicle is equipped with an
automatic engine cooling fan. It
may come on at any time without
warning, even if the ignition key is
in the OFF position and the en-
gine is not running. To avoid injury, always disconnect the ne-
gative battery cable before work-
ing near the fan.
. Because the fuel lines are under
high pressure even when the
engine is off, it is recommended
you visit a NISSAN dealer for
service of the fuel filter or fuel
lines.
CAUTION
.Do not work under the hood while
the engine is hot. Turn the engine
off and wait until it cools down.
. Avoid direct contact with used
engine oil and coolant. Impro-
perly disposed engine oil, coolant,
and/or other vehicle fluids can
damage the environment. Always
conform to local regulations for
disposal of vehicle fluid.
This “8. Do-it-yourself” section gives in-
structions regarding only those items
which are relatively easy for an owner to
perform.
A genuine NISSAN Service Manual is also
available. (See “Owner’s Manual/Service
Manual order information” (P.10-26).)
MAINTENANCE PRECAUTIONS