2019 NISSAN 370Z trunk release
[x] Cancel search: trunk releasePage 128 of 460

3-4Pre-driving checks and adjustments
a place where temperatures
exceed 140°F (60°C).
— Do not change or modify the Intelligent Key.
— Do not use a magnet key holder.
— Do not place the Intelligent Key near an electric appliance
such as a television set, per-
sonal computer or cellular
phone.
— Do not allow the Intelligent Key to come into contact with
water or salt water, and do
not wash it in a washing
machine. This could affect
the system function.
. If an Intelligent Key is lost or
stolen, NISSAN recommends
erasing the ID code of that Intel-
ligent Key. This will prevent the
Intelligent Key from unauthorized
use to unlock the vehicle. For
information regarding the eras-
ing procedure, it is recommended
you visit a NISSAN dealer.
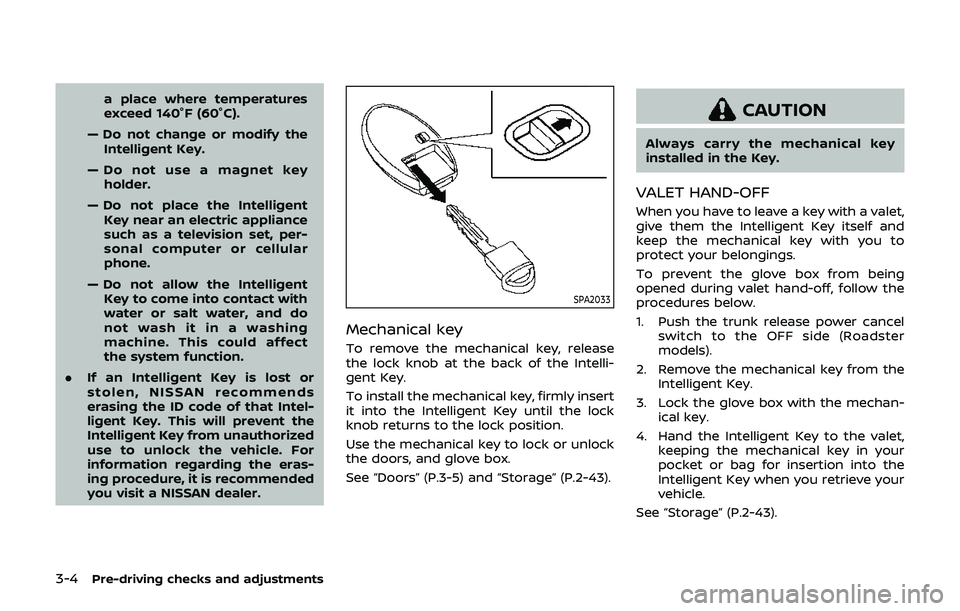
SPA2033
Mechanical key
To remove the mechanical key, release
the lock knob at the back of the Intelli-
gent Key.
To install the mechanical key, firmly insert
it into the Intelligent Key until the lock
knob returns to the lock position.
Use the mechanical key to lock or unlock
the doors, and glove box.
See “Doors” (P.3-5) and “Storage” (P.2-43).
CAUTION
Always carry the mechanical key
installed in the Key.
VALET HAND-OFF
When you have to leave a key with a valet,
give them the Intelligent Key itself and
keep the mechanical key with you to
protect your belongings.
To prevent the glove box from being
opened during valet hand-off, follow the
procedures below.
1. Push the trunk release power cancel
switch to the OFF side (Roadster
models).
2. Remove the mechanical key from the Intelligent Key.
3. Lock the glove box with the mechan- ical key.
4. Hand the Intelligent Key to the valet, keeping the mechanical key in your
pocket or bag for insertion into the
Intelligent Key when you retrieve your
vehicle.
See “Storage” (P.2-43).
Page 139 of 460

Locking doors, rear hatch/trunk lid
and fuel-filler door
1. Push the ignition switch to the OFFposition and make sure you carry the
Intelligent Key with you.*
2. Close all the doors and the rear hatch/ trunk lid.
3. Push the LOCK
buttonon the
Intelligent Key.
4. All the doors, the rear hatch/trunk lid and fuel-filler door will lock.
5. The hazard indicator flashes twice and the horn chirps once.
*: Doors and the rear hatch/trunk lid will
lock with the Intelligent Key while the
ignition switch is in the ACC or ON
position.
Unlocking doors, rear hatch/trunk
lid and fuel-filler door
1. Push the UNLOCKbuttonon
the Intelligent Key once.
2. The hazard indicator flashes once. The driver’s door and fuel-filler door will
unlock.
3. Push the UNLOCK
button on the
Intelligent Key again within 60 sec-
onds.
4. The hazard indicator flashes once again. All the doors and the rear hatch/trunk lid will unlock.
All doors and the rear hatch/trunk lid will
be locked automatically unless one of the
following operations is performed within 1
minute after pushing the UNLOCK
button on the Intelligent Key while the
doors are locked. If during this 1-minute
time period, the UNLOCK
button on
the Intelligent Key is pushed, all doors and
the rear hatch/trunk lid will be locked
automatically after another 1 minute.
. Opening any door
. Pushing the ignition switch
. Inserting the Intelligent Key into the
Intelligent Key port
Opening windows
The UNLOCKbutton operation also
allows you to open a window that is
equipped with the automatic open/close
function. (See “Power windows” (P.2-46).)
To open the window, push the door
UNLOCK
buttonon the Intelligent
Key for about 3 seconds after the door is
unlocked.
To stop opening, release the UNLOCK
button.
Window cannot be closed using the
Intelligent Key.
The door window can be opened or
closed by turning the metal key in a door lock. (See “Doors” (P.3-5).)
Using panic alarm
If you are near your vehicle and feel
threatened, you may activate the alarm
to call attention as follows:
1. Push the PANIC
buttonon the
Key for more than 1 second.
2. The theft warning alarm and head- lights will stay on for 25 seconds.
3. The panic alarm stops when:
.It has run for 25 seconds, or.Any of the buttons on the Intelligent Key are pushed. (Note: Panic button
should be pushed for more than 1
second.)
Setting hazard indicator and horn
mode
This vehicle is set in hazard indicator and
horn mode when you first receive the
vehicle.
In hazard indicator and horn mode, when
the LOCK
buttonis pushed, the
hazard indicator flashes twice and the
horn chirps once. When the UNLOCK
buttonis pushed, the hazard indicator
flashes once.
If horns are not necessary, the system
can be switched to the hazard indicator
mode.
Pre-driving checks and adjustments3-15
Page 144 of 460

3-20Pre-driving checks and adjustments
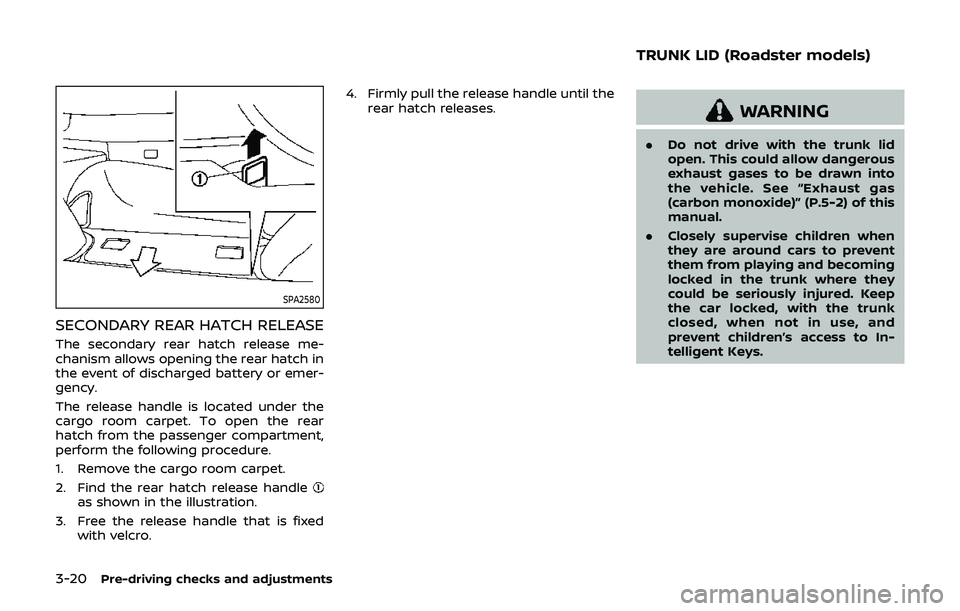
SPA2580
SECONDARY REAR HATCH RELEASE
The secondary rear hatch release me-
chanism allows opening the rear hatch in
the event of discharged battery or emer-
gency.
The release handle is located under the
cargo room carpet. To open the rear
hatch from the passenger compartment,
perform the following procedure.
1. Remove the cargo room carpet.
2. Find the rear hatch release handle
as shown in the illustration.
3. Free the release handle that is fixed with velcro. 4. Firmly pull the release handle until the
rear hatch releases.
WARNING
.Do not drive with the trunk lid
open. This could allow dangerous
exhaust gases to be drawn into
the vehicle. See “Exhaust gas
(carbon monoxide)” (P.5-2) of this
manual.
. Closely supervise children when
they are around cars to prevent
them from playing and becoming
locked in the trunk where they
could be seriously injured. Keep
the car locked, with the trunk
closed, when not in use, and
prevent children’s access to In-
telligent Keys.
TRUNK LID (Roadster models)
Page 145 of 460

SPA2692
TRUNK LID OPENER SWITCH
The trunk lid can be opened by pushing
the trunk lid opener switch when the
Intelligent Key is within the operating
range of the trunk lock/unlock function
regardless of the inside lock knob posi-
tion. (See “Intelligent Key system” (P.3-7).)
SPA2681
TRUNK RELEASE POWER CANCEL
SWITCH
When the switch located inside the glove
box is in the OFF position, the power to
the trunk lid will be canceled and the
trunk lid cannot be opened by the trunk
lid opener or trunk request switch.
When you have to leave the vehicle with a
valet and want to keep your belongings
safe in the glove box and the trunk, push
this switch to OFF and lock the glove box
with the mechanical key. Then leave the
vehicle and the Intelligent Key with the
valet and keep the mechanical key with
you.
See “Keys” (P.3-3). To connect the power to the trunk lid,
push the switch to the ON
position.
INTERIOR TRUNK LID RELEASE
WARNING
Closely supervise children when they
are around cars to prevent them
from playing and becoming locked
in the trunk where they could be
seriously injured. Keep the car
locked, with the trunk lid securely
latched, when not in use, and pre-
vent children’s access to Intelligent
Keys.
The interior trunk lid release mechanism
allows opening of the trunk lid in the
event that people become locked inside
the trunk.
Pre-driving checks and adjustments3-21
Page 146 of 460

3-22Pre-driving checks and adjustments
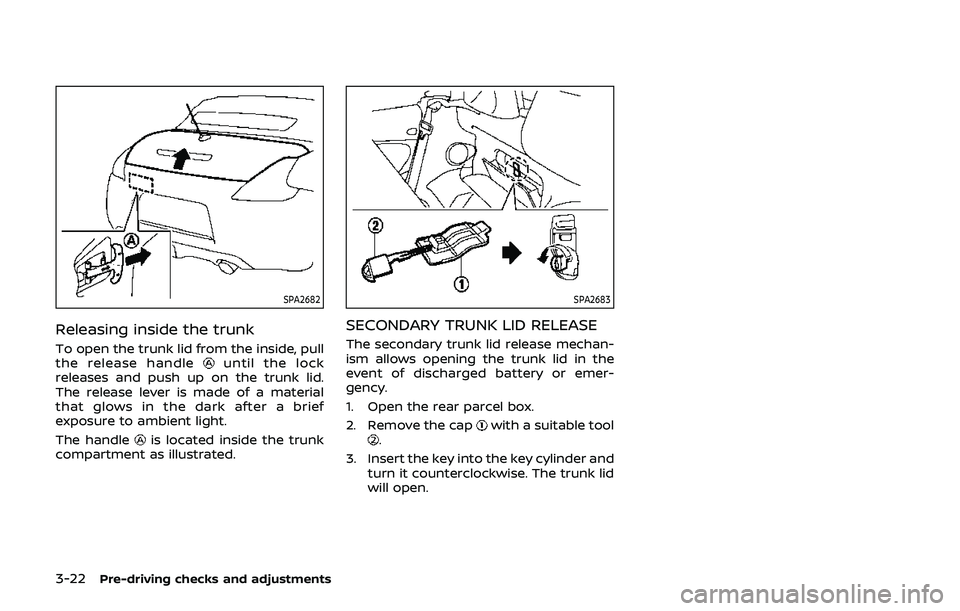
SPA2682
Releasing inside the trunk
To open the trunk lid from the inside, pull
the release handleuntil the lock
releases and push up on the trunk lid.
The release lever is made of a material
that glows in the dark after a brief
exposure to ambient light.
The handle
is located inside the trunk
compartment as illustrated.
SPA2683
SECONDARY TRUNK LID RELEASE
The secondary trunk lid release mechan-
ism allows opening the trunk lid in the
event of discharged battery or emer-
gency.
1. Open the rear parcel box.
2. Remove the cap
with a suitable tool.
3. Insert the key into the key cylinder and turn it counterclockwise. The trunk lid
will open.
Page 149 of 460

.Do not place anything in the top
storage area. The top will not fit
there properly, and this could
damage the top and/or the vehi-
cle body.
. Do not sit or place excessive
weight on the top and the sto-
rage lid, especially when the top
is being operated. The top may be
damaged.
. Do not drive the vehicle with the
top partially opened. Always
make sure the top is either fully
opened or closed before driving.
. Secure items so that they cannot
be blown from the vehicle while
driving with the top open.
. Do not operate the top manually
except for emergency cases.
Manual operation may damage
the top.
. Be sure to fully open or fully close
the top. Do not release the switch
half way through the roof open-
ing or closing process. If the top is
only partially opened, significant
damage to the top could occur.
Make sure the trunk lid is securely closed
before operating the top.
SPA2706
WHEN OPERATING THE TOP
WARNING
Keep hands and other parts of the
body away from moving parts such
as the top, storage lid, side flap
and power windows.
CAUTION
Keep all parts of the top linkage clear
of obstructions, or the top latch may
not be securely locked. NOTE:
.
In case of low battery or low tem-
perature, the top may temporarily
stop moving during the operation.
This functions to protect the top
control mechanism, and it is not a
malfunction.
. If the top is opened and closed
repeatedly in a short period of time
or the top operation is stopped while
opening or closing, the top opera-
tion may be automatically stopped
to protect the system. Wait for ap-
proximately 5 minutes before oper-
ating the top again.
Pre-driving checks and adjustments3-25
Page 154 of 460

3-30Pre-driving checks and adjustments
IF THE TOP DOES NOT OPEN OR
CLOSE ELECTRICALLY
If you cannot operate the soft top with
the operating switch, first check whether
all the following operating conditions are
met.
.vehicle is stopped
. ignition switch is ON (Run the engine
when operating the top.)
. the trunk is closed
. the shift lever is in a position other
than the R (Reverse) position
If the top still does not move under the
above conditions or has any system
malfunction, it is recommended you visit
a NISSAN dealer as soon as possible.
When you must close the top by yourself,
in the event of emergency or when an
immediate dealer service is not available,
close the top manually according to the
procedures shown in this section.
When closing the soft top manually:
. Move the vehicle to a safe place, away
from traffic.
. Two people should perform this pro-
cedure, as some of the top parts are
extremely heavy.
The top cannot be opened manually.
WARNING
. Do not drive with the top partially
opened.
. If the top cannot be operated
properly, have your vehicle
checked as soon as possible. It is
recommended you visit a NISSAN
dealer for this service.
CAUTION
The storage lid is extremely heavy.
The storage lid should be manually
opened or closed by two people.
SPA2715
1. Open the trunk lid. In the event of a
discharged battery, the secondary
trunk release mechanism should be
operated. (See “Secondary trunk lid
release” (P.3-22).)
2. Open the top storage lid a. Remove the board
inside of the
trunk by removing the clips.
b. Pull the lock release cables (right and left)
as illustrated, then close
the trunk lid.
NOTE:
Use a cloth or other tool to protect
your hands when pulling on the lock
release cables
.
Page 345 of 460

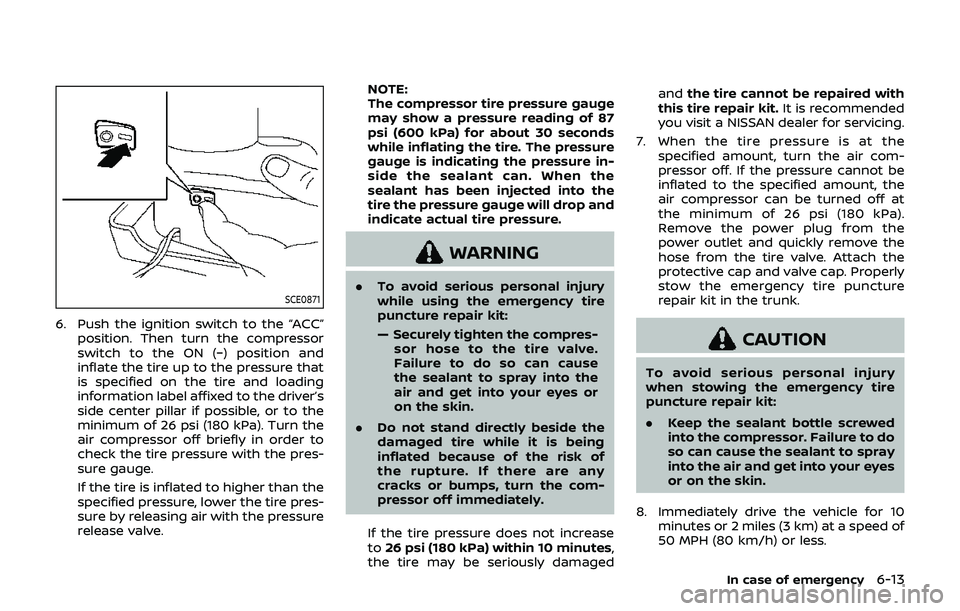
SCE0871
6. Push the ignition switch to the “ACC”position. Then turn the compressor
switch to the ON (−) position and
inflate the tire up to the pressure that
is specified on the tire and loading
information label affixed to the driver’s
side center pillar if possible, or to the
minimum of 26 psi (180 kPa). Turn the
air compressor off briefly in order to
check the tire pressure with the pres-
sure gauge.
If the tire is inflated to higher than the
specified pressure, lower the tire pres-
sure by releasing air with the pressure
release valve. NOTE:
The compressor tire pressure gauge
may show a pressure reading of 87
psi (600 kPa) for about 30 seconds
while inflating the tire. The pressure
gauge is indicating the pressure in-
side the sealant can. When the
sealant has been injected into the
tire the pressure gauge will drop and
indicate actual tire pressure.
WARNING
.
To avoid serious personal injury
while using the emergency tire
puncture repair kit:
— Securely tighten the compres-
sor hose to the tire valve.
Failure to do so can cause
the sealant to spray into the
air and get into your eyes or
on the skin.
. Do not stand directly beside the
damaged tire while it is being
inflated because of the risk of
the rupture. If there are any
cracks or bumps, turn the com-
pressor off immediately.
If the tire pressure does not increase
to 26 psi (180 kPa) within 10 minutes,
the tire may be seriously damaged and
the tire cannot be repaired with
this tire repair kit. It is recommended
you visit a NISSAN dealer for servicing.
7. When the tire pressure is at the specified amount, turn the air com-
pressor off. If the pressure cannot be
inflated to the specified amount, the
air compressor can be turned off at
the minimum of 26 psi (180 kPa).
Remove the power plug from the
power outlet and quickly remove the
hose from the tire valve. Attach the
protective cap and valve cap. Properly
stow the emergency tire puncture
repair kit in the trunk.
CAUTION
To avoid serious personal injury
when stowing the emergency tire
puncture repair kit:
.Keep the sealant bottle screwed
into the compressor. Failure to do
so can cause the sealant to spray
into the air and get into your eyes
or on the skin.
8. Immediately drive the vehicle for 10 minutes or 2 miles (3 km) at a speed of
50 MPH (80 km/h) or less.
In case of emergency6-13