2019 NISSAN 370Z COUPE ignition
[x] Cancel search: ignitionPage 101 of 460

2-32Instruments and controls
WARNING
In freezing temperatures the washer
solution may freeze on the wind-
shield and obscure your vision which
may lead to an accident. Warm wind-
shield with the defroster before you
wash the windshield.
CAUTION
.Do not operate the washer con-
tinuously for more than 30 sec-
onds.
. Do not operate the washer if the
reservoir tank is empty.
. Do not fill the window washer
reservoir tank with washer fluid
concentrates at full strength.
Some methyl alcohol based
washer fluid concentrates may
permanently stain the grille if
spilled while filling the window
washer reservoir tank.
. Pre-mix washer fluid concen-
trates with water to the manu-
facturer’s recommended levels
before pouring the fluid into the
window washer reservoir tank. Do not use the window washer re-
servoir tank to mix the washer
fluid concentrate and water.JVI1012X
The windshield wiper and washer oper-
ates when the ignition switch is in the ON
position.
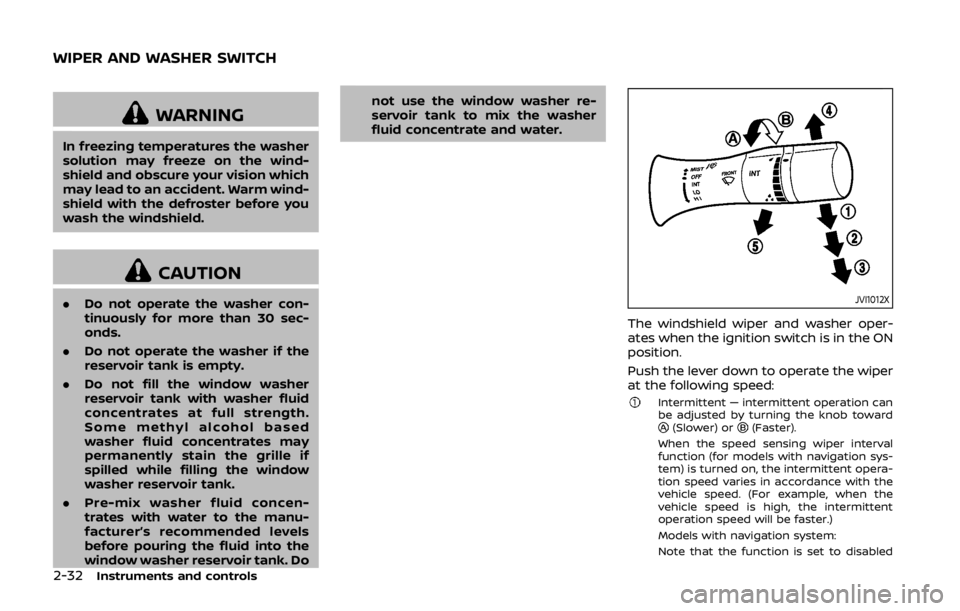
Push the lever down to operate the wiper
at the following speed:
Intermittent — intermittent operation can
be adjusted by turning the knob toward
(Slower) or(Faster).
When the speed sensing wiper interval
function (for models with navigation sys-
tem) is turned on, the intermittent opera-
tion speed varies in accordance with the
vehicle speed. (For example, when the
vehicle speed is high, the intermittent
operation speed will be faster.)
Models with navigation system:
Note that the function is set to disabled
WIPER AND WASHER SWITCH
Page 104 of 460

SIC3995
Autolight system
The autolight system allows the head-
lights to be set so they turn on and off
automatically.
To set the autolight system:
1. Make sure the headlight switch is inthe AUTO position
.
2. Push the ignition switch to the ON position.
3. The autolight system automatically turns the headlights on and off.
To turn the autolight system off, turn the
switch to the OFF,
orposition.
The autolight system can turn on the headlights automatically when it is dark
and turn off the headlights when it is
light.
If the ignition switch is pushed to the OFF
position and one of the doors is opened
and this condition is continued, the head-
lights remain on for 5 minutes.
Automatic headlights off delay:
You can keep the headlights on for 45
seconds after you push the ignition
switch to OFF and open any door then
close all the doors.
Models with navigation system:
You can adjust the period of the auto-
matic headlights off delay from 0 seconds
(OFF) to 180 seconds. The factory default
setting is 45 seconds.
For automatic headlights off delay
setting, see “Light Off Delay” (P.4-15).
SIC3784A
Be sure not to put anything on top of
the photo sensorlocated on the top
of the instrument panel. The photo
sensor controls the autolight; if it is
covered, the photo sensor reacts as if it
is dark and the headlights will illumi-
nate.
Instruments and controls2-35
Page 105 of 460

2-36Instruments and controls
SIC3996
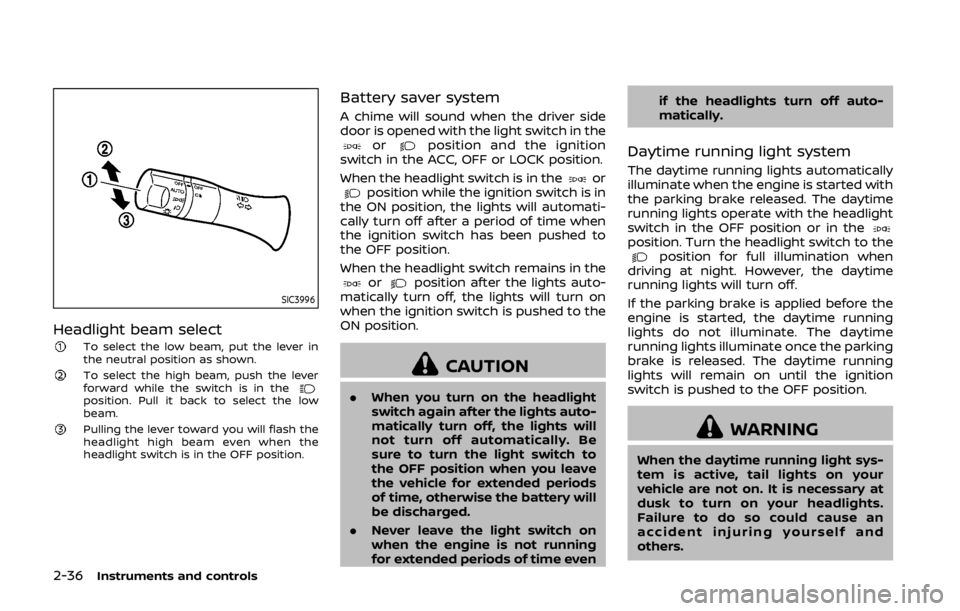
Headlight beam selectTo select the low beam, put the lever in
the neutral position as shown.
To select the high beam, push the lever
forward while the switch is in the
position. Pull it back to select the low
beam.
Pulling the lever toward you will flash the
headlight high beam even when the
headlight switch is in the OFF position.
Battery saver system
A chime will sound when the driver side
door is opened with the light switch in the
orposition and the ignition
switch in the ACC, OFF or LOCK position.
When the headlight switch is in the
orposition while the ignition switch is in
the ON position, the lights will automati-
cally turn off after a period of time when
the ignition switch has been pushed to
the OFF position.
When the headlight switch remains in the
orposition after the lights auto-
matically turn off, the lights will turn on
when the ignition switch is pushed to the
ON position.
CAUTION
. When you turn on the headlight
switch again after the lights auto-
matically turn off, the lights will
not turn off automatically. Be
sure to turn the light switch to
the OFF position when you leave
the vehicle for extended periods
of time, otherwise the battery will
be discharged.
. Never leave the light switch on
when the engine is not running
for extended periods of time even if the headlights turn off auto-
matically.
Daytime running light system
The daytime running lights automatically
illuminate when the engine is started with
the parking brake released. The daytime
running lights operate with the headlight
switch in the OFF position or in the
position. Turn the headlight switch to theposition for full illumination when
driving at night. However, the daytime
running lights will turn off.
If the parking brake is applied before the
engine is started, the daytime running
lights do not illuminate. The daytime
running lights illuminate once the parking
brake is released. The daytime running
lights will remain on until the ignition
switch is pushed to the OFF position.
WARNING
When the daytime running light sys-
tem is active, tail lights on your
vehicle are not on. It is necessary at
dusk to turn on your headlights.
Failure to do so could cause an
accident injuring yourself and
others.
Page 115 of 460

2-46Instruments and controls
SIC3990
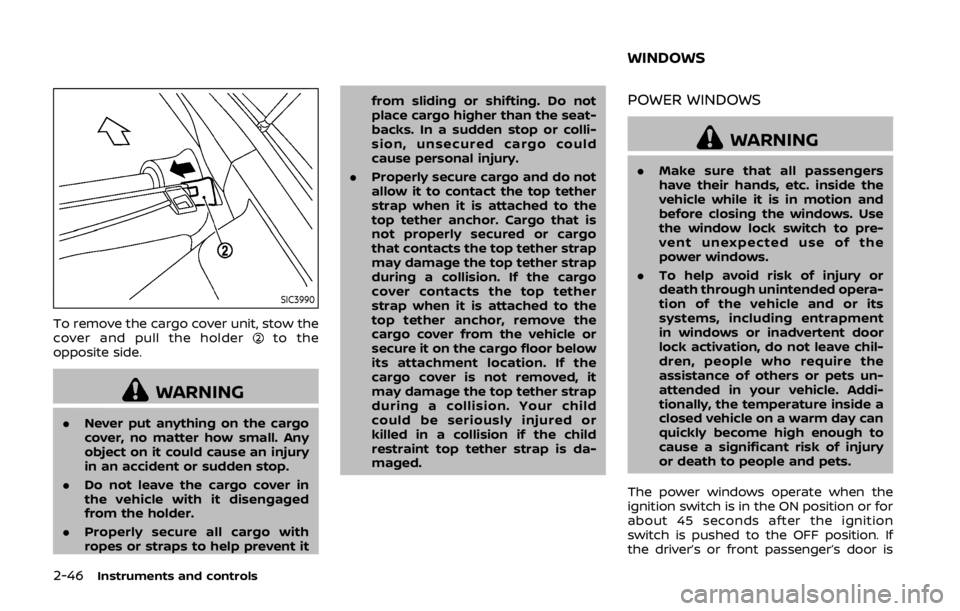
To remove the cargo cover unit, stow the
cover and pull the holderto the
opposite side.
WARNING
. Never put anything on the cargo
cover, no matter how small. Any
object on it could cause an injury
in an accident or sudden stop.
. Do not leave the cargo cover in
the vehicle with it disengaged
from the holder.
. Properly secure all cargo with
ropes or straps to help prevent it from sliding or shifting. Do not
place cargo higher than the seat-
backs. In a sudden stop or colli-
sion, unsecured cargo could
cause personal injury.
. Properly secure cargo and do not
allow it to contact the top tether
strap when it is attached to the
top tether anchor. Cargo that is
not properly secured or cargo
that contacts the top tether strap
may damage the top tether strap
during a collision. If the cargo
cover contacts the top tether
strap when it is attached to the
top tether anchor, remove the
cargo cover from the vehicle or
secure it on the cargo floor below
its attachment location. If the
cargo cover is not removed, it
may damage the top tether strap
during a collision. Your child
could be seriously injured or
killed in a collision if the child
restraint top tether strap is da-
maged.
POWER WINDOWS
WARNING
.Make sure that all passengers
have their hands, etc. inside the
vehicle while it is in motion and
before closing the windows. Use
the window lock switch to pre-
vent unexpected use of the
power windows.
. To help avoid risk of injury or
death through unintended opera-
tion of the vehicle and or its
systems, including entrapment
in windows or inadvertent door
lock activation, do not leave chil-
dren, people who require the
assistance of others or pets un-
attended in your vehicle. Addi-
tionally, the temperature inside a
closed vehicle on a warm day can
quickly become high enough to
cause a significant risk of injury
or death to people and pets.
The power windows operate when the
ignition switch is in the ON position or for
about 45 seconds after the ignition
switch is pushed to the OFF position. If
the driver’s or front passenger’s door is
WINDOWS
Page 117 of 460

2-48Instruments and controls
SIC3241
Passenger side power window
switch
The passenger side switch will open or
close only the corresponding window. To
open or close the window, push down or
pull up the switch and hold it.
JVI1203X
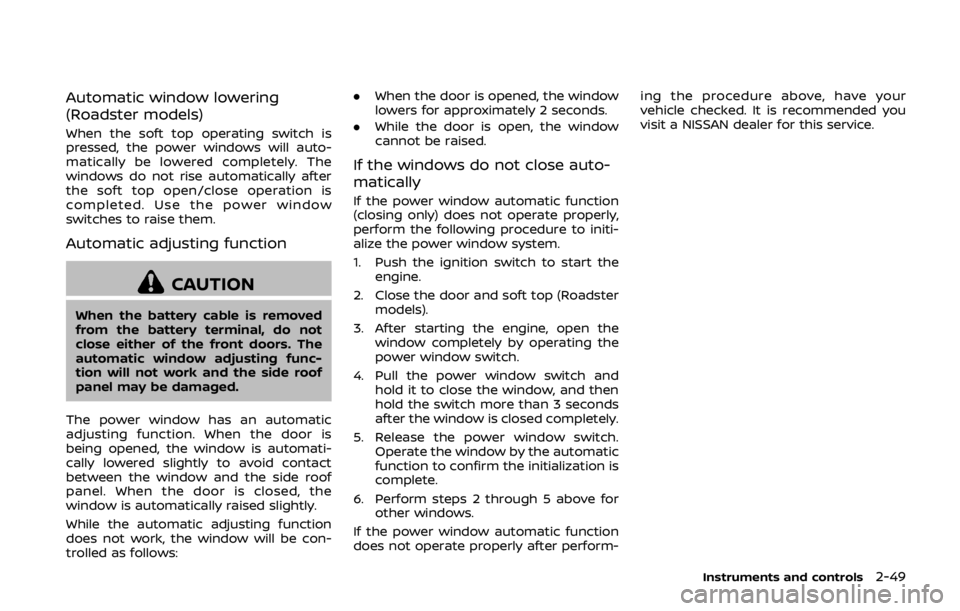
Automatic operation
To fully open or close the window, com-
pletely push down or pull up the switch
and release it; it need not be held. The
window will automatically open or close
all the way. To stop the window, just push
or lift the switch in the opposite direction.
A light push or pull on the switch will
cause the window to open or close until
the switch is released.
Auto reverse function
WARNING
There are some small distances im-
mediately before the closed position
which cannot be detected. Make sure
that all passengers have their hands,
etc., inside the vehicle before closing
the window.
If the control unit detects something
caught in the window as it is closing, the
window will be immediately lowered.
The auto reverse function can be acti-
vated when the window is closed by
automatic operation when the ignition
switch is in the ON position or for 45
seconds after the ignition switch is
pushed to the OFF position.
Depending on the environment or driv-
ing conditions, the auto reverse func-
tion may be activated if an impact or
load similar to something being caught
in the window occurs.
Page 118 of 460

Automatic window lowering
(Roadster models)
When the soft top operating switch is
pressed, the power windows will auto-
matically be lowered completely. The
windows do not rise automatically after
the soft top open/close operation is
completed. Use the power window
switches to raise them.
Automatic adjusting function
CAUTION
When the battery cable is removed
from the battery terminal, do not
close either of the front doors. The
automatic window adjusting func-
tion will not work and the side roof
panel may be damaged.
The power window has an automatic
adjusting function. When the door is
being opened, the window is automati-
cally lowered slightly to avoid contact
between the window and the side roof
panel. When the door is closed, the
window is automatically raised slightly.
While the automatic adjusting function
does not work, the window will be con-
trolled as follows: .
When the door is opened, the window
lowers for approximately 2 seconds.
. While the door is open, the window
cannot be raised.
If the windows do not close auto-
matically
If the power window automatic function
(closing only) does not operate properly,
perform the following procedure to initi-
alize the power window system.
1. Push the ignition switch to start the
engine.
2. Close the door and soft top (Roadster models).
3. After starting the engine, open the window completely by operating the
power window switch.
4. Pull the power window switch and hold it to close the window, and then
hold the switch more than 3 seconds
after the window is closed completely.
5. Release the power window switch. Operate the window by the automatic
function to confirm the initialization is
complete.
6. Perform steps 2 through 5 above for other windows.
If the power window automatic function
does not operate properly after perform- ing the procedure above, have your
vehicle checked. It is recommended you
visit a NISSAN dealer for this service.
Instruments and controls2-49
Page 119 of 460

2-50Instruments and controls
SIC4238
MAP LIGHTS
Push the button as illustrated to turn the
light on or off.
SIC4239
INTERIOR LIGHT CONTROL SWITCH
The interior light control switch has three
positions: ON, DOOR and OFF.
ON position
When the switch is in the ON positionthe map lights will illuminate.
DOOR position
When the switch is in the DOOR position, the map lights will illuminate under the
following conditions:
. ignition switch is switched to the OFF
or LOCK position
— remain on for about 15 seconds. .
doors are unlocked by pushing the
UNLOCK button on the Intelligent Key
or door handle request switch with
the ignition switch in the LOCK posi-
tion
— remain on for about 15 seconds.
. any door is opened and then closed
with the ignition switch in the LOCK
position
— remain on for about 15 seconds.
. any door is opened with the ignition
switch in the ACC or ON position
— remain on while the door is opened.
When the door is closed, the lights
go off.
The lights will also turn off after a
period of time when the lights remain
illuminated after the ignition switch has
been pushed to the OFF or LOCK posi-
tion to prevent the battery from becom-
ing discharged.
Models with navigation system:
When the auto interior illumination is set
to the OFF position (see “Vehicle informa-
tion and settings (models with navigation
system)” (P.4-8)), the lights will illuminate
under the following condition:
. any door is opened with the ignition
switch in any position
INTERIOR LIGHTS
Page 121 of 460

2-52Instruments and controls
The light illuminates when the rear hatch
is opened. When the rear hatch is closed,
the light will turn off.
The light will also turn off after a period
of time when the light remains illumi-
nated after the ignition switch has been
pushed to the OFF or LOCK position to
prevent the battery from becoming
discharged.The light illuminates when the trunk lid is
opened. When the trunk lid is closed, the
light turns off.
The HomeLink® Universal Transceiver
provides a convenient way to consolidate
the functions of up to three individual
hand-held transmitters into one built-in
device.
HomeLink® Universal Transceiver:
.
Will operate most Radio Frequency
(RF) devices such as garage doors,
gates, home and office lighting, entry
door locks and security systems.
. Is powered by your vehicle’s battery.
No separate batteries are required. If
the vehicle’s battery is discharged or is
disconnected, HomeLink® will retain
all programming.
When the HomeLink® Universal Trans-
ceiver is programmed, retain the origi-
nal transmitter for future programming
procedures (Example: new vehicle pur-
chases). Upon sale of the vehicle, the
programmed HomeLink® Universal
Transceiver buttons should be erased
for security purposes. For additional
information, refer to “Programming
HomeLink®” (P.2-53).
WARNING
. Do not use the HomeLink® Uni-
versal Transceiver with any gar-
age door opener that lacks safety
CARGO LIGHT (Coupe models) TRUNK LIGHT (Roadster models) HomeLink® UNIVERSAL
TRANSCEIVER (if so equipped)