2019 NISSAN 370Z COUPE navigation system
[x] Cancel search: navigation systemPage 132 of 460

3. Within 20 seconds of performing Step2, push and hold the power door lock
switch to the
position (UNLOCK)
for more than 5 seconds.
4. When activated, the hazard indicator will flash twice. When deactivated, the
hazard indicator will flash once.
5. The ignition switch must be placed in the OFF and ON position again be-
tween each setting change.
When the automatic door unlock system
is deactivated, the doors do not unlock
when the ignition switch is placed in the
OFF position. To unlock the door manu-
ally, use the inside lock knob or the power
door lock switch (driver’s or front passen-
ger’s side).WARNING
. Radio waves could adversely af-
fect electric medical equipment.
Those who use a pacemaker
should contact the electric med-
ical equipment manufacturer for
the possible influences before
use.
. The Intelligent Key transmits
radio waves when the buttons
are pushed. The FAA advises that
the radio waves may affect air-
craft navigation and communica-
tion systems. Do not operate the
Intelligent Key while on an air-
plane. Make sure the buttons are
not operated unintentionally
when the unit is stored during a
flight.
The Intelligent Key system can operate all
the door and rear hatch/trunk lid locks
using the remote controller function or
pushing the request switch on the vehicle
without taking the key out from a pocket
or purse. The operating environment
and/or conditions may affect the Intelli-
gent Key system operation.
Be sure to read the following before using
the Intelligent Key system.
CAUTION
. Be sure to carry the Intelligent
Key with you when operating the
vehicle.
. Never leave the Intelligent Key in
the vehicle when you leave the
vehicle.
The Intelligent Key is always communi-
cating with the vehicle as it receives radio
waves. The Intelligent Key system trans-
mits weak radio waves. Environmental
conditions may interfere with the opera-
tion of the Intelligent Key system under
the following operating conditions.
. When operating near a location where
strong radio waves are transmitted,
such as a TV tower, power station and
broadcasting station.
. When in possession of wireless equip-
ment, such as a cellular telephone,
transceiver, and CB radio.
. When the Intelligent Key is in contact
with or covered by metallic materials.
. When any type of radio wave remote
control is used nearby.
. When the Intelligent Key is placed near
an electric appliance such as a perso-
nal computer.
Pre-driving checks and adjustments3-7
INTELLIGENT KEY SYSTEM
Page 135 of 460

3-10Pre-driving checks and adjustments
.Do not pull the door handle before
pushing the door handle request
switch. The door will be unlocked but
will not open. Release the door handle
once and pull it again to open the
door.
. Models with navigation system:
The Intelligent Key system (opening/
closing doors with the door handle
request switch) can be set to remain
inactive. (See “Vehicle information and
settings (models with navigation sys-
tem)” (P.4-8).)
SPA2569Coupe models
INTELLIGENT KEY OPERATION
You can lock or unlock the doors without
taking the key out from your pocket or
bag.
SPA2570
SPA2571Coupe models
Page 139 of 460

3-14Pre-driving checks and adjustments
WARNING
The Intelligent Key transmits radio
waves when the buttons are pushed.
The FAA advises that the radio waves
may affect aircraft navigation and
communication systems. Do not op-
erate the Intelligent Key while on an
airplane. Make sure the buttons are
not operated unintentionally when
the unit is stored during a flight.
It is possible to lock/unlock all doors, fuel-
filler door, activate the panic alarm and
open the windows by pushing the but-
tons on the Intelligent Key from outside
the vehicle.
Before locking the doors, make sure the
Intelligent Key is not left in the vehicle.
The LOCK/UNLOCK button on the Intelli-
gent Key can operate at a distance of
approximately 33 ft (10 m) from the
vehicle. (The effective distance depends
upon the conditions around the vehicle.)
As many as 4 Intelligent Keys can be used
with one vehicle. For information con-
cerning the purchase and use of addi-
tional Intelligent Keys, contact a NISSAN
dealer.
The lock and unlock buttons on the Intelligent Key will not operate when:
.
the distance between the Intelligent
Key and the vehicle is over 33 ft (10 m).
. the Intelligent Key battery is dis-
charged.
After locking with the remote keyless
entry function, pull the door handle to
make sure the doors are securely locked.
The LOCK/UNLOCK operating range var-
ies depending on the environment. To
securely operate the lock and unlock
buttons, approach the vehicle to about 3
ft (1 m) from the door.
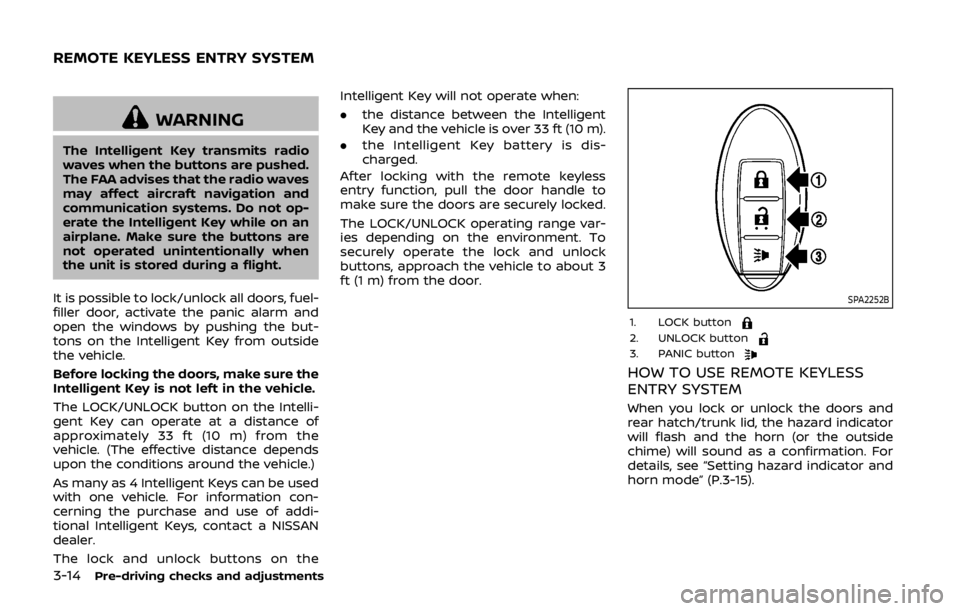
SPA2252B
1. LOCK button2. UNLOCK button3. PANIC button
HOW TO USE REMOTE KEYLESS
ENTRY SYSTEM
When you lock or unlock the doors and
rear hatch/trunk lid, the hazard indicator
will flash and the horn (or the outside
chime) will sound as a confirmation. For
details, see “Setting hazard indicator and
horn mode” (P.3-15).
REMOTE KEYLESS ENTRY SYSTEM
Page 168 of 460

4 Center display, heater, air conditioner,audio, phone and voice recognition sys-
tems
Safety note ........................................................................\
................ 4-3
Center multi-function control panel
(models with navigation system) .................................... 4-4
How to use multi-function controller .................... 4-4
How to use touch screen ................................................ 4-5
Menu options ........................................................................\
.... 4-7
How to select menus on the screen ...................... 4-7
Vehicle information and settings (models with
navigation system) ...................................................................... 4-8 How to use STATUS button .......................................... 4-8
How to use brightness control and display
ON/OFF button ........................................................................\
4-8
How to use INFO button .................................................. 4-8
How to use SETTING button ...................................... 4-11
RearView monitor (mirror display type) .................. 4-17 RearView Monitor system operation .................. 4-18
How to read displayed lines ....................................... 4-18
Difference between predictive and
actual distances ................................................................... 4-19
Display settings (Type A) (if so equipped) ....... 4-21
Display settings (Type B) (if so equipped) ....... 4-21
RearView Monitor system limitations ................. 4-22
System maintenance ....................................................... 4-23 RearView Monitor (center display type) (if
so equipped) ........................................................................\
......... 4-24
RearView Monitor system operation ................ 4-24
How to read displayed lines .................................... 4-25
How to park with predictive course lines ...... 4-25
Difference between predictive and
actual distances ................................................................ 4-26
Adjusting the screen ...................................................... 4-28
Predictive course line settings ............................... 4-28
RearView Monitor system limitations .............. 4-28
System maintenance .................................................... 4-29
Ventilators ........................................................................\
.............. 4-30 Center ventilators ............................................................ 4-30
Side ventilators .................................................................. 4-30
Heater and air conditioner ................................................ 4-31 Automatic air conditioner (Type A) (if
so equipped) ........................................................................\
. 4-32
Automatic air conditioner (Type B) (if
so equipped) ........................................................................\
. 4-34
Operating tips ..................................................................... 4-36
In-cabin microfilter .......................................................... 4-36
Servicing air conditioner ............................................. 4-36
Audio system ........................................................................\
....... 4-36
Page 169 of 460

Audio operation precautions .................................... 4-36
FM-AM radio with Compact Disc
(CD) player ........................................................................\
........ 4-50
FM-AM-SAT radio with Compact Disc
(CD) player ........................................................................\
........ 4-59
DVD (Digital Versatile Disc) player operation
(models with navigation system) ........................... 4-62
USB (Universal Serial Bus) connection port
(models with navigation system) ........................... 4-66
Bluetooth® streaming audio (models with
navigation system) ............................................................ 4-70
iPod® player operation (models with
navigation system) ............................................................ 4-75
Auxiliary input jacks (models with
navigation system) ............................................................ 4-77
CD/DVD/USB memory care and cleaning ...... 4-78
Steering-wheel-mounted controls
for audio ........................................................................\
............. 4-80
Antenna ........................................................................\
.............. 4-81
Car phone or CB radio .......................................................... 4-82
Bluetooth® hands-free phone system
(models with navigation system) ................................. 4-83 Regulatory information .................................................. 4-84
Voice commands ................................................................ 4-85
Control buttons .................................................................... 4-85
Connecting procedure ................................................... 4-85 Phone selection ................................................................. 4-86
Quick Dial ........................................................................\
........ 4-86
Making a call ........................................................................\
4-89
Receiving a call ................................................................... 4-90
During a call ........................................................................\
.. 4-90
Phone setting ...................................................................... 4-91
Troubleshooting guide ................................................ 4-93
Bluetooth® hands-free phone system (models
without navigation system) ............................................. 4-94 Regulatory information ............................................... 4-95
Using the system .............................................................. 4-96
Control buttons ................................................................. 4-98
Getting started ................................................................... 4-98
List of voice commands .......................................... 4-100
Speaker Adaptation (SA) mode ......................... 4-104
Troubleshooting guide ............................................ 4-106
NISSAN Voice Recognition System
(models with navigation system) ............................. 4-107
NISSAN voice recognition
Standard Mode ............................................................... 4-107
Using the system .......................................................... 4-110
NISSAN voice recognition Alternate
Command Mode ........................................................... 4-118
Using the system .......................................................... 4-127
Troubleshooting guide ............................................ 4-132
Page 171 of 460

4-4Center display, heater, air conditioner, audio, phone and voice recognition systems
SAA2273
1. “STATUS” status display button (P.4-8)
2, 3, 7, 8, 9.For navigation system control buttons
(Refer to the separate Navigation System
Owner’s Manual.)
4. Multi-function controller (P.4-4)
5. “PHONE” Bluetooth® Hands-Free Phone System button (P.4-83)
6. “
OFF” brightness control and display
ON/OFF button (P.4-8)
10. “INFO” vehicle and navigation information button (P.4-8)
11. “SETTING” button (P.4-11)
SAA2274
HOW TO USE MULTI-FUNCTION
CONTROLLER
Choose an item on the display using the
main directional buttons(or additional
directional buttonswith navigation
system) or center dial, and push the
ENTER buttonfor operation.
Push the BACK button
to return the
display to the previous screen or delete
characters. Pushing BACK may or may
not save the settings depending on the
menu.
For the VOICE button
functions, refer to
the separate Navigation System Owner’s
Manual.
CENTER MULTI-FUNCTION CONTROL
PANEL (models with navigation system)
Page 172 of 460

HOW TO USE TOUCH SCREEN
CAUTION
.The glass screen on the liquid
crystal display may break if it is
hit with a hard or sharp object. If
the glass screen breaks, do not
touch it. Doing so could result in
an injury.
. To clean the display, use a soft,
dry cloth. If additional cleaning is
necessary, use a small amount of
neutral detergent with a soft
cloth. Never use a rough cloth,
alcohol, benzine, thinner or any
kind of solvent or paper towel
with a chemical cleaning agent.
They will scratch or deteriorate
the panel.
. Do not splash any liquid such as
water or car fragrance on the
display. Contact with liquid will
cause the system to malfunction.
To ensure safe driving, some functions
cannot be operated while driving.
The on-screen functions that are not
available while driving will be “grayed
out” or muted. Park the vehicle in a safe location and
then operate the navigation system.
WARNING
.
ALWAYS give your full attention to
driving.
. Avoid using vehicle features that
could distract you. If distracted,
you could lose control of your
vehicle and cause an accident.
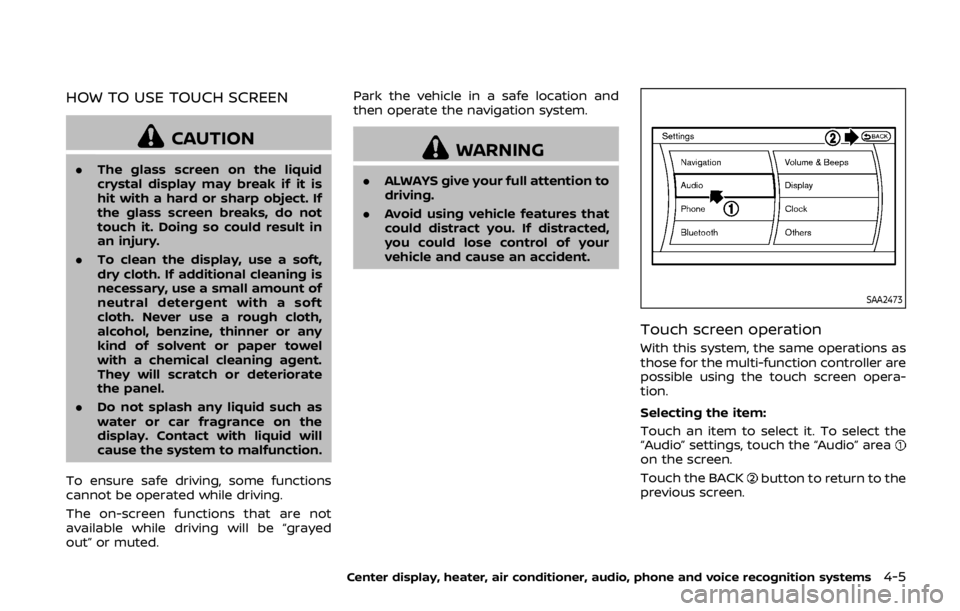
SAA2473
Touch screen operation
With this system, the same operations as
those for the multi-function controller are
possible using the touch screen opera-
tion.
Selecting the item:
Touch an item to select it. To select the
“Audio” settings, touch the “Audio” area
on the screen.
Touch the BACK
button to return to the
previous screen.
Center display, heater, air conditioner, audio, phone and voice recognition systems4-5
Page 174 of 460

SAA2143
MENU OPTIONS
The start menu can be displayed using
the menu control switch on the steering-
wheel-mounted controls.
1. While the MAP or STATUS screen isdisplayed, push and hold the menu
control switch until the “Menu Op-
tions” screen appears.
2. Highlight the preferred item by tilting the menu control switch up or down,
and then push the menu control
switch to select it.
SAA2476
Available items
Destination/Route:
These items are for the navigation sys-
tem. See the separate Navigation System
Owner’s Manual for details.
Info:
Displays the information screen. It is the
same screen that appears when you push
the INFO button.
Settings:
Displays the settings screen. It is the same
screen that appears when you push the
SETTING button.
SAA2477
HOW TO SELECT MENUS ON THE
SCREEN
Vehicle functions are viewed on the dis-
play screen in menus. To select each key
item, highlight the preferred item using
the multi-function controller and push
the ENTER button.
Whenever a menu selection is made or
menu item is highlighted, different areas
on the screen provide you with important
information. See the following for details.
1. Header:
Shows the path used to get to the
current screen. (i.e. push SETTING
button > choose “Comfort” menu
item.)
Center display, heater, air conditioner, audio, phone and voice recognition systems4-7