2019 MERCEDES-BENZ SLC ROADSTER tow bar
[x] Cancel search: tow barPage 85 of 306
Opera
tingAIRGUIDE X
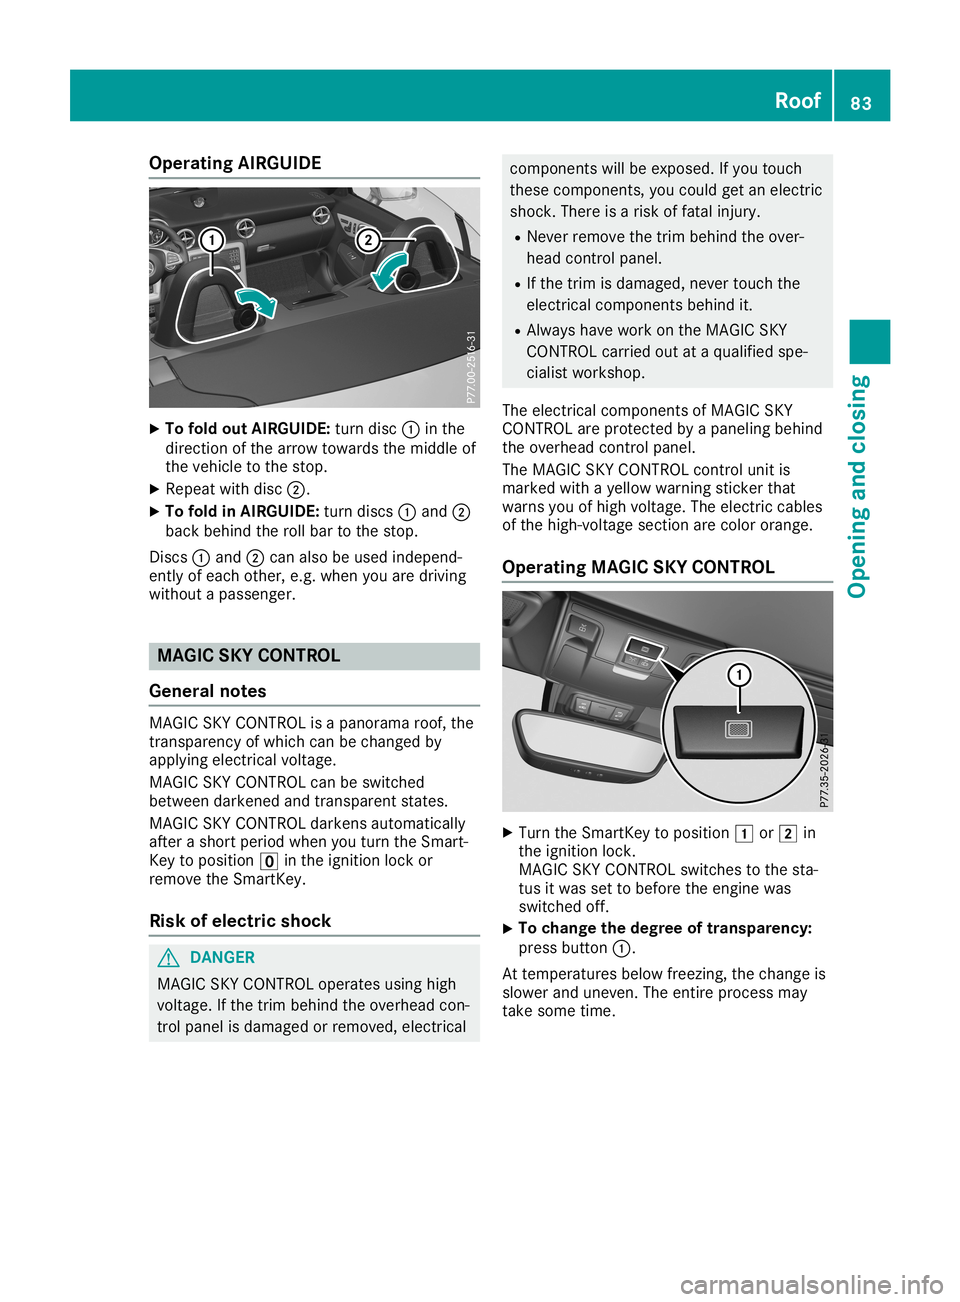
To fold outAIRGUIDE: turndisc0043inthe
direct ionofthe arrow towards themiddle of
the vehicle tothe stop.
X Repeat withdisc0044.
X To fold inAIRGUIDE: turndiscs 0043and 0044
back behind therollbar tothe stop.
Disc s0043 and 0044can also beused independ-
ent lyof each other,e.g. when youaredriving
without apassenger. MAGIC
SKYCONTR OL
General notes MAGIC
SKYCONTROL isapanorama roof,the
tran sparenc yof which canbechanged by
applying electricalvoltage.
MAGIC SKYCONTROL canbeswitched
between darkenedand transparent states.
MAGIC SKYCONTROL darkensautomatic ally
after ashort period whenyouturn theSmart -
Key toposition 0092inthe ignition lockor
remove theSmart Key.
Risk ofelectric shock G
DANGER
MAGIC SKYCONTROL operatesusinghigh
voltage. Ifthe trim behind theoverhead con-
trol panel isdamaged orremoved, electrical compon
entswill beexposed. Ifyou touch
these compon ents,you could getanelectr ic
shock .There isarisk offatal injury.
R Never remove thetrim behind theover-
head control panel.
R Ifthe trim isdamaged, nevertouch the
electr icalcompon entsbehind it.
R Always havework onthe MAGIC SKY
CONTROL carriedoutataqualified spe-
cialist worksho p.
The electr icalcompon entsof MAGIC SKY
CONTROL areprotec tedbyapaneling behind
the overhead control panel.
The MAGIC SKYCONTROL control unit is
marked withayellow warning sticker that
warns youofhigh voltage. Theelectr iccables
of the high-vo ltagesectionare color orange.
Opera tingMAGIC SKYCONTR OL X
Turn theSmart Keytoposition 0047or0048 in
the ignition lock.
MAGIC SKYCONTROL switchestothe sta-
tus itwas settobefore theengin ewas
switched off.
X To
change thedegree oftranspa rency:
press button 0043.
At temper aturesbelowfreezing,thechange is
slower anduneven .The entireprocess may
take some time. Roof
83Opening andclosi ng Z
Page 126 of 306
Problem
Possible
causes/co nsequences and0050 0050
Solutions The
coolant tempera-
ture display showsa
value above 248‡
(120 †).The coolant
warning lampmayalso
be on and awarning
tone maysound. The
coolant levelistoo low. Thecoolant istoo hotand theengine is
no longer beingcooled sufficiently.
X Stop assoon aspossible andallow theengine andthecoolant to
cool down.
X Check thecoolant level(Ypage 242). Observe thewarning notes
as you dosoand add coolant ifnecessary. If
the coolant leveliscorrect ,the engine radiator fanmay befaulty.
The coolant istoo hotand theengine isno longer beingcooled suf-
ficiently.
X At coolant temperatures below248‡(120 †),drive tothe near-
est quali fiedspecialist workshop.
X Avoid heavy loadsonthe engine asyou doso, e.g. driving in
mountainous terrainandstop-and- gotraffic. Notes
ontowing vehicles
The vehicle isnot suitable forattaching tow
bar systems, suchasthose usedforflat tow-
ing ordinghy towing.
Att aching orusing towbarsystems mayresult
in damage tothe vehicle.
When towing avehicle withtowbarsystems,
safe driving characterist icscannot beguaran-
teed forthe towing vehicle orthe towed vehi-
cle.
The vehicle/vehicle combinationmayswerve.
Observe thepermissible towingmethods
(Y page 264)andthenotes ontowing with
both axles onthe ground (Ypage 264). DYNAMIC
SELECTbutt on
Use theDYNAMIC SELECTbutton tochange
the drive program. Depending onthe drive pro-
gram selected thefollowing vehiclecharacter-
istics willchange:
R the drive (engine andtransmission manage-
ment)
R the suspension orthe adaptive adjustable
damping onlyonvehicles withAMG RIDE
CONTROL sportssuspension
R the sound ofthe exhaust system(vehicles
with sports exhaust system)
R the steering
R the availa bilityofthe ECO start/ stopfunc-
tion Each
timeyoustart theengine withtheSmart-
Key orthe Start /Stopbutton, driveprogram C
is activated. Forfurther information about
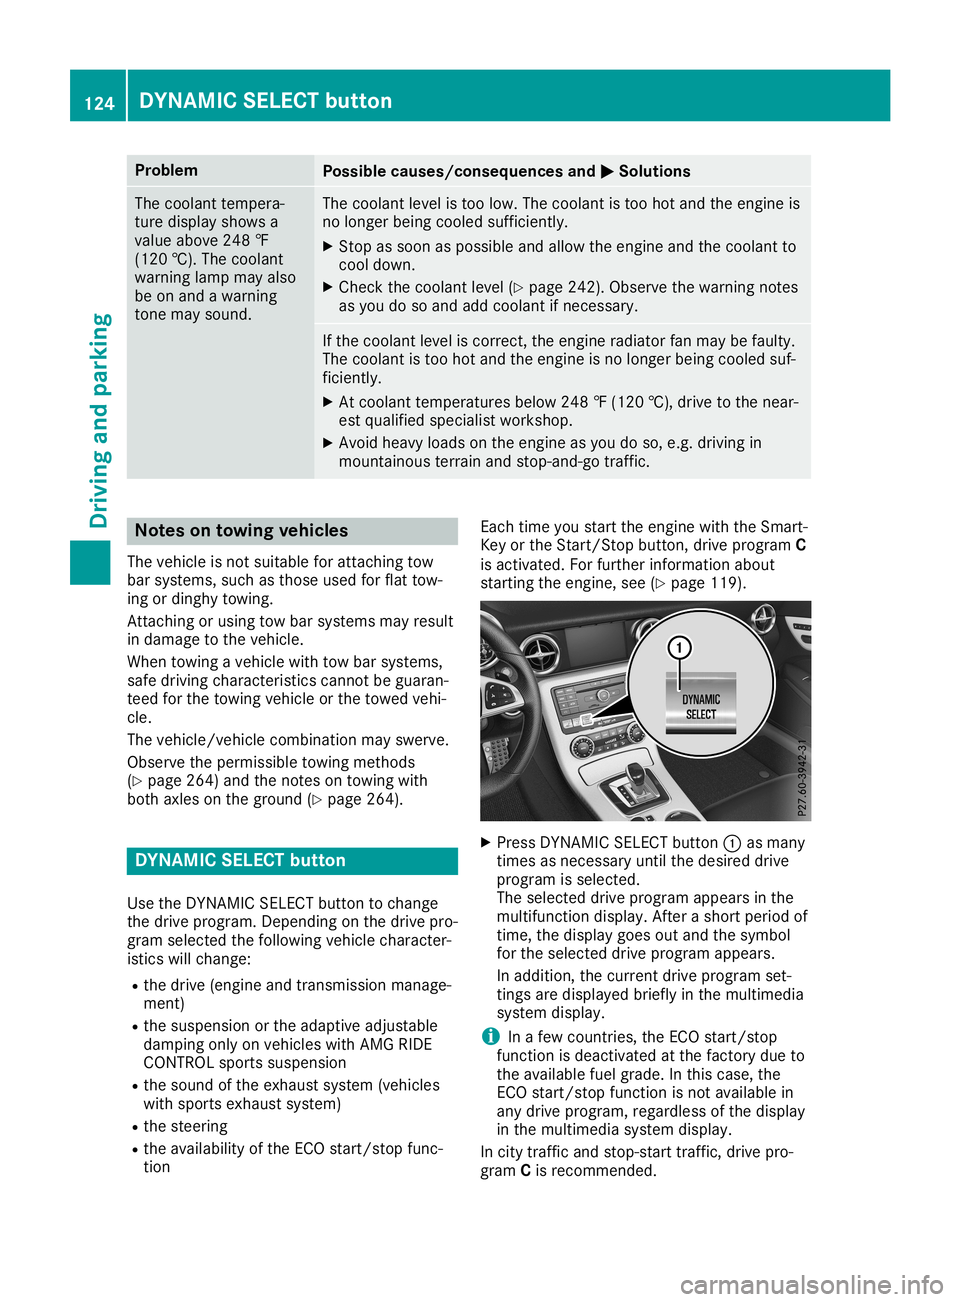
startin gthe engine, see(Ypage 119). X
Press DYNAMIC SELECTbutton 0043asmany
times asnecessary untilthedesired drive
program isselected.
The selected driveprogram appearsinthe
multifunct iondisplay .Aft erashort period of
time, thedisplay goesoutand thesymbol
for the selected driveprogram appears.
In addition, thecurrent driveprogram set-
tings aredisplay edbriefly inthe multimedia
system display.
i In
afew countr ies,theECO start/ stop
funct ionisdeactivated atthe factory dueto
the availa blefuel grade. Inthis case, the
ECO start/ stopfunct ionisnot availa blein
any drive program, regardless ofthe display
in the multimedia systemdisplay.
In city traffic andstop-st arttraffic, drivepro-
gram Cis recommen ded. 124
DY
NAMIC SELECTbutt onDriving andparking
Page 162 of 306
The
image fromtherear view camera is
availabl ethroughout themaneuvering proc-
ess.
To deactivat e:the rear view camera deacti-
vates ifyou shift thetrans mission toposition
005D, orafter driving forwards ashort distance.
The inner segment sof the warning indicator
are display edinred ifthere isacomplete sys-
tem failure. Theindicator lampinthe
PARKTRONIC buttonlightsup.
If the system failsatthe rear ofthe vehicle:
R the rear segment sare shown inred when
backing up.
R the rear segment sare hidden whendriving
forwards.
Displays inthe mult imedia system The
rear view camera mayshow adistort ed
view ofobstacles, showthemincorr ectlyor
not atall. The rear view camera doesnotshow
object sin the following positions:
R very close tothe rear bumper
R under therear bumper
R in close range above thehandle onthe trunk
lid
! Object
snot atground levelmayappear to
be further awaythantheyactually are,e.g.:
R the bumper ofaparked vehicle
R the drawbar ofatrailer
R the ball coupling ofatrailer towhitch
R the rear section ofan HGV
R aslanted post
Use theguidelines onlyfororient ation.
Approach objectsno further thanthebot-
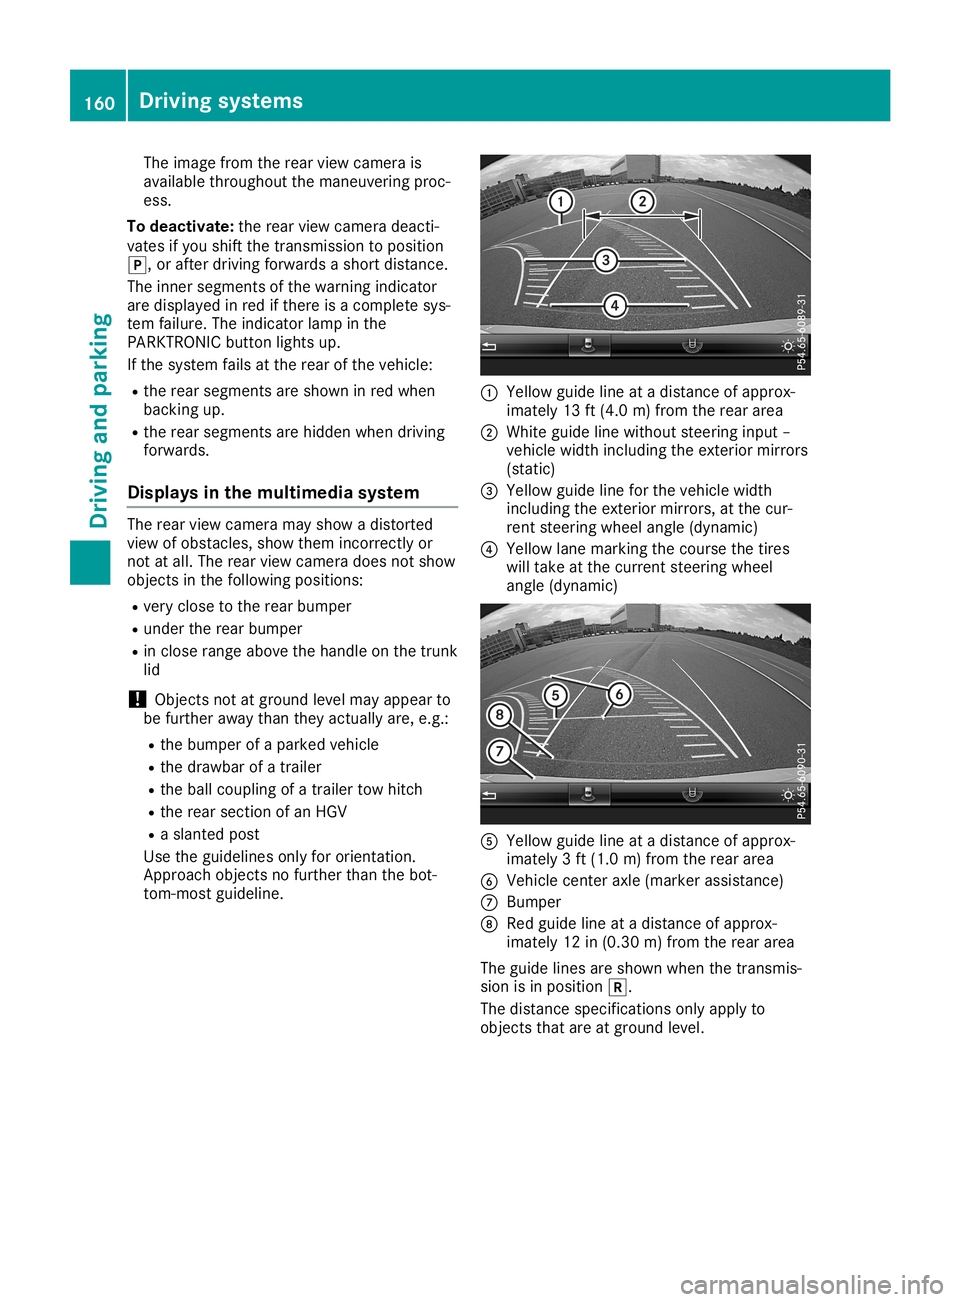
tom- most guideline. 0043
Yellow guidelineatadistance ofapprox-
imately 13ft(4.0 m)from therear area
0044 White guidelinewithout steeringinput –
vehicle widthincluding theexter iormirrors
(static)
0087 Yellow guidelineforthe vehicle width
including theexter iormirrors, atthe cur-
rent steerin gwheel angle(dynamic)
0085 Yellow lanemarking thecourse thetires
will take atthe current steeringwheel
angle (dynamic) 0083
Yellow guidelineatadistance ofapprox-
imately 3ft (1.0 m)from therear area
0084 Vehicle centeraxle (marker assistance)
006B Bumper
006C Red guide lineatadistance ofapprox-
imately 12in(0.30 m)from therear area
The guide linesareshown whenthetrans mis-
sion isin position 005E.
The distance specification sonly apply to
object sthat areatground level. 160
Driving
systemsDriving andparking
Page 257 of 306
Using
theTIREFIT kit X
Do not remov eany foreign objectswhich
have penet rated thetire, e.g.screws or
nails.
X Remove thetire sealant bottle,the accom -
panying TIREFITstic ker and thetire inflat ion
compr essorfromthestowage wellunder-
neat hthe trun kfloor (Ypage 252).
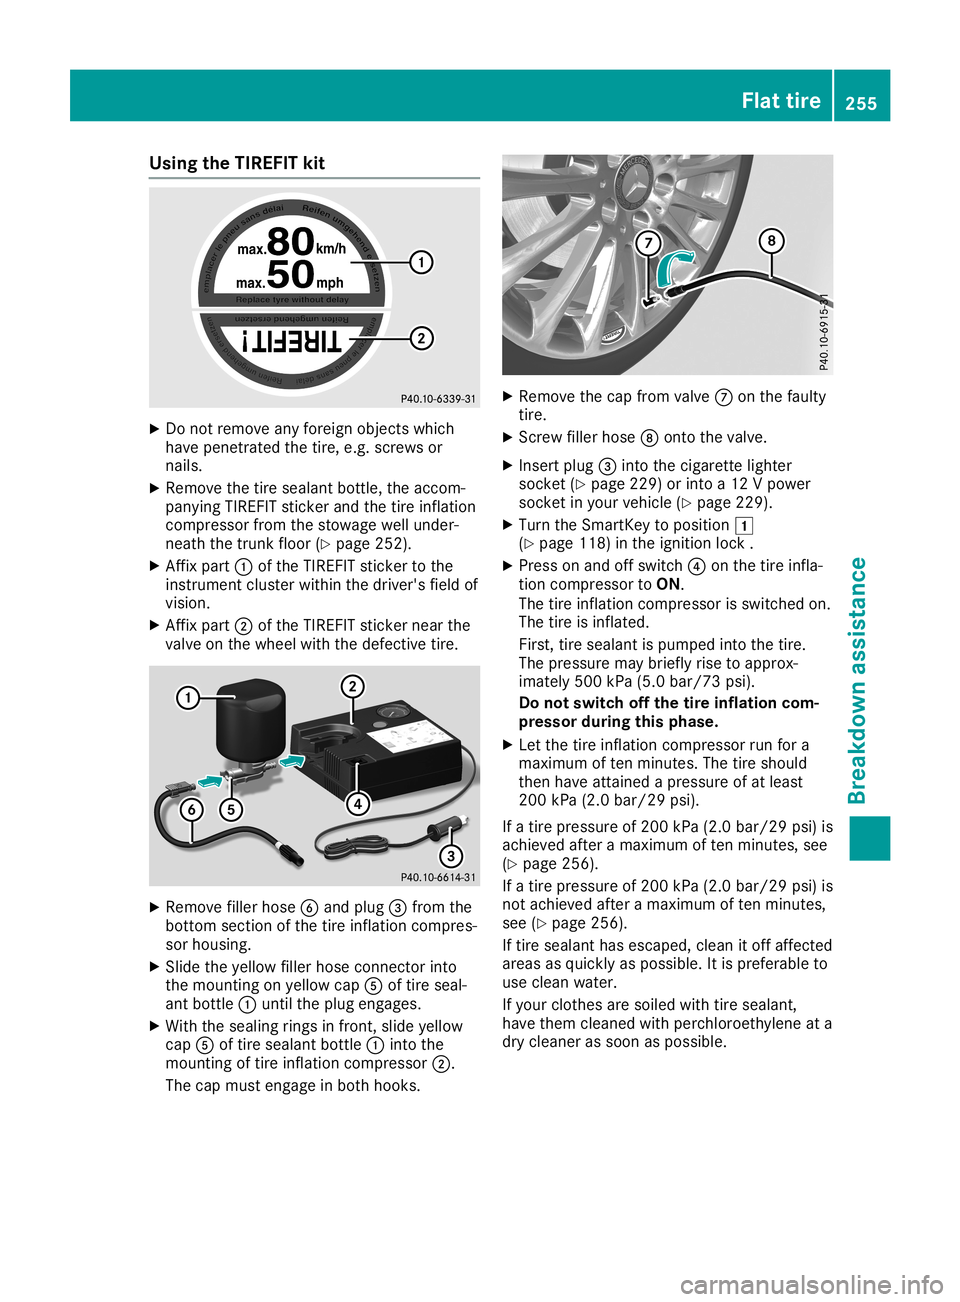
X Aff ixpart 0043ofthe TIREF ITstic ker tothe
inst rumen tclust erwithin thedriver' sfield of
vision .
X Aff ixpart 0044ofthe TIREF ITstic ker near the
valve onthe wheel withthedefect ivetire. X
Remove fillerhose 0084and plug 0087from the
bott omsect ionofthe tire inflat ioncompr es-
sor housing.
X Slide theyellow fillerhose connectorinto
the mount ingonyellow cap0083oftire seal-
ant bott le0043 until theplug engages.
X With thesealing ringsinfron t,slide yellow
cap 0083oftire sealant bottle0043 intothe
mount ingoftire inflat ioncompr essor0044.
The capmust engage inboth hooks . X
Remove thecap from valve 006Bonthe faulty
tire.
X Sc rew filler hose 006Contothe valve.
X Ins ert plug 0087intothe cigaret telighter
sock et(Y page 229)orintoa12 Vpower
sock etinyour vehicle (Ypage 229).
X Turn theSmart Keytoposition 0047
(Y page 118)inthe ignit ionlock .
X Press onand offswitc h0085 onthe tire infla-
tion compr essortoON.
The tireinflat ioncompr essorisswitc hedon.
The tireisinflat ed.
First ,tire sealant ispumped intothe tire.
The pressure maybriefly risetoapprox-
imately 500kPa(5.0 bar/7 3psi).
Do not switch offthe tireinflat ioncom-
pr essor during this phase.
X Let the tire inflat ioncompr essorrunfora
maximum often minut es.The tireshould
then have attained apressure ofat least
200 kPa(2.0 bar/29 psi).
If atire pressure of200 kPa(2.0 bar/2 9psi) is
achieved afteramaximum often minut es,see
(Y page 256).
If atire pressure of200 kPa(2.0 bar/29 psi)is
not achieved afteramaximum often minut es,
see (Ypage 256).
If tire sealant hasescaped, cleanitoff affec ted
areas asquickly aspossible. Itis prefer ableto
use clean water.
If your clothes aresoiled withtiresealant ,
have them cleaned withperch loroet hylene ata
dry cleaner assoon aspossible. Flat
tire
255Breakd ownassist ance Z
Page 258 of 306
Tire
pres sure notreac hed If
atire pressu reof200 kPa(2.0 bar/29 psi)
ha sbe en ach ieved after ten minutes:
X Swi tch offthe tire inflation comp ressor .
X Unsc rewthefillerhos efro mthe valve ofthe
fa ulty tire .
Note thattire sealant ma yesc apewh en you
uns crew thefillerhos e.
X Ver yslow lydri ve forwa rds orrev ers e
ap pro xim ately30 ft(10 m).
X Pu mp upthe tire again.
After ama xim um often minutes,the tire
pre ssu remu stbe atleas t200 kPa(2.0 bar/
29 psi). G
WA
RNING
If the required tire pressu reisnot reached
afte rthe specified time ,the tire istoo badly
da mag ed.The tiresealant cannot repairthe
tire inthis insta nce. Dama gedtiresand a
tire pressu rethat istoo low can signifi cantl y
imp airthe vehi cle'sbra king anddriving
cha racte ristics. Thereisaris kof acci dent.
Do not continu edri ving .Co ntact aqu alifi ed
spe cialist wo rksho p.
Tire press urereac hed G
WARNI
NG
A tire tempo rarily sea led wi th tire sealant
imp airs the vehi cle'sdri ving characte ristics
and isnot suita ble for driving athig her
spe eds.The reisaris kof an acci dent.
Ada ptyour driving styleacco rdingly and
dri ve care fully.Do not excee dthe maxi mum
per mis siblespe edfor atire sealed wi th tire
sea lant.
The maxi mum permis siblespe edfor atire
sea led wi th tire sealant is50 mph (80km/h ).
The upper partof the TIREFIT sticke rmus tbe
affi xed tothe instru ment cluster inthe driver' s
fie ldof vis ion.
! Re
sid ue from thetire sealant may come
ou tof the fillerhos eafte rus e. Thi scou ld
cau sestai ns.
The refo re,place thefillerhos ein the plasti c
ba gwhi chcontai nedtheTIREFIT kit. H
En
viro nmen talnote
Have theused tire sealant bottl edispo sed
of pro fess iona lly, e.g. ataqu alifi ed spe cial-
ist worksho p.
If tire pressu reof200 kPa(2.0 bar/29 psi)
ha sbee nach ieved aftera maxi mum period of
ten minu tes:
X Swi tch offthe tire inflation comp ressor.
X Unscre wthe fillerhos efrom thevalve ofthe
fau ltytire .
X Stow thetire sealant bottl eand thetire
infl ation comp ressor.
X Pul laway immedi ately.
X Stop afterdri ving forappro xima telyten
minu tesand check thetire pressu rewith
the tire inflation comp ressor.
The tirepressu remus tnow beatleast
130 kPa(1.3 bar/19 psi). G
WARNI
NG
If the required tire pressu reisnot reached
afte rdri ving forasho rtper iod,the tire istoo
ba dlyda mag ed.The tiresealant cannot
rep airthe tire inthis insta nce. Dama ged
tire sand atire pressu rethat istoo low can
sig nifi cantl yimp airthe vehi cle'sbra king and
dri ving characte ristics. Thereisaris kof
acci dent.
Do not continu edri ving .Co ntact aqu alifi ed
spe cialist wo rksho p.
i In
case ssu ch asthe one mentio ned
ab ove, contact anauthori zedMerce des-
Benz Center. Orcall1-800-FOR -MERCedes
(i n the USA) or1-800-387-0100 (in Ca nad a).
X Co rrect thetire pressu reifit is stil lat least
130 kPa(1.3 bar/19 psi).See theTireand
Loa ding Inform ation placa rdon the driver' s
sid eB-pil laror the tire pressu retab lein the
fue lfil lerfla pfor values.
X To inc reas ethe tire press ure:switch on
the tire inflation comp ressor. 256
Fl
at tireBreakdo wnassi stanc e
Page 265 of 306
Tow
ingand tow-starti ng Impo
rtant safety notes G
WA
RNING
Wh entow ingortow -sta rtingano therveh icle
and itsweight isgre atertha nthe permi ssi-
bl e gro sswe ight ofyour veh icle, the :
R the towingeyecou ldde tach itself
R the vehicle/tra iler comb inationcou ldrol l-
ove r.
The reisaris kof an acc ident.
Wh entow ingortow -sta rtingano therveh i-
cle ,its weight sho uld not begre atertha n
the permi ssible gro sswe ight ofyour veh icle.
Deta ils on the permi ssible gro ssveh iclewe ight
of your veh iclecan befou ndonthe vehicle
id enti ficati on plate (Ypage 297 ).
! Wh
enActiv eBra keAssi st,Activ eDis tance
Assi stDISTR ONICor the HOLD functio nis
acti vated ,the vehiclebra kes automa tically
in certa insitua tions.
To avoid da ma getothe vehicle, de acti vate
the sesystem sin the followi ng orsimil arsit-
ua tio ns:
R wh en tow ingthe vehicle
R in the carwash
! Onl
ysec urethe tow ropeor tow barat the
tow ingeyes. Othe rwise, the vehiclecou ldbe
da ma ged.
! Do
not usethe towingeyefor reco very,
thi scou ldda ma gethe vehicle. Ifin do ubt,
reco verthe vehiclewi th acra ne.
! Wh
entow ing,pu llaw ay slow lyand
smo othly.Ifthe tractiv epo we ris too high,
the vehicles cou ldbe dama ged.
! Do
not tow with sling -typ eeq uipme nt.This
cou ldda ma gethe vehicle.
! Wh
entow ingaway veh icles with KEYL ESS-
GO ,us ethe key instea dof the Star t/Stop
bu tton. Theautoma tictransmi ssion may
othe rwise shi ftto positio n005D when you
op en the driver 'sor fro nt-pa ssenge rdo or,
wh ich cou ldda ma gethe transmi ssion. !
Ma
kesure tha tthe electri cpa rkin gbra ke
is rel eased .If the electri cpa rkin gbra keis
fa ulty, visitaqu alifi ed speci alistwo rksh op.
! Yo
uma ytow thevehiclefor ama xim um
di sta nce of30 miles(50 kilome ters).A tow -
ing spee dof 30 mph (50km/h )mu stnot be
exce eded.
For towingdista nces over30 miles
(50 kilome ters),the entireveh iclemu stbe
ra ised and transp orte d.
! Wh
enyouar etow -sta rtingor tow ing
ano therveh icle, its weight mu stnot exce ed
the maxim um permi ssible gro sswe ight of
yo ur veh icle.
It is be tter tohave the vehicletra nsp orte d
tha nto have ittow edaway.
The automa tictransmi ssion mu stbe inpo si-
tio n005C when the vehicleis be ing tow edaway.
The battery mustbe conne ctedandcharged.
Othe rwise, you:
R canno ttur nthe Sma rtKeyto positio n0048 in
the igniti onlock
R canno tshi ftthe automa tictransmi ssion to
po sitio n005C
Dea ctivate the automa ticlocking feature
be for ethe vehicleis tow ed(Ypage 178 ).Yo u
cou ldothe rwise be locked outwh en pushi ng
or tow ingthe vehicle. In
stal ling /re mov ingthe towingey e
In stal ling the towingey e G
WA
RNING
The exhaust tai lpi pe maybe veryhot. There
is aris kof burns when rem oving the rear
cove r.
Do not touchthe exhaust pipe .Ta ke partic u-
la rcar ewh en rem oving the rearcove r. Tow
ingand tow-starti ng
263Break downass istanc e Z
Page 266 of 306
The
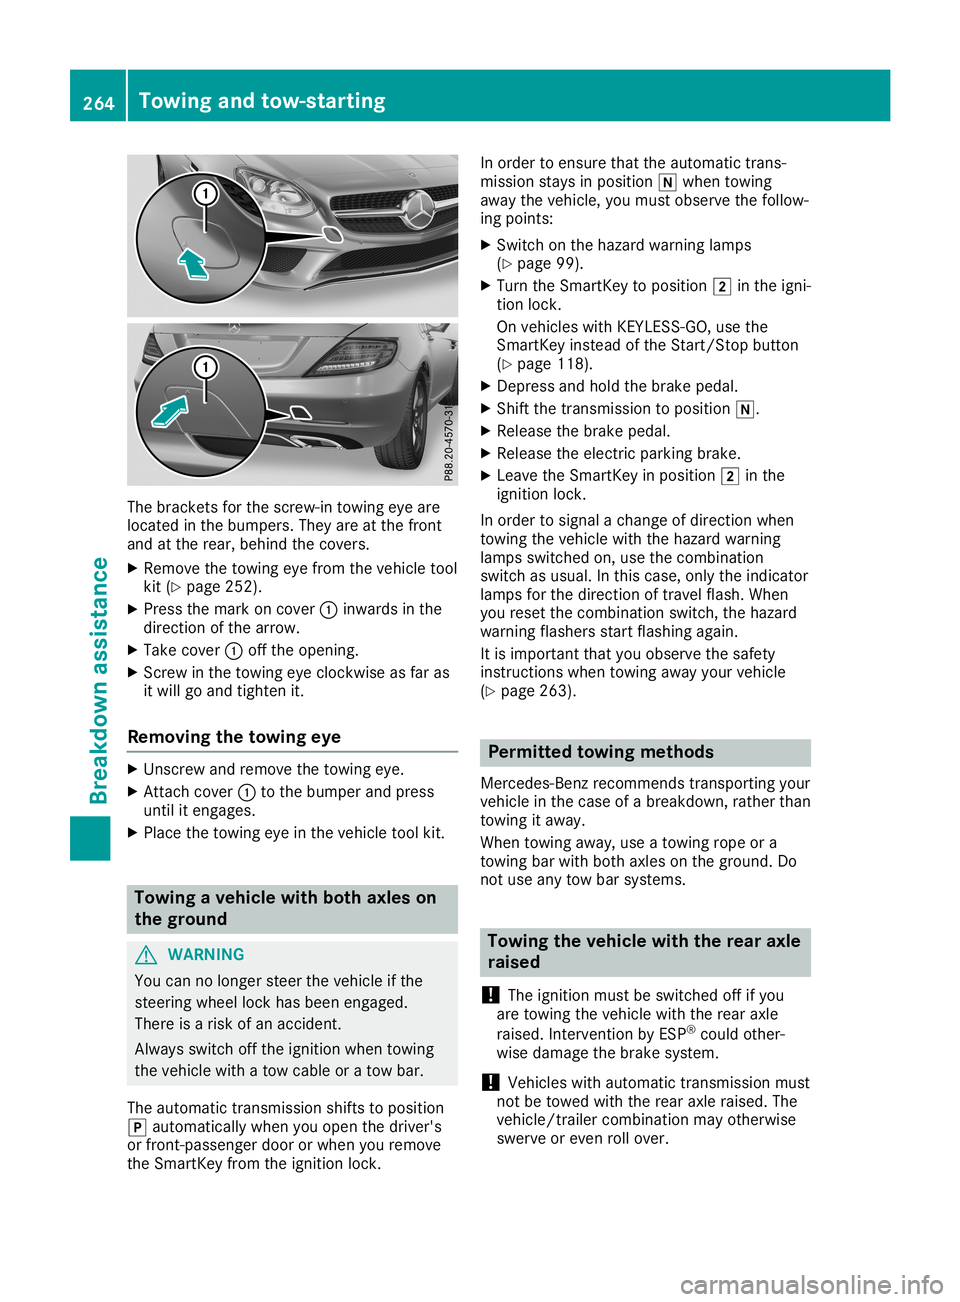
bracket sfor the screw-in towingeyeare
located inthe bumpers. Theyareatthe front
and atthe rear, behind thecovers.
X Remove thetowing eyefrom thevehicle tool
kit (Ypage 252).
X Press themark oncover 0043inwards inthe
direction ofthe arrow.
X Take cover 0043offthe opening.
X Scr ew inthe towing eyeclock wiseasfar as
it will goand tighten it.
Removing thetowing eye X
Unsc rewand remove thetowing eye.
X Attach cover 0043tothe bumper andpress
until itengages.
X Place thetowing eyeinthe vehicle toolkit. Towing
avehicle withboth axles on
the ground G
WARNIN
G
You cannolonger steerthevehicle ifthe
steerin gwheel lockhasbeen engaged.
There isarisk ofan accident .
Always switchoffthe ignition whentowing
the vehicle withatow cable oratow bar.
The automatic transmission shiftstoposition
005D automatically whenyouopen thedriver's
or front -passenger doororwhen youremove
the Smart Keyfrom theignition lock. In
order toensure thattheautomatic trans-
mission staysinposition 005Cwhen towing
away thevehicle, youmust observe thefollow-
ing points:
X Switch onthe hazard warning lamps
(Y page 99).
X Turn theSmart Keytoposition 0048inthe igni-
tion lock.
On vehicles withKEYLE SS-GO, usethe
Smart Keyinstead ofthe Start /Stopbutton
(Y page 118).
X Depress andhold thebrake pedal.
X Shift thetrans mission toposition 005C.
X Release thebrake pedal.
X Release theelectric parking brake.
X Leave theSmart Keyinposition 0048inthe
ignition lock.
In order tosignal achange ofdirection when
towing thevehicle withthehazard warning
lamps switched on,use thecombinat ion
switch asusual. Inthis case, onlytheindicator
lamps forthe direction oftravel flash.When
you reset thecombinat ionswitch, thehazard
warning flashersstartflashing again.
It is important thatyouobserve thesafety
instr uctions whentowing awayyourvehicle
(Y page 263). Permit
tedtowing methods
Mercedes- Benzrecomm endstransportin gyour
vehicle inthe case ofabreakdown, ratherthan
towing itaway .
When towing away,use atowing ropeora
towing barwith both axles onthe ground. Do
not use anytow barsystems. Towing
thevehicle withtherear axle
raised
! The
ignition mustbeswitched offifyou
are towing thevehicle withtherear axle
raised. Intervent ionbyESP ®
could other-
wise damage thebrake system.
! Vehicles
withautomatic transmission must
not betowed withtherear axle raised. The
vehicle/t railercombinat ionmay otherwise
swerve oreven rollover. 264
Towing
andtow-sta rtingBr eakdown assistance