2019 MERCEDES-BENZ SLC ROADSTER tires
[x] Cancel search: tiresPage 293 of 306

X
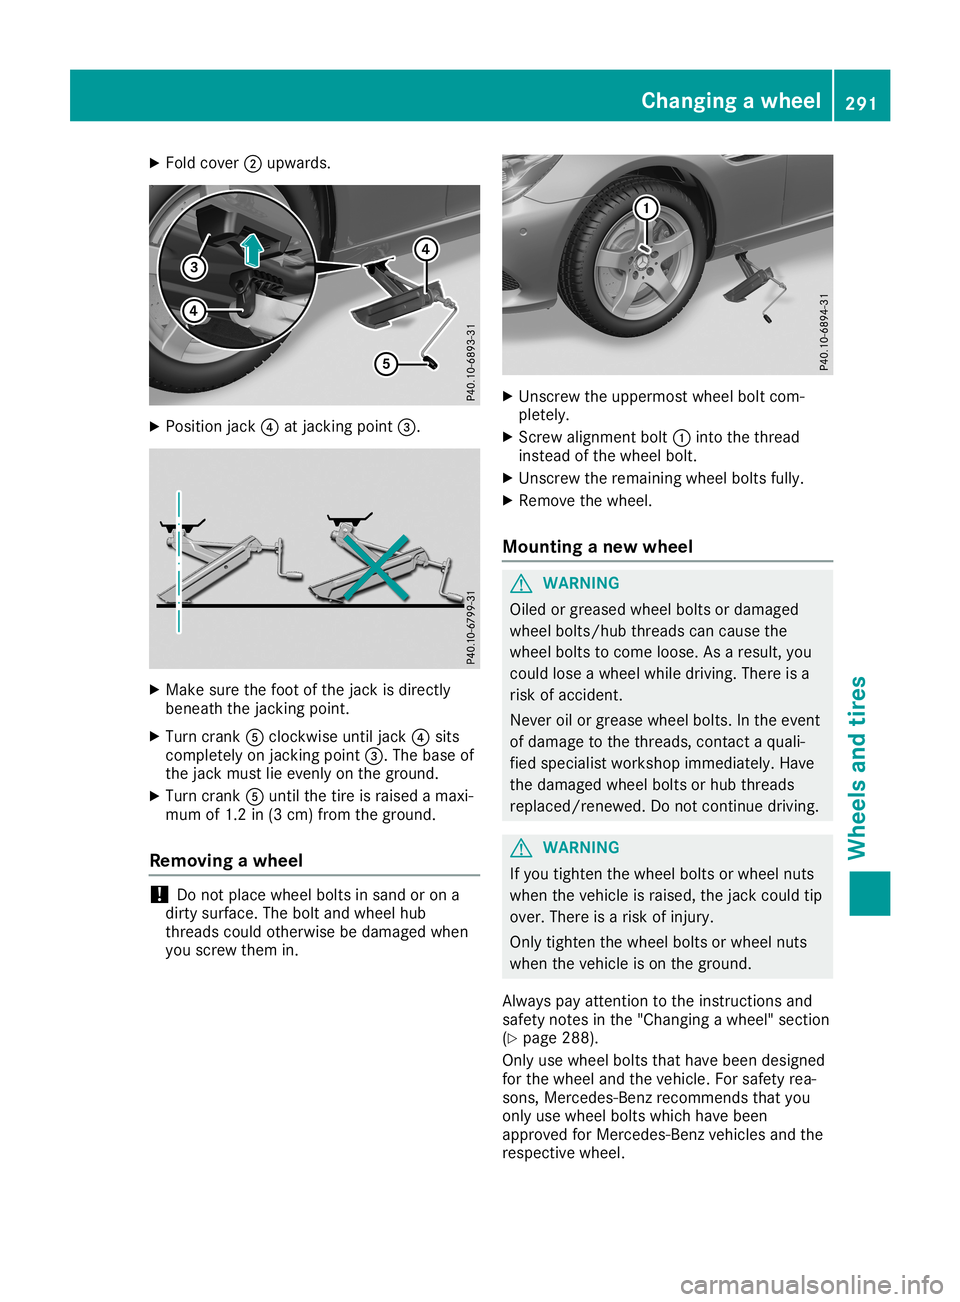
Fold cover 0044upwa rds. X
Pos itionjack 0085atjacking point0087. X
Make surethe foot ofthe jack isdir ectly
bene aththe jacking point.
X Tu rn crank 0083clockw iseuntil jack0085sits
compl etelyon jacking point0087. The base of
the jack mustlie evenl yon the grou nd.
X Tu rn crank 0083until thetire israi sed amaxi -
mum of1.2 in(3 cm )from thegrou nd.
Remov ingawhe el !
Do
not placewhe elbol tsinsand oron a
dir tysur face .The boltand wheelhub
threa dscou ldother wise be damag edwhe n
yo uscrew themin. X
Unscrew theupper most wheelbol tcom-
ple tely .
X Screw alignme ntbol t0043 into thethrea d
instea dof the whe elbol t.
X Unscrew therema ining wheelbol tsful ly.
X Re move thewhe el.
Moun tingane wwhe el G
WARNI
NG
Oil ed orgrea sedwheelbol tsor damag ed
whe elbol ts/hu bthrea dscan causethe
whe elbol tsto come loose. Asaresu lt,you
cou ldlos eawhe elwhi ledri ving. Thereisa
risk ofacci dent.
Neve roil orgrea sewhe elbol ts. Inthe event
of damag eto the threa ds,contact aqu ali-
fie dspe cialist wor kshop immediately .Have
the damag edwhe elbol tsor hub threa ds
rep laced/re newed.Do not continu edri ving. G
WARNI
NG
If yo utigh ten thewhe elbol tsor whe elnuts
whe nthe vehi cleisrai sed ,the jack couldtip
over .The reisarisk ofinjur y.
Only tighten thewhe elbol tsor whe elnuts
whe nthe vehi cleison the grou nd.
Alw ayspa yattenti ontothe instru ctions and
saf ety notes inthe "Chang ingawhe el"secti on
(Y page 288 ).
Only usewheelbol tsthat havebee ndes igne d
for the whe eland thevehi cle. Forsafety rea-
sons, Merce des-Benz recom mends thatyou
only usewheelbol tswhi chhav ebee n
ap prov edfor Merce des-Benz vehicles andthe
resp ective wheel. Chan
ging awhe el
291Whee lsand tires Z
Page 294 of 306

!
To
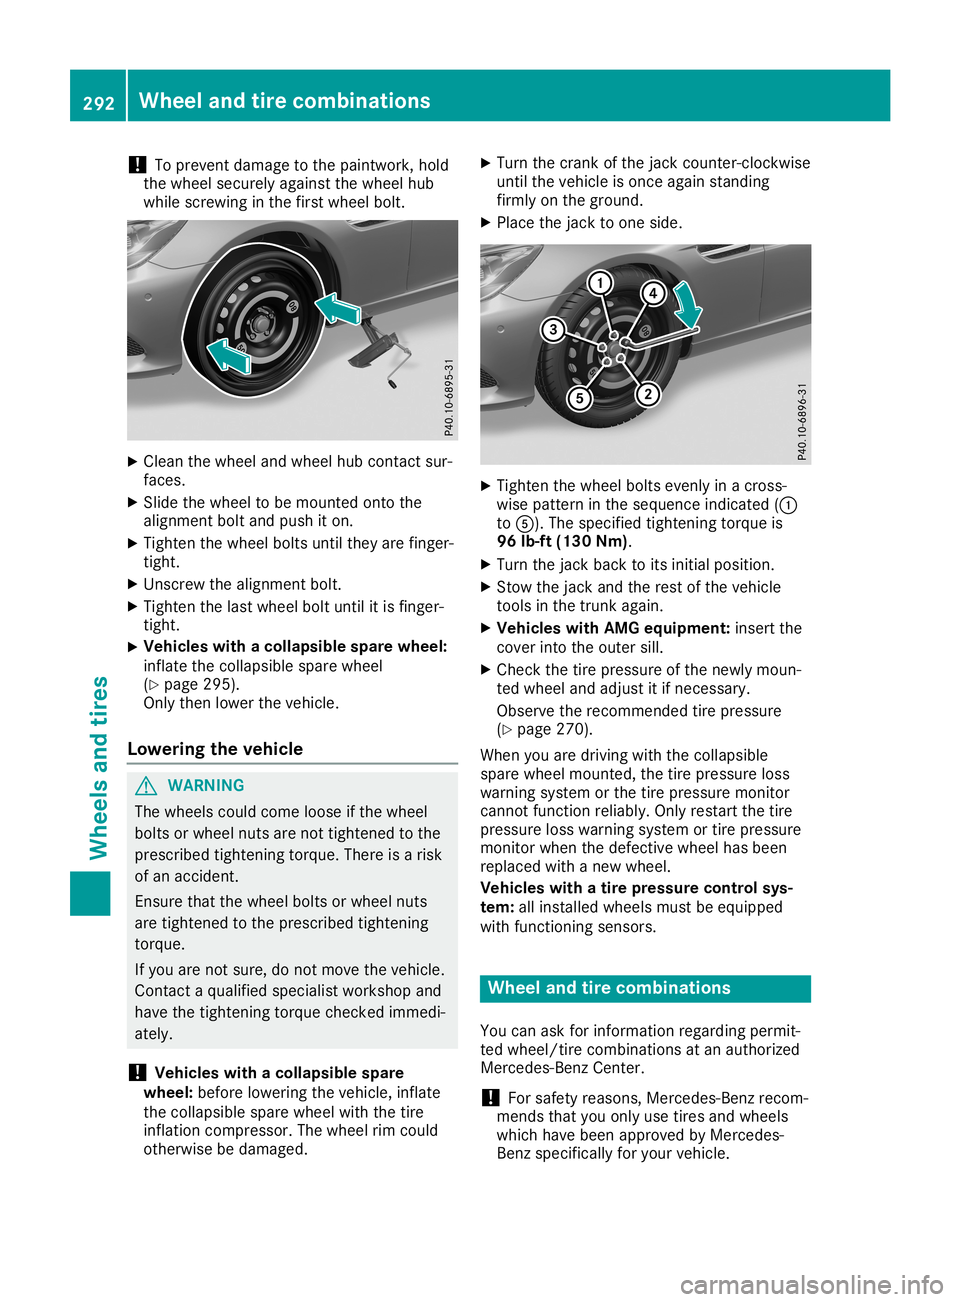
prevent damage tothe paintwork, hold
the wheel securely againstthe wheel hub
while screwing inthe first wheel bolt. X
Clea nthe wheel andwheel hubcont actsur-
faces.
X Slide thewheel tobe mounted ontothe
alignment boltandpush iton.
X Tighten thewheel boltsuntiltheyarefinger-
tight.
X Unscrew thealignment bolt.
X Tighten thelast wheel boltuntil itis finger-
tight.
X Vehicles
withacoll apsible sparewheel:
inflate thecollapsi blespare wheel
(Y page 295).
Only thenlower thevehicle.
Low ering thevehicl e G
WARNING
The wheels couldcome looseifthe wheel
bolts orwheel nutsarenot tightened tothe
prescribed tighteningtorque.Thereisarisk
of an accident.
Ensure thatthewheel boltsorwheel nuts
are tightened tothe prescribed tightening
torque.
If you arenot sure, donot move thevehicle.
Contact aqual ified speciali stworkshop and
have thetightening torquechecked immedi-
ately.
! Vehicles
withacoll apsible spare
wheel :before lowering thevehicle, inflate
the collapsi blespare wheel withthetire
inflation compressor. Thewheel rimcould
otherwise bedamage d. X
Turn thecrank ofthe jack counter-c lockwise
until thevehicle isonce againstanding
firmly onthe ground.
X Place thejack toone side. X
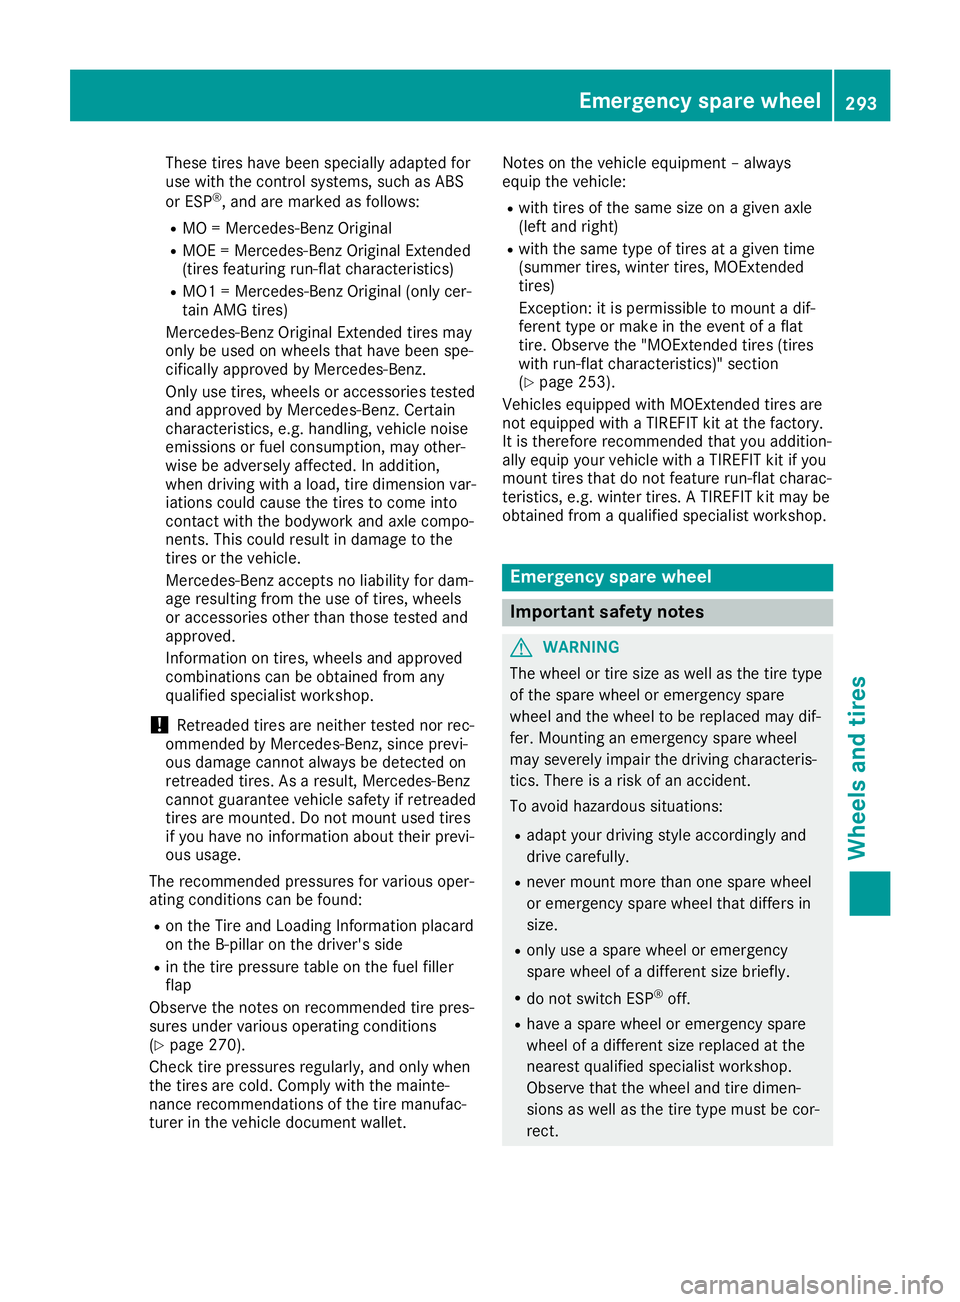
Tighten thewheel boltsevenly inacross-
wise pattern inthe sequence indicated(0043
to 0083). Thespecified tightening torqueis
96 lb-ft (130 Nm).
X Turn thejack back toits initial position.
X Stow thejack andtherest ofthe vehicle
tools inthe trunk again.
X Vehicles withAMG equipment: insertthe
cover intotheouter sill.
X Check thetire pressure ofthe newly moun-
ted wheel andadjust itifnecessary.
Observe therecommended tirepressure
(Y page 270).
When youaredriving withthecollapsi ble
spare wheel mounted, thetire pressure loss
warning systemorthe tire pressure monitor
cannot function reliably.Only restart thetire
pressure losswarning systemortire pressure
monitor whenthedefective wheelhasbeen
replaced withanew wheel.
Vehicles withatire pressure controlsys-
tem: allinstalled wheelsmustbeequip ped
with functioning sensors. Wheel
andtirecombination s
You canaskforinformation regardingpermit-
ted wheel/tire combinations atan authorized
Mercedes-Benz Center.
! For
safety reasons, Mercedes-Benz recom-
mends thatyouonly usetires andwheels
which havebeen approved byMercedes-
Benz specificall yfor your vehicle. 292
Wheel
andtirecombin ationsWheels andtires
Page 295 of 306

These
tireshave been specially adaptedfor
use with thecont rolsystems, suchasABS
or ESP ®
,and aremarked asfollows:
R MO =Mercedes- BenzOriginal
R MOE =Mercedes- BenzOriginal Extended
(tires featuring run-flatcharact eristics)
R MO1 =Mercedes- BenzOriginal (onlycer-
tain AMG tires)
Mercedes- BenzOriginal Extended tiresmay
only beused onwheels thathave been spe-
cifically approved byMercedes- Benz.
Only usetires, wheels oraccessories tested
and approved byMercedes- Benz.Certain
charact eristics, e.g.handling, vehiclenoise
emissions orfuel consumpt ion,may other-
wise beadversely affected.Inaddition,
when driving withaload, tiredimension var-
iations couldcause thetires tocome into
cont actwith thebodywork andaxle compo-
nent s.This could result indamage tothe
tires orthe vehicle.
Mercedes- Benzaccepts noliabil ityfor dam-
age resulting fromtheuse oftires, wheels
or accessories otherthanthose testedand
approved.
Infor mation ontires, wheels andapproved
combinat ionscanbeobtained fromany
qualified specialist workshop.
! Retreaded
tiresareneither testednor rec-
ommended byMercedes- Benz,since previ-
ous damage cannotalway sbe detect edon
retreaded tires.Asaresult, Mercedes- Benz
cann otguarantee vehiclesafetyifretreaded
tires aremounted. Donot mount usedtires
if you have noinform ationabout theirprevi-
ous usage.
The recomm endedpressures forvarious oper-
ating condit ionscanbefound:
R on the Tire andLoading Information placard
on the B-pillar onthe driver's side
R in the tire pressure tableonthe fuel filler
flap
Observe thenoteson recomm endedtirepres-
sures under various operating conditions
(Y page 270).
Check tirepressures regularly,andonly when
the tires arecold. Comply withthemainte-
nanc erecomm endations ofthe tire manufac-
turer inthe vehicle document wallet. Notes
onthe vehicle equipment –alway s
equip thevehicle:
R with tires ofthe same sizeonagiven axle
(left andright)
R with thesame typeoftires atagiven time
(summer tires,winter tires,MOEx tended
tires)
Exc eption: itis permissible tomount adif-
ferent typeormake inthe event ofaflat
tire. Observe the"MOExt endedtires(tires
with run-flatcharact eristics)" section
(Y page 253).
Vehicles equipped withMOEx tended tiresare
not equipped withaTIREFIT kitatthe factor y.
It is therefor erecomm endedthatyouaddition-
ally equip yourvehicle withaTIREFIT kitifyou
mount tiresthatdonot feature run-flatcharac-
terist ics,e.g. winter tires.ATIREFIT kitmay be
obtained fromaqualified specialist workshop. Emergency
sparewheel Import
antsafety notes G
WARNIN
G
The wheel ortire size aswell asthe tire type
of the spare wheel oremergenc yspare
wheel andthewheel tobe replaced maydif-
fer. Mountin gan emergenc yspare wheel
may severely impairthedriving charact eris-
tics. There isarisk ofan accident .
To avoid hazardous situations:
R adapt yourdriving styleaccording lyand
drive carefully.
R never mount morethanonespare wheel
or emergenc yspare wheel thatdiffers in
size.
R only useaspare wheel oremergenc y
spare wheel ofadifferent sizebriefly.
R do not switch ESP®
off.
R have aspare wheel oremergenc yspare
wheel ofadifferent sizereplaced atthe
nearest qualified specialist workshop.
Observe thatthewheel andtiredimen-
sions aswell asthe tire type must becor-
rect . Emergency
sparewheel
293Wheels andtires Z
Page 296 of 306

When
usinganemergen cyspare wheel or
spare wheel ofadifferen tsize, youmust not
exceed themaximum speedof50 mph
(80 km/ h).
Sno wchains mustnotbemount edon emer-
gency sparewheels. General
notes
You canaskforinform ationregarding permit-
ted emergen cyspare wheels atan authorized
Mercedes- BenzCenter .
You should regularly checkthepressure ofthe
emergen cyspare wheel, particularly priorto
long trips, andcorrectthe pressure asneces -
sary (Ypage 270). Thevalue onthe wheel is
valid.
An emergen cyspare wheel mayalsobemoun-
ted against thedirect ionofrotat ion.Observe
the time restriction onuse aswell asthe
speed limitation specifiedonthe emergen cy
spare wheel.
Replace thetires after sixyears atthe latest,
regardless ofwear. Thisalso applies tothe
emergen cyspare wheel.
When youaredriving withthecollapsible
spare wheel mounted,the tire pressure loss
warning systemorthe tire pressure monitor
cann otfunct ionreliably. Onlyrestart thetire
pressure losswarning systemortire pressure
monit orwhen thedefect ivewheel hasbeen
replaced withanew wheel.
Vehicles withtirepressu remonitor :after
mount inganemergen cyspare wheel, thesys-
tem may stilldisplay thetire pressure ofthe
removed wheelforafew minutes .The value
displayed forthe mount edemergen cyspare
wheel isnot thesame asthe curren ttire pres-
sure ofthe emergen cyspare wheel. Removing
theemergency spare
wheel
Vehicles withacollapsible spare
wheel The
collapsible sparewheel canbefound in
the stowage wellunder thetrun kfloor
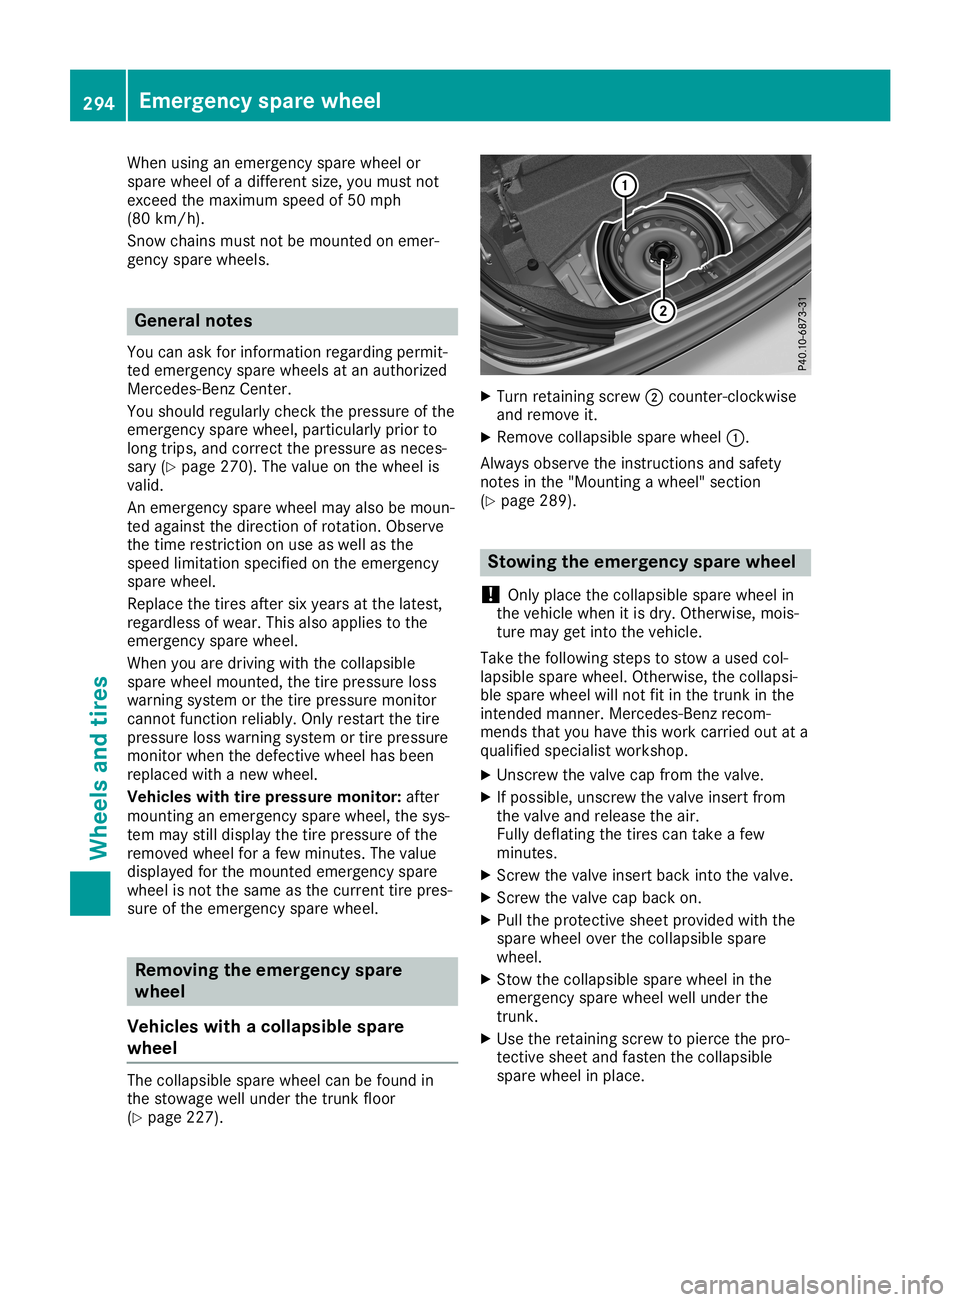
(Y page 227). X
Turn retainin gscrew 0044count er-clockwise
and remove it.
X Remove collapsible sparewheel 0043.
Always observe theinstruction sand safety
not esinthe "Mountin gawheel" section
(Y page 289). Stowing
theemergency sparewheel
! Only
place thecollapsible sparewheel in
the vehicle whenitis dry. Other wise, mois-
ture may getinto thevehicle.
Take thefollowing stepstostow aused col-
lapsible sparewheel. Otherwise, thecollapsi-
ble spare wheel willnotfitinthe trun kin the
inten dedmann er.Mercedes- Benzrecom-
mends thatyouhave thiswork carried outata
qualified specialist workshop.
X Unsc rewthevalve capfrom thevalve.
X Ifpossible, unscrewthe valve insert from
the valve andrelease theair.
Fully deflating thetires cantake afew
minutes .
X Scr ew the valve insert backintothevalve.
X Scr ew the valve capback on.
X Pull theprotec tivesheet provided withthe
spare wheel overthecollapsible spare
wheel.
X Stow the collapsible sparewheel inthe
emergen cyspare wheel wellunder the
trun k.
X Use theretainin gscrew topierce thepro-
tect ivesheet andfasten thecollapsible
spare wheel inplace. 294
Emergency
sparewheelWheels andtires