2019 MERCEDES-BENZ SLC ROADSTER warning light
[x] Cancel search: warning lightPage 230 of 306
!
Do
not expose drinksbottles inthe cup
holder inthe center console tocont inuous,
strong anddirect sunlight. Thepassenger
compartment inthe area ofthe center con-
sole canotherwise bedamage dby the con-
centr atedandreflected sunlight.
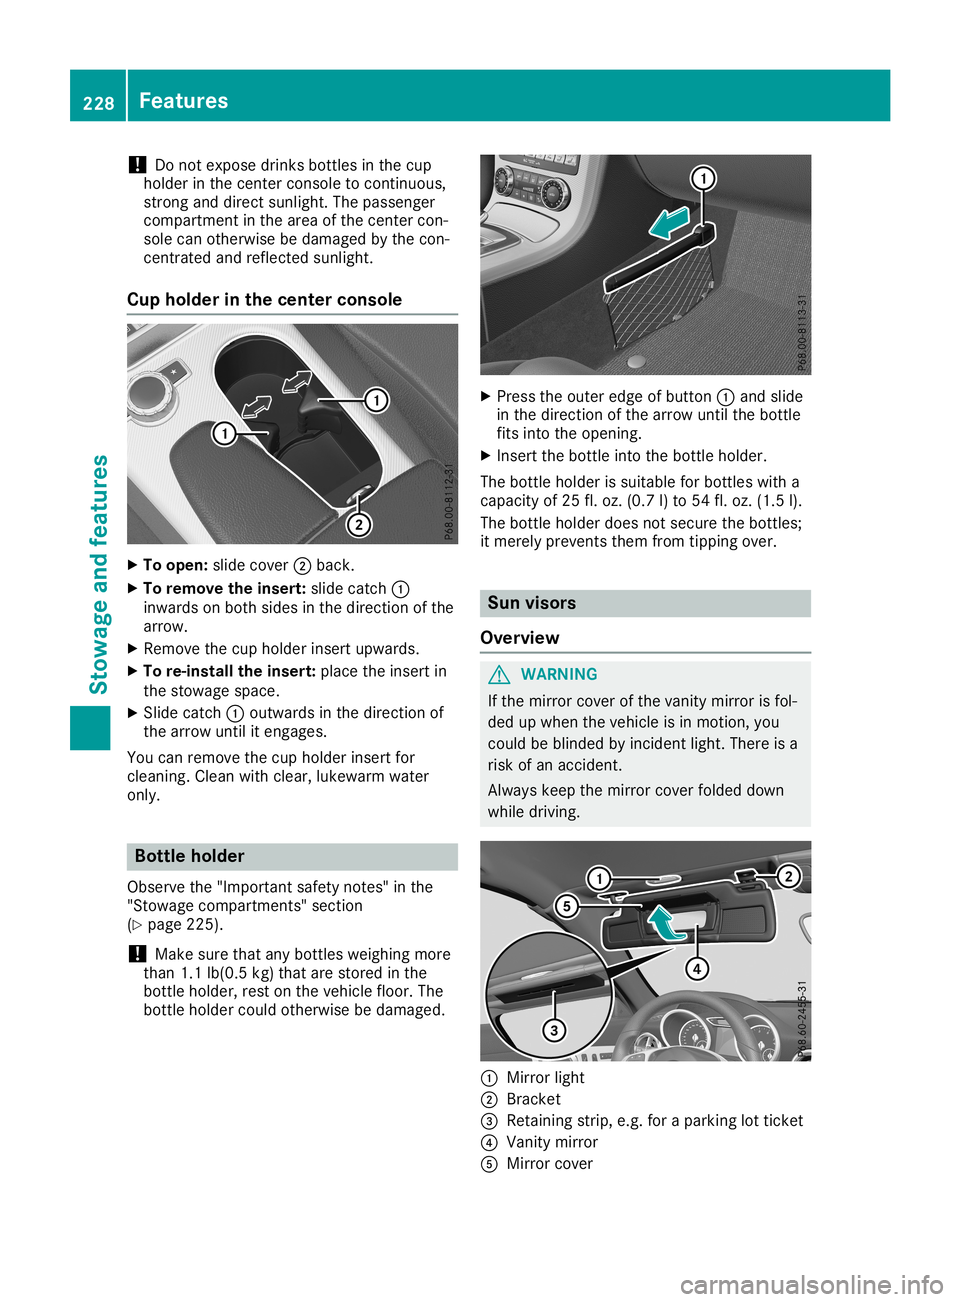
Cup holder inthe center console X
To open: slidecover 0044back.
X To remove theinsert: slidecatch 0043
inwards onboth sides inthe direction ofthe
arrow.
X Remove thecup holder insertupwards.
X To re-install theinsert: placetheinsert in
the stowage space.
X Slide catch 0043outwards inthe direction of
the arrow untilitengages.
You canremove thecup holder insertfor
cleaning. Cleanwith clear, lukewa rmwater
only. Bottle
holder
Observe the"Important safetynotes" inthe
"Stowage compartment s"section
(Y page 225).
! Make
surethatanybottles weighingmore
than 1.1lb(0.5 kg)that arestored inthe
bottle holder, restonthe vehicle floor.The
bottle holder couldotherwise bedamage d. X
Press theouter edgeofbutton 0043and slide
in the direction ofthe arrow untilthebottle
fits into theopening.
X Insert thebottle intothebottle holder.
The bottle holder issuitabl efor bottles witha
capacity of25 fl.oz. (0.7 l)to 54 fl.oz. (1.5 l).
The bottle holder doesnotsecure thebottles;
it merely prevents themfromtipping over. Sun
visors
Overview G
WARNING
If the mirror coverofthe vanity mirror isfol-
ded upwhen thevehicle isin motion, you
could beblinded byincident light.There isa
risk ofan accident.
Alway skeep themirror coverfolded down
while driving. 0043
Mirror light
0044 Bracket
0087 Retaining strip,e.g.foraparking lotticket
0085 Vanity mirror
0083 Mirror cover 228
FeaturesStowage
andfeatur es
Page 248 of 306
R
solvents
R cleaning agentscontaining solvents
Do not scrub.
Do not touch thesurfaces andfilms with
hard objects, e.g.rings orice scrapers. Oth-
erwise, youmay scratch ordamage thesur-
faces andfilms.
! Do
not park yourvehicle foralong period
of time directly aftercleaning, particularly
after cleaning thewheel rimwith wheel
cleaner. Wheelcleaner canlead tothe
increased corrosionofthe brake discsand
pads. Therefore, driveforafew minutes
after cleaning. Byheating upthe brakes, the
brake discsandpads dry.Thevehicle can
then beparked foralong period oftime.
Regu larcare ofyour vehicle isacondition for
retaining thequal ityinthe long term.
Use care products andcleaning agentsrecom-
mended andapproved byMercedes-Benz . Washing
thevehicl eand cleani ng
the paintwork
Automatic carwash G
WARNING
Braking efficiency isreduced afterwashing
the vehicle. Thereisarisk ofan accident.
Aft erthe vehicle hasbeen washed, brake
carefully whilepayingattent iontothe traffic
conditions untilfullbraking poweris
restored.
! When
DISTRONIC PLUSorthe HOLD func-
tion isactivated, thevehicle brakesauto-
matically incertain situations.
To avoid damage tothe vehicle, deactivate
DISTRONIC PLUSandtheHOLD function in
the followi ngorsimilar situations:
R when towing thevehicle
R in the carwash
! It
is preferable touse carwashes with
adjustable high-pressure pre-cleaningthat
corresponds tothe specification forthe
Cabri oletprogram. Incar washes thatuse
high water pressures, thereisarisk that a
small amount ofwater mayleakintothe
vehicle. !
Lock
thecarifyou wash itin an automatic
car wash. Otherwise, thevehicle mightbe
damaged .
! Never
cleanyourvehicle inaTouchless
Automatic CarWash asthese usespecial
cleaning agents.Thesecleaning agentscan
damage thepaintwork orplastic parts.
If you have yourvehicle cleaned inahigh-
pressure automatic carwash, small
amounts ofwater mayenter thevehicle.
! Make
surethattheautomatic transmission
is in position Nwhen washing yourvehicle
in atow-through carwash. Thevehicle could
be damaged ifthe transmission isin another
position.
! Make
surethat:
R the side windows andtheroof arecom-
pletely closed
R the climate controlblower isswitched off
R the windshiel dwiper switch isat position
0
The vehicle couldotherwise bedamaged .
You canclean thevehicle atan automatic car
wash fromthevery start.
Preferably cleanthevehicle atautomatic car
washes thatusetextilewashing elements
without brushes. Thisprevents finescratches
from forming onthe paintwork andfilm.
If the vehicle isvery dirty, pre-wash itbefore
cleaning itin an automatic carwash.
Aft erusing anautomatic carwash, wipeoff
wax from thewindshiel dand thewiper blades.
This willprevent smearsandreduce wiping
noises caused byresidue onthe windshiel d.
i Vehicles
withdecorative film:select a
wash program withouthotwax atthe auto-
matic carwash.
Washing byhand In
some countries, washingbyhand isonly
allow edatspeciall yequip pedwashing bays.
Observe thelegal requirements ineach coun-
try.
X Do not use hotwater anddonot wash the
vehicle indirect sunlight.
X Use asoft sponge toclean.
X Use amild cleaning agent,suchasacar
shampoo approved byMercedes-Benz .246
CareMaintenance
andcare
Page 262 of 306
If
the indicator/wa rninglampsdo not light up
at low temperature s,itis very likely thatthe
discha rgedbattery hasfrozen. Inthis case,
you may neither chargethebattery norjump-
start thevehicle .The service lifeofathawed -
out battery maybeshorter. Thestarting char-
acteristics canbeimpa ired, particul arlyatlow
temperature s.Have thethawed -outbattery
checked ataqua lifiedspecia listworkshop.
Rea dthe battery charger's operatinginstruc-
tions before charging thebattery.
X Open thehood.
X Connect thebattery charger tothe positive
terminal andground pointinthe same order
as when connecting thedonor battery inthe
jump-starting procedure(Y page 260). Replaci
ngthe 12Vbattery
Observe thenotes onthe 12Vbattery
(Y page 257).
Mercedes-Benz recommendsthatyouhave
the 12Vbattery replacedataqua lifiedspe-
ciali stworkshop, e.g.atan authori zed
Mercedes-Benz Center. If
you want torepla cethe battery yourself,
observe thefollow ingnotes:
R Alway srepla ceadefective batterywitha
battery whichmeets thespecific require-
ments ofthe vehicle .
The vehicle isequi pped withanAGM
(Absorbent GlassMat) technology battery.
Full vehicle functionality isonly guaranteed
with anAGM battery. Forsafety reasons,
Mercedes-Benz recommendsthatyouonly
use batteries whichhavebeen tested and
appro vedforyou rvehicle byMercedes-
Benz.
R Use detachab leparts suchasbreather
hoses, angled connecting piecesorterminal
covers fromthebattery whichisto be
repla ced.
R Make surethatthevent hose isalw ays con-
nected tothe origina lopening onthe bat-
tery side.
R Install existing orsupp liedcellcaps topre-
vent gases orbattery acidfrom escapi ng.
R Make surethatthedetachab leparts are
connected againinthe same way. Jump-star
ting
For thejump-starting procedure,use only thejump-starting connectionpointinthe engine com-
partment, consisting ofapositive terminal andaground point. G
WARNING
Battery acidiscaustic. Thereisarisk ofinjury.
Avoid contact withskin, eyesorclothing. Donot inhale anybattery gases.Do not leanover the
battery. Keepchildre nawa yfrom batteries. Washawaybattery acidimmedi atelywithplenty of
clean water andseek medica lattention. G
WARNING
During charging andjump-starting, explosivegases canescape fromthebattery. Thereisa
risk ofan explosi on.
Particul arlyavoid fire,open flames ,creating sparksandsmoking. Ensurethereissufficie nt
ventilation whilecharging andjump-starting. Donot leanover abattery. G
WARNING
During thecharging process,abattery produceshydro gengas. Ifashort circuit occurs or
sparks arecreated, thehydro gengascan ignite. Thereisarisk ofan explosi on. 260
Jump-st
artingBreakd ownassis tance
Page 263 of 306
R
Make surethatthepositive terminal ofaconn ected battery doesnotcome intocontactwith
vehicle parts.
R Never placemetal object sor tools onabattery.
R Itis important thatyouobserve thedescribed orderofthe battery terminals whenconnect-
ing and disconnec tingabattery.
R When jump-st arting,makesurethatthebattery poleswithidentical polarityareconn ected.
R Itis particularly importanttoobserve thedescribed orderwhenconnecting anddisconnec t-
ing the jumper cables.
R Never connectordisconnec tthe battery terminals whiletheengine isrunning. G
WARNING
A discharged batterycanfreeze attemperatures belowfreezing point.Whenjump-st artingthe
vehicle orcharging thebattery, gasescanescape fromthebattery. Thereisarisk ofan explo-
sion.
Allow thefrozen battery tothaw outbefore charging itor jump-st arting.
! Avoid
repeated andlengthy startingattempt s.Otherwise, thecatalytic convertercould be
damaged bythe non- combusted fuel.
If the indicator/warnin glamps donot light upatlow temperatures, itis very likely thatthedis-
charged batteryhasfrozen .In this case, youmay neither chargethebattery norjump-st artthe
vehicle. Theservice lifeofathawed-out batterymaybeshorter. Thestartin gcharacterist icscan
be impaired, particularly atlow temperatures. Havethethawed-out batterycheckedataqual i-
fied specialist workshop.
Do not start thevehicle usingarapid charging device.Ifyour vehicle's batteryisdischarged, the
engine canbejump-st artedfromanother vehicleorfrom adonor battery usingjumper cables.
Observe thefollowing points:
R The battery isnot accessible inall vehicles. Ifthe other vehicle's batteryisnot accessible,
jump-st artthe vehicle usingadonor battery orajump-st artingdevice.
R You may onlyjump-st artthe vehicle whentheengine andexhaust systemarecold.
R Do not start theengine ifthe battery isfrozen .Let the battery thawfirst.
R Only jump-st artfrom batteries witha12 Vvoltage rating.
R Only usejumper cableswhichhaveasufficient cross-sectionandinsulated terminalclamps.
R Ifthe battery isfully discharged, leavethebattery thatisbeing usedtojump-st artconn ected
for afew minutes beforeattempt ingtostart. Thischarges thebattery slightly.
R Make surethatthetwo vehicles donot touch.
Make surethat:
R The jumper cablesarenot damaged.
R Bare parts ofthe terminal clampdonot come intocontactwith other metal partswhile the
jumper cablesareconn ected tothe battery.
R The jumper cablescannot comeintocontactwith parts which canmove whentheengine is
running, suchasthe V-belt pulleyor the fan.
X Secure thevehicle byapply ingthe electric parking brake.
X Shift thetransmission toposition 005D.
X Make surethattheignition isswitched off.Allindicator lampsinthe instrumen tcluster must
be off. When usingtheSmartK ey,turn theSmartK eytoposition 0092inthe ignition lockand
remove it(Y page 118). Jump
-starting
261Breakdown assistance Z
Page 278 of 306
vehicl
eto ahal tby braking carefully.Avoid
abru ptsteering movements.
The tirepressu remonitor hasayel low warni ng
lamp inthe instrument clusterforindica ting
pressu reloss oramalfu nction. Whether the
warni nglamp flashes orlights upindica tes
whethe ra tire pressu reistoo low orthe tire
pressu remonitor ismalfu nctioning:
R ifthe warni nglamp islit continuous ly,the
tire pressu reon one ormore tiresissignifi -
cantly toolow.The tirepressu remonitor is
not malfu nctioning.
R ifthe warni nglamp flashes forapp rox-
imatel ya minute andthen remai nslitcon-
stantly, thetire pressu remonitor ismalfu nc-
tioning.
In add ition tothe warni nglamp ,a messa ge
app ears inthe multi function display.Observe
the informati onondisp laymessa ges
(Y pag e201) .
It may take uptoten minutes foramalfu nc-
tion ofthe tire pressu remonitor tobe indica -
ted. Amalfu nction willbe indica tedbythe tire
pressu rewarni nglamp flashing forapp rox-
imatel yone minute andthen remai ninglit.
When themalfu nction hasbeen rectified ,the
tire pressu rewarni nglamp goesoutafter a
few minutes ofdrivi ng.
The tirepressu revalu esindica tedbythe on-
boa rdcomputer maydiffer fromthose meas-
ured atagas station withapressu regage .The
tire pressu resshow nby the on-board com-
puter refertothose measu redatsea level .At
high altitudes, thetire pressu revalu esindica -
ted byapressu regage arehighe rthan those
show nby the on-board computer. Inthis case,
do not redu cethe tire pressu res.
The opera tionofthe tire pressu remonitor can
be affected byinterference fromradiotrans-
mitting equipme nt(e.g. radiohead phones,
two-wa yradi os)that may bebeing operatedin
or near thevehicl e.
Chec kingthetire pressure electroni -
call y X
Make surethattheSmartKey isin posi tion
0048 (Ypag e118) inthe ignitio nlock.
X Press the0059 or0065 button onthe steer-
ing whee lto sele ctthe Serv. Serv.
menu. X
Press the0063 or0064 button tosele ct
Tire Pressure Tire
Pressure .
X Press 0076.
The current tirepressu reofeach tireis
show nin the multi function display.
If the vehicl ehas been parked forover
20 minutes ,the Tire pressure willbe Tire
pressure willbe
displaye dafter driving afew minutes displaye
dafter driving afew minutes
messa geapp ears.
After ateach-in process, thetire pressu re
monitor automatical lydetects newwhee lsor
new sensors. Aslong asaclea rall ocation of
the tire pressu revalu eto the indivi dualwhee ls
is not possi ble,theTire Pressure Monitor Tire
Pressure Monitor
Active Active
displaymessa geisshow ninstead of
the tire pressu redisp lay.The tirepressu res
are already being monitored.
If an emerge ncyspare wheelis mounted, the
system maycontinue toshow thetire pressu re
of the whee lthat hasbeen removed forafew
minutes. Beawa rethat thevalu edisp layed for
the posi tion where theemerge ncyspare wheel
is fitted isnot thesame asthe current tire
pressu reofthe emerge ncyspare wheel.
Tire pressure monitorwarnin gmes-
sage s The
tirepressu remonitor detectsapressu re
loss inone ormore tires:
R Ifthe tire pressu remonitor detectsapres-
sure lossinone ormore tires,awarni ng
messa geisshow nin the multi function dis-
pla y.The yellow tirepressu rewarni nglamp
then lights up.
R Ifthe Please Correct TirePressure Please
Correct TirePressure
messa geapp ears inthe multi function dis-
pla y,the tire pressu reinat lea stone tireis
too low.The tirepressu remust becorrected
when theoppo rtunity arises.
R Ifthe Check Tires Check
Tiresmessageapp ears inthe
multi function display,the tire pressu reinat
lea stone tirehas dropp edsignifi cantly. The
tires must bechecked.
R Ifthe Warning TireMalfunct ion Warning
TireMalfunct ionmes-
sage appears inthe multi function display,
the tire pressu reinat lea stone tirehas
dropp edsudd enly.The tires must be
checked.
Observe theinstructions andsafety notesin
the disp laymessa gesinthe "Tires" section
(Y pag e201). 276
Tire
pressureWhee lsand tires