2019 MERCEDES-BENZ SLC ignition
[x] Cancel search: ignitionPage 252 of 306
Cleaning the mirror turn signals
!Only use cleaning agents or cleaningcloths that are suitable for plastic lenses.Unsuitable cleaning agents or cleaningcloths could scratch or damage the plasticlenses of the mirror turn signals.
XClean the plastic lenses of the mirror turnsignals in the exterior mirror housing using awet sponge and mild cleaning agent, e.g.Mercedes-Benz car shampoo or with clean-ing cloths.
Cleaning the sensors
!If you clean the sensors with a powerwasher, make sure that you keep a distanceof at least 11.8 in(30 cm) between the vehi-cleand the power washer nozzle. Informa-tion about the correct distance is availablefrom the equipment manufacturer.
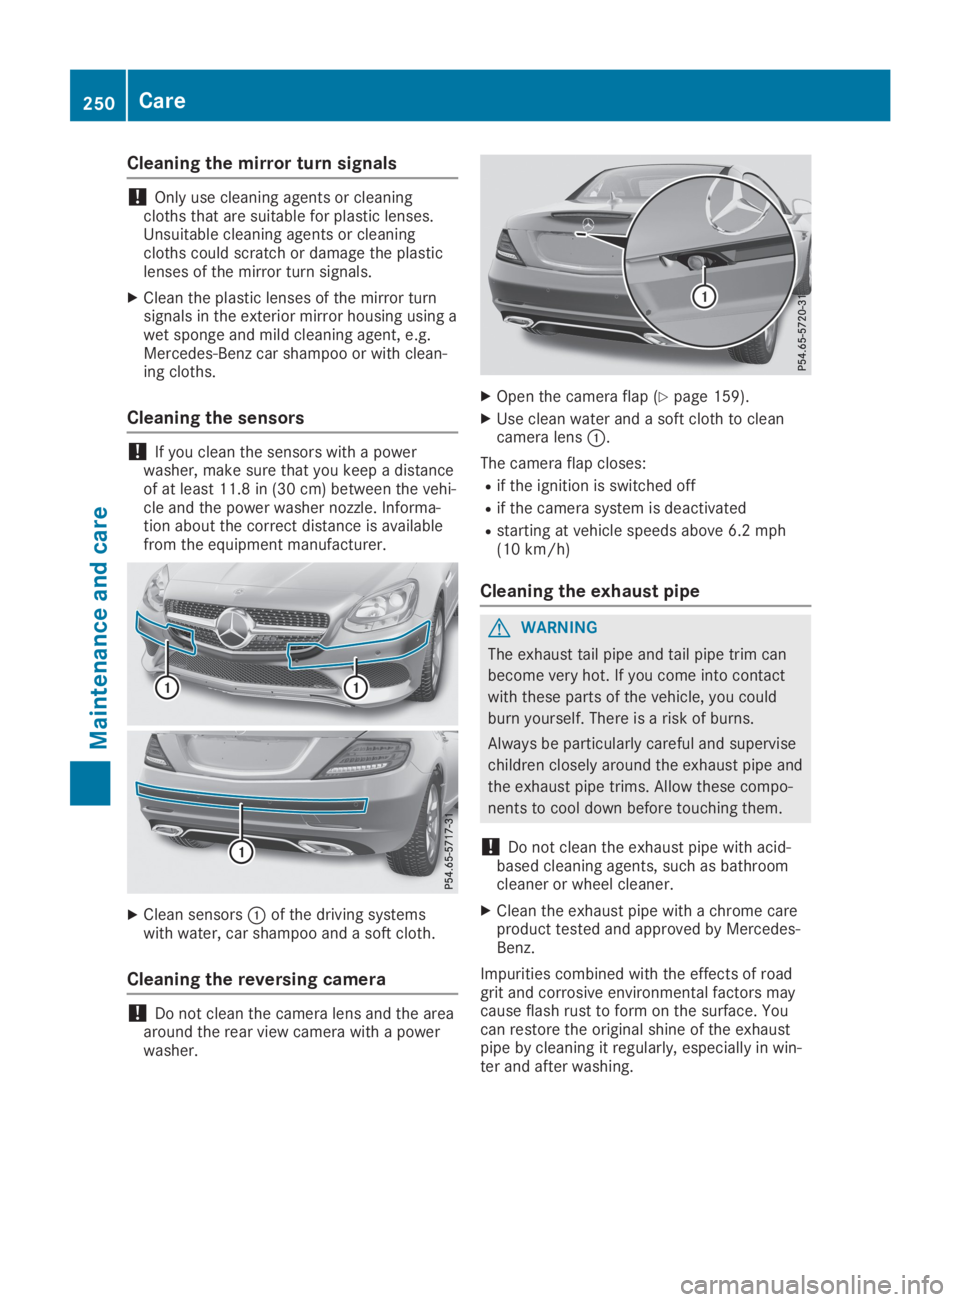
XClean sensors�Cof the driving systemswith water, car shampoo and a soft cloth.
Cleaning the reversing camera
!Do not clean the camera lens and the areaaround the rear view camera with a powerwasher.
XOpen the camera flap (Ypage 159).
XUse clean water and a soft cloth to cleancamera lens�C.
The camera flap closes:
Rif the ignition is switched off
Rif the camera system is deactivated
Rstarting at vehicle speeds above 6.2 mph(10 km/h)
Cleaning the exhaust pipe
GWARNING
The exhaust tail pipe and tail pipe trim can
become very hot. If you come into contact
with these parts of the vehicle, you could
burn yourself. There is a risk of burns.
Always be particularly careful and supervise
children closely around the exhaust pipe and
the exhaust pipe trims. Allow these compo-
nents to cool down before touching them.
!Do not clean the exhaust pipe with acid-based cleaning agents, such as bathroomcleaner or wheel cleaner.
XClean the exhaust pipe with a chrome careproduct tested and approved by Mercedes-Benz.
Impurities combined with the effects of roadgrit and corrosive environmental factors maycause flash rust to form on the surface. Youcan restore the original shine of the exhaustpipe by cleaning it regularly, especially in win-ter and after washing.
250Care
Maintenance and care
Page 255 of 306
teristics, e.g. winter tires. A TIREFIT kit may beobtained from a qualified specialist workshop.
Information on changing and mounting wheels(Ypage 288).
XStop the vehicle on solid, non-slippery andlevel ground, as far away as possible fromtraffic.
XSwitch on the hazard warning lamps.
XSecure the vehicle against rolling away(Ypage 134).
XIf possible, bring the front wheels into thestraight-ahead position.
XSwitch off the engine.
XVehicles without KEYLESS-GO:removethe SmartKey from the ignition lock.
XVehicles with KEYLESS-GO:open the driv-er's door.The vehicle electronics are now in position�Z. This is the same as the SmartKey havingbeen removed.
XVehicles with KEYLESS-GO:remove theStart/Stop button from the ignition lock(Ypage 118).
XMake sure that the passengers are notendangered as they do so. Make sure thatno one is near the danger area while awheel is being changed. Anyone who is notdirectly assisting in the wheel changeshould, for example, stand behind the bar-rier.
XGet out of the vehicle. Pay attention to traf-fic conditions when doing so.
XClose the driver's door.
MOExtended tires (tires with run-flat
properties)
General notes
With MOExtended tires (tires with run flatcharacteristics), you can continue to drive yourvehicle even if there is a total loss of pressurein one or more tires. The affected tire must notshow any clearly visible damage.
You can recognize an MOExtended tire by theMOExtended marking which appears on thesidewall of the tire. You will find this markingnext to the tire size designation, the load-bear-ing capacity and the speed index(Ypage 283).
MOExtended tires may only be used in con-junction with an active tire pressure loss warn-ing system or with an active tire pressure mon-itor.
If a pressure loss warning messageappears in the multifunction display:
Robserve the instructions in the display mes-sages (Ypage 201)
Rcheck the tire for damage
Rif driving on, observe the following notes
The driving distance possible in run-flat modeis approximately 50 miles (80 kilometers)when the vehicle is partially laden and approx-imately 19 miles (30 kilometers) when thevehicle is fully laden.
In addition to the vehicle load, the driving dis-tance possible depends upon:
RVehicle speed
RRoad condition
ROutside temperature
The driving distance possible in run-flat modemay be reduced by extreme driving conditionsor maneuvers, or it can be increased through amoderate style of driving.
The driving distance possible in run-flat modeis counted from the moment the tire pressureloss warning appears in the multifunction dis-play.
You must not exceed a maximum designspeed of 50 mph (80 km/h).
When replacing one or all tires, please observethe following specifications for your vehicle'stires:
RSize
RType and
RThe "MOExtended" mark
If a tire has gone flat and cannot be replacedwith an MOExtended tire, a standard tire maybe used as a temporary measure. Make surethat you use the proper size and type (summeror winter tire).
Vehicles equipped with MOExtended tires arenot equipped with a TIREFIT kit at the factory.It is therefore recommended that you addition-ally equip your vehicle with a TIREFIT kit if youmount tires that do not feature run-flat charac-teristics, e.g. winter tires. A TIREFIT kit can beobtained from a qualified specialist workshop,for example.
Flat tire253
Breakdown assistance
Page 260 of 306
Always make sure that neither you nor the bat-tery is electrostatically charged. A build-up ofelectrostatic charge can be caused, for exam-ple:
Rby wearing clothing made from syntheticfibers
Rdue to friction between clothing and seats
Rif you push or pull the battery across thecarpet or other synthetic materials
Rif you wipe the battery with a cloth
GWARNING
During the charging process, a battery pro-
duces hydrogen gas. If a short circuit occurs
or sparks are created, the hydrogen gas can
ignite. There is a risk of an explosion.
RMake sure that the positive terminal of a
connected battery does not come into
contact with vehicle parts.
RNever place metal objects or tools on a
battery.
RIt is important that you observe the
described order of the battery terminals
when connecting and disconnecting a bat-
tery.
RWhen jump-starting, make sure that the
battery poles with identical polarity are
connected.
RIt is particularly important to observe the
described order when connecting and dis-
connecting the jumper cables.
RNever connect or disconnect the battery
terminals while the engine is running.
GWARNING
Battery acid is caustic. There is a risk of
injury.
Avoid contact with skin, eyes or clothing. Do
not inhale any battery gases. Do not lean
over the battery. Keep children away from
batteries. Wash away battery acid immedi-
ately with plenty of clean water and seek
medical attention.
HEnvironmental note
Batteries contain pollutants.
It is illegal to dispose of
them with the household
rubbish. They must be col-
lected separately and dis-
posed of in an environmen-
tally responsible recycling
system.
Dispose of batteries in an
environmentally responsible
manner. Take discharged
batteries to a qualified spe-
cialist workshop or to a col-
lection point for used bat-
teries.
!Have the battery regularly checked at aqualified specialist workshop.
Comply with the service intervals in theMaintenance Booklet, or contact a qualifiedspecialist workshop for more information.
!Always have work on batteries carried outat a qualified specialist workshop.
Should it, in exceptional circumstances, beabsolutely necessary to disconnect the 12-volt battery yourself, please observe the fol-lowing:
RSecure the vehicle to prevent it from roll-ing away.
RSwitch off the ignition.
RDisconnect the negative terminal first andthen the positive terminal.
The transmission is locked in position�]after disconnecting the battery.
After the work has been done, install thebattery and replace the cover of the positiveterminal clamp firmly.
Comply with safety precautions and take pro-tective measures when handling batteries.
Risk of explosion.
Fire, open flames and smoking areprohibited when handling the bat-tery. Avoid creating sparks.
258Battery (vehicle)
Breakdo wn assis tan ce
Page 263 of 306
RMake sure that the positive terminal of a connected battery does not come into contact with
vehicle parts.
RNever place metal objects or tools on a battery.
RIt is important that you observe the described order of the battery terminals when connect-
ing and disconnecting a battery.
RWhen jump-starting, make sure that the battery poles with identical polarity are connected.
RIt is particularly important to observe the described order when connecting and disconnect-
ing the jumper cables.
RNever connect or disconnect the battery terminals while the engine is running.
GWARNING
A discharged battery can freeze at temperatures below freezing point. When jump-starting the
vehicle or charging the battery, gases can escape from the battery. There is a risk of an explo-
sion.
Allow the frozen battery to thaw out before charging it or jump-starting.
!Avoid repeated and lengthy starting attempts. Otherwise, the catalytic converter could bedamaged by the non-combusted fuel.
If the indicator/warning lamps do not light up at low temperatures, it is very likely that the dis-charged battery has frozen. In this case, you may neither charge the battery nor jump-start thevehicle. The service life of a thawed-out battery may be shorter. The starting characteristics canbe impaired, particularly at low temperatures. Have the thawed-out battery checked at a quali-fied specialist workshop.
Do not start the vehicle using a rapid charging device. If your vehicle's battery is discharged, theengine can be jump-started from another vehicle or from a donor battery using jumper cables.Observe the following points:
RThe battery is not accessible in all vehicles. If the other vehicle's battery is not accessible,jump-start the vehicle using a donor battery or a jump-starting device.
RYou may only jump-start the vehicle when the engine and exhaust system are cold.
RDo not start the engine if the battery is frozen. Let the battery thaw first.
ROnly jump-start from batteries with a 12 V voltage rating.
ROnly use jumper cables which have a sufficient cross-section and insulated terminal clamps.
RIf the battery is fully discharged, leave the battery that is being used to jump-start connectedfor a few minutes before attempting to start. This charges the battery slightly.
RMake sure that the two vehicles do not touch.
Make sure that:
RThe jumper cables are not damaged.
RBare parts of the terminal clamp do not come into contact with other metal parts while thejumper cables are connected to the battery.
RThe jumper cables cannot come into contact with parts which can move when the engine isrunning, such as the V-belt pulley or the fan.
XSecure the vehicle by applying the electric parking brake.
XShift the transmission to position�].
XMake sure that the ignition is switched off. All indicator lamps in the instrument cluster mustbe off. When using the SmartKey, turn the SmartKey to position�
Page 265 of 306
Towing and tow-starting
Important safety notes
GWARNING
When towing or tow-starting another vehicle
and its weight is greater than the permissi-
ble gross weight of your vehicle, the:
Rthe towing eye could detach itself
Rthe vehicle/trailer combination could roll-
over.
There is a risk of an accident.
When towing or tow-starting another vehi-
cle, its weight should not be greater than
the permissible gross weight of your vehicle.
Details on the permissible gross vehicle weightof your vehicle can be found on the vehicleidentification plate (Ypage 297).
!When Active Brake Assist, Active DistanceAssist DISTRONIC or the HOLD function isactivated, the vehicle brakes automaticallyin certain situations.
To avoid damage to the vehicle, deactivatethese systems in the following or similar sit-uations:
Rwhen towing the vehicle
Rin the car wash
!Only secure the tow rope or tow bar at thetowing eyes. Otherwise, the vehicle could bedamaged.
!Do not use the towing eye for recovery,this could damage the vehicle. If in doubt,recover the vehicle with a crane.
!When towing, pull away slowly andsmoothly. If the tractive power is too high,the vehicles could be damaged.
!Do not tow with sling-type equipment. Thiscould damage the vehicle.
!When towing away vehicles with KEYLESS-GO, use the key instead of the Start/Stopbutton. The automatic transmission mayotherwise shift to position�]when youopen the driver's or front-passenger door,which could damage the transmission.
!Make sure that the electric parking brakeis released. If the electric parking brake isfaulty, visit a qualified specialist workshop.
!You may tow the vehicle for a maximumdistance of 30 miles (50 kilometers). A tow-ing speed of 30 mph (50 km/h) must not beexceeded.
For towing distances over 30 miles(50 kilometers), the entire vehicle must beraised and transported.
!When you are tow-starting or towinganother vehicle, its weight must not exceedthe maximum permissible gross weight ofyour vehicle.
It is better to have the vehicle transportedthan to have it towed away.
The automatic transmission must be in posi-tion�\\when the vehicle is being towed away.
The battery must be connected and charged.Otherwise, you:
Rcannot turn the SmartKey to position�Hinthe ignition lock
Rcannot shift the automatic transmission toposition�\\
Deactivate the automatic locking featurebefore the vehicle is towed (Ypage 178). Youcould otherwise be locked out when pushingor towing the vehicle.
Installing/removing the towing eye
Installing the towing eye
GWARNING
The exhaust tail pipe may be very hot. There
is a risk of burns when removing the rear
cover.
Do not touch the exhaust pipe. Take particu-
lar care when removing the rear cover.
Towing and tow-starting263
Breakdown assistance
Z
Page 266 of 306
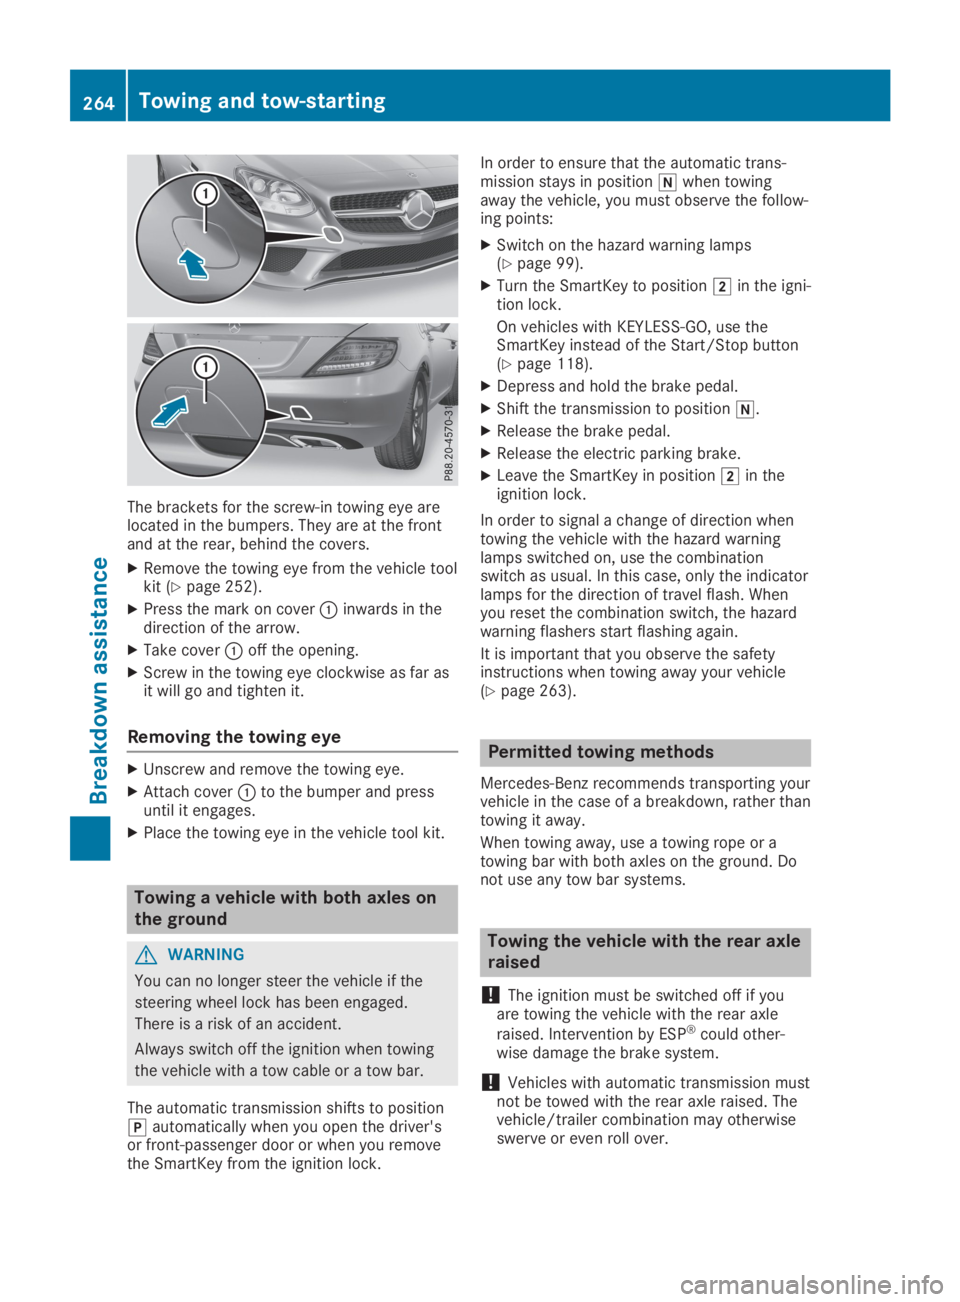
The brackets for the screw-in towing eye arelocated in the bumpers. They are at the frontand at the rear, behind the covers.
XRemove the towing eye from the vehicle toolkit (Ypage 252).
XPress the mark on cover�Cinwards in thedirection of the arrow.
XTake cover�Coff the opening.
XScrew in the towing eye clockwise as far asit will go and tighten it.
Removing the towing eye
XUnscrew and remove the towing eye.
XAttach cover�Cto the bumper and pressuntil it engages.
XPlace the towing eye in the vehicle tool kit.
Towing a vehicle with both axles on
the ground
GWARNING
You can no longer steer the vehicle if the
steering wheel lock has been engaged.
There is a risk of an accident.
Always switch off the ignition when towing
the vehicle with a tow cable or a tow bar.
The automatic transmission shifts to position�]automatically when you open the driver'sor front-passenger door or when you removethe SmartKey from the ignition lock.
In order to ensure that the automatic trans-mission stays in position�\\when towingaway the vehicle, you must observe the follow-ing points:
XSwitch on the hazard warning lamps(Ypage 99).
XTurn the SmartKey to position�Hin the igni-tion lock.
On vehicles with KEYLESS-GO, use theSmartKey instead of the Start/Stop button(Ypage 118).
XDepress and hold the brake pedal.
XShift the transmission to position�\\.
XRelease the brake pedal.
XRelease the electric parking brake.
XLeave the SmartKey in position�Hin theignition lock.
In order to signal a change of direction whentowing the vehicle with the hazard warninglamps switched on, use the combinationswitch as usual. In this case, only the indicatorlamps for the direction of travel flash. Whenyou reset the combination switch, the hazardwarning flashers start flashing again.
It is important that you observe the safetyinstructions when towing away your vehicle(Ypage 263).
Permitted towing methods
Mercedes-Benz recommends transporting yourvehicle in the case of a breakdown, rather thantowing it away.
When towing away, use a towing rope or atowing bar with both axles on the ground. Donot use any tow bar systems.
Towing the vehicle with the rear axle
raised
!The ignition must be switched off if youare towing the vehicle with the rear axle
raised. Intervention by ESP®could other-wise damage the brake system.
!Vehicles with automatic transmission mustnot be towed with the rear axle raised. Thevehicle/trailer combination may otherwiseswerve or even roll over.
264Towing and tow-starting
Breakdown assistance
Page 268 of 306
XMake sure that the ignition is switched off(Ypage 118).
or
XWhen using the SmartKey, turn the Smart-Key to position�
Page 276 of 306
pressure loss warning system" section(Ypage 274).
Important safety notes
The tire pressure warning system does notwarn you of an incorrectly set tire pressure.Observe the notes on the recommended tirepressure (Ypage 270).
The tire pressure loss warning does notreplace the need to regularly check the tirepressure. An even loss of pressure on severaltires at the same time cannot be detected bythe tire pressure loss warning system.
The tire pressure monitor is not able to warnyou of a sudden loss of pressure, e.g. if thetire is penetrated by a foreign object. In theevent of a sudden loss of pressure, bring thevehicle to a halt by braking carefully. Avoidabrupt steering movements.
The function of the tire pressure loss warningsystem is limited or delayed if:
Rsnow chains are mounted on your vehicle'stires.
Rroad conditions are wintry.
Ryou are driving on sand or gravel.
Ryou adopt a very sporty driving style (corner-ing at high speeds or driving with high ratesof acceleration).
Ryou drive with a heavy load.
Restarting the tire pressure loss warn-
ing system
Restart the tire pressure loss warning systemif you have:
Rchanged the tire pressure
Rchanged the wheels or tires
Rmounted new wheels or tires
XBefore restarting, make sure that the tirepressures are set properly on all four tiresfor the respective operating conditions.
The recommended tire pressure can befound on the Tire and Loading Informationplacard on the B-pillar. Additionally, a tirepressure table is attached to the fuel fillerflap. The tire pressure loss warning systemcan only give reliable warnings if you haveset the correct tire pressure. If an incorrect
tire pressure is set, these incorrect valueswill be monitored.
XAlso observe the notes in the section on tirepressures (Ypage 270).
XMake sure that the SmartKey is in position�Hin the ignition lock (Ypage 118).
XPress the�Yor�ebutton on the steer-ing wheel to select theServ.Serv.menu.
XPress the�cor�dbutton to selectTire PressureTire Pressure.
XPress the�vbutton.TheRun Flat Indicator Active PressRun Flat Indicator Active Press'OK' to Restart'OK' to Restartmessage appears in themultifunction display.
If you wish to confirm the restart:
XPress the�vbutton.TheTire Pressure Now OK?Tire Pressure Now OK?messageappears in the multifunction display.
XPress the�cor�dbutton to selectYesYes.
XPress the�vbutton.TheRun Flat Indicator RestartedRun Flat Indicator Restartedmes-sage appears in the multifunction display.
After a teach-in period, the tire pressureloss warning system will monitor the set tirepressures of all four tires.
If you wish to cancel the restart:
XPress the�8button.
or
XIf theTire Pressure Now OK?Tire Pressure Now OK?messageappears, use the�cor�dbutton toselectCancelCancel.
XPress the�vbutton.The tire pressure values stored at the lastrestart will continue to be monitored.
Tire pressure monitor
General notes
If a tire pressure monitor is installed, the vehi-cle's wheels have sensors that monitor the tirepressures in all four tires. The tire pressuremonitor warns you if the pressure drops in oneor more of the tires. The tire pressure monitoronly functions if the corresponding sensorsare installed in all wheels.
Information on tire pressures is displayed inthe multifunction display. After a few minutesof driving, the current tire pressure of each tire
274Tire pressure
Wheels and tires