2019 MERCEDES-BENZ SLC run flat
[x] Cancel search: run flatPage 272 of 306
Snow chains
GWARNING
If snow chains are installed to the front
wheels, they may drag against the vehicle
body or chassis components. This could
cause damage to the vehicle or the tires.
There is a risk of an accident.
To avoid hazardous situations:
Rnever install snow chains to the front
wheels
Ralways install snow chains in pairs to the
rear wheels.
For safety reasons, Mercedes-Benz recom-mends that you only use snow chains thathave been specially approved for your vehicleby Mercedes-Benz, or are of a correspondingstandard of quality. For more information,please contact a qualified specialist workshop.
If you intend to mount snow chains, pleasebear the following points in mind:
RSnow chains may not be mounted on allwheel/tire combinations. Permissiblewheel-tire combinations (Ypage 292).
ROnly use snow chains when driving on roadscompletely covered by snow. Remove thesnow chains as soon as possible when youcome to a road that is not snow-covered.
RLocal regulations may restrict the use ofsnow chains. Observe the appropriate regu-lations if you wish to mount snow chains.
RDo not exceed the maximum permissiblespeed of 30 mph (50 km/h).
You may wish to deactivate ESP®when pullingaway with snow chains installed (Ypage 61).You can thereby allow the wheels to spin in acontrolled manner, achieving an increaseddriving force (cutting action).
Information about driving with an emergencyspare wheel (Ypage 293).
Tire pressure
Tire pressure specifications
Important safety notes
GWARNING
Underinflated or overinflated tires pose the
following risks:
Rthe tires may burst, especially as the load
and vehicle speed increase.
Rthe tires may wear excessively and/or
unevenly, which may greatly impair tire
traction.
Rthe driving characteristics, as well as
steering and braking, may be greatly
impaired.
There is a risk of an accident.
Follow recommended tire inflation pressures
and check the pressure of all the tires
including the spare wheel:
Rmonthly, at least
Rif the load changes
Rbefore beginning a long journey
Runder different operating conditions, e.g.
off-road driving
If necessary, correct the tire pressure.
The data on the Tire and Loading Informationplacard and tire pressure table shown here areexamples. Tire pressure specifications arevehicle-specific and may deviate from the datashown here. The tire pressure specificationsthat are valid for your vehicle can be found onthe Tire and Loading Information placard andtire pressure table on the vehicle.
General notes
The recommended tire pressures for the tiresmounted at the factory can be found on thelabels described here.
Operation with an emergency spare wheel:information on operation with an emergencyspare wheel can be found in the general notesin the "Emergency spare wheel" section(Ypage 294).
Further information on tire pressures can beobtained at a qualified specialist workshop.
270Tire pressure
Wheels and tires
Page 275 of 306
Avoid tire pressures that are too high in all
the tires, including the spare wheel.
Overinflated tires may:
Rincrease the braking distance
Radversely affect handling
Rwear excessively and/or unevenly
Rhave an adverse effect on ride comfort
Rbe more susceptible to damage
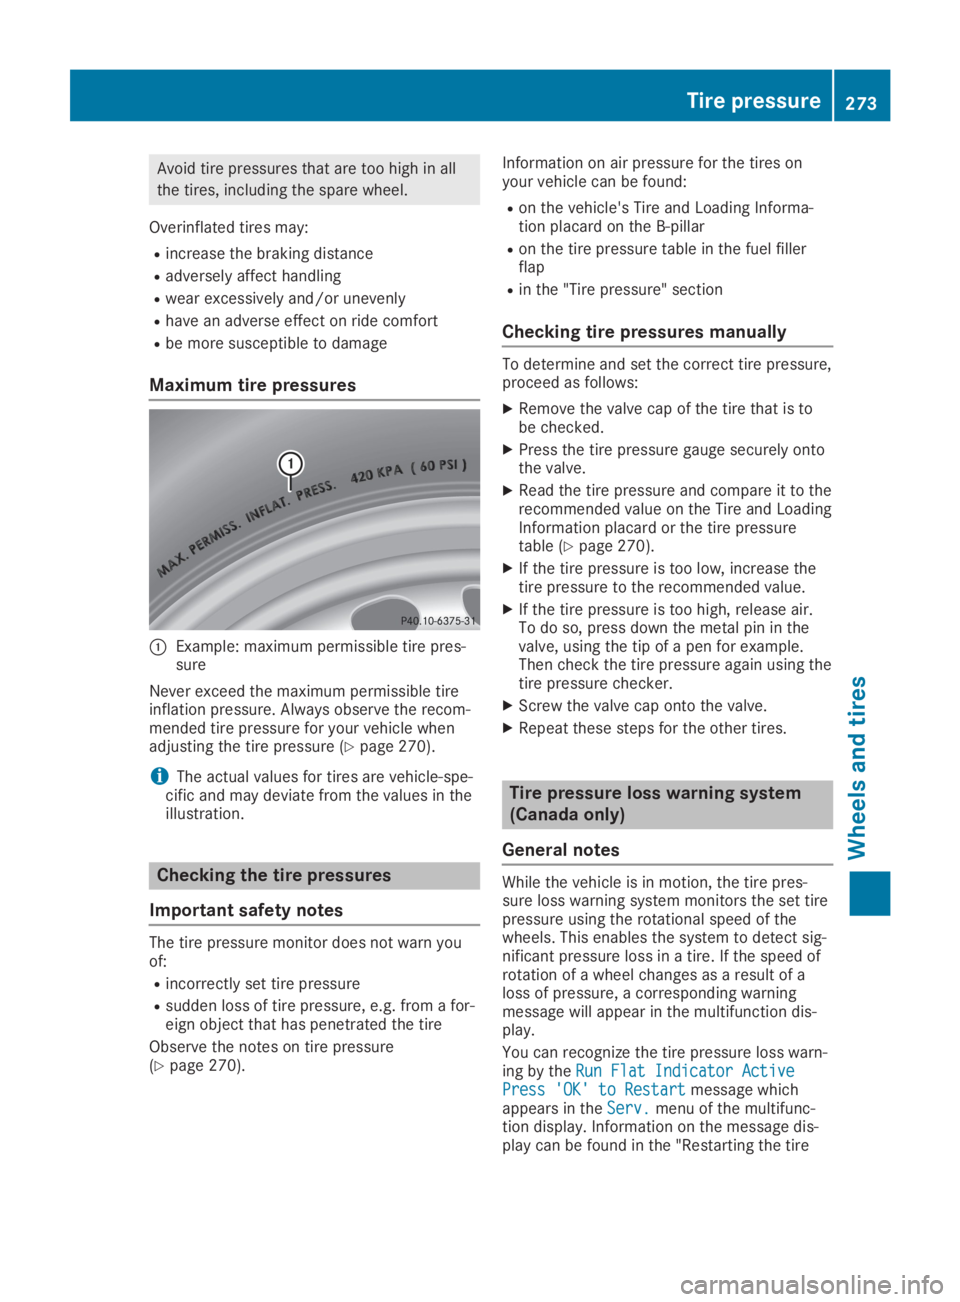
Maximum tire pressures
�CExample: maximum permissible tire pres-sure
Never exceed the maximum permissible tireinflation pressure. Always observe the recom-mended tire pressure for your vehicle whenadjusting the tire pressure (Ypage 270).
iThe actual values for tires are vehicle-spe-cific and may deviate from the values in theillustration.
Checking the tire pressures
Important safety notes
The tire pressure monitor does not warn youof:
Rincorrectly set tire pressure
Rsudden loss of tire pressure, e.g. from a for-eign object that has penetrated the tire
Observe the notes on tire pressure(Ypage 270).
Information on air pressure for the tires onyour vehicle can be found:
Ron the vehicle's Tire and Loading Informa-tion placard on the B-pillar
Ron the tire pressure table in the fuel fillerflap
Rin the "Tire pressure" section
Checking tire pressures manually
To determine and set the correct tire pressure,proceed as follows:
XRemove the valve cap of the tire that is tobe checked.
XPress the tire pressure gauge securely ontothe valve.
XRead the tire pressure and compare it to therecommended value on the Tire and LoadingInformation placard or the tire pressuretable (Ypage 270).
XIf the tire pressure is too low, increase thetire pressure to the recommended value.
XIf the tire pressure is too high, release air.To do so, press down the metal pin in thevalve, using the tip of a pen for example.Then check the tire pressure again using thetire pressure checker.
XScrew the valve cap onto the valve.
XRepeat these steps for the other tires.
Tire pressure loss warning system
(Canada only)
General notes
While the vehicle is in motion, the tire pres-sure loss warning system monitors the set tirepressure using the rotational speed of thewheels. This enables the system to detect sig-nificant pressure loss in a tire. If the speed ofrotation of a wheel changes as a result of aloss of pressure, a corresponding warningmessage will appear in the multifunction dis-play.
You can recognize the tire pressure loss warn-ing by theRun Flat Indicator ActiveRun Flat Indicator ActivePress 'OK' to RestartPress 'OK' to Restartmessage whichappears in theServ.Serv.menu of the multifunc-tion display. Information on the message dis-play can be found in the "Restarting the tire
Tire pressure273
Wheels and tires
Z
Page 276 of 306
pressure loss warning system" section(Ypage 274).
Important safety notes
The tire pressure warning system does notwarn you of an incorrectly set tire pressure.Observe the notes on the recommended tirepressure (Ypage 270).
The tire pressure loss warning does notreplace the need to regularly check the tirepressure. An even loss of pressure on severaltires at the same time cannot be detected bythe tire pressure loss warning system.
The tire pressure monitor is not able to warnyou of a sudden loss of pressure, e.g. if thetire is penetrated by a foreign object. In theevent of a sudden loss of pressure, bring thevehicle to a halt by braking carefully. Avoidabrupt steering movements.
The function of the tire pressure loss warningsystem is limited or delayed if:
Rsnow chains are mounted on your vehicle'stires.
Rroad conditions are wintry.
Ryou are driving on sand or gravel.
Ryou adopt a very sporty driving style (corner-ing at high speeds or driving with high ratesof acceleration).
Ryou drive with a heavy load.
Restarting the tire pressure loss warn-
ing system
Restart the tire pressure loss warning systemif you have:
Rchanged the tire pressure
Rchanged the wheels or tires
Rmounted new wheels or tires
XBefore restarting, make sure that the tirepressures are set properly on all four tiresfor the respective operating conditions.
The recommended tire pressure can befound on the Tire and Loading Informationplacard on the B-pillar. Additionally, a tirepressure table is attached to the fuel fillerflap. The tire pressure loss warning systemcan only give reliable warnings if you haveset the correct tire pressure. If an incorrect
tire pressure is set, these incorrect valueswill be monitored.
XAlso observe the notes in the section on tirepressures (Ypage 270).
XMake sure that the SmartKey is in position�Hin the ignition lock (Ypage 118).
XPress the�Yor�ebutton on the steer-ing wheel to select theServ.Serv.menu.
XPress the�cor�dbutton to selectTire PressureTire Pressure.
XPress the�vbutton.TheRun Flat Indicator Active PressRun Flat Indicator Active Press'OK' to Restart'OK' to Restartmessage appears in themultifunction display.
If you wish to confirm the restart:
XPress the�vbutton.TheTire Pressure Now OK?Tire Pressure Now OK?messageappears in the multifunction display.
XPress the�cor�dbutton to selectYesYes.
XPress the�vbutton.TheRun Flat Indicator RestartedRun Flat Indicator Restartedmes-sage appears in the multifunction display.
After a teach-in period, the tire pressureloss warning system will monitor the set tirepressures of all four tires.
If you wish to cancel the restart:
XPress the�8button.
or
XIf theTire Pressure Now OK?Tire Pressure Now OK?messageappears, use the�cor�dbutton toselectCancelCancel.
XPress the�vbutton.The tire pressure values stored at the lastrestart will continue to be monitored.
Tire pressure monitor
General notes
If a tire pressure monitor is installed, the vehi-cle's wheels have sensors that monitor the tirepressures in all four tires. The tire pressuremonitor warns you if the pressure drops in oneor more of the tires. The tire pressure monitoronly functions if the corresponding sensorsare installed in all wheels.
Information on tire pressures is displayed inthe multifunction display. After a few minutesof driving, the current tire pressure of each tire
274Tire pressure
Wheels and tires
Page 292 of 306
Raising the vehicle
GWARNING
If you do not position the jack correctly at
the appropriate jacking point of the vehicle,
the jack could tip over with the vehicle
raised. There is a risk of injury.
Only position the jack at the appropriate
jacking point of the vehicle. The base of the
jack must be positioned vertically, directly
under the jacking point of the vehicle.
!Only position the jack at the appropriatejacking point of the vehicle. Otherwise, youcould damage the vehicle.
Observe the following when raising the vehi-cle:
RTo raise the vehicle, only use the vehicle-specific jack that has been tested andapproved by Mercedes-Benz. If used incor-rectly, the jack could tip over with the vehi-cle raised.
RThe jack is designed only to raise and holdthe vehicle for a short time while a wheelis being changed. It must not be used forperforming maintenance work under thevehicle.
RAvoid changing the wheel on uphill anddownhill slopes.
RBefore raising the vehicle, secure it fromrolling away by applying the parking brakeand inserting wheel chocks. Do not disen-gage the parking brake while the vehicle israised.
RThe jack must be placed on a firm, flat andnon-slip surface. On a loose surface, a large,flat, load-bearing underlay must be used. Ona slippery surface, a non-slip underlay mustbe used, e.g. rubber mats.
RDo not use wooden blocks or similar objectsas a jack underlay. Otherwise, the jack willnot be able to achieve its load-bearing capa-city due to the restricted height.
RMake sure that the distance between theunderside of the tires and the ground doesnot exceed 1.2 in (3 cm).
RNever place your hands and feet under theraised vehicle.
RDo not lie under the vehicle.
RDo not start the engine when the vehicle israised.
RDo not open or close a door or the trunk lidwhen the vehicle is raised.
RMake sure that no persons are present inthe vehicle when the vehicle is raised.
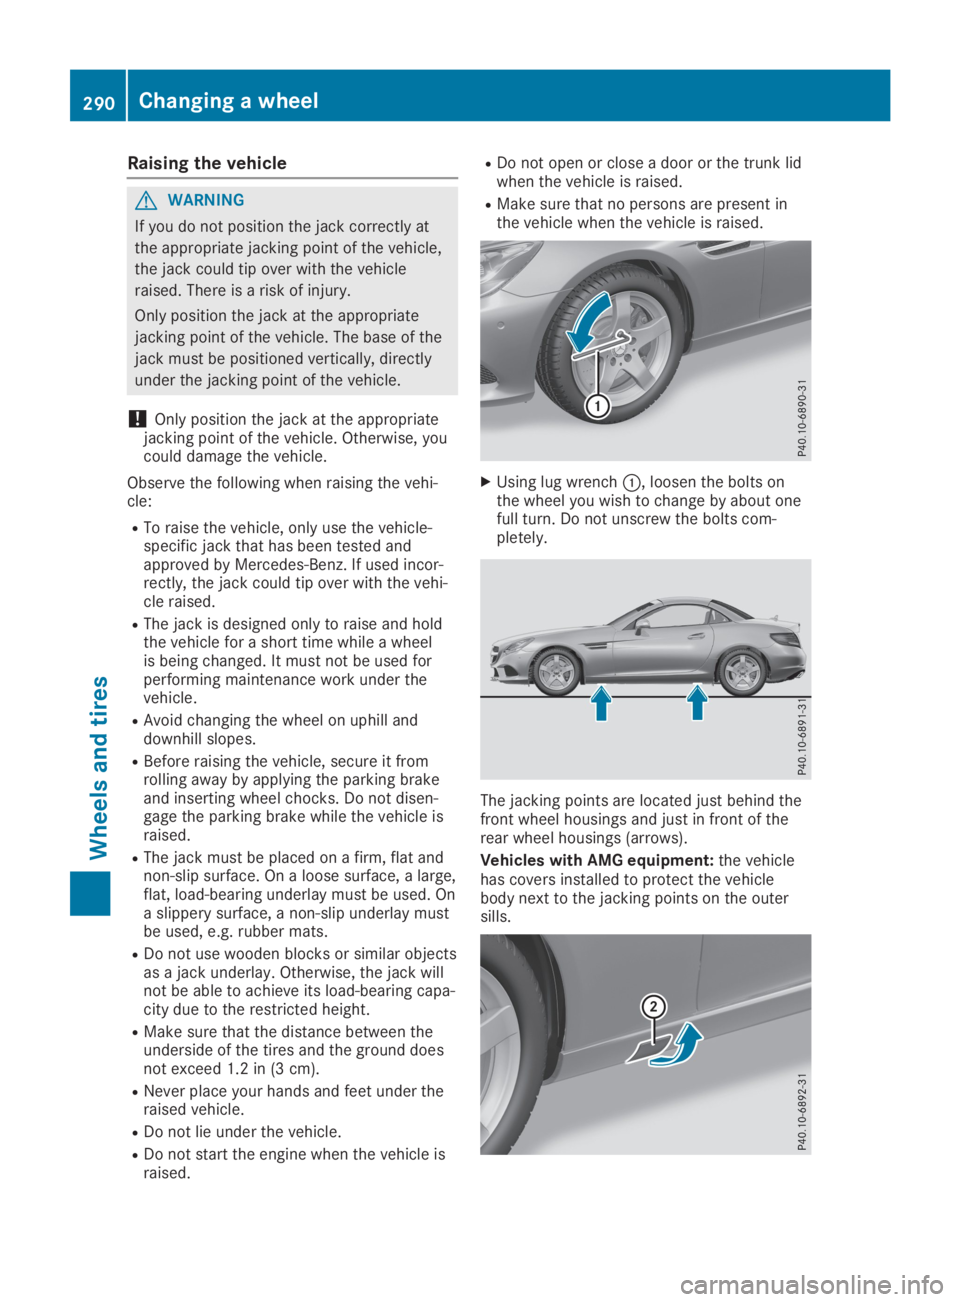
XUsing lug wrench�C, loosen the bolts onthe wheel you wish to change by about onefull turn. Do not unscrew the bolts com-pletely.
The jacking points are located just behind thefront wheel housings and just in front of therear wheel housings (arrows).
Vehicles with AMG equipment:the vehiclehas covers installed to protect the vehiclebody next to the jacking points on the outersills.
290Changing a wheel
Wheels and tires
Page 295 of 306
These tires have been specially adapted foruse with the control systems, such as ABS
or ESP®, and are marked as follows:
RMO = Mercedes-Benz Original
RMOE = Mercedes-Benz Original Extended(tires featuring run-flat characteristics)
RMO1 = Mercedes-Benz Original (only cer-tain AMG tires)
Mercedes-Benz Original Extended tires mayonly be used on wheels that have been spe-cifically approved by Mercedes-Benz.
Only use tires, wheels or accessories testedand approved by Mercedes-Benz. Certaincharacteristics, e.g. handling, vehicle noiseemissions or fuel consumption, may other-wise be adversely affected. In addition,when driving with a load, tire dimension var-iations could cause the tires to come intocontact with the bodywork and axle compo-nents. This could result in damage to thetires or the vehicle.
Mercedes-Benz accepts no liability for dam-age resulting from the use of tires, wheelsor accessories other than those tested andapproved.
Information on tires, wheels and approvedcombinations can be obtained from anyqualified specialist workshop.
!Retreaded tires are neither tested nor rec-ommended by Mercedes-Benz, since previ-ous damage cannot always be detected onretreaded tires. As a result, Mercedes-Benzcannot guarantee vehicle safety if retreadedtires are mounted. Do not mount used tiresif you have no information about their previ-ous usage.
The recommended pressures for various oper-ating conditions can be found:
Ron the Tire and Loading Information placardon the B-pillar on the driver's side
Rin the tire pressure table on the fuel fillerflap
Observe the notes on recommended tire pres-sures under various operating conditions(Ypage 270).
Check tire pressures regularly, and only whenthe tires are cold. Comply with the mainte-nance recommendations of the tire manufac-turer in the vehicle document wallet.
Notes on the vehicle equipment – alwaysequip the vehicle:
Rwith tires of the same size on a given axle(left and right)
Rwith the same type of tires at a given time(summer tires, winter tires, MOExtendedtires)
Exception: it is permissible to mount a dif-ferent type or make in the event of a flattire. Observe the "MOExtended tires (tireswith run-flat characteristics)" section(Ypage 253).
Vehicles equipped with MOExtended tires arenot equipped with a TIREFIT kit at the factory.It is therefore recommended that you addition-ally equip your vehicle with a TIREFIT kit if youmount tires that do not feature run-flat charac-teristics, e.g. winter tires. A TIREFIT kit may beobtained from a qualified specialist workshop.
Emergency spare wheel
Important safety notes
GWARNING
The wheel or tire size as well as the tire type
of the spare wheel or emergency spare
wheel and the wheel to be replaced may dif-
fer. Mounting an emergency spare wheel
may severely impair the driving characteris-
tics. There is a risk of an accident.
To avoid hazardous situations:
Radapt your driving style accordingly and
drive carefully.
Rnever mount more than one spare wheel
or emergency spare wheel that differs in
size.
Ronly use a spare wheel or emergency
spare wheel of a different size briefly.
Rdo not switch ESP®off.
Rhave a spare wheel or emergency spare
wheel of a different size replaced at the
nearest qualified specialist workshop.
Observe that the wheel and tire dimen-
sions as well as the tire type must be cor-
rect.
Emergency spare wheel293
Wheels and tires
Z
Page 296 of 306
When using an emergency spare wheel orspare wheel of a different size, you must notexceed the maximum speed of 50 mph(80 km/h).
Snow chains must not be mounted on emer-gency spare wheels.
General notes
You can ask for information regarding permit-ted emergency spare wheels at an authorizedMercedes-Benz Center.
You should regularly check the pressure of theemergency spare wheel, particularly prior tolong trips, and correct the pressure as neces-sary (Ypage 270). The value on the wheel isvalid.
An emergency spare wheel may also be moun-ted against the direction of rotation. Observethe time restriction on use as well as thespeed limitation specified on the emergencyspare wheel.
Replace the tires after six years at the latest,regardless of wear. This also applies to theemergency spare wheel.
When you are driving with the collapsiblespare wheel mounted, the tire pressure losswarning system or the tire pressure monitorcannot function reliably. Only restart the tirepressure loss warning system or tire pressuremonitor when the defective wheel has beenreplaced with a new wheel.
Vehicles with tire pressure monitor:aftermounting an emergency spare wheel, the sys-tem may still display the tire pressure of theremoved wheel for a few minutes. The valuedisplayed for the mounted emergency sparewheel is not the same as the current tire pres-sure of the emergency spare wheel.
Removing the emergency spare
wheel
Vehicles with a collapsible spare
wheel
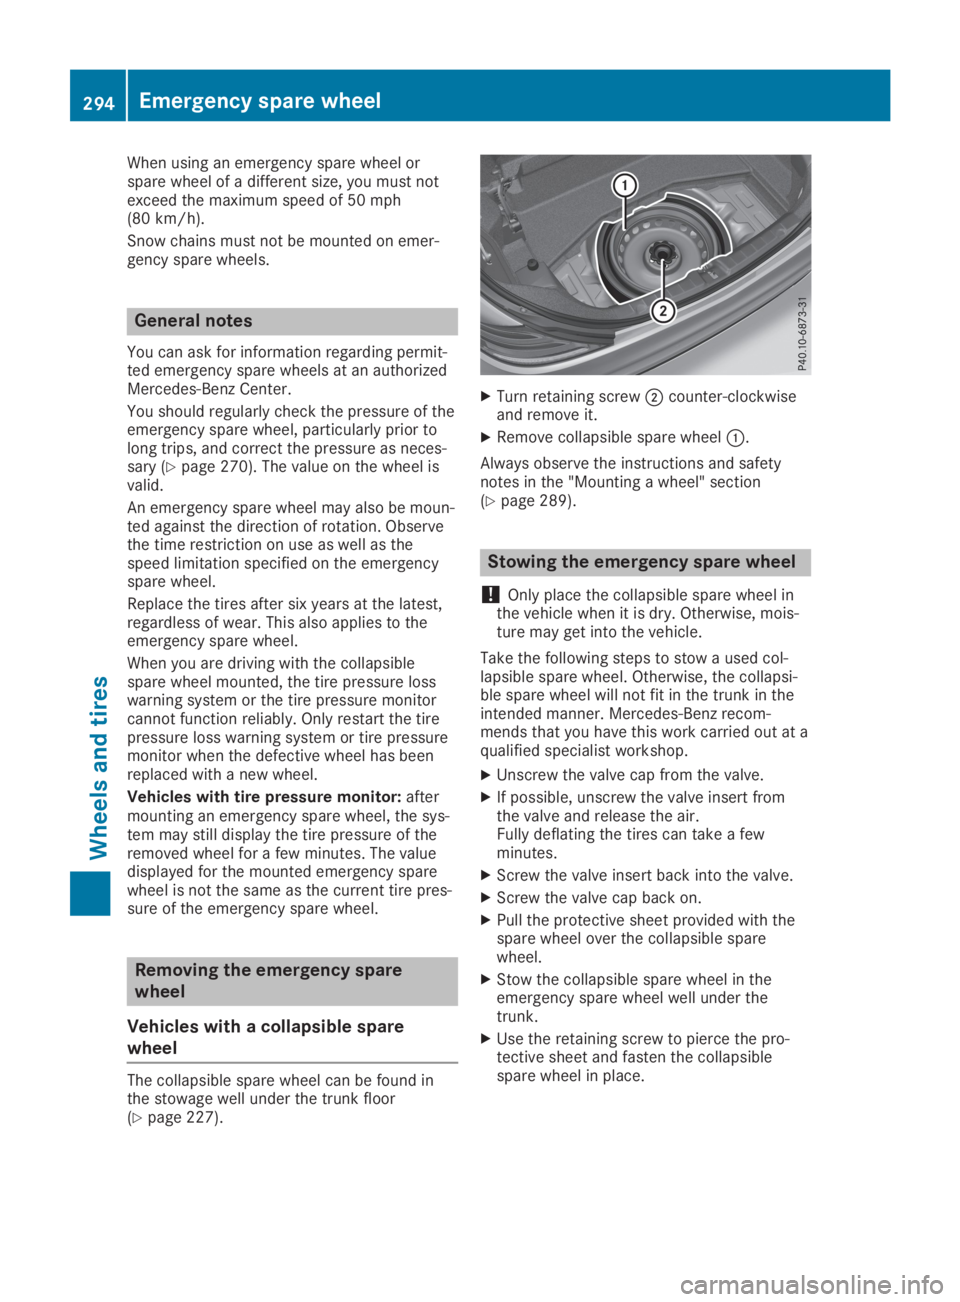
The collapsible spare wheel can be found inthe stowage well under the trunk floor(Ypage 227).
XTurn retaining screw�Dcounter-clockwiseand remove it.
XRemove collapsible spare wheel�C.
Always observe the instructions and safetynotes in the "Mounting a wheel" section(Ypage 289).
Stowing the emergency spare wheel
!Only place the collapsible spare wheel inthe vehicle when it is dry. Otherwise, mois-ture may get into the vehicle.
Take the following steps to stow a used col-lapsible spare wheel. Otherwise, the collapsi-ble spare wheel will not fit in the trunk in theintended manner. Mercedes-Benz recom-mends that you have this work carried out at aqualified specialist workshop.
XUnscrew the valve cap from the valve.
XIf possible, unscrew the valve insert fromthe valve and release the air.Fully deflating the tires can take a fewminutes.
XScrew the valve insert back into the valve.
XScrew the valve cap back on.
XPull the protective sheet provided with thespare wheel over the collapsible sparewheel.
XStow the collapsible spare wheel in theemergency spare wheel well under thetrunk.
XUse the retaining screw to pierce the pro-tective sheet and fasten the collapsiblespare wheel in place.
294Emergency spare wheel
Wheels and tires
Page 297 of 306
Inflating the collapsible spare wheel
!Inflate the collapsible spare wheel usingthe tire inflation compressor before loweringthe vehicle. The wheel rim could otherwisebe damaged.
!Do not operate the tire inflation compres-sor for longer than eight minutes at a timewithout a break. It may otherwise overheat.
The tire inflation compressor can be oper-ated again once it has cooled down.
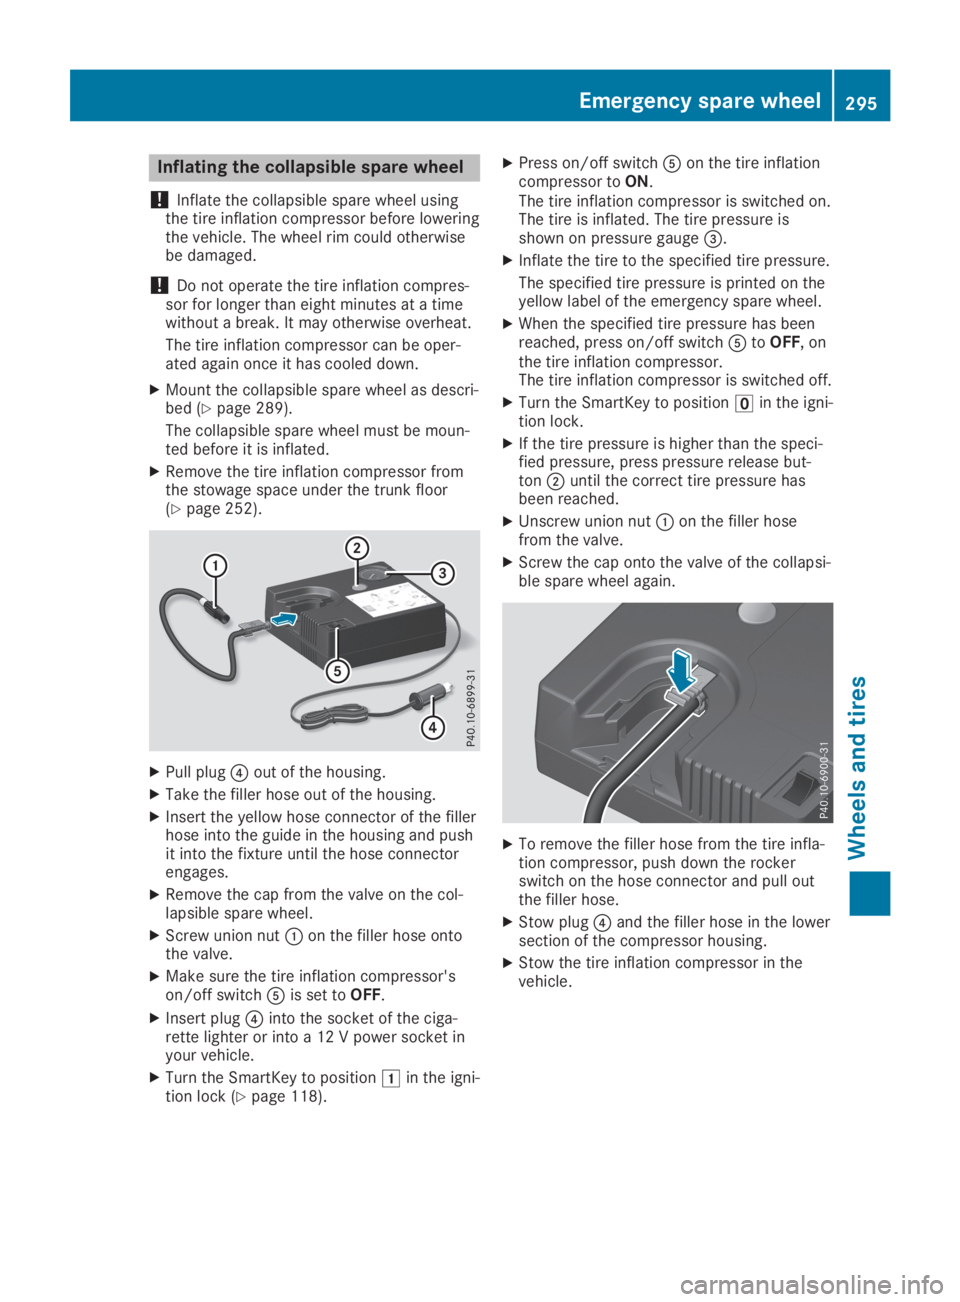
XMount the collapsible spare wheel as descri-bed (Ypage 289).
The collapsible spare wheel must be moun-ted before it is inflated.
XRemove the tire inflation compressor fromthe stowage space under the trunk floor(Ypage 252).
XPull plug�