2019 MERCEDES-BENZ SLC engine
[x] Cancel search: enginePage 247 of 306
Maintaining the time-dependent service sched-ule:
XNote down the service due date displayed inthe multifunction display before disconnect-ing the battery.
or
XAfter reconnecting the battery, subtract thebattery disconnection periods from the ser-vice date shown on the display.
Hiding service displays
XPress the�vor�8button on the steer-ing wheel.
Showing service displays
XSwitch on the ignition.
XPress�Yor�eon the steering wheelto select theServ.Serv.menu.
XPress�cor�dto select theASSYSTASSYSTPLUSPLUSsubmenu and confirm by pressing the�vbutton.The service due date appears in the multi-function display.
Information about Service
Resetting the ASSYST PLUS service
interval display
!If the ASSYST PLUS service interval dis-play has been inadvertently reset, this set-ting can be corrected at a qualified special-ist workshop.
Have service work carried out as describedin the Maintenance Booklet. This may other-wise lead to increased wear and damage tothe major assemblies or the vehicle.
A qualified specialist workshop, e.g. an author-ized Mercedes-Benz Center, will reset theASSYST PLUS service interval display after theservice work has been carried out. You canalso obtain further information on mainte-nance work, for example.
Special service requirements
The specified maintenance interval takes onlythe normal operation of the vehicle intoaccount. Service work will need to be per-formed more often if the vehicle is operatedunder arduous conditions or increased loads.
The ASSYST PLUS service interval display isonly an aid. The driver of the vehicle is respon-sible for whether service work will need to beperformed more frequently than required as aresult of the actual operating conditionsand/or loads.
Examples of arduous operating conditions:
Rregular city driving with frequent intermedi-ate stops
Rthe vehicle is primarily used to travel shortdistances
Rfrequent use in mountainous terrain or onpoor road surfaces
Rthe engine is often left idling for long peri-ods
Rparticularly dusty conditions, or if air-recir-culation mode is frequently used
In these or similar operating conditions, havethe interior filter, air filter, engine oil and oil fil-ter, for example, changed more frequently.Under arduous operating conditions, the tiresmust be checked more often. Further informa-tion can be obtained at a qualified specialistworkshop.
Driving abroad
An extensive Mercedes-Benz Service networkis also available in other countries. You canobtain further information from any authorizedMercedes-Benz Service Center.
Care
Notes on care
HEnvironmental note
Dispose of empty packaging and cleaning
cloths in an environmentally responsible
manner.
!When cleaning your car, do not use:
Rdry, coarse or hard cloths
Rabrasive cleaning agents
Care245
Maintenance and care
Z
Page 255 of 306
teristics, e.g. winter tires. A TIREFIT kit may beobtained from a qualified specialist workshop.
Information on changing and mounting wheels(Ypage 288).
XStop the vehicle on solid, non-slippery andlevel ground, as far away as possible fromtraffic.
XSwitch on the hazard warning lamps.
XSecure the vehicle against rolling away(Ypage 134).
XIf possible, bring the front wheels into thestraight-ahead position.
XSwitch off the engine.
XVehicles without KEYLESS-GO:removethe SmartKey from the ignition lock.
XVehicles with KEYLESS-GO:open the driv-er's door.The vehicle electronics are now in position�Z. This is the same as the SmartKey havingbeen removed.
XVehicles with KEYLESS-GO:remove theStart/Stop button from the ignition lock(Ypage 118).
XMake sure that the passengers are notendangered as they do so. Make sure thatno one is near the danger area while awheel is being changed. Anyone who is notdirectly assisting in the wheel changeshould, for example, stand behind the bar-rier.
XGet out of the vehicle. Pay attention to traf-fic conditions when doing so.
XClose the driver's door.
MOExtended tires (tires with run-flat
properties)
General notes
With MOExtended tires (tires with run flatcharacteristics), you can continue to drive yourvehicle even if there is a total loss of pressurein one or more tires. The affected tire must notshow any clearly visible damage.
You can recognize an MOExtended tire by theMOExtended marking which appears on thesidewall of the tire. You will find this markingnext to the tire size designation, the load-bear-ing capacity and the speed index(Ypage 283).
MOExtended tires may only be used in con-junction with an active tire pressure loss warn-ing system or with an active tire pressure mon-itor.
If a pressure loss warning messageappears in the multifunction display:
Robserve the instructions in the display mes-sages (Ypage 201)
Rcheck the tire for damage
Rif driving on, observe the following notes
The driving distance possible in run-flat modeis approximately 50 miles (80 kilometers)when the vehicle is partially laden and approx-imately 19 miles (30 kilometers) when thevehicle is fully laden.
In addition to the vehicle load, the driving dis-tance possible depends upon:
RVehicle speed
RRoad condition
ROutside temperature
The driving distance possible in run-flat modemay be reduced by extreme driving conditionsor maneuvers, or it can be increased through amoderate style of driving.
The driving distance possible in run-flat modeis counted from the moment the tire pressureloss warning appears in the multifunction dis-play.
You must not exceed a maximum designspeed of 50 mph (80 km/h).
When replacing one or all tires, please observethe following specifications for your vehicle'stires:
RSize
RType and
RThe "MOExtended" mark
If a tire has gone flat and cannot be replacedwith an MOExtended tire, a standard tire maybe used as a temporary measure. Make surethat you use the proper size and type (summeror winter tire).
Vehicles equipped with MOExtended tires arenot equipped with a TIREFIT kit at the factory.It is therefore recommended that you addition-ally equip your vehicle with a TIREFIT kit if youmount tires that do not feature run-flat charac-teristics, e.g. winter tires. A TIREFIT kit can beobtained from a qualified specialist workshop,for example.
Flat tire253
Breakdown assistance
Page 260 of 306
Always make sure that neither you nor the bat-tery is electrostatically charged. A build-up ofelectrostatic charge can be caused, for exam-ple:
Rby wearing clothing made from syntheticfibers
Rdue to friction between clothing and seats
Rif you push or pull the battery across thecarpet or other synthetic materials
Rif you wipe the battery with a cloth
GWARNING
During the charging process, a battery pro-
duces hydrogen gas. If a short circuit occurs
or sparks are created, the hydrogen gas can
ignite. There is a risk of an explosion.
RMake sure that the positive terminal of a
connected battery does not come into
contact with vehicle parts.
RNever place metal objects or tools on a
battery.
RIt is important that you observe the
described order of the battery terminals
when connecting and disconnecting a bat-
tery.
RWhen jump-starting, make sure that the
battery poles with identical polarity are
connected.
RIt is particularly important to observe the
described order when connecting and dis-
connecting the jumper cables.
RNever connect or disconnect the battery
terminals while the engine is running.
GWARNING
Battery acid is caustic. There is a risk of
injury.
Avoid contact with skin, eyes or clothing. Do
not inhale any battery gases. Do not lean
over the battery. Keep children away from
batteries. Wash away battery acid immedi-
ately with plenty of clean water and seek
medical attention.
HEnvironmental note
Batteries contain pollutants.
It is illegal to dispose of
them with the household
rubbish. They must be col-
lected separately and dis-
posed of in an environmen-
tally responsible recycling
system.
Dispose of batteries in an
environmentally responsible
manner. Take discharged
batteries to a qualified spe-
cialist workshop or to a col-
lection point for used bat-
teries.
!Have the battery regularly checked at aqualified specialist workshop.
Comply with the service intervals in theMaintenance Booklet, or contact a qualifiedspecialist workshop for more information.
!Always have work on batteries carried outat a qualified specialist workshop.
Should it, in exceptional circumstances, beabsolutely necessary to disconnect the 12-volt battery yourself, please observe the fol-lowing:
RSecure the vehicle to prevent it from roll-ing away.
RSwitch off the ignition.
RDisconnect the negative terminal first andthen the positive terminal.
The transmission is locked in position�]after disconnecting the battery.
After the work has been done, install thebattery and replace the cover of the positiveterminal clamp firmly.
Comply with safety precautions and take pro-tective measures when handling batteries.
Risk of explosion.
Fire, open flames and smoking areprohibited when handling the bat-tery. Avoid creating sparks.
258Battery (vehicle)
Breakdo wn assis tan ce
Page 261 of 306
Battery acid is caustic. Avoid con-tact with skin, eyes or clothing.
Wear suitable protective clothing,especially gloves, apron and face-guard.
Rinse any acid spills immediatelywith clear water. Contact a physi-cian if necessary.
Wear eye protection.
Keep children away.
Observe this Operator's Manual.
For safety reasons, Mercedes-Benz recom-mends that you only use batteries which havebeen tested and approved for your vehicle byMercedes-Benz. These batteries provideincreased impact protection to prevent vehicleoccupants from suffering acid burns shouldthe battery be damaged in the event of anaccident.
In order for the battery to achieve the maxi-mum possible service life, it must always besufficiently charged.
Like other batteries, the vehicle battery maydischarge over time if you do not use the vehi-cle. In this case, have the battery disconnec-ted at a qualified specialist workshop. You canalso charge the battery with a charger recom-mended by Mercedes-Benz. Contact a quali-fied specialist workshop for further informa-tion.
Have the battery condition of charge checkedmore frequently if you use the vehicle mainlyfor short trips or if you leave it standing idlefor a lengthy period. Consult a qualified spe-cialist workshop if you wish to leave your vehi-cle parked for a long period of time.
Remove the SmartKey if you park the vehicleand do not require any electrical consumers.The vehicle will then use very little energy,thus conserving battery power.
If the power supply has been interrupted, e.g.if you reconnect the battery, you will have to:
Rreset the function for automatically foldingthe exterior mirrors in/out by folding themirrors out once (Ypage 93)
Rset the clock
On vehicles with a multimedia system, thetime is set automatically.
Charging the battery
GWARNING
During charging and jump-starting, explosive
gases can escape from the battery. There is
a risk of an explosion.
Particularly avoid fire, open flames, creating
sparks and smoking. Ensure there is suffi-
cient ventilation while charging and jump-
starting. Do not lean over a battery.
GWARNING
Battery acid is caustic. There is a risk of
injury.
Avoid contact with skin, eyes or clothing. Do
not inhale any battery gases. Do not lean
over the battery. Keep children away from
batteries. Wash away battery acid immedi-
ately with plenty of clean water and seek
medical attention.
GWARNING
A discharged battery can freeze at tempera-
tures below freezing point. When jump-start-
ing the vehicle or charging the battery,
gases can escape from the battery. There is
a risk of an explosion.
Allow the frozen battery to thaw out before
charging it or jump-starting.
!Only use battery chargers with a maximumcharging voltage of 14.8V.
!Onlycharge the battery using the jump-starting connection point.
The jump-starting connection point is in theengine compartment.
Battery (vehicle)259
Breakdown assistance
Z
Page 262 of 306
If the indicator/warning lamps do not light upat low temperatures, it is very likely that thedischarged battery has frozen. In this case,you may neither charge the battery nor jump-start the vehicle. The service life of a thawed-out battery may be shorter. The starting char-acteristics can be impaired, particularly at lowtemperatures. Have the thawed-out batterychecked at a qualified specialist workshop.
Read the battery charger's operating instruc-tions before charging the battery.
XOpen the hood.
XConnect the battery charger to the positiveterminal and ground point in the same orderas when connecting the donor battery in thejump-starting procedure (Ypage 260).
Replacing the 12 V battery
Observe the notes on the 12 V battery(Ypage 257).
Mercedes-Benz recommends that you havethe 12 V battery replaced at a qualified spe-cialist workshop, e.g. at an authorizedMercedes-Benz Center.
If you want to replace the battery yourself,observe the following notes:
RAlways replace a defective battery with abattery which meets the specific require-ments of the vehicle.
The vehicle is equipped with an AGM(Absorbent Glass Mat) technology battery.Full vehicle functionality is only guaranteedwith an AGM battery. For safety reasons,Mercedes-Benz recommends that you onlyuse batteries which have been tested andapproved for your vehicle by Mercedes-Benz.
RUse detachable parts such as breatherhoses, angled connecting pieces or terminalcovers from the battery which is to bereplaced.
RMake sure that the vent hose is always con-nected to the original opening on the bat-tery side.
RInstall existing or supplied cell caps to pre-vent gases or battery acid from escaping.
RMake sure that the detachable parts areconnected again in the same way.
Jump-starting
For the jump-starting procedure, use only the jump-starting connection point in the engine com-partment, consisting of a positive terminal and a ground point.
GWARNING
Battery acid is caustic. There is a risk of injury.
Avoid contact with skin, eyes or clothing. Do not inhale any battery gases. Do not lean over the
battery. Keep children away from batteries. Wash away battery acid immediately with plenty of
clean water and seek medical attention.
GWARNING
During charging and jump-starting, explosive gases can escape from the battery. There is a
risk of an explosion.
Particularly avoid fire, open flames, creating sparks and smoking. Ensure there is sufficient
ventilation while charging and jump-starting. Do not lean over a battery.
GWARNING
During the charging process, a battery produces hydrogen gas. If a short circuit occurs or
sparks are created, the hydrogen gas can ignite. There is a risk of an explosion.
260Jump-starting
Breakdown assistance
Page 263 of 306
RMake sure that the positive terminal of a connected battery does not come into contact with
vehicle parts.
RNever place metal objects or tools on a battery.
RIt is important that you observe the described order of the battery terminals when connect-
ing and disconnecting a battery.
RWhen jump-starting, make sure that the battery poles with identical polarity are connected.
RIt is particularly important to observe the described order when connecting and disconnect-
ing the jumper cables.
RNever connect or disconnect the battery terminals while the engine is running.
GWARNING
A discharged battery can freeze at temperatures below freezing point. When jump-starting the
vehicle or charging the battery, gases can escape from the battery. There is a risk of an explo-
sion.
Allow the frozen battery to thaw out before charging it or jump-starting.
!Avoid repeated and lengthy starting attempts. Otherwise, the catalytic converter could bedamaged by the non-combusted fuel.
If the indicator/warning lamps do not light up at low temperatures, it is very likely that the dis-charged battery has frozen. In this case, you may neither charge the battery nor jump-start thevehicle. The service life of a thawed-out battery may be shorter. The starting characteristics canbe impaired, particularly at low temperatures. Have the thawed-out battery checked at a quali-fied specialist workshop.
Do not start the vehicle using a rapid charging device. If your vehicle's battery is discharged, theengine can be jump-started from another vehicle or from a donor battery using jumper cables.Observe the following points:
RThe battery is not accessible in all vehicles. If the other vehicle's battery is not accessible,jump-start the vehicle using a donor battery or a jump-starting device.
RYou may only jump-start the vehicle when the engine and exhaust system are cold.
RDo not start the engine if the battery is frozen. Let the battery thaw first.
ROnly jump-start from batteries with a 12 V voltage rating.
ROnly use jumper cables which have a sufficient cross-section and insulated terminal clamps.
RIf the battery is fully discharged, leave the battery that is being used to jump-start connectedfor a few minutes before attempting to start. This charges the battery slightly.
RMake sure that the two vehicles do not touch.
Make sure that:
RThe jumper cables are not damaged.
RBare parts of the terminal clamp do not come into contact with other metal parts while thejumper cables are connected to the battery.
RThe jumper cables cannot come into contact with parts which can move when the engine isrunning, such as the V-belt pulley or the fan.
XSecure the vehicle by applying the electric parking brake.
XShift the transmission to position�].
XMake sure that the ignition is switched off. All indicator lamps in the instrument cluster mustbe off. When using the SmartKey, turn the SmartKey to position�
Page 291 of 306
Clean the contact surfaces of the wheel andthe brake disc thoroughly every time a wheelis rotated. Check the tire pressure and, if nec-essary, restart the tire pressure loss warningsystem or the tire pressure monitor.
Direction of rotation
Tires with a specified direction of rotation haveadditional benefits, e.g. if there is a risk ofhydroplaning. These advantages can only begained if the tires are installed correspondingto the direction of rotation.
An arrow on the sidewall of the tire indicatesits correct direction of rotation.
Storing wheels
Store wheels that are not being used in a cool,dry and preferably dark place. Protect the tiresfrom oil, grease, gasoline and diesel.
Mounting a wheel
Preparing the vehicle
XStop the vehicle on solid, non-slippery andlevel ground.
XApply the electric parking brake manually.
XBring the front wheels into the straight-ahead position.
XShift the transmission to position�].
XSwitch off the engine.
XVehicles without KEYLESS-GO:removethe SmartKey from the ignition lock.
XVehicles with KEYLESS-GO:open the driv-er's door.The vehicle electronics now have status0.This is the same as the SmartKey havingbeen removed.
XVehicles with KEYLESS-GO:remove theStart/Stop button from the ignition lock(Ypage 118).
XIf included in the vehicle equipment, removethe tire-change tool kit from the vehicle.
XSafeguard the vehicle against rolling away.
iDue to differences in vehicle equipment,not all vehicles are equipped with a tire-change tool kit. For information on which
tools are required to perform a wheelchange on your vehicle, consult an author-ized Mercedes-Benz Center.
Necessary tire-changing tools can include,for example:
RJack
RWheel chock
RLug wrench
Securing the vehicle to prevent it from
rolling away
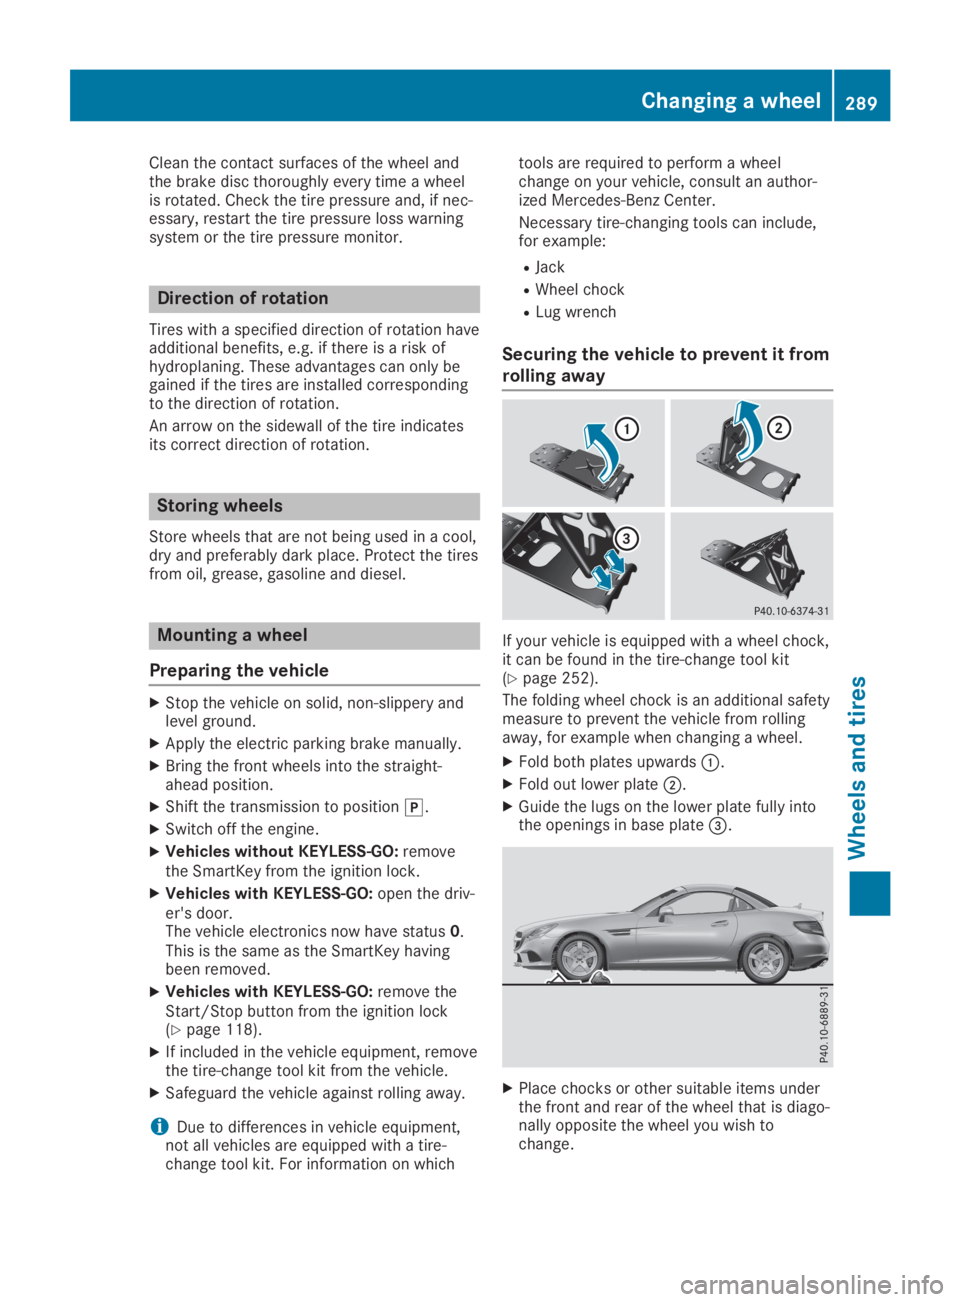
If your vehicle is equipped with a wheel chock,it can be found in the tire-change tool kit(Ypage 252).
The folding wheel chock is an additional safetymeasure to prevent the vehicle from rollingaway, for example when changing a wheel.
XFold both plates upwards�C.
XFold out lower plate�D.
XGuide the lugs on the lower plate fully intothe openings in base plate�
Page 292 of 306
Raising the vehicle
GWARNING
If you do not position the jack correctly at
the appropriate jacking point of the vehicle,
the jack could tip over with the vehicle
raised. There is a risk of injury.
Only position the jack at the appropriate
jacking point of the vehicle. The base of the
jack must be positioned vertically, directly
under the jacking point of the vehicle.
!Only position the jack at the appropriatejacking point of the vehicle. Otherwise, youcould damage the vehicle.
Observe the following when raising the vehi-cle:
RTo raise the vehicle, only use the vehicle-specific jack that has been tested andapproved by Mercedes-Benz. If used incor-rectly, the jack could tip over with the vehi-cle raised.
RThe jack is designed only to raise and holdthe vehicle for a short time while a wheelis being changed. It must not be used forperforming maintenance work under thevehicle.
RAvoid changing the wheel on uphill anddownhill slopes.
RBefore raising the vehicle, secure it fromrolling away by applying the parking brakeand inserting wheel chocks. Do not disen-gage the parking brake while the vehicle israised.
RThe jack must be placed on a firm, flat andnon-slip surface. On a loose surface, a large,flat, load-bearing underlay must be used. Ona slippery surface, a non-slip underlay mustbe used, e.g. rubber mats.
RDo not use wooden blocks or similar objectsas a jack underlay. Otherwise, the jack willnot be able to achieve its load-bearing capa-city due to the restricted height.
RMake sure that the distance between theunderside of the tires and the ground doesnot exceed 1.2 in (3 cm).
RNever place your hands and feet under theraised vehicle.
RDo not lie under the vehicle.
RDo not start the engine when the vehicle israised.
RDo not open or close a door or the trunk lidwhen the vehicle is raised.
RMake sure that no persons are present inthe vehicle when the vehicle is raised.
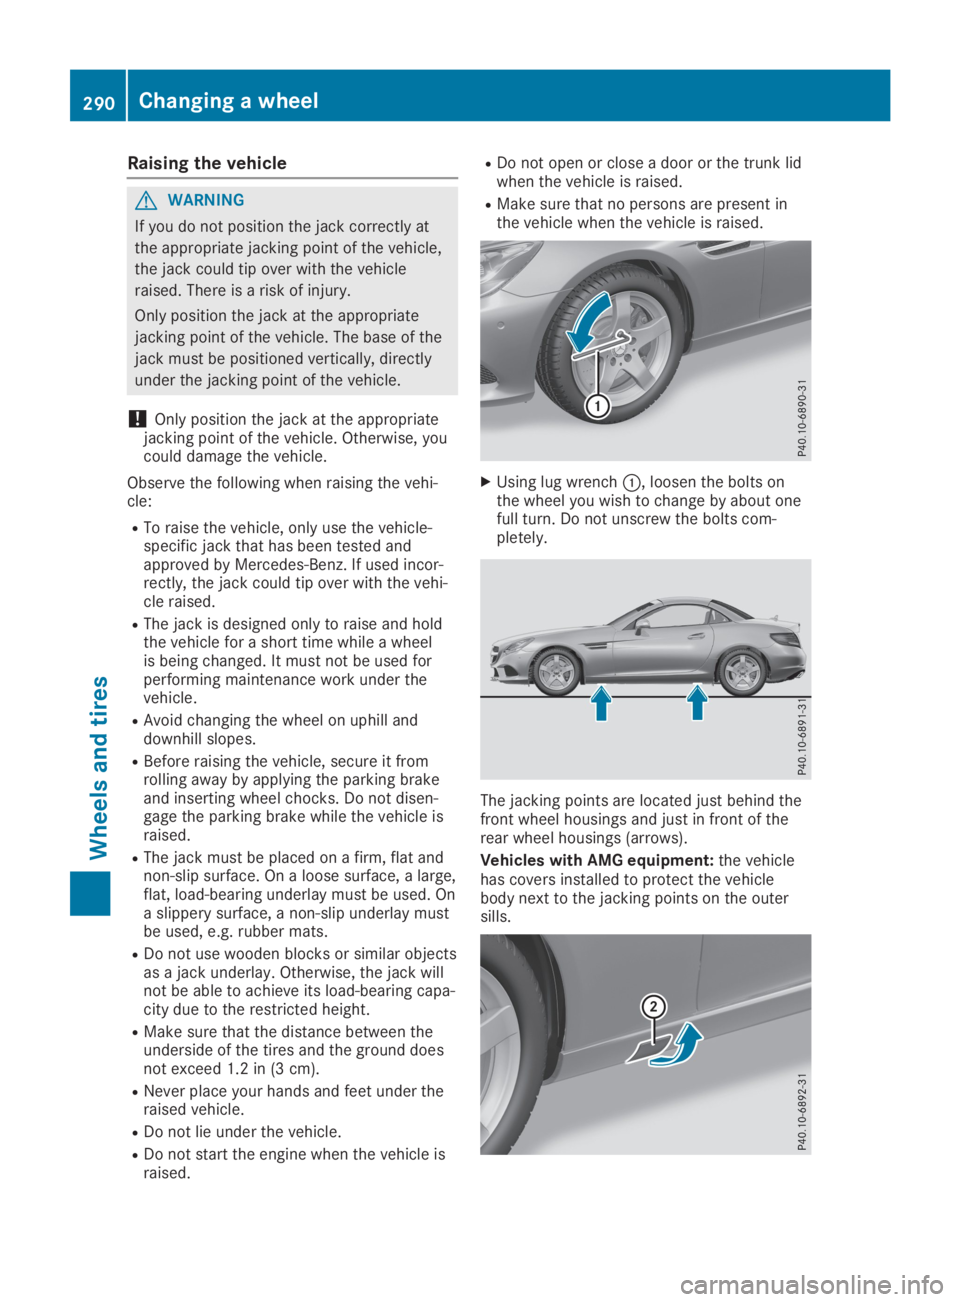
XUsing lug wrench�C, loosen the bolts onthe wheel you wish to change by about onefull turn. Do not unscrew the bolts com-pletely.
The jacking points are located just behind thefront wheel housings and just in front of therear wheel housings (arrows).
Vehicles with AMG equipment:the vehiclehas covers installed to protect the vehiclebody next to the jacking points on the outersills.
290Changing a wheel
Wheels and tires