2019 MERCEDES-BENZ SL CLASS warning
[x] Cancel search: warningPage 303 of 330

stantly, the tire pressure monitor is malfunc-tioning.
In addition to the warning lamp, a messageappears in the multifunction display. Observethe information on display messages(Ypage 227).
It may take up to ten minutes for a malfunc-tion of the tire pressure monitor to be indica-ted. A malfunction will be indicated by the tirepressure warning lamp flashing for approx-imately one minute and then remaining lit.When the malfunction has been rectified, thetire pressure warning lamp goes out after afew minutes of driving.
The tire pressure values indicated by the on-board computer may differ from those meas-ured at a gas station with a pressure gage. Thetire pressures shown by the on-board com-puter refer to those measured at sea level. Athigh altitudes, the tire pressure values indica-ted by a pressure gage are higher than thoseshown by the on-board computer. In this case,do not reduce the tire pressures.
The operation of the tire pressure monitor canbe affected by interference from radio trans-mitting equipment (e.g. radio headphones,two-way radios) that may be being operated inor near the vehicle.
Checking the tire pressure electroni-
cally
XMake sure that the SmartKey is in position�H(Ypage 126) in the ignition lock.
XPress the�Yor�ebutton on the steer-ing wheel to select theServ.Serv.menu.
XPress the�cor�dbutton to selectTire PressureTire Pressure.
XPress�v.The current tire pressure of each tire isshown in the multifunction display.
If the vehicle has been parked for over20 minutes, theTire pressure will beTire pressure will bedisplayed after driving a few minutesdisplayed after driving a few minutesmessage appears.
After a teach-in process, the tire pressuremonitor automatically detects new wheels ornew sensors. As long as a clear allocation ofthe tire pressure value to the individual wheelsis not possible, theTire Pressure MonitorTire Pressure MonitorActiveActivedisplay message is shown instead ofthe tire pressure display. The tire pressuresare already being monitored.
Tire pressure monitor warning mes-
sages
The tire pressure monitor detects a pressureloss in one or more tires:
RIf the tire pressure monitor detects a pres-sure loss in one or more tires, a warningmessage is shown in the multifunction dis-play. The yellow tire pressure warning lampthen lights up.
RIf thePlease Correct Tire PressurePlease Correct Tire Pressuremessage appears in the multifunction dis-play, the tire pressure in at least one tire istoo low. The tire pressure must be correctedwhen the opportunity arises.
RIf theCheck TiresCheck Tiresmessage appears in themultifunction display, the tire pressure in atleast one tire has dropped significantly. Thetires must be checked.
RIf theWarning Tire MalfunctionWarning Tire Malfunctionmes-sage appears in the multifunction display,the tire pressure in at least one tire hasdropped suddenly. The tires must bechecked.
Observe the instructions and safety notes inthe display messages in the "Tires" section(Ypage 227).
If the wheel positions on the vehicle are rota-ted, the tire pressures may be displayed forthe wrong positions for a short time. This isrectified after a few minutes of driving, and thetire pressures are displayed for the correctpositions.
Restarting the tire pressure monitor
When you restart the tire pressure monitor, allexisting warning messages are deleted and thewarning lamps go out. The monitor uses thecurrently set tire pressures as the referencevalues for monitoring. In most cases, the tirepressure monitor will automatically detect thenew reference values after you have changedthe tire pressure. However, you can also setreference values manually as described here.The tire pressure monitor then monitors thenew tire pressure values.
XSet the tire pressure to the value recom-mended for the corresponding driving situa-tion on the Tire and Loading Informationplacard on the driver's side B-pillar(Ypage 296).
Tire pressure301
Wheels and tires
Z
Page 304 of 330

Additional tire pressure values for differentloads can also be found on the tire pressuretable on the inside of the fuel filler flap(Ypage 296).
XMake sure that the tire pressure is correcton all four wheels.
XEnsure that the SmartKey is in position�Hin the ignition lock.
XPress the�Yor�ebutton on the steer-ing wheel to select theServ.Serv.menu.
XPress the�cor�dbutton to selectTire PressureTire Pressure.
XPress�v.The multifunction display shows the currenttire pressure for the individual tires or theTire pressure will be displayedTire pressure will be displayedafter driving a few minutesafter driving a few minutesmessage.
XPress the�dbutton.TheUse Current Pressures as NewUse Current Pressures as NewReference ValuesReference Valuesmessage appears in themultifunction display.
If you wish to confirm the restart:
XPress�v.TheTire Press. Monitor RestartedTire Press. Monitor Restartedmessage appears in the multifunction dis-play.
After driving for a few minutes, the systemchecks whether the current tire pressuresare within the specified range. The new tirepressures are then accepted as referencevalues and monitored.
If you wish to cancel the restart:
XPress�8.The tire pressure values stored at the lastrestart will continue to be monitored.
Radio type approval for the tire pres-
sure monitor
CountryRadio type approval number
USAFCC ID: MRXMW2433A
FCCIC ID:MRXGG4 This devicecomplies with part 15 of theFCC rules and with licenseexempt RSS standards of Indus-try Canada. Operation is subjectto the following conditions. (1)This device may not causeharmful interference, and (2)This device must accept anyinterference received, includinginterference that may causeundesired operation. Le presentappareil est conforme d'indus-trie Canada applicables auxappareils radio exempts delicence. L'exploitation estauthorisee aux deux conditionssuivantes. (1) L'appareil ne doitpas produire de brouillage, et(2) L'autisatuer de l'appareildoit accepter tout brouillageradioelectrique subi, meme si lebrouillage est susceptible d'encompromettre le fonctionne-ment. WARNING: Changes ormodifications not expresslyapproved by the party responsi-ble for compliance could voidthe user's authority to operatethe equipment. The term "IC:"before the radio certificationnumber only signifies Canadatechnical specifications weremet.
FCC ID:MRXMC34MA4 Thisdevice complies with part 15 ofthe FCC rules and with licenseexempt RSS standards of Indus-try Canada. Operation is subjectto the following conditions. (1)This device may not causeharmful interference, and (2)This device must accept anyinterference received, includinginterference that may causeundesired operation. Le presentappareil est conforme d'indus-trie Canada applicables auxappareils radio exempts de
302Tire pressure
Wheels and tires
Page 305 of 330

CountryRadio type approval number
licence. L'exploitation estauthorisee aux deux conditionssuivantes. (1) L'appareil ne doitpas produire de brouillage, et(2) L'autisatuer de l'appareildoit accepter tout brouillageradioelectrique subi, meme si lebrouillage est susceptible d'encompromettre le fonctionne-ment. WARNING: Changes ormodifications not expresslyapproved by the party responsi-ble for compliance could voidthe user's authority to operatethe equipment. The term "IC:"before the radio certificationnumber only signifies Canadatechnical specifications weremet.
CanadaIC: 2546A-MW2433A
IC:2546A-GG4 This device com-plies with part 15 of the FCCrules and with license exemptRSS standards of Industry Can-ada. Operation is subject to thefollowing conditions. (1) Thisdevice may not cause harmfulinterference, and (2) This devicemust accept any interferencereceived, including interferencethat may cause undesired oper-ation. Le present appareil estconforme d'industrie Canadaapplicables aux appareils radioexempts de licence. L'exploita-tion est authorisee aux deuxconditions suivantes. (1) L'ap-pareil ne doit pas produire debrouillage, et (2) L'autisatuer del'appareil doit accepter toutbrouillage radioelectrique subi,meme si le brouillage est sus-ceptible d'en compromettre lefonctionnement. WARNING:Changes or modifications notexpressly approved by the partyresponsible for compliancecould void the user's authorityto operate the equipment. Theterm "IC:" before the radio cer-tification number only signifiesCanada technical specificationswere met.
CountryRadio type approval number
IC: 2546A-MC34MA4
Loading the vehicle
Instruction labels for tires and loads
GWARNING
Overloaded tires can overheat, causing a
blowout. Overloaded tires can also impair
the steering and driving characteristics and
lead to brake failure. There is a risk of acci-
dent.
Observe the load rating of the tires. The load
rating must be at least half of the GAWR of
your vehicle. Never overload the tires by
exceeding the maximum load.
Two instruction labels on your vehicle showthe maximum possible load.
(1) The Tire and Loading Information placardis on the B-pillar on the driver's side. TheTire and Loading Information placardshows the maximum permissible numberof occupants and the maximum permissi-ble vehicle load. It also contains details ofthe tire sizes and corresponding pressuresfor tires mounted at the factory.
(2) The vehicle identification plate is on theB-pillar on the driver's side. The vehicleidentification plate informs you of thegross vehicle weight rating. It is made upof the vehicle weight, all vehicle occu-pants, the fuel and the cargo. You can alsofind information about the maximum grossaxle weight rating on the front and rearaxle.
The maximum gross axle weight rating isthe maximum weight that can be carriedby one axle (front or rear axle). Neverexceed the maximum load or the maxi-mum gross axle weight rating for the frontor rear axle.
Loading the vehicle303
Wheels and tires
Z
Page 309 of 330

surfaces that are not icy or covered with snow.Take appropriate care when driving.
Temperature
GWARNING
The temperature grade for this tire is estab-
lished for a tire that is properly inflated and
not overloaded. Excessive speed, underinfla-
tion, or excessive loading, either separately
or in combination, can cause excessive heat
build-up and possible tire failure.
The temperature grades are A (the highest), B,and C, representing the tire's resistance to thegeneration of heat and its ability to dissipateheat when tested under controlled conditionson a specified indoor laboratory test wheel.Sustained high temperature can cause thematerial of the tire to degenerate and reducetire life, and excessive temperature can lead tosudden tire failure. The grade C correspondsto a level of performance which all passengercar tires must meet under the Federal MotorVehicle Safety Standard No. 109. Grades Band A represent higher levels of performanceon the laboratory test wheel than the minimumrequired by law.
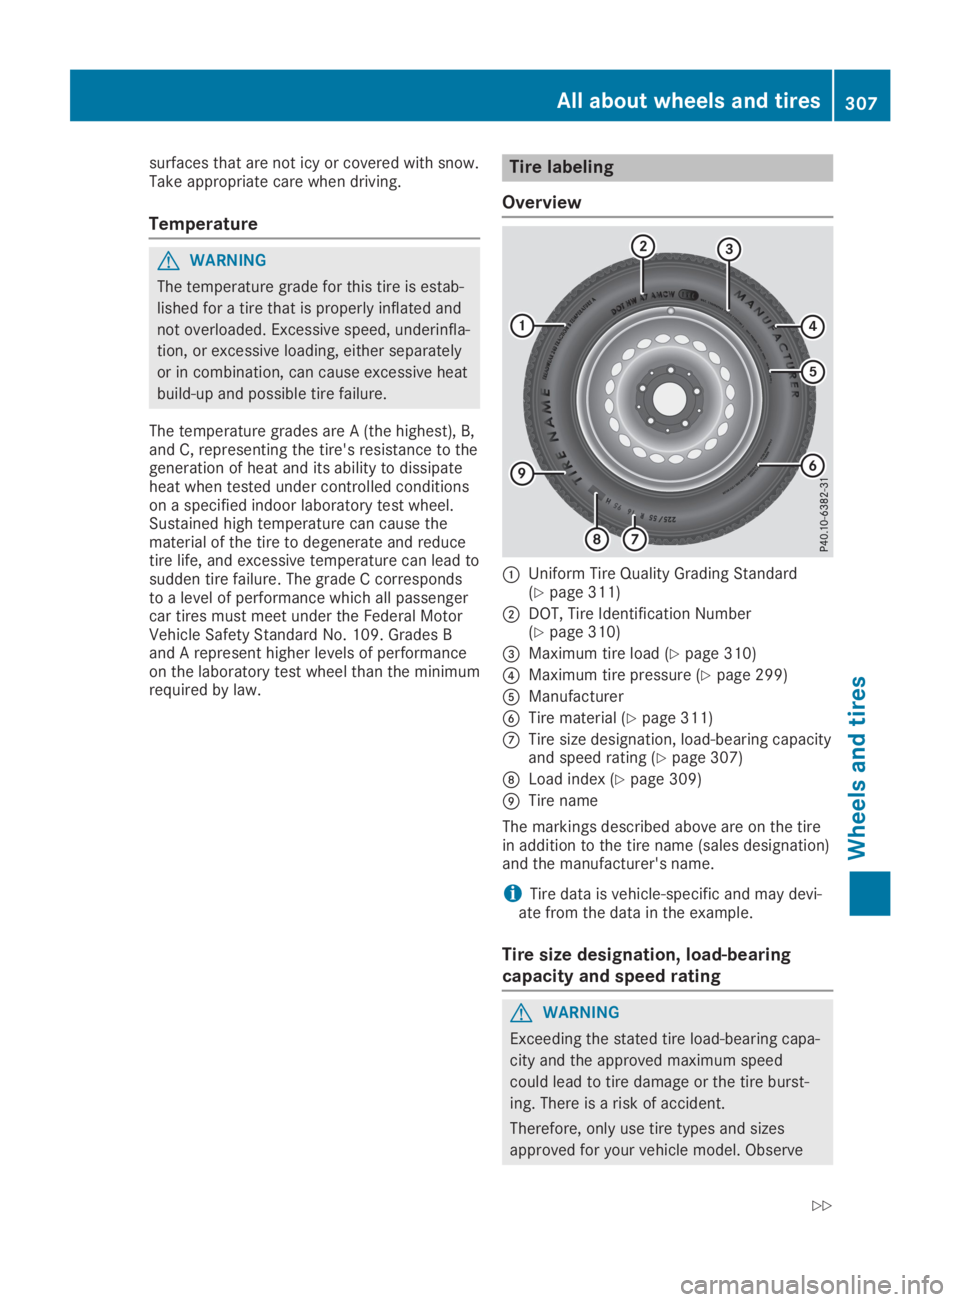
Tire labeling
Overview
�CUniform Tire Quality Grading Standard(Ypage 311)
�DDOT, Tire Identification Number(Ypage 310)
�
Page 319 of 330

GWARNING
If you tighten the wheel bolts or wheel nuts
when the vehicle is raised, the jack could tip
over. There is a risk of injury.
Only tighten the wheel bolts or wheel nuts
when the vehicle is on the ground.
Always pay attention to the instructions andsafety notes in the "Changing a wheel" section(Ypage 313).
Only use wheel bolts that have been designedfor the wheel and the vehicle. For safety rea-sons, Mercedes-Benz recommends that youonly use wheel bolts which have beenapproved for Mercedes-Benz vehicles and therespective wheel.
!Mercedes-AMG vehicles:during removaland repositioning of the wheel, the wheelrim can strike the ceramic-brake disc anddamage it. Therefore, you should proceedcarefully and get a second person assist toyou. Alternatively, you can use a secondalignment bolt.
!To prevent damage to the paintwork, holdthe wheel securely against the wheel hubwhile screwing in the first wheel bolt.
XClean the wheel and wheel hub contact sur-faces.
XSlide the wheel to be mounted onto thealignment bolt and push it on.
XTighten the wheel bolts until they are finger-tight.
XUnscrew the alignment bolt.
XTighten the last wheel bolt until it is finger-tight.
Lowering the vehicle
GWARNING
The wheels could come loose if the wheel
bolts or wheel nuts are not tightened to the
prescribed tightening torque. There is a risk
of an accident.
Ensure that the wheel bolts or wheel nuts
are tightened to the prescribed tightening
torque.
If you are not sure, do not move the vehicle.
Contact a qualified specialist workshop and
have the tightening torque checked immedi-
ately.
XTurn the crank of the jack counter-clockwiseuntil the vehicle is once again standingfirmly on the ground.
XPlace the jack to one side.
XTighten the wheel bolts evenly in a cross-wise pattern in the sequence indicated (�Cto�
Page 321 of 330

Information regarding technical data
iThe data stated here specifically refers toa vehicle with standard equipment. Consultan authorized Mercedes-Benz Center for thedata for all vehicle variants and trim levels.
Vehicle electronics
Tampering with the engine electron-
ics
!Have the engine electronics and associ-ated parts, such as control units, sensors,actuating components or electric cablesserviced only at a qualified specialist work-shop. Vehicle components may otherwisewear more quickly and the vehicle's operat-ing permit may be invalidated.
Installing two-way radios and mobile
phones (RF transmitters)
GWARNING
The electromagnetic radiation from two-way
radios can interfere with the vehicle elec-
tronics if two-way radios are manipulated or
retrofitted incorrectly. This could jeopardize
the operating safety of the vehicle. There is
a risk of an accident.
You should have all work on electrical and
electronic components carried out at a
qualified specialist workshop.
GWARNING
If you incorrectly operate two-way radios in
the vehicle, the electromagnetic radiation
may interfere with the vehicle electronics,
for example if:
Rthe two-way radio is not connected to an
exterior antenna
Rthe exterior antenna is not correctly
mounted or is not low-reflection
This could jeopardize the operating safety of
the vehicle. There is a risk of an accident.
Have the low-reflection exterior antenna
installed at a qualified specialist workshop.
Always connect two-way radios to the low-
reflection exterior antenna when operating
in the vehicle.
!The operating permit may be invalidated ifthe instructions for installation and use oftwo-way radios are not observed.
In particular, the following requirementsmust be complied with:
Ronly approved wavebands may be used
Robserve the maximum permissible outputin these wavebands
Ronly approved antenna positions may beused
Excessive levels of electromagnetic radiationmay cause damage to your health and thehealth of others. Using an exterior antennatakes into account current scientific discus-sions relating to the possible health hazardsthat may result from electromagnetic fields.
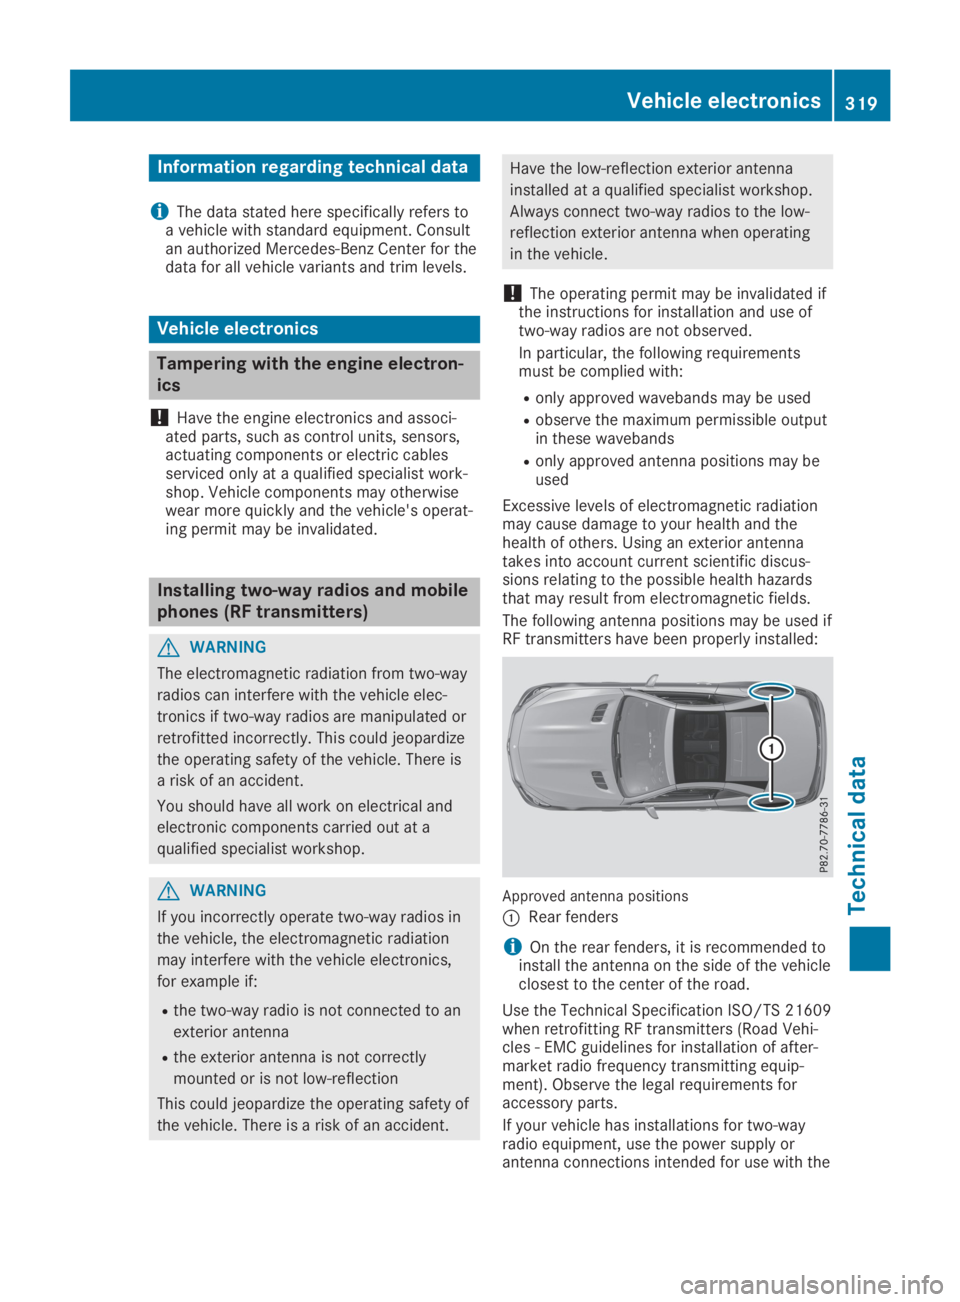
The following antenna positions may be used ifRF transmitters have been properly installed:
Approved antenna positions
�CRear fenders
iOn the rear fenders, it is recommended toinstall the antenna on the side of the vehicleclosest to the center of the road.
Use the Technical Specification ISO/TS 21609when retrofitting RF transmitters (Road Vehi-cles - EMC guidelines for installation of after-market radio frequency transmitting equip-ment). Observe the legal requirements foraccessory parts.
If your vehicle has installations for two-wayradio equipment, use the power supply orantenna connections intended for use with the
Vehicle electronics319
Technical data
Z
Page 324 of 330

Other identifications, for example:
R0 W-30
R5 W-30
R5 W-40
Fuel
Important safety notes
GWARNING
Fuel is highly flammable. Improper handling
of fuel creates a risk of fire and explosion.
Avoid fire, open flames, smoking and creat-
ing sparks under all circumstances. Switch
off the engine and, if applicable, the auxiliary
heating before refueling.
GWARNING
Fuels are toxic and harmful to health. There
is a risk of injury.
You must avoid fuels coming into contact
with skin, eyes and clothes or being swal-
lowed.
Do not inhale the fuel vapors. Keep children
away from fuels.
Keep doors and windows closed during the
refueling process.
If you or others come into contact with fuel,
observe the following points:
RImmediately rinse the fuel off your skin
with soap and water.
RIf you get fuel into your eyes, immediately
rinse your eyes throughly with clean
water. Seek medical attention immedi-
ately.
RSeek medical attention immediately if fuel
has been swallowed. Do not induce vomit-
ing.
RImmediately change out of clothing which
has come into contact with fuel.
Tank capacity
ModelTotal capa-city
All models19.8 US gal(75.0l)
ModelOf whichreserve
Mercedes‑AMG vehiclesApprox.3.7 US gal(14.0l)
All other modelsApprox.2.4 US gal(9.0 l)
Gasoline
Fuel grade
!Do not use diesel to refuel vehicles with agasoline engine. Do not switch on the igni-tion if you accidentally refuel with the wrongfuel. Otherwise, the fuel will enter the fuelsystem. Even small amounts of the wrongfuel could result in damage to the fuel sys-tem and the engine. Notify a qualified spe-cialist workshop and have the fuel tank andfuel lines drained completely.
!Only refuel using unleaded premium gradegasoline with at least 91 AKI/95 RON.
iE10 fuel contains up to 10% bioethanol.Your vehicle is E10-compatible. You canrefuel your vehicle using E10 fuel.
!Only use the fuel recommended. Operatingthe vehicle with other fuels can lead to dam-age to the fuel system, engine and exhaustsystem.
!Do not use the following:
RGasoline with more than 10% ethanol
RE100 (100% ethanol)
RGasoline with methanol
RM100(100% methanol)
RGasoline with metalliferous additives
RDiesel
Do not mix such fuels with the fuel recom-mended for your vehicle.
322Service products and filling capacities
Technical data
Page 326 of 330

ModelMB-Freigabe or MB-Approval
All models229.5
Mercedes‑AMG vehicles:use onlySAE 0W-40 or SAE 5W-40 engine oils.
iMB approval is indicated on the oil con-tainers.
Filling capacities
The following values refer to an oil changeincluding the oil filter.
Missing values were not available at time ofgoing to print.
ModelCapacity
SL 4506.9 US qt (6.5l)
SL 5508.5 US qt (8.0l)
Mercedes-AMGSL 638.9 US qt (8.5l)
Additives
!Do not use any additives in the engine oil.This could damage the engine.
Brake fluid
GWARNING
The brake fluid constantly absorbs moisture
from the air. This lowers the boiling point of
the brake fluid. If the boiling point of the
brake fluid is too low, vapor pockets may
form in the brake system when the brakes
are applied hard. This would impair braking
efficiency. There is a risk of an accident.
You should have the brake fluid renewed at
the specified intervals.
When handling brake fluid, observe the impor-tant safety notes on service products(Ypage 321).
The brake fluid change intervals can be foundin the Maintenance Booklet.
Only use brake fluid approved by Mercedes-Benz in accordance with MB-Freigabe or MB-Approval 331.0.
Information about approved brake fluid can beobtained at any qualified specialist workshopor on the Internet athttp://bevo.mercedes-benz.com.
iHave the brake fluid regularly replaced at aqualified specialist workshop and thereplacement confirmed in the MaintenanceBooklet.
Coolant
Important safety notes
GWARNING
If antifreeze comes into contact with hot
components in the engine compartment, it
may ignite. There is a risk of fire and injury.
Let the engine cool down before you add
antifreeze. Make sure that antifreeze is not
spilled next to the filler neck. Thoroughly
clean the antifreeze from components
before starting the engine.
!Only add coolant that has been premixedwith the desired antifreeze protection. Youcould otherwise damage the engine.
You can find additional notes on the coolantin the following places:
Rin the Mercedes-Benz Specifications forService Products, MB BeVo 310.1
-on the Internet athttp://bevo.mercedes-benz.com
-on the Mercedes-Benz BeVo app
Ra qualified specialized workshop
!Always use a suitable coolant mixture,even in countries where high temperaturesprevail.
Otherwise, the engine cooling system is notsufficiently protected from corrosion andoverheating.
iHave the coolant regularly replaced at aqualified specialist workshop and thereplacement confirmed in the MaintenanceBooklet.
Comply with the important safety notes forservice products when handling coolant(Ypage 321).
324Service products and filling capacities
Technical data