Page 401 of 518

The
wear pat tern s on the front and rear wheels
dif fer:
R Front wheels wear more on the shoulder of
th e tire
R Rear wheels wear more in the center of the
tire
On vehicles that ha vethe same size front and
re ar wheels, rotat eth e wheels according tothe
inter vals in the tire manufacturer's warranty
book in your vehicle documents. If this is not
av ailable, rotate the tires every
3,000 to6,000 mile s (5,000to10,000 km),
depending on thewe ar. Ensure that the direction
of rotation is maintained.
It is impe rative toobser vethe instructions and
saf ety no tes on "Changing a wheel" when doing
so Preparing theve hicle for a wheel
ch ange( →page 400). Note
s onstoring wheels When
storing wheels, obser vethefo llowing
no tes:
R Afterre moving wheels, store them in a cool,
dry and preferably dark place.
R Protect the tires from conta ct withoil, grease
or fuel. Overview of
the tire-chan getool kit Apart from some countr
y-specific variants, vehi‐
cles are not equipped with a tire-change tool kit.
Fo r more information on which tire-changetools
are requ ired and appr ovedfo r per form ing a
wheel change on your vehicle, consult a qualified
specialist workshop.
Re quired tire-change tools may include, for
ex ample:
R Jack
R Chock
R Lug wrench
R Alignment bolt The tire-change
tool kit is located under the
trunk floor. 1
Ratchet
2 Alignment bolt
3 Jack ing support
4 Jack
5 Lug wrench
6 Folding chock Wheels and tires
399
Page 405 of 518

#
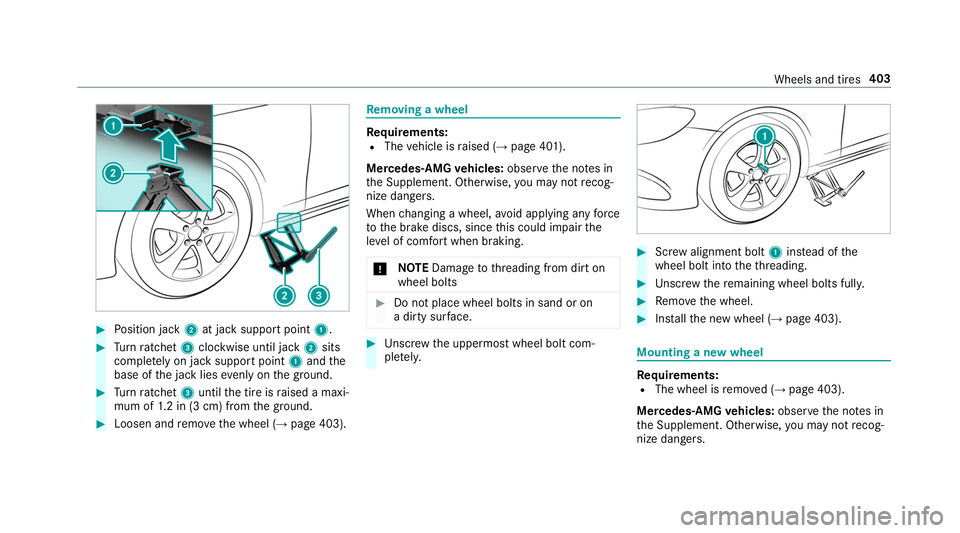
Position jack 2at jack support point 1.#
Turn ratchet 3clockwise until jack 2sits
comple tely on jack support point 1and the
base of the jack lies evenly on the ground. #
Turn ratchet 3until the tire is raised a maxi‐
mum of 1.2 in (3 cm) from the ground. #
Loosen and remo vethe wheel (→ page 403). Re
moving a wheel Re
quirements:
R The vehicle is raised (→ page 401).
Mercedes-AMG vehicles: observeth e no tes in
th e Supplement. Otherwise, you may not recog‐
nize dangers.
When changing a wheel, avoid applying any force
to the brake discs, since this could impair the
le ve l of com fort when braking.
* NO
TEDama getothre ading from dirt on
wheel bolts #
Do not place wheel bolts in sand or on
a dirty sur face. #
Unscr ew the uppermost wheel bolt com‐
ple tely. #
Screw alignment bolt 1instead of the
wheel bolt into theth re ading. #
Unscr ew there maining wheel bolts fully. #
Remo vethe wheel. #
Installth e new wheel (→ page 403). Mounting a new wheel
Re
quirements:
R The wheel is remo ved (→ page 403).
Mercedes-AMG vehicles: observeth e no tes in
th e Supplement. Otherwise, you may not recog‐
nize dangers. Wheels and tires
403
Page 406 of 518

&
WARNING Risk of accident from losing a
wheel
Oiled, greased or damaged wheel bolt/wheel
nut thre ads or wheel hub/wheel mounting
bolt thre ads can cause the wheel bolts/
wheel nuts tocome loose.
As a result, you could lose a wheel while driv‐
ing. #
Never oil or grease theth re ads. #
Intheeve nt of damage totheth re ads,
con tact a qualified specialist workshop
immediatel y. #
Have the damaged wheel bolts or dam‐
aged hub thre ads replaced. #
Do not continue driving. #
Obser vethe information on thech oice of
tires (→ page 396).
Fo r tires with a specified direction of rotation, an
ar row onthe side wall of the tire indicates the
cor rect di rection of rotation. Obse rveth e direc‐
tion of rotation when ins talling. #
Slide the wheel tobe mounted onto the
alignment bolt and push it on. &
WARNING Risk of inju ryfrom tightening
wheel bolts and nuts
If yo u tighten the wheel bolts or wheel nuts
when theve hicle is raised, the jack could tip. #
Only tighten wheel bolts or wheel nuts
when theve hicle is on the ground. #
Be sure toobser vethe instructions and
saf ety no tes on "Changing a wheel"
(→ page 396). #
For saf etyre asons, on lyuse wheel bolts
which ha vebeen appr ovedby Mercedes-
Benz and forth e wheel in question.
* NO
TEDama getopaintwork of the wheel
ri m when scr ewing on thefirs t wheel bolt If
th e wheel has too much play when scr ew‐
ing in thefirs t wheel bolt, the wheel rim paint
can be dama ged. #
Press the wheel firm lyagainst the
wheel hub when scr ewing on thefirst
wheel bolt. #
Tighten the wheel bolts evenly in a diagonal
pattern in the order indicated until they are
fi nger-tight. #
Unscr ew the alignment bolt. #
Tighten the last wheel bolt until it is finger-
tight. #
Lowe rth eve hicle (→ page 404). Lo
weri ngtheve hicle af ter a wheel change Re
quirements:
R The new wheel has been ins talled
(→ page 403). #
Place thera tchet onto the he xagon nut of the
jack so that the letters "AB" are visible. #
Tolowe r the vehicle: turnthera tchet of the
jack counter-clo ckwise. 404
Wheels and tires