2019 MERCEDES-BENZ METRIS ECU
[x] Cancel search: ECUPage 229 of 318

Engine
Warning/
indicator
lampNSignal type
Possible causes/consequences and M
Solutions
;NThe yellow Check Engine warning lamp lights up while the engine is running.
There may be a malfunction, for example:
Rin the engine management
Rin the transmission management
Rin the fuel injection system
Rin the exhaust system
Rin the ignition system (for vehicles with a gasoline engine)
Rin the fuel system
The emission limit values may be exceeded and the engine may be running in
emergency mode.
XHave the vehicle checked as soon as possible at a qualified specialist workshop.
æN The yellow reserve fuel warning lamp is on while the engine is running.
The fuel level has dropped to the reserve range.
XRefuel at the nearest gas station.
?N The red coolant warning lamp comes on while the engine is running.
On vehicles without steering wheel buttons, the coolant temperature gage is at the
start of the bar display (
Ypage 175).
On vehicles with steering wheel buttons, the coolant temperature gage is at the
start of the scale in the instrument cluster (
Ypage 39).
The temperature sensor for the coolant temperature gage is faulty.
The coolant temperature is no longer being monitored. There is a risk of engine
damage if the coolant temperature is too high.
XStop the vehicle immediately, paying attention to road and traffic conditions,
and switch off the engine. Do not continue driving under any circumstances.
XSecure the vehicle to prevent it from rolling away (Ypage 135).
XConsult a qualified specialist workshop.
Indicator and warning lamps in the instrument cluster227
On-board computer and displays
Z
Page 230 of 318

Warning/
indicator
lampNSignal type
Possible causes/consequences and M
Solutions
?NThe red coolant warning lamp comes on while the engine is running.
The coolant level is too low.
If the coolant level is correct, the airflow to the engine radiator may be blocked or
the electric engine radiator fan may be malfunctioning.
The coolant is too hot and the engine is no longer being cooled sufficiently.
XObserve the display messages.
XStop the vehicle immediately, paying attention to road and traffic conditions,
and switch off the engine.
XSecure the vehicle to prevent it from rolling away (Ypage 135).
XExit the vehicle and keep a safe distance from the vehicle until the engine has
cooled down.
XCheck the coolant level and add coolant, observing the warning notes
(Ypage 255).
XIf you have to add coolant more frequently, have the engine cooling system
checked.
XMake sure that the air supply to the radiator is not obstructed, by frozen slush
for example.
XCheck the coolant temperature:
Rusing the display in the on-board computer on vehicles without steering wheel
buttons (Ypage 175)
Rusing the analog display in the instrument cluster on vehicles with steering
wheel buttons (Ypage 39)
XDo not start the engine again until the coolant temperature is below the maxi-
mum value specified below. The engine could otherwise be damaged.
XDrive to the nearest qualified specialist workshop.
Avoid heavy loads on the engine, e.g. driving in mountainous terrain, and stop-
start traffic.
Under normal operating conditions and with the specified coolant level, the cool-
ant temperature gage may rise to 248 ‡ (120 †).
?N The red coolant warning lamp comes on while the engine is running. An addi-
tional warning tone sounds.
The coolant temperature has exceeded the maximum value specified below. The
airflow to the engine radiator may be blocked or the coolant level may be too low.
GWARNING
The engine is not being cooled adequately and could become damaged.
Never drive with an overheated engine. Otherwise, fluids which may have leaked
into the engine compartment could catch fire.
In addition, steam from an overheated engine can cause serious burns, which can
occur just by opening the hood.
There is a risk of injury.
XObserve the display messages.
XStop the vehicle immediately, paying attention to road and traffic conditions,
and switch off the engine.
XSecure the vehicle to prevent it from rolling away (Ypage 135).
228Indicator and warning lamps in the instrument cluster
On-board computer and displays
Page 232 of 318

Tires
Warning/
indicator
lampNSignal type
Possible causes/consequences and M
Solutions
hNThe yellow tire pressure monitor warning lamp (pressure loss/malfunction) is lit.
The tire pressure monitor has detected a loss of pressure in at least one of the tires.
GWARNING
Underinflated tires pose the following risks:
RThe tires may burst, especially as the load and vehicle speed increase.
RThe tires may wear excessively and/or unevenly, which may greatly impair tire traction.
RThe handling as well as steering and braking characteristics may be severely
affected.
There is a risk of an accident.
XStop the vehicle without making any sudden steering or braking maneuvers. Pay
attention to the traffic conditions while doing so.
XSecure the vehicle to prevent it from rolling away (Ypage 135).
XObserve the display messages.
XCheck the tires and, if necessary, change the wheel (Ypage 298).
XCheck the tire pressure.
You can check the tire pressure electronically on vehicles with steering wheel
buttons (
Ypage 286).
XIf necessary, correct the tire pressure.
hN The yellow tire pressure monitor (pressure loss/malfunction) warning lamp
flashes for approximately one minute and then remains lit.
The tire pressure monitor is malfunctioning.
GWARNING
The system may not be able to detect or signal low tire pressure as intended.
There is a risk of an accident.
XObserve the display messages.
XVisit a qualified specialist workshop.
230Indicator and warninglamps in the instrument cluster
On-board computer and displays
Page 235 of 318

reflection exterior antenna when operating in
the vehicle.
When using the device please follow:
Rthe safety notes in these operating instruc-
tions
Rtraffic rules and regulations
Rmotor vehicle laws and safety standards
General notes
These brief instructions only describe the basic
operation of your multimedia system.
All further information on the individual func-
tions can be found on the Internet at
www.mercedes-benz.de/betriebsanleitung-
transporter.
Protection against theft
The multimedia system is equipped with tech-
nical provisions to protect it against theft.
Further information about anti-theft protection
can be obtained at a qualified specialist work-
shop.
Detailed information on protection against theft
is available at your authorized Sprinter Dealer.
In order to render the multimedia system use-
less for thieves, it is protected by a four-digit
security code. If the multimedia system was dis- connected from the power supply, you will need
to enter this security code after switching the
multimedia system on.
Introduction233
Multimedia systems in brief
Z
Page 241 of 318

GPS reception
Correct functioning of the navigation system
depends, amongst other aspects, on GPS recep-
tion. In certain situations, GPS reception may be
impaired, there may be interference or there
may be no reception at all, e.g. in tunnels or
parking garages.
Preparing navigation
Inserting the navigation module
iSwitch off the ignition before removing or
inserting the navigation module.
XOpen the glove box.
XInsert the navigation module into the device
holder.
The battery built into the navigation module
starts charging when the vehicle ignition is
switched on.
XRemove the catch on the front side of the
device holder.
This way, the navigation module is secured, as
well as protected against theft.
XClose the glove box.
Switching on the navigation system
XPress the ßbutton.
or
XPress the 9button repeatedly until the
main menu bar is selected.
XSelect Navi.
The display shows the main menu of the nav- igation system.
iIf the battery was completely discharged, it
takes up to 1 minute before the navigation
system is ready.
Audio 15239
Multimedia systems in brief
Z
Page 242 of 318

Useful information
This Operator's Manual describes all models as
well as standard and optional equipment of your
vehicle that were available at the time of going
to print. Country-specific variations are possi-
ble. Note that your vehicle may not be equipped
with all of the described functions. This also
applies to systems and functions relevant to
safety.
Read the information on qualified specialist
workshops (
Ypage 31).
Stowage spaces and stowage com-
partments
Important safety notes
GWARNING
If you transport objects in the vehicle interior
and these are not adequately secured, they
could slip or be flung around and thereby
strike vehicle occupants. In addition, cup
holders, open stowage spaces and mobile
phone brackets may not always be able to
hold the objects placed in them in the event of
an accident. There is a risk of injury, particu-
larly in the event of sharp braking or sudden
changes of direction.
RAlways stow objects in such a way that they cannot be tossed about in these or similar
situations.
RAlways make sure that objects do not pro-
trude out of the stowage spaces, luggage
nets or stowage nets.
REnsure that closable stowage spaces are
shut before beginning your journey.
RAlways stow and secure heavy, hard, poin-
ted, sharp-edged, fragile or large objects in
the cargo compartment.
Observe the "Loading guidelines" (
Ypage 244).
Glove box
Glove box (example: glove box with a lockable lid)
1
Unlocked
2Locked
=Glove box handle
You can lock and unlock the glove box using the mechanical key (
Ypage 70).
When you open the glove box flap, a coin holder,
a pen holder and a credit card holder are inte-
grated on the inside.
XTo open: unlock the glove box lid if neces-
sary.
XPull glove box handle =in the direction of the
arrow.
XTo close: fold the glove box up and press it
until it engages.
Eyeglasses compartment in the over-
head control panel
Eyeglasses compartment (example: luxury over-
head control panel)
240Stowage spaces and stowage compartments
Stowing and features
Page 243 of 318

XTo open:briefly press cover of spectacles
compartment :.
The eyeglasses compartment opens down-
wards.
XTo close: press the cover of spectacles com-
partment :into the overhead control panel
until it engages.
Make sure that the eyeglasses compartment is
always closed while the vehicle is in motion.
Stowage net
You can use the stowage nets on the back of the
seat backrests to store small, lightweight items.
Observe the loading directions (
Ypage 244)
and the safety information about the stowage
spaces (
Ypage 240).
Sun visors
Overview
GWARNING
If the mirror cover of the vanity mirror is folded
up when the vehicle is in motion, you could be
blinded by incident light. There is a risk of an
accident.
Always keep the mirror cover folded down
while driving.
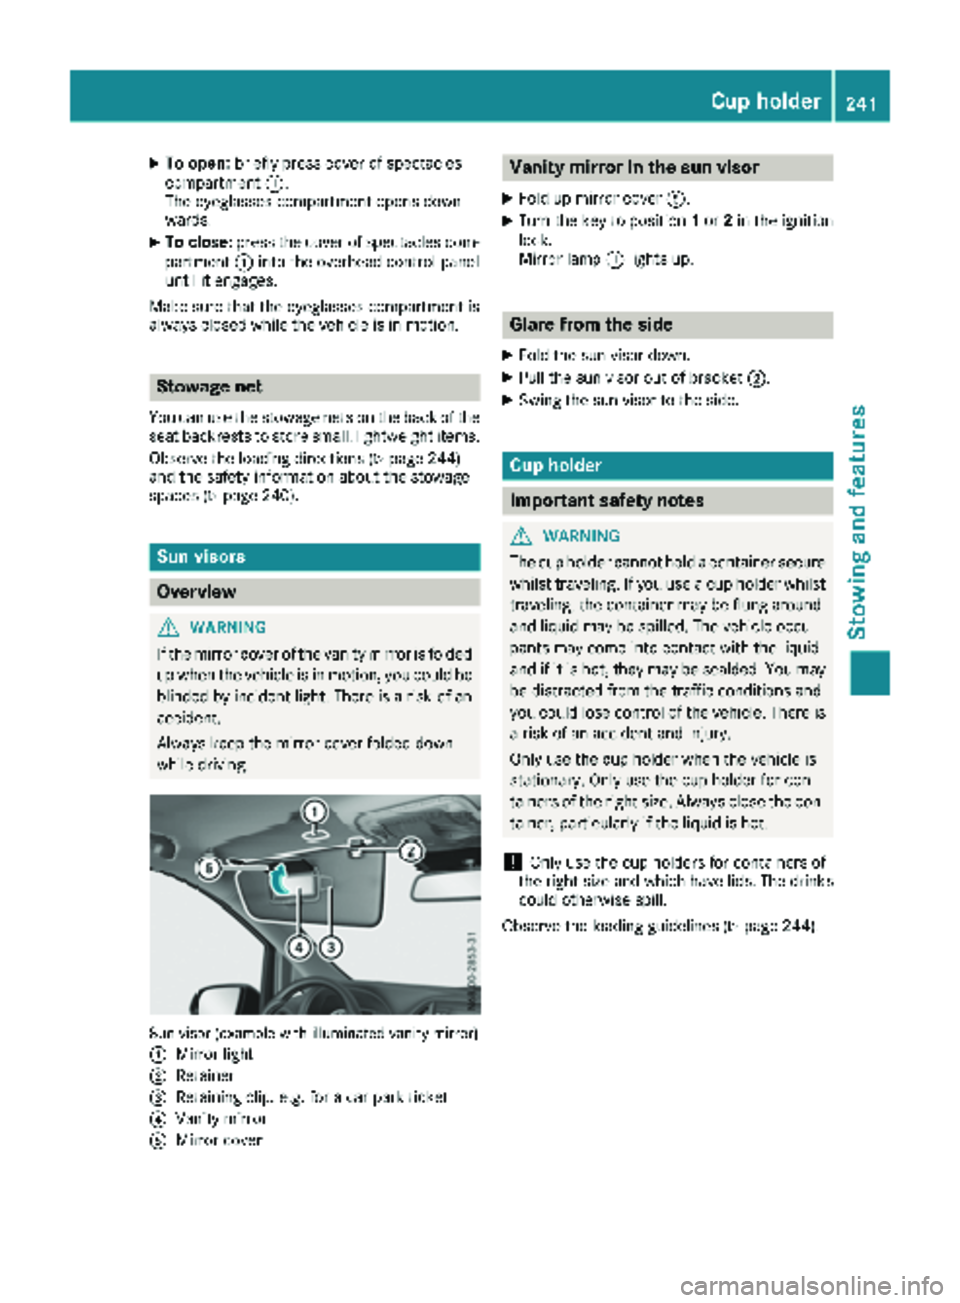
Sun visor (example with illuminated vanity mirror)
:
Mirror light
;Retainer
=Retaining clip, e.g. for a car park ticket
?Vanity mirror
AMirror cover
Vanity mirror in the sun visor
XFold up mirror cover A.
XTurn the key to position 1or 2in the ignition
lock.
Mirror lamp :lights up.
Glare from the side
XFold the sun visor down.
XPull the sun visor out of bracket ;.
XSwing the sun visor to the side.
Cup holder
Important safety notes
GWARNING
The cup holder cannot hold a container secure
whilst traveling. If you use a cup holder whilst
traveling, the container may be flung around
and liquid may be spilled. The vehicle occu-
pants may come into contact with the liquid
and if it is hot, they may be scalded. You may
be distracted from the traffic conditions and
you could lose control of the vehicle. There is a risk of an accident and injury.
Only use the cup holder when the vehicle is
stationary. Only use the cup holder for con-
tainers of the right size. Always close the con-
tainer, particularly if the liquid is hot.
!Only use the cup holders for containers of
the right size and which have lids. The drinks could otherwise spill.
Observe the loading guidelines (
Ypage 244).
Cup holder241
Stowing an d features
Z
Page 246 of 318

Useful information
This Operator's Manual describes all models as
well as standard and optional equipment of your
vehicle that were available at the time of going
to print. Country-specific variations are possi-
ble. Note that your vehicle may not be equipped
with all of the described functions. This also
applies to systems and functions relevant to
safety.
Read the information on qualified specialist
workshops (
Ypage 31).
Loading guidelines
Important safety notes
GWARNING
When objects are unsecured or inadequately
secured, they can slip, turn over or be thrown
about, striking vehicle occupants. This also
applies to:
Rluggage or loads
Rseats which have been removed and are
being transported in the vehicle in an
exceptional case.
There is a risk of injury, particularly in the
event of a braking maneuver or abrupt change
in direction.
Always stow objects in such a way that they
cannot be tossed about. Before traveling,
secure objects, luggage or loads to prevent
them slipping or tipping over. If you remove a
seat, store it preferably outside the vehicle.
GWARNING
As a result of improperly placed or unevenly
distributed loads, the center of gravity of the
load being transported may be too high or too
far back. This can significantly impair handling
as well as steering and braking characteris-
tics. There is a risk of an accident.
Always make sure that the center of gravity of
the load is:
Rbetween the axles
and
Ras low as possible, near the rear axle.
GWARNING
When the permissible wheel loads, axle loads
and/or the maximum permissible gross vehi-
cle weight are exceeded, driving safety is
compromised. The handling as well as steer-
ing and braking characteristics may be signif-
icantly impaired. Overloaded tires may over-
heat, causing them to burst. There is a risk of
an accident.
When transporting a load, always observe the
permissible wheel loads, axle loads and the
maximum permissible gross vehicle weight
for the vehicle (including occupants).
!If you are using a roof carrier, observe the
maximum roof load and maximum roof carrier
load.
RDo not stack luggage or loads higher than the
backrests.
RObjects to be transported should preferably
be stowed in the cargo compartment.
RWhen transporting luggage, always use the
cargo tie-down rings for securing loads and a
cargo net, if installed.
RUse cargo tie-down rings and fasteners which
are suitable for the weight and size of the
load.
When using suitable load securing aids and tie
downs, always follow the manufacturer's oper-
ating instructions, in particular the notes on dis-
card criteria contained therein.
Load securing aids or tie downs must not be
used if:
Ridentification marks are missing or illegible
Rthere are yarn breakages, damage to bearing seams or other signs of tearing
Rthere are signs of shearing, deformation,
pinching or other damage
Rthere is damage to clamping or connecting
elements
Load securing aids and tie downs in this condi-
tion are ready for discard and must be replaced.
If you use load securing aids or tie downs which are worn out, the load may not be sufficiently
secured and could cause damage to property.
244Loading guidelines
Transporting loads