2019 MERCEDES-BENZ METRIS charging
[x] Cancel search: chargingPage 267 of 318

installed in the vehicle. The vehicle's elec-
tronics system may otherwise be damaged.
!Only charge the battery using the jump-
starting connection point.
A battery charger unit specially adapted for
Mercedes-Benz vehicles and tested and
approved by Mercedes-Benz is available as an
accessory. Only this device permits the charging
of the battery in its installed position. Contact an
authorized Mercedes-Benz Commercial Van
Center for information and availability. Read the
operating instructions for your charger before
charging the battery.
Recharge the battery more frequently if you use the vehicle mainly for short trips and/or drive at
low outside temperatures.
Only charge the installed battery with a battery
charger that has been tested and approved by
Mercedes-Benz, using the jump-start connec-
tion point in the engine compartment.
XConnect the battery charger to the positive
terminal and ground terminal in the same
order as when connecting the donor battery in
the jump-starting procedure (
Ypage 274).
iIf a battery is not installed and not in service,
you should charge it every three months. This
will counter self-discharging and prevent bat-
tery damage.
Care
!
Dirty battery clamps and battery surfaces
cause leak currents which lead to the batter-
ies discharging.
!Do not use cleaning agents containing fuel.
Cleaning agents containing fuel corrode the
battery housing.
!If dirt gets into the battery cell, battery self-
discharge will increase and the battery may
be damaged.
The following points on battery care must be
observed:
XRegularly check the battery terminals and the
fastening of the negative cable to the chassis
to ensure that they are firmly seated.
XAlways keep the battery terminals and battery
surfaces clean and dry.
XLightly grease the undersides of the battery
terminals with acid-resistant grease.
XOnly clean the battery casing with a commer-
cially available cleaning product.
Care
Notes on care
GWARNING
If you use openings in the bodywork or
detachable parts as steps, you could:
Rslip and/or fall
Rdamage the vehicle and cause yourself to
fall.
There is a risk of injury.
Always use secure climbing aids, e.g. a suita-
ble ladder.
!Do not use the lower sliding door guide (car-
riage) as a step. Otherwise, you could damage
the paneling and/or the sliding door mecha-
nism.
!For cleaning your vehicle, do not use any of
the following:
Rdry, rough or hard cloths
Rabrasive cleaning agents
Rsolvents
Rcleaning agents containing solvents
Do not scrub.
Do not touch the surfaces or protective films
with hard objects, e.g. a ring or ice scraper.
You could otherwise scratch or damage the
surfaces and protective film.
!Do not park your vehicle for a long period of
time directly after cleaning, particularly after
cleaning the wheel rim with wheel cleaner.
Wheel cleaner can lead to the increased cor-
rosion of the brake discs and pads. Therefore,
drive for a few minutes after cleaning. By
heating up the brakes, the brake discs and
pads dry. The vehicle can then be parked for a
long period of time.
HEnvironmental note
Only clean your vehicle at specially designed
wash bays. Dispose of empty containers and
Care265
Maintenance and care
Z
Page 276 of 318
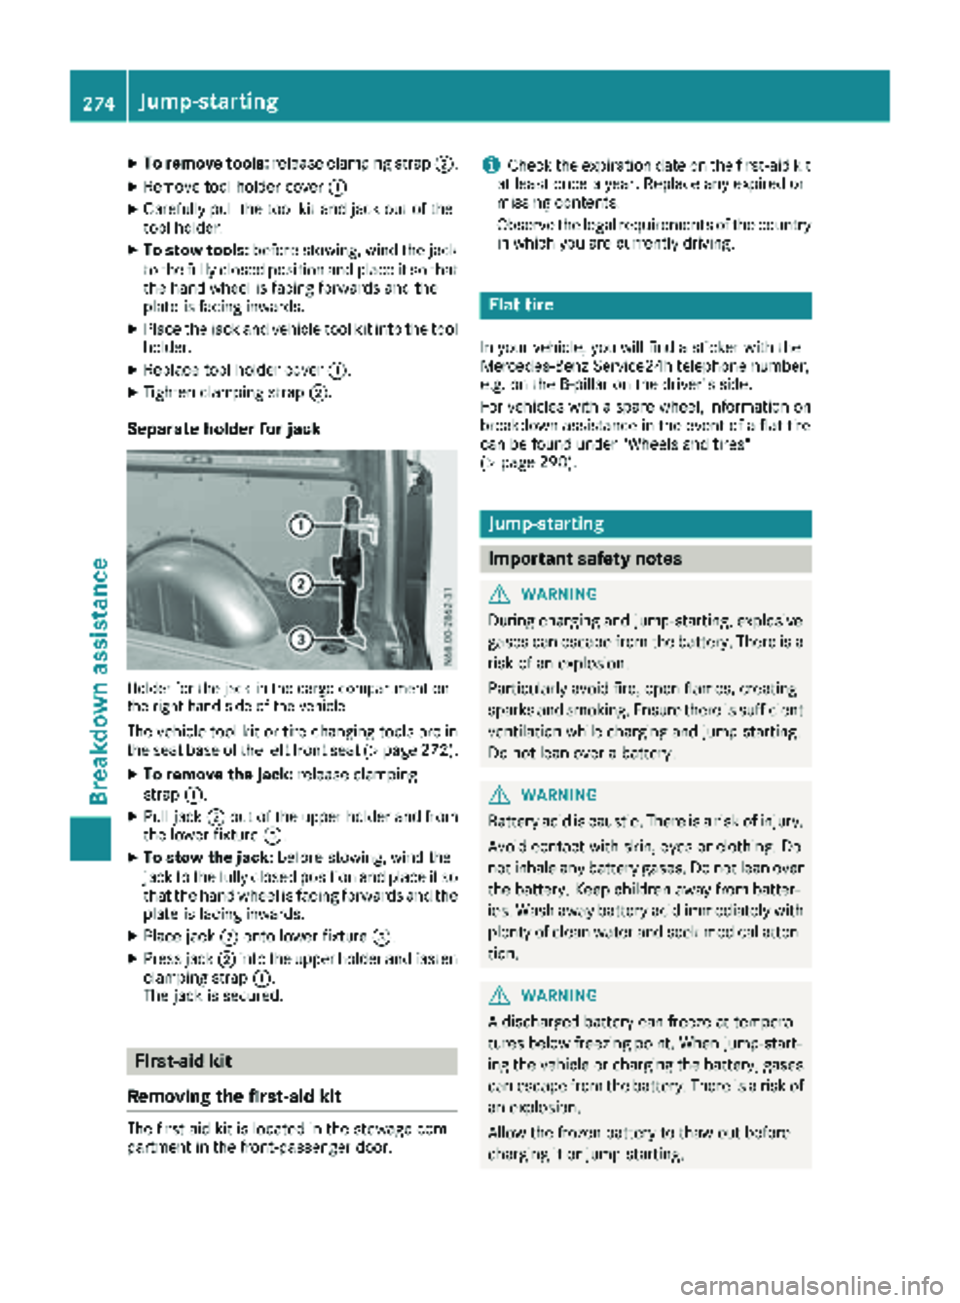
XTo remove tools:release clamping strap ;.
XRemove tool holder cover :
XCarefully pull the tool kit and jack out of the
tool holder.
XTo stow tools:before stowing, wind the jack
to the fully closed position and place it so that
the hand wheel is facing forwards and the
plate is facing inwards.
XPlace the jack and vehicle tool kit into the tool
holder.
XReplace tool holder cover :.
XTighten clamping strap;.
Separate holder for jack
Holder for the jack in the cargo compartment on
the right-hand side of the vehicle
The vehicle tool kit or tire-changing tools are in
the seat base of the left front seat (Ypage 272).
XTo remove the jack:release clamping
strap :.
XPull jack ;out of the upper holder and from
the lower fixture =.
XTo stow the jack: before stowing, wind the
jack to the fully closed position and place it so
that the hand wheel is facing forwards and the plate is facing inwards.
XPlace jack ;onto lower fixture =.
XPress jack;into the upper holder and fasten
clamping strap :.
The jack is secured.
First-aid kit
Removing the first-aid kit
The first-aid kit is located in the stowage com-
partment in the front-passenger door.
iCheck the expiration date on the first-aid kit
at least once a year. Replace any expired or
missing contents.
Observe the legal requirements of the country
in which you are currently driving.
Flat tire
In your vehicle, you will find a sticker with the
Mercedes-Benz Service24h telephone number,
e.g. on the B-pillar on the driver's side.
For vehicles with a spare wheel, information on
breakdown assistance in the event of a flat tire
can be found under "Wheels and tires"
(
Ypage 298).
Jump-starting
Important safety notes
GWARNING
During charging and jump-starting, explosive
gases can escape from the battery. There is a risk of an explosion.
Particularly avoid fire, open flames, creating
sparks and smoking. Ensure there is sufficient
ventilation while charging and jump-starting.
Do not lean over a battery.
GWARNING
Battery acid is caustic. There is a risk of injury.
Avoid contact with skin, eyes or clothing. Do
not inhale any battery gases. Do not lean over
the battery. Keep children away from batter-
ies. Wash away battery acid immediately with
plenty of clean water and seek medical atten-
tion.
GWARNING
A discharged battery can freeze at tempera-
tures below freezing point. When jump-start-
ing the vehicle or charging the battery, gases can escape from the battery. There is a risk of
an explosion.
Allow the frozen battery to thaw out before
charging it or jump-starting.
274Jump-starting
Breakdo wn assis tance
Page 277 of 318

!Vehicles with a gasoline engine:avoid
repeated and lengthy starting attempts. Oth-
erwise, the catalytic converter could be dam-
aged by non-combusted fuel.
If the indicator and warning lamps in the instru-
ment cluster do not light up at low tempera-
tures, the discharged battery may have frozen.
In this case you may neither charge the battery
nor jump-start the vehicle. The service life of a
thawed battery may be shorter. Start-up behav-
ior may deteriorate, in particular at low temper-
atures. Have the thawed battery checked at a
qualified specialist workshop.
Do not use a rapid charging device to start the
vehicle. If your vehicle's battery is discharged,
the engine can be jump-started from another
vehicle or from a donor battery using jumper
cables. For this purpose, the vehicle has a jump-
starting connection point in the engine com-
partment.
When jump-starting, observe the following
points:
RThe battery is not accessible in all vehicles. If
the other vehicle's battery is not accessible,
jump-start the vehicle using a donor battery
or a jump-starting device.
RYou may only jump-start the vehicle when the
engine and exhaust system are cold.
Rdo not start the engine if the battery is frozen.
Let the battery thaw first.
Rjump-starting may only be performed from
batteries with a nominal voltage of 12 V.
Ronly use jumper cables that have a sufficient
cross-section and insulated terminal clamps.
Rif the battery is fully discharged, attach the
battery of another vehicle for a few minutes
before attempting to start. This charges the
empty battery a little.
Rmake sure that the two vehicles do not touch.
Make sure that:
Rthe jumper cables are not damaged.
Rbare parts of the terminal clamps do not come into contact with other metal parts while the
jumper cables are connected to the battery.
Rthe jumper cables cannot come into contact
with parts such as the V-belt pulley or the fan.
These parts move when the engine is started
and while it is running.
Jumper cables and further information regarding
jump starting can be obtained at any qualified
specialist workshop.
Before connecting the jumper cables
XApply the parking brake.
XShift the transmission to position P.
XSwitch off all electrical consumers, e.g. audio
equipment, blower.
XTurn the key to position 0in the ignition lock
and remove it.
XOpen the hood (Ypage 253).
Connecting the jumper cable
XPush contact protection cover :of the jump-
starting connection point backwards against
the spring force as far as it will go.
The jump-starting connection point is visible.
Terminal connecting planXRemove the cover from positive terminal =
of the donor vehicle's battery.
XConnect the positive terminal clamp of the
jumper cable to positive terminal =of the
donor vehicle's battery, and then to positive
terminal Aof the jump-starting connection
point.
XRun the donor vehicle's engine at idling
speed.
Jump-starting275
Breakdown assistance
Z
Page 307 of 318

Useful information
This Operator's Manual describes all models as
well as standard and optional equipment of your
vehicle that were available at the time of going
to print. Country-specific variations are possi-
ble. Note that your vehicle may not be equipped
with all of the described functions. This also
applies to systems and functions relevant to
safety.
Read the information on qualified specialist
workshops (
Ypage 31).
Vehicle electronics
Tampering with the engine electron-
ics
!
Only have engine electronics and the corre-
sponding parts, such as control units, actua-
tors, sensors or connector leads, serviced at a
qualified specialist workshop. Otherwise, the
vehicle parts may wear more quickly. This can
lead to loss of the New Vehicle Limited War-
ranty.
Installing electrical or electronic
equipment
You and others can suffer health-related dam-
age through electromagnetic radiation. By using
an exterior antenna, a possible health risk
caused by electromagnetic fields, as discussed
in scientific circles, is taken into account. Only
have the exterior antenna installed by a qualified specialist workshop.
Electrical and electronic devices may have a
detrimental effect on both the comfort and the
operating safety of the vehicle. If equipment of
this kind is installed, its electromagnetic com-
patibility must be checked and verified.
If these devices are linked to functions associ-
ated with resistance to interference, they must
have type approval. This applies to the device or
its interfaces to the vehicle electronics, e.g.
charging brackets.
A telephone or two-way radio to be installed in
the vehicle must be approved. You can obtain
further information from any Mercedes-Benz
Commercial Van Center. For operation of mobile phones and two-way
radios, Mercedes-Benz recommends connec-
tion to an approved exterior antenna. This is the
only way to ensure optimum reception quality
inside the vehicle and to minimize mutual inter-
ference between the vehicle electronics, mobile
phones and two-way radios.
The transmission output of the mobile phone or
two-way radio may not exceed the following
maximum transmission output (PEAK):
Frequency rangeMaximum trans-
mission output
(PEAK)
Shortwave
(f < 50 MHz)100 W
4 m waveband30 W
2 m waveband50 W
Trunked radio/Tetra35 W
70 cm waveband35 W
GSM/UMTS/LTE10 W
Identification plates
Vehicle identification plate with vehi-
cle identification number (VIN)
Vehicle identification plate on the driver's side B-
pillar
XOpen the driver’s door.
You will see vehicle identification plate
:
with the vehicle identification number (VIN),
the paint code and the permissible weight
data.
Identification plates305
Technical data