2019 MERCEDES-BENZ GLS SUV warning lights
[x] Cancel search: warning lightsPage 164 of 398
intervals and in accordance with the Mercedes-
Benz service requirements.
You can obtain current information concerning
the servicing of your vehicle at any time from a
qualified specialist workshop. This could be an
overview of the maintenance work or any addi-
tional maintenance work, for example. ECO display
The ECO display shows you how economical
your driving style is. The ECO display assists you in achieving the most economical driving style
for the selected settings and prevailing condi-
tions. Your driving style can significantly influ-
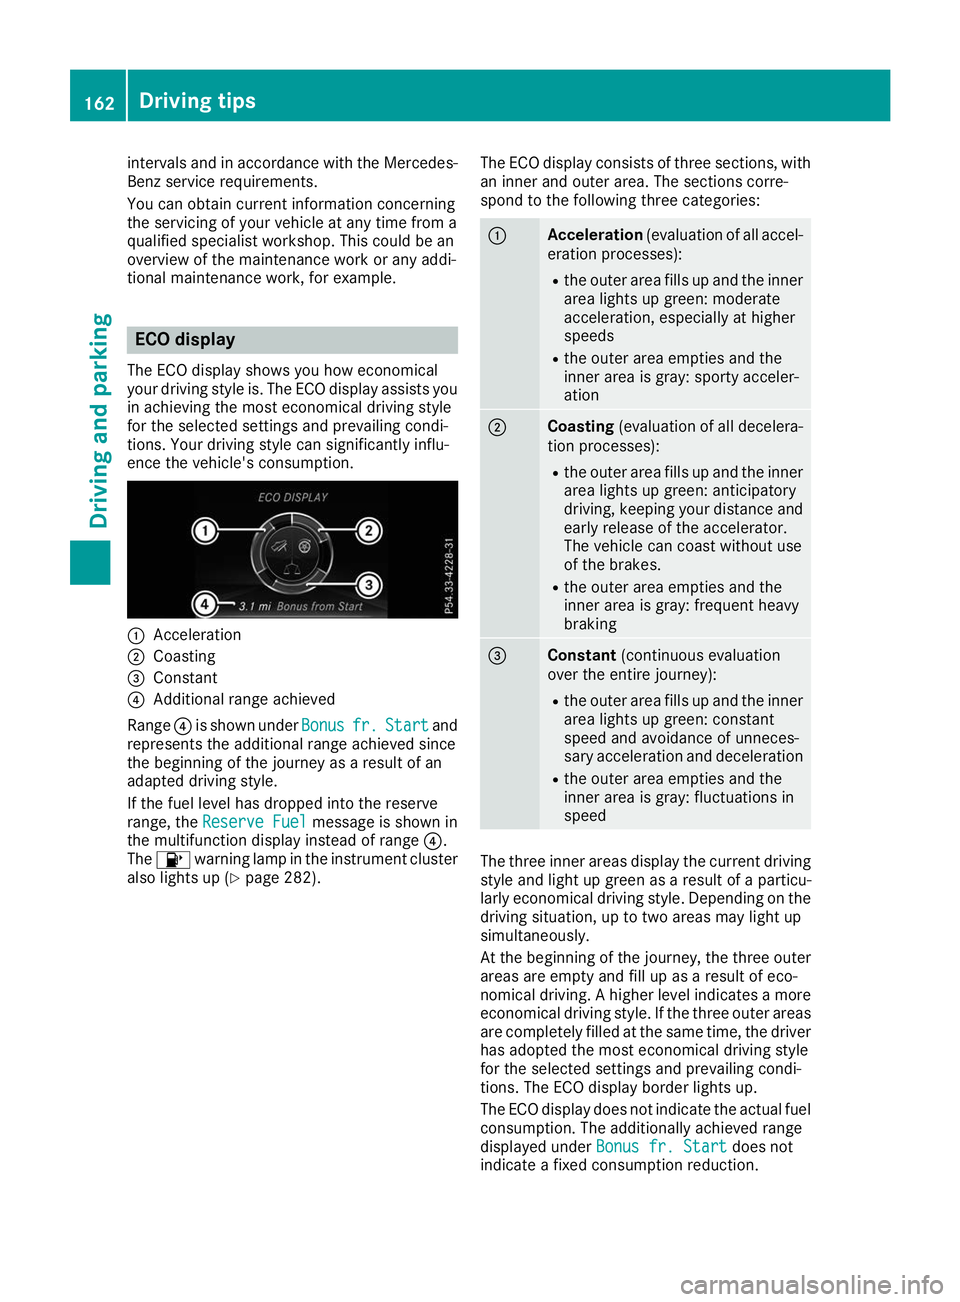
ence the vehicle's consumption. 0043
Acceleration
0044 Coasting
0087 Constant
0085 Additional range achieved
Range 0085is shown under Bonus Bonusfr.
fr.Start
Start and
represents the additional range achieved since
the beginning of the journey as a result of an
adapted driving style.
If the fuel level has dropped into the reserve
range, the Reserve Fuel Reserve Fuel message is shown in
the multifunction display instead of range 0085.
The 00B6 warning lamp in the instrument cluster
also lights up (Y page 282). The ECO display consists of three sections, with
an inner and outer area. The sections corre-
spond to the following three categories: 0043
Acceleration
(evaluation of all accel-
eration processes):
R the outer area fills up and the inner
area lights up green: moderate
acceleration, especially at higher
speeds
R the outer area empties and the
inner area is gray: sporty acceler-
ation 0044
Coasting
(evaluation of all decelera-
tion processes):
R the outer area fills up and the inner
area lights up green: anticipatory
driving, keeping your distance and
early release of the accelerator.
The vehicle can coast without use
of the brakes.
R the outer area empties and the
inner area is gray: frequent heavy
braking 0087
Constant
(continuous evaluation
over the entire journey):
R the outer area fills up and the inner
area lights up green: constant
speed and avoidance of unneces-
sary acceleration and deceleration
R the outer area empties and the
inner area is gray: fluctuations in
speed The three inner areas display the current driving
style and light up green as a result of a particu-
larly economical driving style. Depending on the driving situation, up to two areas may light up
simultaneously.
At the beginning of the journey, the three outer
areas are empty and fill up as a result of eco-
nomical driving. A higher level indicates a more
economical driving style. If the three outer areas
are completely filled at the same time, the driver
has adopted the most economical driving style
for the selected settings and prevailing condi-
tions. The ECO display border lights up.
The ECO display does not indicate the actual fuel consumption. The additionally achieved range
displayed under Bonus fr. Start Bonus fr. Start does not
indicate a fixed consumption reduction. 162
Driving tipsDriving and parking
Page 166 of 398
time. This may also occur after the vehicle has
been washed or driven through deep water.
You then have to depress the brake pedal more
firmly. Maintain a greater distance from the
vehicle in front.
After driving on a wet road or having the vehicle washed, brake firmly while paying attention to
the traffic conditions. This will warm up the
brake discs, thereby drying them more quickly
and protecting them against corrosion.
Limited braking performance on salt-
treated roads If you drive on salted roads, a layer of salt resi-
due may form on the brake discs and brake
pads. This can result in a significantly longer
braking distance.
R Brake occasionally to remove any possible
salt residue. Make sure that you do not
endanger other road users when doing so.
R Carefully depress the brake pedal and the
beginning and end of a journey.
R Maintain a greater distance to the vehicle
ahead.
Servicing the brakes !
The brake fluid level may be too low, if:
R if the red brake warning lamp lights up in
the instrument cluster and
R you hear a warning tone while the engine is
running
Observe additional warning messages in the
multifunction display.
The brake fluid level may be too low due to
brake pad wear or leaking brake lines.
Have the brake system checked immediately. Consult a qualified specialist workshop to
arrange this.
! A function or performance test should only
be carried out on a 2-axle dynamometer. If
you wish to operate the vehicle on such a
dynamometer, please consult a qualified spe-
cialist workshop in advance. You could oth-
erwise damage the drive train or the brake
system.
! Because ESP ®
is an automatic system, the
engine and ignition must be switched off
(SmartKey in position 0or 1or Start/Stop
button in position 0or 1) when the electric parking brake is being tested on a brake dyna-
mometer (maximum 10 second s).
Braking triggered automatically by ESP ®
may
seriously damage the brake system.
All checks and maintenance work on the brake
system must be carried out at a qualified spe-
cialist workshop.
Have brake pads installed and brake fluid
replaced at a qualified specialist workshop.
If the brake system has only been subject to
moderate loads, you should test the functional- ity of your brakes at regular intervals. To do so,
depress the brake pedal firmly when driving at a
high speed. This improves the grip of the brake
pads.
You can find a description of Brake Assist (BAS) on (Y page 67 )or of BAS PLUS on (Y page 72).
Mercedes-Benz recommends that you only have
brake pads/linings installed on your vehicle
which have been approved for Mercedes-Benz
vehicles or which correspond to an equivalent
quality standard. Brake pads/linings which have not been approved for Mercedes-Benz vehicles
or which are not of an equivalent quality could
affect your vehicle's operating safety.
Mercedes-Benz recommends that you only use
brake fluid that has been specially approved for your vehicle by Mercedes-Benz, or which corre-
sponds to an equivalent quality standard. Brake fluid which has not been approved for
Mercedes-Benz vehicles or which is not of an
equivalent quality could affect your vehicle's
operating safety.
High-performance brake system
(Mercedes-AMG vehicles) The high-performance brake system is designed
for heavy loads. This may lead to noise when
braking. This will depend on:
R Speed
R Braking force
R Environmental conditions, such as tempera-
ture and humidity
The wear of individual components of the brake system, such as the brake pads/linings or brake
discs, depends on the individual driving style
and operating conditions.
For this reason, it is impossible to state a mile-
age that will be valid under all circumstances. An aggressive driving style will lead to high wear. 164
Driving tipsDriving and parking
Page 170 of 398
R
Take care when turning on an uphill or down-
hill slope or when driving across a slope. The
vehicle could otherwise tip over.
R Always keep the doors, the tailgate, the side
windows and the sliding sunroof closed while the vehicle is in motion.
R Do not shift the automatic transmission to
position 005C.
R Observe the notes on off-road fording
(Y page 165).
i Information about retrofitting special all-ter-
rain tires is available from any qualified spe-
cialist workshop.
i Do not use the HOLD function when driving
off-road, on steep uphill or downhill gradients
or on slippery or loose surfaces. The HOLD
function cannot hold the vehicle on such sur- faces.
Checklist before driving off-road !
If the engine oil warning lamp lights up while
the vehicle is in motion, stop the vehicle in a
safe place as soon as possible. Check the
engine oil level. The engine oil warning lamp
warning must not be ignored. Continuing the
journey while the symbol is displayed could
lead to engine damage.
X Engine oil level: check the engine oil level
and add engine oil if necessary.
When you drive on steep gradients, the engine
oil level must be sufficiently high to ensure
that oil is supplied correctly in the vehicle.
X Tire-changing tool kit: check that the jack is
working and make sure you have the lug
wrench, a robust tow cable and a folding
spade in the vehicle.
X Wheels and tires: check the tread depth and
pressure of the tires.
X Check for damage and remove any foreign
objects, e.g. small stones, from the wheels/
tires.
X Replace any missing valve caps.
X Replace dented or damaged wheels.
X Rims: dented or bent rims can result in a loss
of tire pressure and damage the tire bead.
Before driving off-road, check the wheels and
replace them if necessary. Checklist after driving off-road !
If you detect damage to the vehicle after
driving off-road, have the vehicle checked
immediately at a qualified specialist work-
shop.
Driving over rough terrain places greater
demands on your vehicle than driving on normal
roads. After driving off-road, check the vehicle.
This allows you to detect damage promptly and reduce the risk of an accident to yourself and
other road users.
X If the Offroad orOffroad Plus drive program
is selected: select the Individual,Sport,
Comfort orSlippery drive program
(Y page 147).
X Deactivate the LOW RANGE off-road gear
(Y page 218).
X Deactivate DSR (Y page 215).
X Lower the vehicle level again to a level suita-
ble to the road conditions, e.g. to the normal
level.
X Clean the headlamps and rear lights and
check for damage.
X Clean the front and rear license plates.
X Clean the wheels and tires with a water jet
and remove any foreign objects.
X Clean the wheels, wheel housings and the
vehicle underside with a water jet; check for
any foreign objects and damage.
X Check whether twigs or other parts of plants
have become trapped. These increase the risk of fire and can damage fuel pipes, brake
hoses or the rubber bellows of the axle joints
and propeller shafts.
X After the trip, examine without fail the entire
undercarriage, wheels, tires, brakes, body-
work structure, steering, chassis and exhaust
system for damage.
X After driving for extended periods across
sand, mud, gravel, water or in similarly dirty
conditions, have the brake discs, wheels,
brake pads/linings and axle joints checked
and cleaned.
X If you detect strong vibrations after off-road
travel, check for foreign objects in the wheels
and drive train and remove them if necessary.
Foreign objects can disturb the balance and
cause vibrations. 168
Driving tipsDriving and parking
Page 185 of 398
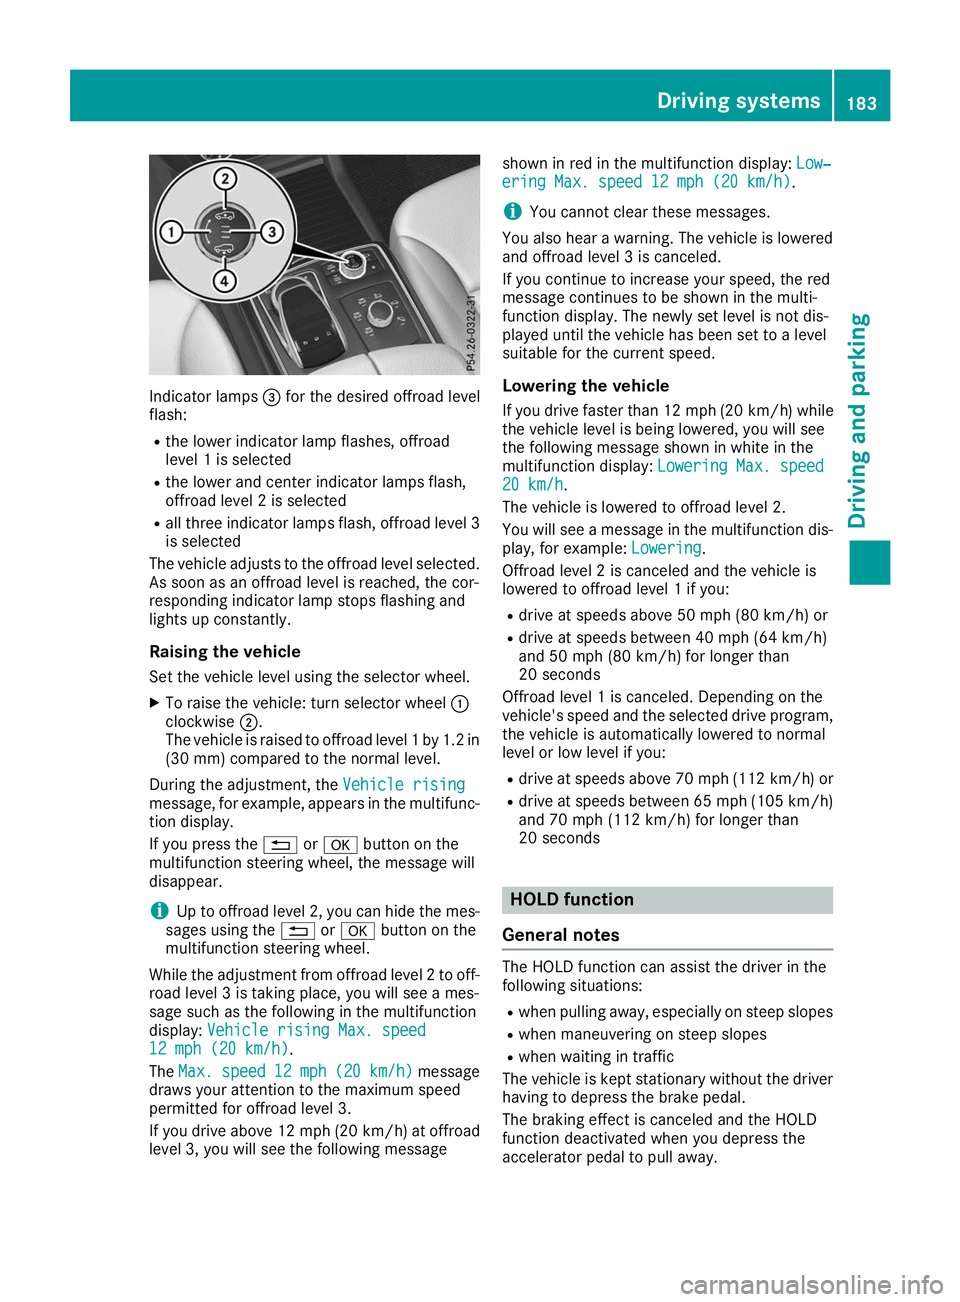
Indicator lamps
0087for the desired offroad level
flash:
R the lower indicator lamp flashes, offroad
level 1 is selected
R the lower and center indicator lamps flash,
offroad level 2 is selected
R all three indicator lamps flash, offroad level 3
is selected
The vehicle adjusts to the offroad level selected.
As soon as an offroad level is reached, the cor-
responding indicator lamp stops flashing and
lights up constantly.
Raising the vehicle
Set the vehicle level using the selector wheel.
X To raise the vehicle: turn selector wheel 0043
clockwise 0044.
The vehicle is raised to offroad level 1 by 1.2 in
(30 mm) compared to the normal level.
During the adjustment, the Vehicle rising
Vehicle rising
message, for example, appears in the multifunc-
tion display.
If you press the 0038or0076 button on the
multifunction steering wheel, the message will
disappear.
i Up to offroad level 2, you can hide the mes-
sages using the 0038or0076 button on the
multifunction steering wheel.
While the adjustment from offroad level 2 to off-
road level 3 is taking place, you will see a mes-
sage such as the following in the multifunction
display: Vehicle rising Max. speed
Vehicle rising Max. speed
12 mph (20 km/h) 12 mph (20 km/h).
The Max. Max. speed
speed 12 mph
12 mph (20 km/h)
(20 km/h) message
draws your attention to the maximum speed
permitted for offroad level 3.
If you drive above 12 mph (20 km/h) at offroad
level 3, you will see the following message shown in red in the multifunction display:
Low‐ Low‐
ering Max. speed 12 mph (20 km/h)
ering Max. speed 12 mph (20 km/h).
i You cannot clear these messages.
You also hear a warning. The vehicle is lowered and offroad level 3 is canceled.
If you continue to increase your speed, the red
message continues to be shown in the multi-
function display. The newly set level is not dis-
played until the vehicle has been set to a level
suitable for the current speed.
Lowering the vehicle If you drive faster than 12 mph (20 km/h) while
the vehicle level is being lowered, you will see
the following message shown in white in the
multifunction display: Lowering Max. speed Lowering Max. speed
20 km/h
20 km/h.
The vehicle is lowered to offroad level 2.
You will see a message in the multifunction dis- play, for example: Lowering Lowering.
Offroad level 2 is canceled and the vehicle is
lowered to offroad level 1 if you:
R drive at speeds above 50 mph (80 km/h) or
R drive at speeds between 40 mph (64 km/h)
and 50 mph (80 km/h) for longer than
20 seconds
Offroad level 1 is canceled. Depending on the
vehicle's speed and the selected drive program,
the vehicle is automatically lowered to normal
level or low level if you:
R drive at speeds above 70 mph (112 km/h) or
R drive at speeds between 65 mph (105 km/h)
and 70 mph (112 km/h) for longer than
20 seconds HOLD function
General notes The HOLD function can assist the driver in the
following situations:
R when pulling away, especially on steep slopes
R when maneuvering on steep slopes
R when waiting in traffic
The vehicle is kept stationary without the driver
having to depress the brake pedal.
The braking effect is canceled and the HOLD
function deactivated when you depress the
accelerator pedal to pull away. Driving systems
183Driving and parking Z
Page 193 of 398
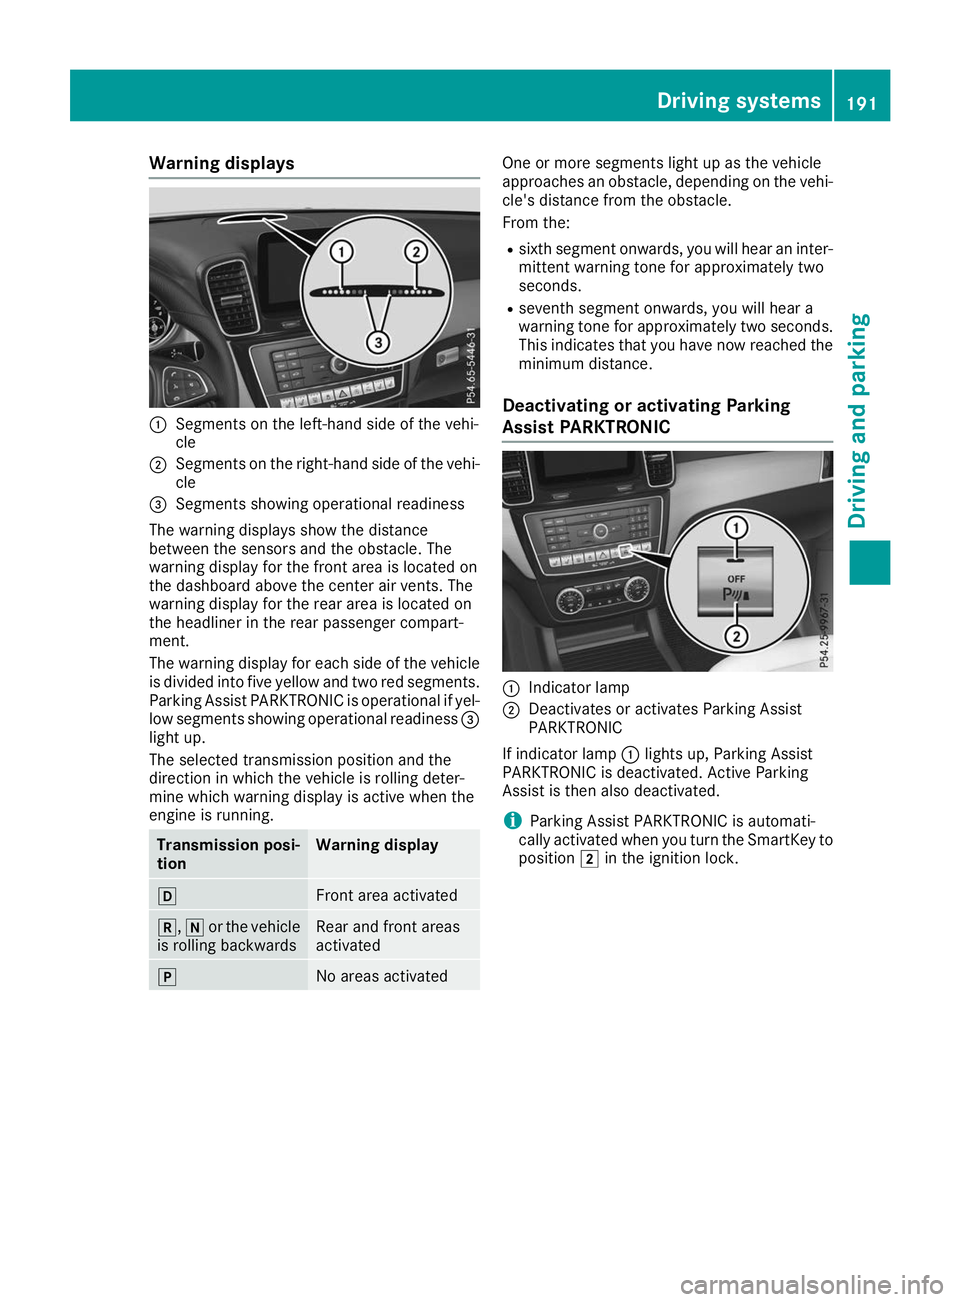
Warning displays
0043
Segments on the left-hand side of the vehi-
cle
0044 Segments on the right-hand side of the vehi-
cle
0087 Segments showing operational readiness
The warning displays show the distance
between the sensors and the obstacle. The
warning display for the front area is located on
the dashboard above the center air vents. The
warning display for the rear area is located on
the headliner in the rear passenger compart-
ment.
The warning display for each side of the vehicle
is divided into five yellow and two red segments.
Parking Assist PARKTRONIC is operational if yel-
low segments showing operational readiness 0087
light up.
The selected transmission position and the
direction in which the vehicle is rolling deter-
mine which warning display is active when the
engine is running. Transmission posi-
tion Warning display
005B
Front area activated
005E,
005Cor the vehicle
is rolling backwards Rear and front areas
activated
005D
No areas activated One or more segments light up as the vehicle
approaches an obstacle, depending on the vehi-
cle's distance from the obstacle.
From the:
R sixth segment onwards, you will hear an inter-
mittent warning tone for approximately two
seconds.
R seventh segment onwards, you will hear a
warning tone for approximately two seconds.
This indicates that you have now reached the minimum distance.
Deactivating or activating Parking
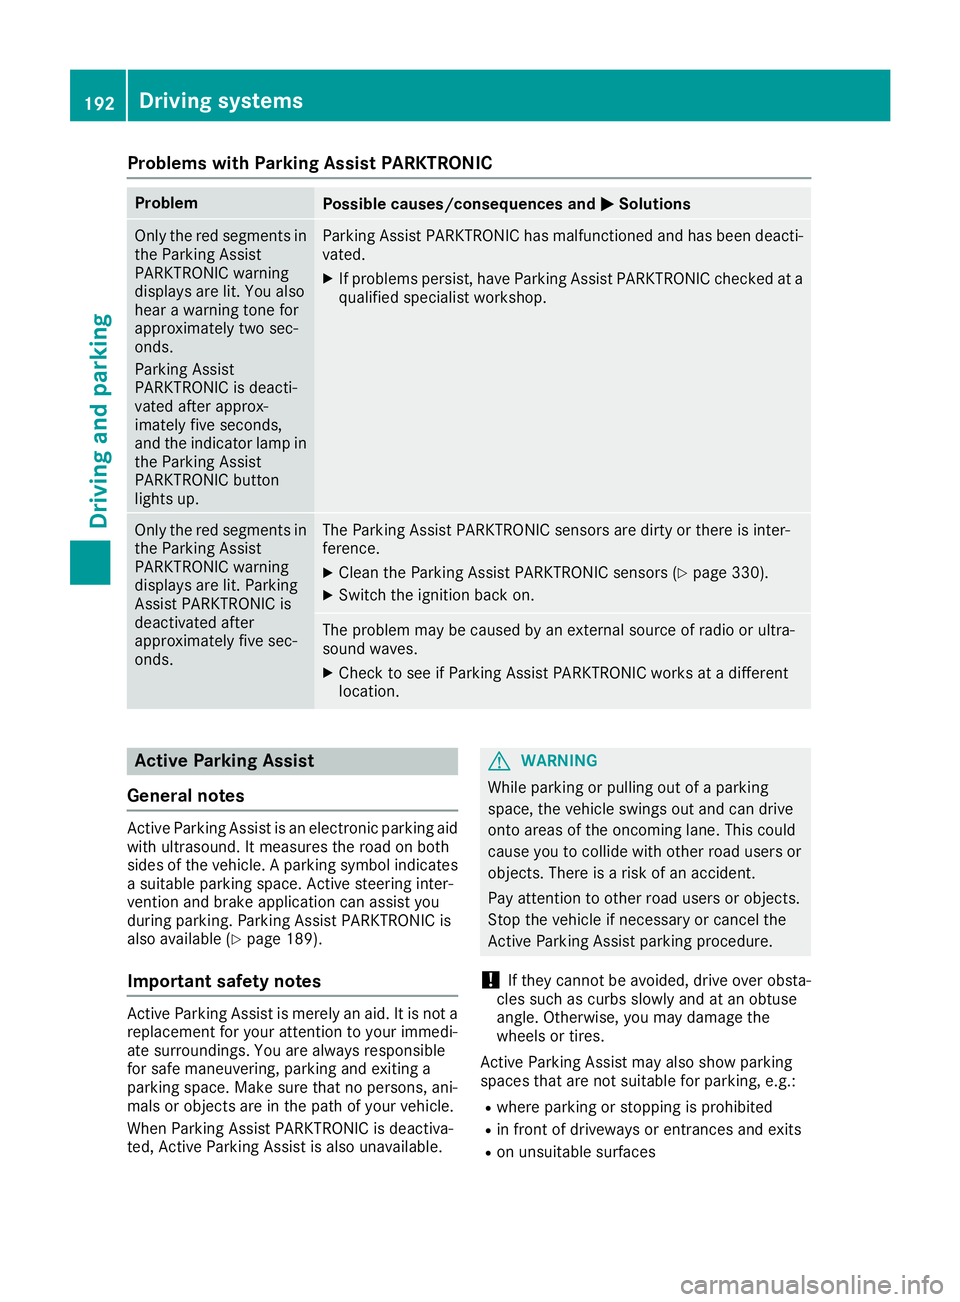
Assist PARKTRONIC 0043
Indicator lamp
0044 Deactivates or activates Parking Assist
PARKTRONIC
If indicator lamp 0043lights up, Parking Assist
PARKTRONIC is deactivated. Active Parking
Assist is then also deactivated.
i Parking Assist PARKTRONIC is automati-
cally activated when you turn the SmartKey to
position 0048in the ignition lock. Driving systems
191Driving and parking Z
Page 194 of 398
Problems with Parking Assist PARKTRONIC
Problem
Possible causes/consequences and
0050
0050Solutions Only the red segments in
the Parking Assist
PARKTRONIC warning
displays are lit. You also
hear a warning tone for
approximately two sec-
onds.
Parking Assist
PARKTRONIC is deacti-
vated after approx-
imately five seconds,
and the indicator lamp in
the Parking Assist
PARKTRONIC button
lights up. Parking Assist PARKTRONIC has malfunctioned and has been deacti-
vated.
X If problems persist, have Parking Assist PARKTRONIC checked at a
qualified specialist workshop. Only the red segments in
the Parking Assist
PARKTRONIC warning
displays are lit. Parking
Assist PARKTRONIC is
deactivated after
approximately five sec-
onds. The Parking Assist PARKTRONIC sensors are dirty or there is inter-
ference.
X Clean the Parking Assist PARKTRONIC sensors (Y page 330).
X Switch the ignition back on. The problem may be caused by an external source of radio or ultra-
sound waves.
X Check to see if Parking Assist PARKTRONIC works at a different
location. Active Parking Assist
General notes Active Parking Assist is an electronic parking aid
with ultrasound. It measures the road on both
sides of the vehicle. A parking symbol indicates a suitable parking space. Active steering inter-
vention and brake application can assist you
during parking. Parking Assist PARKTRONIC is
also available (Y page 189).
Important safety notes Active Parking Assist is merely an aid. It is not a
replacement for your attention to your immedi-
ate surroundings. You are always responsible
for safe maneuvering, parking and exiting a
parking space. Make sure that no persons, ani-
mals or objects are in the path of your vehicle.
When Parking Assist PARKTRONIC is deactiva-
ted, Active Parking Assist is also unavailable. G
WARNING
While parking or pulling out of a parking
space, the vehicle swings out and can drive
onto areas of the oncoming lane. This could
cause you to collide with other road users or
objects. There is a risk of an accident.
Pay attention to other road users or objects.
Stop the vehicle if necessary or cancel the
Active Parking Assist parking procedure.
! If they cannot be avoided, drive over obsta-
cles such as curbs slowly and at an obtuse
angle. Otherwise, you may damage the
wheels or tires.
Active Parking Assist may also show parking
spaces that are not suitable for parking, e.g.: R where parking or stopping is prohibited
R in front of driveways or entrances and exits
R on unsuitable surfaces 192
Driving systemsDriving and parking
Page 198 of 398
the vehicle has exited the parking space com-
pletely. This is useful, for example when you
recognize that it is already possible to pull out of
the parking space.
Canceling Active Parking Assist X
Stop the movement of the multifunction
steering wheel or steer yourself.
Active Parking Assist will be canceled at once.
The Active Parking Assist Canceled
Active Parking Assist Canceled
message appears on the multifunction dis-
play.
or X Press the Parking Assist PARKTRONIC button
(Y page 191).
Parking Assist PARKTRONIC is switched off
and Active Parking Assist is immediately can-
celed. The Active Parking Assist Can‐
Active Parking Assist Can‐
celed celed message appears on the multifunction
display.
Active Parking Assist is canceled automatically
if: R the electric parking brake is engaged
R transmission position 005Dis selected
R parking using Active Parking Assist is no lon-
ger possible
R you are driving faster than 6 mph (10 km/h)
R a wheel spins, ESP ®
intervenes or fails. The
00E5 warning lamp lights up in the instrument
cluster
A warning tone sounds. The parking symbol dis-
appears and the multifunction display shows the
Active
Active Parking Parking Assist
AssistCanceled
Canceled message.
When Active Parking Assist is canceled, you
must steer and brake again yourself.
If a system malfunction occurs, the vehicle is
braked to a standstill. To drive on, depress the
accelerator again. Rear view camera
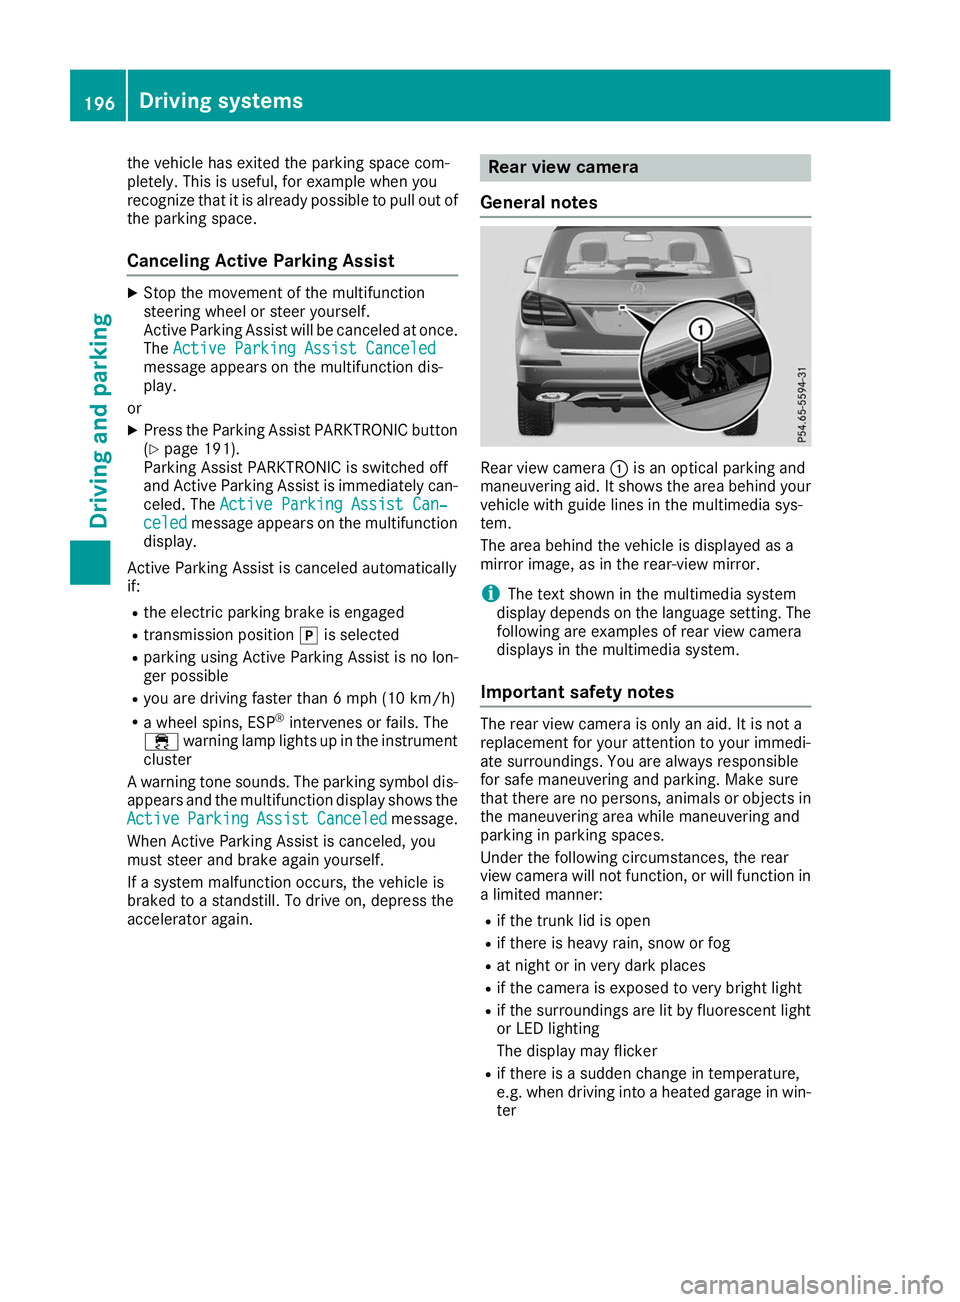
General notes Rear view camera
0043is an optical parking and
maneuvering aid. It shows the area behind your
vehicle with guide lines in the multimedia sys-
tem.
The area behind the vehicle is displayed as a
mirror image, as in the rear-view mirror.
i The text shown in the multimedia system
display depends on the language setting. The
following are examples of rear view camera
displays in the multimedia system.
Important safety notes The rear view camera is only an aid. It is not a
replacement for your attention to your immedi-
ate surroundings. You are always responsible
for safe maneuvering and parking. Make sure
that there are no persons, animals or objects in
the maneuvering area while maneuvering and
parking in parking spaces.
Under the following circumstances, the rear
view camera will not function, or will function in
a limited manner:
R if the trunk lid is open
R if there is heavy rain, snow or fog
R at night or in very dark places
R if the camera is exposed to very bright light
R if the surroundings are lit by fluorescent light
or LED lighting
The display may flicker
R if there is a sudden change in temperature,
e.g. when driving into a heated garage in win-
ter 196
Driving systemsDriving an
d parking
Page 210 of 398
If the lanes are narrow, vehicles driving in the
lane beyond the lane next to your vehicle may be
indicated, especially if the vehicles are not driv-
ing in the middle of their lane. This may be the
case if there are vehicles driving at the inner
edge of their lanes.
Due to the nature of the system:
R warnings may be issued in error when driving
close to crash barriers or similar solid lane
borders.
R the warning is canceled when driving for an
extended period next to long vehicles, such as
trucks.
Warning lamp
Blind Spot Assist is not active at speeds below
approximately 20 mph (30 km/h). Vehicles in
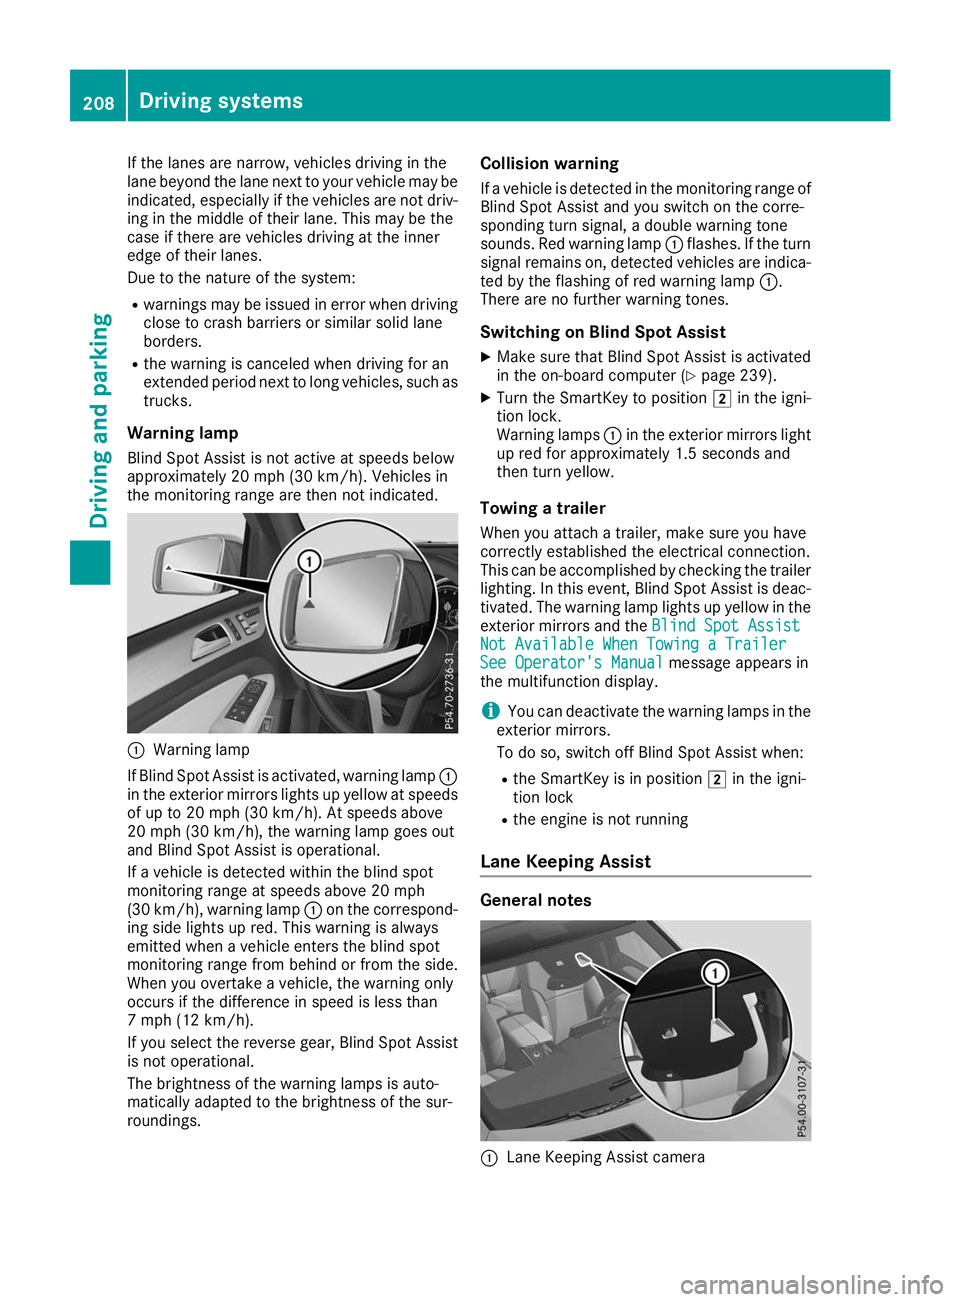
the monitoring range are then not indicated. 0043
Warning lamp
If Blind Spot Assist is activated, warning lamp 0043
in the exterior mirrors lights up yellow at speeds
of up to 20 mph (30 km/h). At speeds above
20 mph (30 km/h), the warning lamp goes out
and Blind Spot Assist is operational.
If a vehicle is detected within the blind spot
monitoring range at speeds above 20 mph
(30 km/h), warning lamp 0043on the correspond-
ing side lights up red. This warning is always
emitted when a vehicle enters the blind spot
monitoring range from behind or from the side.
When you overtake a vehicle, the warning only
occurs if the difference in speed is less than
7 mph (12 km/h).
If you select the reverse gear, Blind Spot Assist
is not operational.
The brightness of the warning lamps is auto-
matically adapted to the brightness of the sur-
roundings. Collision warning
If a vehicle is detected in the monitoring range of
Blind Spot Assist and you switch on the corre-
sponding turn signal, a double warning tone
sounds. Red warning lamp 0043flashes. If the turn
signal remains on, detected vehicles are indica-
ted by the flashing of red warning lamp 0043.
There are no further warning tones.
Switching on Blind Spot Assist X Make sure that Blind Spot Assist is activated
in the on-board computer (Y page 239).
X Turn the SmartKey to position 0048in the igni-
tion lock.
Warning lamps 0043in the exterior mirrors light
up red for approximately 1.5 seconds and
then turn yellow.
Towing a trailer
When you attach a trailer, make sure you have
correctly established the electrical connection.
This can be accomplished by checking the trailer
lighting. In this event, Blind Spot Assist is deac-
tivated. The warning lamp lights up yellow in the
exterior mirrors and the Blind Spot Assist
Blind Spot Assist
Not Available When Towing a Trailer Not Available When Towing a Trailer
See Operator's Manual See Operator's Manual message appears in
the multifunction display.
i You can deactivate the warning lamps in the
exterior mirrors.
To do so, switch off Blind Spot Assist when:
R the SmartKey is in position 0048in the igni-
tion lock
R the engine is not running
Lane Keeping Assist General notes
0043
Lane Keeping Assist camera 208
Driving systemsDriving and parking