2019 MERCEDES-BENZ GLS SUV battery
[x] Cancel search: batteryPage 159 of 398
X
Switch off the engine.
X Remove the SmartKey from the ignition lock.
or, on vehicles with KEYLESS ‑GO:
X Open the driver's door.
The vehicle electronics will now be in key
position 0092. This is the same as the SmartKey
having been removed.
The driver’s door can be closed again.
X Press the fuel filler flap in the direction of
arrow 0043.
The fuel filler flap swings up.
X Turn the fuel filler cap counter-clockwise and
remove it.
X Insert the fuel filler cap into the holder
bracket on the inside of filler flap 0044.
X Completely insert the filler neck of the fuel
pump nozzle into the tank, hook in place and refuel.
X Only fill the tank until the pump nozzle
switches off. Do not add any more fuel after the pump stops
filling for the first time. Otherwise, fuel may leak
out.
Closing the fuel filler flap X
Replace the cap on the filler neck and turn
clockwise until it engages audibly.
X Close the fuel filler flap.
Close the fuel filler flap before locking the vehi-
cle.
If you are driving with the fuel filler cap open, the
00B6 reserve fuel warning lamp flashes. A mes-
sage appears in the multifunction display
(Y page 260).
In addition, the 00B9Check Engine warning
lamp may light up (Y page 282). Problems with fuel and the fuel tank
Problem
Possible causes/consequences and
0050 0050Solutions Fuel is leaking from the
vehicle.
G
WARNING
The fuel line or the fuel tank is faulty.
Risk of explosion or fire. X Apply the electric parking brake.
X Switch off the engine.
X Remove the SmartKey from the ignition lock.
or, on vehicles with KEYLESS ‑GO:
X Open the driver's door.
The vehicle electronics will now be in key position 0092. This is the
same as the SmartKey having been removed.
X Do not restart the engine under any circumstances.
X Consult a qualified specialist workshop. The fuel filler flap cannot
be opened. The fuel filler flap is not unlocked.
X Unlock the vehicle (Y page 77). The SmartKey battery is discharged or nearly discharged.
X Unlock the vehicle using the mechanical key (Y page 79). The fuel filler flap is unlocked, but the opening mechanism is jammed.
X Consult a qualified specialist workshop. Refueling
157Driving and parking Z
Page 162 of 398
The electric parking brake is also applied auto-
matically if:
R Active Distance Assist DISTRONIC brings the
vehicle to a standstill or
R the HOLD function is keeping the vehicle sta-
tionary
R Active Parking Assist or the Parking Package
with rear view camera is keeping the vehicle
stationary
In addition, at least one of the following condi-
tions must be fulfilled:
R the engine is switched off
R the driver is not wearing a seat belt and the
driver's door is opened
R there is a system malfunction
R the power supply is insufficient
R the vehicle is stationary for a lengthy period
The red 0049(USA only) or 0024(Canada only)
indicator lamp in the instrument cluster lights
up.
The electric parking brake is not automatically
applied if the engine is switched off by the ECO
start/stop function.
Releasing automatically The electric parking brake is released automat-
ically when all of the following conditions are
fulfilled:
R The engine is running.
R The seat belt tongue is engaged in the belt
buckle.
R The transmission is in position 005Bor005E and
you depress the accelerator pedal or, on a
level surface, you shift from transmission
position 005Dto005B or005E.
R If the transmission is in position 005E, the trunk
lid must be closed.
If the seat belt tongue is not engaged in the seat belt buckle, the following conditions must be
fulfilled:
R The driver's door is closed.
R You are shifting from transmission position
005D or have previously driven at speeds
greater than 2 mph (3 km/h).
R If the transmission is in position 005E, the trunk
lid must be closed.
When the electric parking brake is released,
the 0024 indicator lamp goes out in the instru-
ment cluster. Emergency braking
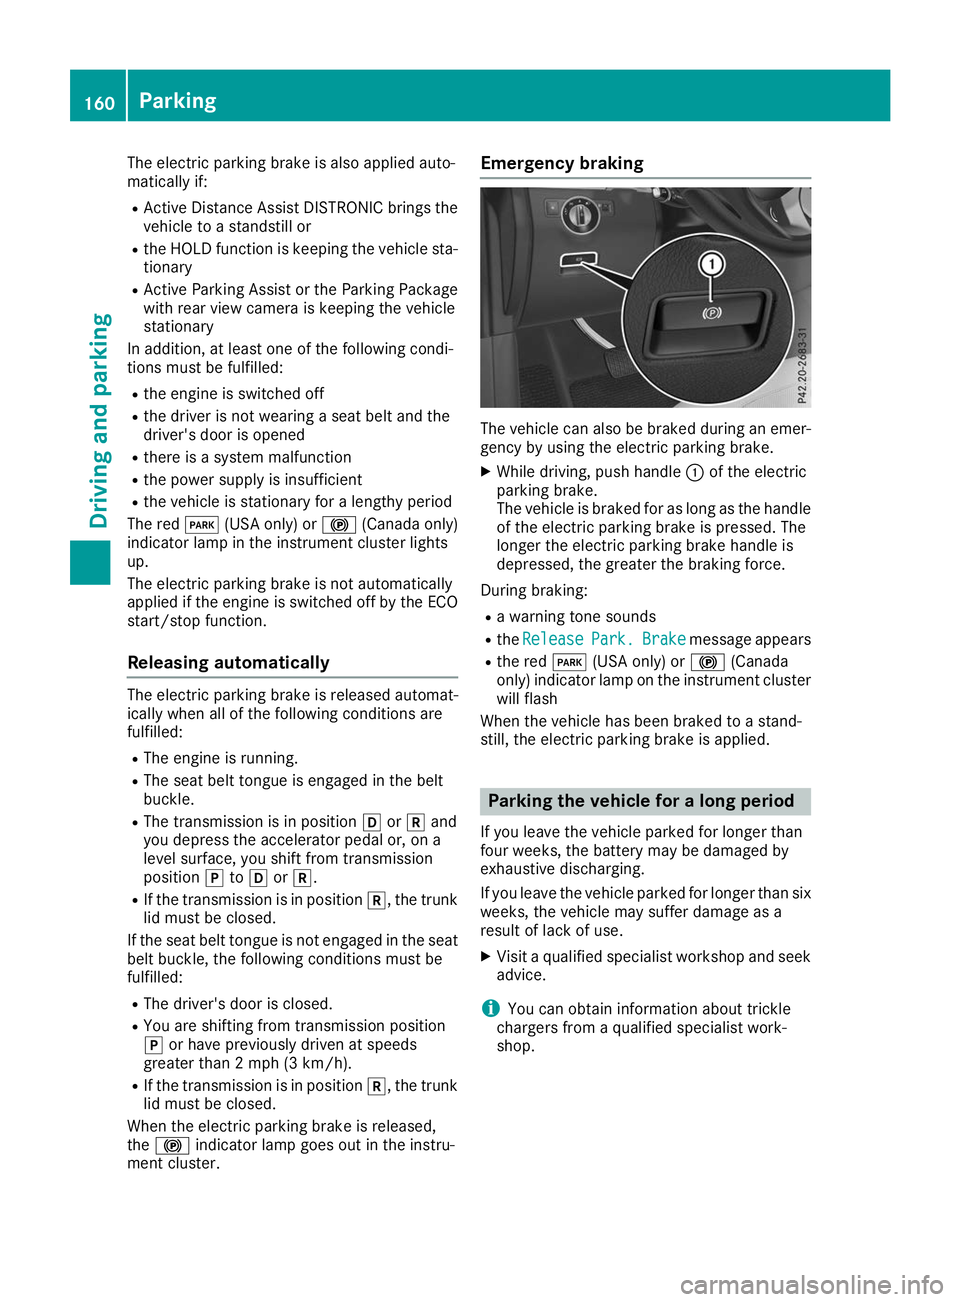
The vehicle can also be braked during an emer-
gency by using the electric parking brake.
X While driving, push handle 0043of the electric
parking brake.
The vehicle is braked for as long as the handle of the electric parking brake is pressed. The
longer the electric parking brake handle is
depressed, the greater the braking force.
During braking:
R a warning tone sounds
R the Release Release Park.
Park.Brake
Brakemessage appears
R the red 0049(USA only) or 0024(Canada
only) indicator lamp on the instrument cluster will flash
When the vehicle has been braked to a stand-
still, the electric parking brake is applied. Parking the vehicle for a long period
If you leave the vehicle parked for longer than
four weeks, the battery may be damaged by
exhaustive discharging.
If you leave the vehicle parked for longer than six weeks, the vehicle may suffer damage as a
result of lack of use.
X Visit a qualified specialist workshop and seek
advice.
i You can obtain information about trickle
chargers from a qualified specialist work-
shop. 160
ParkingDriving and parking
Page 178 of 398
between your vehicle and the vehicle in front
becomes too small.
i When you change lanes, Active Distance
Assist DISTRONIC monitors the right lane (in
left-side traffic) or the left lane (in right-side
traffic).
Stopping G
WARNING
If you leave the driver's seat when the vehicle is only being braked by Active Distance Assist
DISTRONIC, it could roll away:
R if there is a malfunction in the system or in
the voltage supply
R if Active Distance Assist DISTRONIC is
deactivated using the cruise control lever,
for example by a vehicle occupant or from
outside the vehicle
R if the electrical system in the engine com-
partment, the battery or the fuses are tam-
pered with
R if the battery is disconnected
R if the vehicle is accelerated, e.g. by a vehi-
cle occupant
There is a risk of an accident.
Always deactivate Active Distance Assist
DISTRONIC and secure the vehicle against
rolling away before you leave it.
If Active Distance Assist DISTRONIC detects
that the vehicle in front is stopping, it brakes
your vehicle until it is stationary.
Once your vehicle is stationary, it remains sta-
tionary and you do not need to depress the
brake.
After a time, the electric parking brake secures
the vehicle and relieves the service brake.
Depending on the specified minimum distance,
your vehicle will come to a standstill at a suffi-
cient distance behind the vehicle in front. The
specified minimum distance is set using the
control on the cruise control lever. When Active Distance Assist DISTRONIC is acti-
vated and the vehicle is at a standstill, the trans-
mission will be shifted automatically to position
005D if:
R the driver's door is open and the driver's seat
belt is unfastened.
R the engine is switched off, unless it is auto-
matically switched off by the ECO start/stop
function.
When Active Distance Assist DISTRONIC is acti-
vated and the vehicle is at a standstill, the elec- tric parking brake will secure the vehicle auto-
matically if:
R a system malfunction occurs
R the power supply is not sufficient
On steep uphill or downhill inclines or if there is
a malfunction, the transmission may also be
automatically shifted into position 005D.
Setting a speed Keep in mind that it may take a brief moment
until the vehicle has accelerated or braked to
the speed set.
X Press the cruise control lever up 0043for a
higher speed or down 0083for a lower speed
X To adjust the set speed in 1 mph incre-
ments (1 km/h increments):
briefly press
the cruise control lever up 0043or down 0044to
the pressure point.
Every time the cruise control lever is pressed
up 0043 or down 0044the last speed stored is
increased or reduced.
X To adjust the set speed in 5 mph incre-
ments
(10 km/h increments): briefly press
the cruise control lever up 0043or down 0044
beyond the pressure point.
Every time the cruise control lever is pressed
up 0043 or down 0044, the last speed stored is
increased or reduced.
i If you accelerate to overtake, Active Dis-
tance Assist DISTRONIC adjusts the vehicle's
speed to the last speed stored after you have
finished overtaking. 176
Driving systemsDriving and parking
Page 196 of 398
R
that are parallel to the direction of travel and
at least 39.5 in (1.0 m)longer than your vehi-
cle
R that are at right angles to the direction of
travel and at least 39.5 in (1.0 m) wider than
your vehicle
i Note that Active Parking Assist cannot
measure the size of a parking space if it is at
right angles to the direction of travel. You will
need to judge whether your vehicle will fit into the parking space.
When driving at speeds below 19 mph
(30 km/h), you will see parking symbol 0044as a
status indicator in the instrument cluster. When
a parking space has been detected, an arrow
towards the right or the left also appears. By
default, Active Parking Assist only displays park- ing spaces on the front-passenger side. Parking spaces on the driver's side are displayed as
soon as the turn signal on the driver's side is
activated. When parking on the driver's side,
this must remain activated until you confirm the
use of Active Parking Assist by pressing the
0076 button on the multifunction steering
wheel. The system automatically determines
whether the parking space is parallel or at right
angles to the direction of travel.
A parking space is displayed while you are driv- ing past it, and until you are approximately 50 ft
(15 m) away from it.
Parking G
WARNING
If you leave the driver's seat when the vehicle is being braked only by the Active Parking
Assist, it could roll away in the following sit-
uations:
R if there is a malfunction in the system or in
the voltage supply
R if the electrical system in the engine com-
partment, the battery or the fuses have
been tampered with
R if the battery is disconnected
R if the vehicle is accelerated, e.g. by a vehi-
cle occupant
There is a risk of an accident.
Before leaving the vehicle, always secure it
against rolling away. i
If Parking Assist PARKTRONIC detects
obstacles, Active Parking Assist will brake
automatically whilst the vehicle is parking.
You are responsible for braking in good time.
X Stop the vehicle when the parking space sym-
bol shows the desired parking space in the
instrument cluster.
X Shift the transmission to position 005E.
The Start
Start Parking Parking Assist?
Assist?Yes:
Yes:OK
OKNo:
No:
0038 message will appear on the multifunc-
tion display.
X To cancel the procedure: press the0038
button on the multifunction steering wheel or pull away.
or
X To park using Active Parking Assist: press
the 0076 button on the multifunction steering
wheel.
The Parking
Parking Assist AssistActive
ActiveAccelerate
Accelerate
and Brake Observe Surroundings
and Brake Observe Surroundings mes-
sage will appear on the multifunction display.
X Let go of the multifunction steering wheel.
X Back up the vehicle, being ready to brake at all
times. When backing up, drive at a speed
below approximately 6 mph (10 km/h). Oth-
erwise, Active Parking Assist will be canceled.
Active Parking Assist brakes the vehicle to a
standstill when the vehicle approaches the
rear border of the parking space.
Maneuvering may be required in tight parking
spaces.
The Parking Assist Active Select D Parking Assist Active Select D
Observe Surroundings
Observe Surroundings message will appear
on the multifunction display.
X Shift the transmission to position 005Bwhile
the vehicle is stationary.
Active Parking Assist immediately steers in
the other direction.
The Parking Parking Assist
AssistActive
ActiveAccelerate
Accelerate
and Brake Observe Surroundings
and Brake Observe Surroundings mes-
sage will appear on the multifunction display.
i You will achieve the best results by waiting
for the steering procedure to complete before
pulling away.
X Drive forwards and be ready to brake at all
times.
Active Parking Assist brakes the vehicle to a
standstill.
The Parking Assist Active Select R Parking Assist Active Select R
Observe Surroundings
Observe Surroundings message will appear
on the multifunction display. 194
Driving systemsDriving and parking
Page 229 of 398
X
Clean the ball coupling if it is dirty.
X Stow the ball coupling so that it cannot be
thrown around.
Observe the loading guidelines (Y page 295)
and the safety notes regarding stowage spaces
(Y page 295).
Information on cleaning and care of the trailer
tow hitch (Y page 331). Trailer power supply
! Accessories with a maximum power con-
sumption of 180 W can be connected to the
permanent power supply.
You must not charge a trailer battery using the
power supply.
The trailer socket of your vehicle is equipped at
the factory with a permanent power supply.
The permanent power supply is supplied via
trailer socket pin 4.
The trailer's permanent power supply is
switched off in the event of low vehicle supply
voltage and after six hours at the latest.
A qualified specialist workshop can provide
more information about installing the trailer
electrics. Bicycle rack
General notes
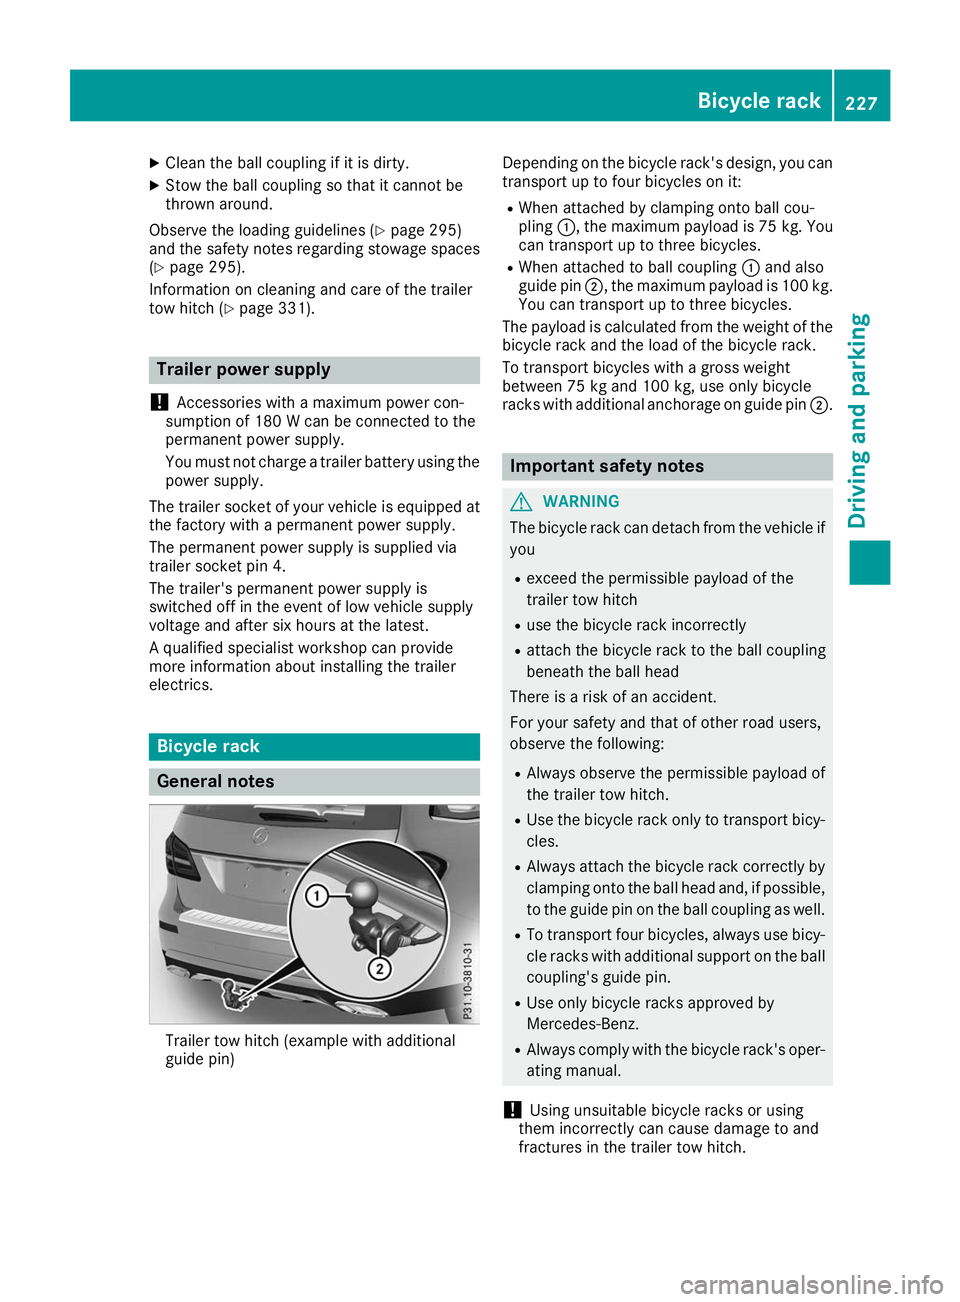
Trailer tow hitch (example with additional
guide pin) Depending on the bicycle rack's design, you can
transport up to four bicycles on it:
R When attached by clamping onto ball cou-
pling 0043, the maximum payload is 75 kg. You
can transport up to three bicycles.
R When attached to ball coupling 0043and also
guide pin 0044, the maximum payload is 100 kg.
You can transport up to three bicycles.
The payload is calculated from the weight of the
bicycle rack and the load of the bicycle rack.
To transport bicycles with a gross weight
between 75 kg and 100 kg, use only bicycle
racks with additional anchorage on guide pin 0044. Important safety notes
G
WARNING
The bicycle rack can detach from the vehicle if
you
R exceed the permissible payload of the
trailer tow hitch
R use the bicycle rack incorrectly
R attach the bicycle rack to the ball coupling
beneath the ball head
There is a risk of an accident.
For your safety and that of other road users,
observe the following:
R Always observe the permissible payload of
the trailer tow hitch.
R Use the bicycle rack only to transport bicy-
cles.
R Always attach the bicycle rack correctly by
clamping onto the ball head and, if possible, to the guide pin on the ball coupling as well.
R To transport four bicycles, always use bicy-
cle racks with additional support on the ball
coupling's guide pin.
R Use only bicycle racks approved by
Mercedes-Benz.
R Always comply with the bicycle rack's oper-
ating manual.
! Using unsuitable bicycle racks or using
them incorrectly can cause damage to and
fractures in the trailer tow hitch. Bicycle rack
227Driving and parking Z
Page 252 of 398
Display messages
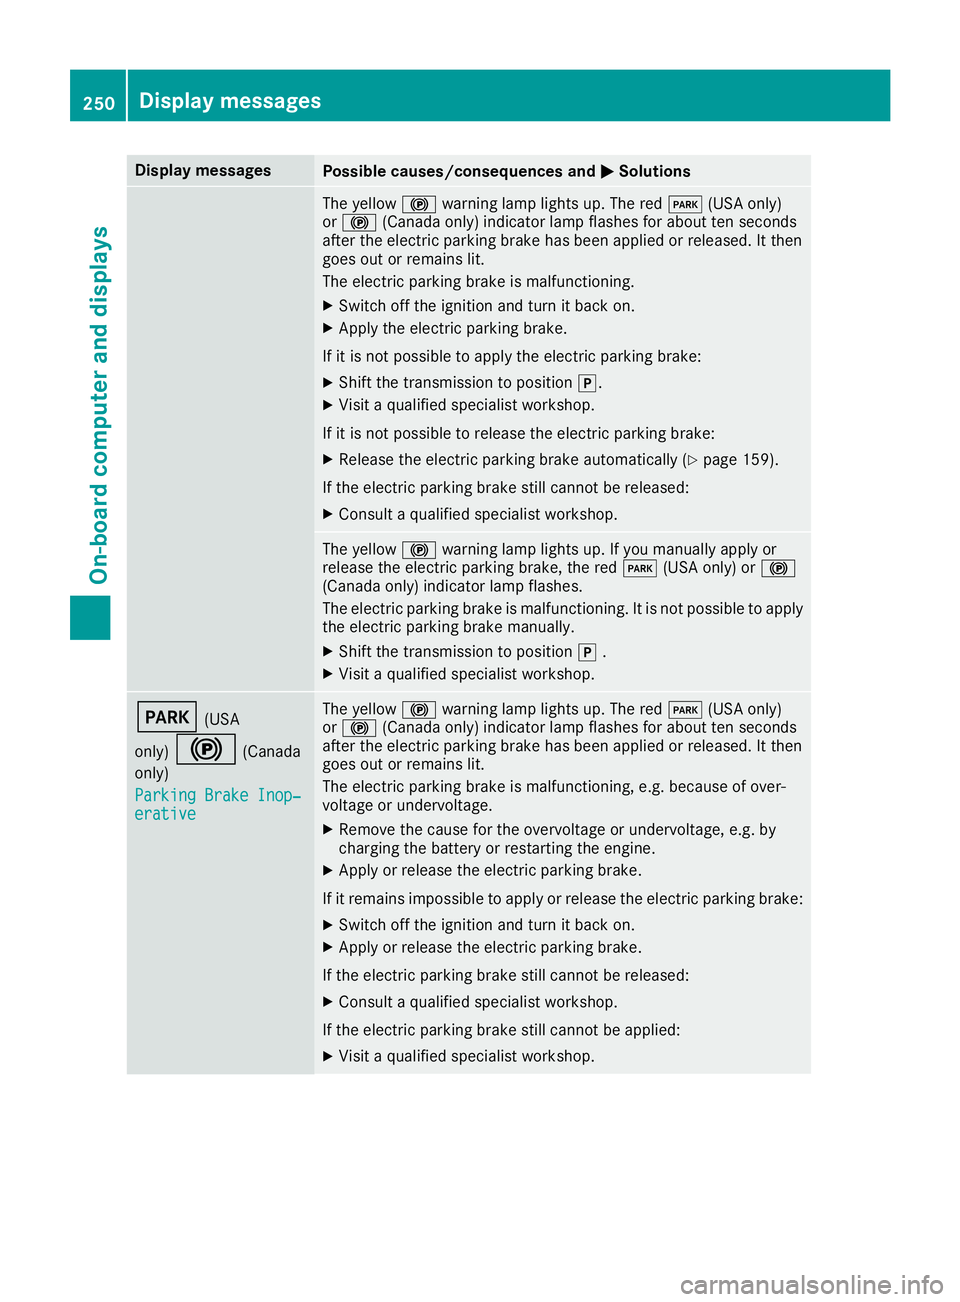
Possible causes/consequences and
0050
0050Solutions The yellow
0024warning lamp lights up. The red 0049(USA only)
or 0024 (Canada only) indicator lamp flashes for about ten seconds
after the electric parking brake has been applied or released. It then
goes out or remains lit.
The electric parking brake is malfunctioning.
X Switch off the ignition and turn it back on.
X Apply the electric parking brake.
If it is not possible to apply the electric parking brake:
X Shift the transmission to position 005D.
X Visit a qualified specialist workshop.
If it is not possible to release the electric parking brake:
X Release the electric parking brake automatically (Y page 159).
If the electric parking brake still cannot be released:
X Consult a qualified specialist workshop. The yellow
0024warning lamp lights up. If you manually apply or
release the electric parking brake, the red 0049(USA only) or 0024
(Canada only) indicator lamp flashes.
The electric parking brake is malfunctioning. It is not possible to apply
the electric parking brake manually.
X Shift the transmission to position 005D.
X Visit a qualified specialist workshop. 0049
(USA
only) 0024 (Canada
only)
Parking Brake Inop‐
Parking Brake Inop‐
erative erative The yellow
0024warning lamp lights up. The red 0049(USA only)
or 0024 (Canada only) indicator lamp flashes for about ten seconds
after the electric parking brake has been applied or released. It then
goes out or remains lit.
The electric parking brake is malfunctioning, e.g. because of over-
voltage or undervoltage.
X Remove the cause for the overvoltage or undervoltage, e.g. by
charging the battery or restarting the engine.
X Apply or release the electric parking brake.
If it remains impossible to apply or release the electric parking brake:
X Switch off the ignition and turn it back on.
X Apply or release the electric parking brake.
If the electric parking brake still cannot be released: X Consult a qualified specialist workshop.
If the electric parking brake still cannot be applied:
X Visit a qualified specialist workshop. 250
Display
messagesOn-board computer and displays
Page 261 of 398
Display messages
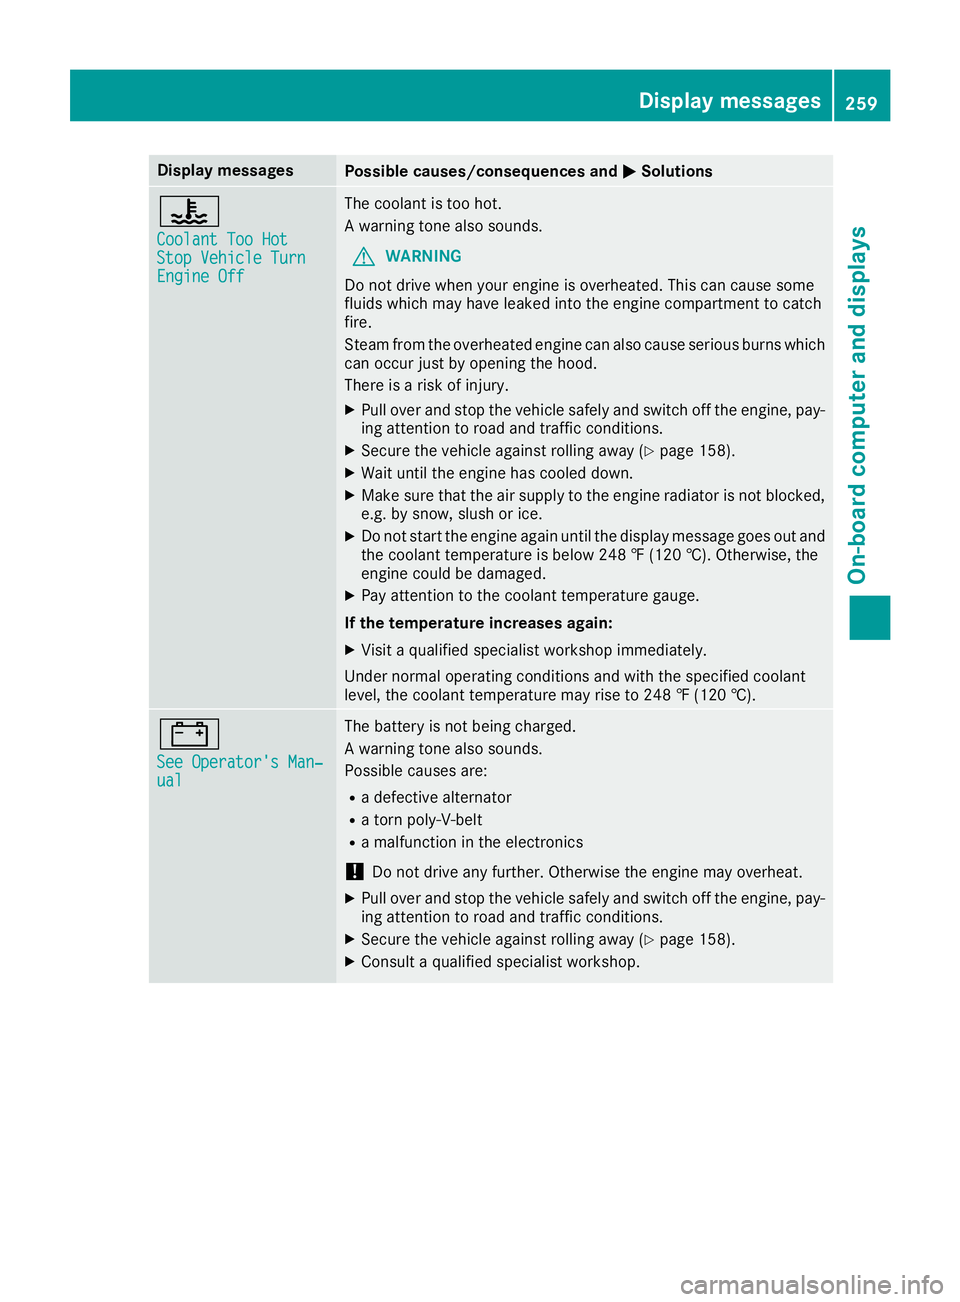
Possible causes/consequences and
0050
0050Solutions 00AC
Coolant Too Hot Coolant Too Hot
Stop Vehicle Turn Stop Vehicle Turn
Engine Off Engine Off The coolant is too hot.
A warning tone also sounds.
G WARNING
Do not drive when your engine is overheated. This can cause some
fluids which may have leaked into the engine compartment to catch
fire.
Steam from the overheated engine can also cause serious burns which can occur just by opening the hood.
There is a risk of injury.
X Pull over and stop the vehicle safely and switch off the engine, pay-
ing attention to road and traffic conditions.
X Secure the vehicle against rolling away (Y page 158).
X Wait until the engine has cooled down.
X Make sure that the air supply to the engine radiator is not blocked,
e.g. by snow, slush or ice.
X Do not start the engine again until the display message goes out and
the coolant temperature is below 248 ‡ (120 †). Otherwise, the
engine could be damaged.
X Pay attention to the coolant temperature gauge.
If the temperature increases again: X Visit a qualified specialist workshop immediately.
Under normal operating conditions and with the specified coolant
level, the coolant temperature may rise to 248 ‡ (120 †). 003D
See Operator's Man‐ See Operator's Man‐
ual ual The battery is not being charged.
A warning tone also sounds.
Possible causes are:
R a defective alternator
R a torn poly-V-belt
R a malfunction in the electronics
! Do not drive any further. Otherwise the engine may overheat.
X Pull over and stop the vehicle safely and switch off the engine, pay-
ing attention to road and traffic conditions.
X Secure the vehicle against rolling away (Y page 158).
X Consult a qualified specialist workshop. Display
messages
259On-board computer and displays Z
Page 262 of 398
Display messages
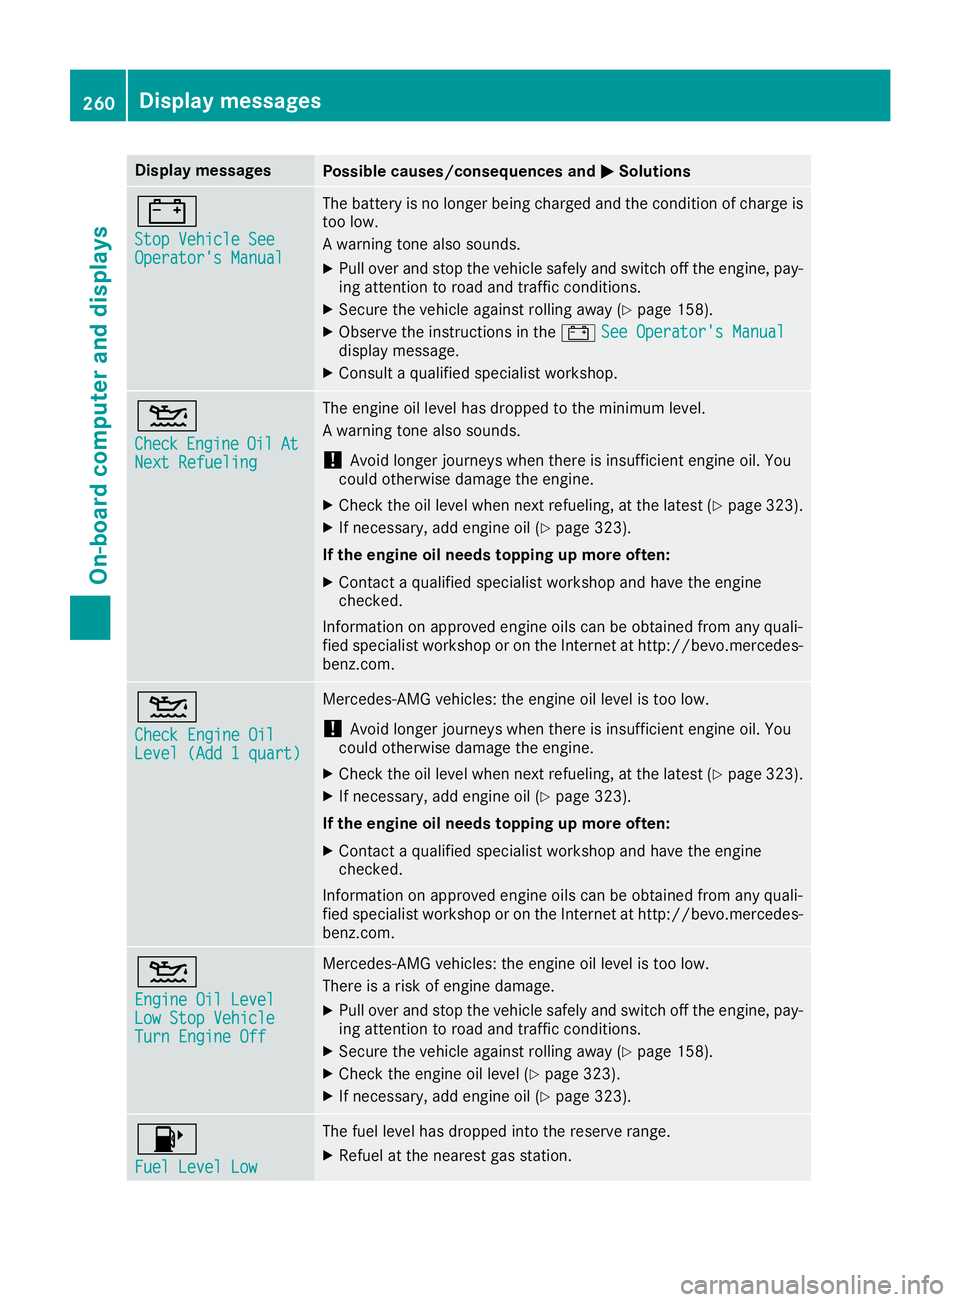
Possible causes/consequences and
0050
0050Solutions 003D
Stop Vehicle See Stop Vehicle See
Operator's Manual Operator's Manual The battery is no longer being charged and the condition of charge is
too low.
A warning tone also sounds.
X Pull over and stop the vehicle safely and switch off the engine, pay-
ing attention to road and traffic conditions.
X Secure the vehicle against rolling away (Y page 158).
X Observe the instructions in the 003DSee Operator's Manual
See Operator's Manual
display message.
X Consult a qualified specialist workshop. 00B2
Check Check
Engine
Engine Oil
OilAt
At
Next Refueling
Next Refueling The engine oil level has dropped to the minimum level.
A warning tone also sounds.
! Avoid longer journeys when there is insufficient engine oil. You
could otherwise damage the engine.
X Check the oil level when next refueling, at the latest (Y page 323).
X If necessary, add engine oil (Y page 323).
If the engine oil needs topping up more often: X Contact a qualified specialist workshop and have the engine
checked.
Information on approved engine oils can be obtained from any quali-
fied specialist workshop or on the Internet at http://bevo.mercedes- benz.com. 00B2
Check Engine Oil Check Engine Oil
Level (Add 1 quart) Level (Add 1 quart) Mercedes-AMG vehicles: the engine oil level is too low.
! Avoid longer journeys when there is insufficient engine oil. You
could otherwise damage the engine.
X Check the oil level when next refueling, at the latest (Y page 323).
X If necessary, add engine oil (Y page 323).
If the engine oil needs topping up more often: X Contact a qualified specialist workshop and have the engine
checked.
Information on approved engine oils can be obtained from any quali-
fied specialist workshop or on the Internet at http://bevo.mercedes- benz.com. 00B2
Engine Oil Level Engine Oil Level
Low Stop Vehicle Low Stop Vehicle
Turn Engine Off Turn Engine Off Mercedes-AMG vehicles: the engine oil level is too low.
There is a risk of engine damage.
X Pull over and stop the vehicle safely and switch off the engine, pay-
ing attention to road and traffic conditions.
X Secure the vehicle against rolling away (Y page 158).
X Check the engine oil level (Y page 323).
X If necessary, add engine oil (Y page 323).00B6
Fuel Level Low Fuel Level Low The fuel level has dropped into the reserve range.
X Refuel at the nearest gas station. 260
Display
messagesOn-board computer and displays