2019 MERCEDES-BENZ GLS SUV towing
[x] Cancel search: towingPage 24 of 398
Display message ............................ 268
Distribution of the vehicle occu-
pants (definition) ............................ 372
DOT (Department of Transporta-
tion) (definition) ............................. 370
DOT, Tire Identification Number
(TIN) ............................................... 370
GAWR (Gross Axle Weight Rating)
(definition) .................................... .371
GTW (Gross Trailer Weight) (defi-
nition) ............................................ 371
GVW (Gross Vehicle Weight) (def-
inition) .......................................... .371
GVWR (Gross Vehicle Weight Rat-
ing) (definition) .............................. 371
Important safety notes .................. 352
Increased vehicle weight due to
optional equipment (definition) ...... 371
Information on driving .................... 352
Kilopascal (kPa) (definition) ........... 371
Labeling (overview )........................ 367
Load bearing index (definition) ...... 372
Load index ..................................... 369
Load index (definition) ................... 371
M+S tire s....................................... 354
Maximum load on a tire (defini-
tion) ............................................... 371
Maximum loaded vehicle weight
(definition) ..................................... 371
Maximum permissible tire pres-
sure (definition) ............................. 371
Maximum tire load ......................... 369
Maximum tire load (definition) ....... 371
MOExtended tire s.......................... 353
Optional equipment weight (defi-
nition) ............................................ 372
PSI (pounds per square inch) (def-
inition) ........................................... 372
Replacing ....................................... 372
Service life ..................................... 353
Sidewall (definition) ....................... 372
Snow chains .................................. 354
Speed rating (definition) ................ 371
Storing ........................................... 373
Structure and characteristics
(definition) ..................................... 370
Summer tires in winter .................. 354
Temperature .................................. 366 TIN (Tire Identification Number)
(definition) ..................................... 372
Tire bead (definition) ...................... 372
Tire pressure (definition) ................ 372
Tire pressures (recommended) ...... 371
Tire size (data) ............................... 377
Tire size designation, load-bearing
capacity, speed rating .................... 367
Tire tread ....................................... 353
Tire tread (definition) ..................... 372
Total load limit (definition) ............. 372
Traction ......................................... 366
Traction (definition) ....................... 372
Tread wear ..................................... 366
TWR (permissible trailer drawbar
noseweight) (definition) ................. 372
Uniform Tire Quality Grading
Standards ...................................... 366
Uniform Tire Quality Grading
Standards (definition) .................... 370
Wear indicator (definition) ............. 372
Wheel and tire combination ........... 377
Wheel rim (definition) .................... 371
see Flat tire
Tool
see Vehicle tool kit
Top Tether ............................................ 63
Tow-starting
Emergency engine starting ............ 349
Important safety notes .................. 346
Towing
Permitted towing methods ............ 347
Towing a trailer
Axle load, permissibl e.................... 392
Cleaning the trailer tow hitch ......... 331
Coupling up a traile r...................... 224
Decoupling a trailer ....................... 226
Driving tip s.................................... 222
Important safety notes .................. 221
Installing the ball coupling ............. 223
Lights display message .................. 257
Mounting dimensions .................... 392
Parking Assist PARKTRONIC .......... 189
Power supply ................................. 227
Pulling away with a traile r.............. 143
Removing the ball coupling ............ 226
Trailer load s................................... 392 22
Index
Page 25 of 398
Towing away
Important safety guidelines ........... 346
Installing the towing eye ................ 347
Notes for 4MATIC vehicles ............ 349
Removing the towing eye ............... 347
Transporting the vehicle ................ 348
With both axles on the ground ....... 347
Towing eye ......................................... 335
Traffic reports
see also Digital Operator's Man-
ual .................................................. 287
Traffic Sign Assist
Activating/deactivating the warn-ing function .................................... 238
Display message ............................ 264
Function/note s............................. 206
Important safety notes .................. 206
Instrument cluster display ............. 206
Trailer coupling
see Towing a trailer
Trailer loads and drawbar nose-
weights ............................................... 226
Trailer towing
Active Blind Spot Assist ................. 212
Active Lane Keeping Assist ............ 215
Blind Spot Assist ............................ 208
Permissible trailer loads and
drawbar noseweights ..................... 226
Transfer case ..................................... 155
Transmission
see Automatic transmission
Transmission position display ......... 149
Transporting the vehicle .................. 348
Traveling uphill
Brow of hill ..................................... 170
Driving downhill ............................. 170
Maximum gradient-climbing capa-
bility ............................................... 170
Trim pieces (cleaning instruc-
tions) .................................................. 332
Trip computer (on-board com-
puter) .................................................. 233
Trip odometer
Calling up ....................................... 233
Resetting (on-board computer) ...... 234
Trunk
see Tailgate Turn signals
Display message ............................ 257
Replacing bulbs (front) ................... 122
Switching on/of f........................... 116
Two-way radio
Frequencies ................................... 382
Installation ..................................... 382
Transmission output (maximum) .... 382
TWR (Tongue Weight Rating) (defi-
nition) ................................................. 372
Type identification plate
see Vehicle identification plate U
Unlocking Emergency unlocking ....................... 84
From inside the vehicle (central
unlocking button) ............................. 83
Upshift indicator (on-board com-
puter, Mercedes-AMG vehicles) ....... 242
USB devices
Connecting to the Media Inter-
face ............................................... 294 V
Vanity mirror (in the sun visor) ........ 305
Vehicle
Correct use ...................................... 31
Data acquisition ............................... 32
Display message ............................ 270
Equipment ....................................... 28
Individual settings .......................... 240
Limited Warranty ............................. 32
Loading .......................................... 362
Locking (in an emergency) ............... 84
Locking (SmartKey) .......................... 77
Lowering ........................................ 377
Maintenance .................................... 29
Operating safety .............................. 30
Parking .......................................... 158
Parking for a long period ................ 160
Pulling away ................................... 143
Raising ........................................... 374
REACH Regulation ........................... 31
Reporting problems ......................... 32
Securing from rolling away ............ 374 Index
23
Page 26 of 398

Towing away ..................................3
46
Transporting .................................. 348
Unlocking (in an emergency) ........... 84
Unlocking (SmartKey) ..................... .77
Vehicle data ................................... 389
Vehicle battery
see Battery (vehicle)
Vehicle data ....................................... 389
Vehicle data (off-road driving)
Approach/departure angle ............ 391
Maximum gradient climbing abil-
ity .................................................. 392
Maximum water depth ................... 390
Vehicle dimensions ........................... 389
Vehicle emergency locking ................ 84
Vehicle identification number
see VIN
Vehicle identification plate .............. 383
Vehicle level
AIRMATIC ...................................... 187
Vehicle level (display message) ....... 261
Vehicle tool kit .................................. 335
Video
Operating the DVD .........................2 36
see also Digital Operator's Man-
ual ................................................. .287
VIN ...................................................... 383
Seat ............................................... 384
Type plate ...................................... 383 W
Warning and indicator lamps ABS ................................................ 277
Brakes .......................................... .276
Coolant .......................................... 283
Distance warning ........................... 285
Engine diagnostics ......................... 282
ESP ®
.............................................. 279
ESP ®
OFF ....................................... 280
Fuel tank ........................................ 282
Overview .......................................... 37
Parking brake ................................ 282
PASSENGER AIR BAG ..................... .45
Reserve fuel .................................. .282
Restraint system ............................ 282
Seat belt ........................................ 275
Tire pressure monitor .................... 286 Warranty
.............................................. 28
Washer fluid
Display message ............................ 273
Weather display (COMAND)
see also Digital Operator's Man-
ual.................................................. 287
Wheel and tire combinations
Tires ............................................... 377
Wheel bolt tightening torque ........... 377
Wheel chock ...................................... 374
Wheels
Changing a whee l.......................... 372
Checking ........................................ 352
Cleaning ......................................... 329
Emergency spare wheel ................. 378
Important safety notes .................. 352
Information on driving .................... 352
Interchanging/changing ................ 372
Mounting a new whee l................... 376
Mounting a whee l.......................... 373
Overview ........................................ 352
Removing a whee l.......................... 375
Snow chains .................................. 354
Storing ........................................... 373
Tightening torque ........................... 377
Wheel size/tire size ....................... 377
Window curtain air bag
Display message ............................ 254
Operation ......................................... 51
Windows
see Side windows
Windshield
Defrosting ...................................... 133
Infrared reflective .......................... 320
Windshield washer fluid
see Windshield washer system
Windshield washer system
Adding washer fluid ....................... 324
Important safety notes .................. 388
Windshield wipers
Problem (malfunction) ................... 124
Rear window wipe r........................ 123
Replacing the wiper blades ............ 123
Switching on/of f........................... 122
Winter driving
Slippery road surfaces ................... 165
Winter operation
Overview ........................................ 354 24
Index
Page 63 of 398
Activating the special seat belt retractor:
X Pull the seat belt out fully and let the inertia
reel retract it again.
While the seat belt is retracting, you should
hear a ratcheting sound. The special seat belt retractor is enabled.
X Push the child restraint system down so that
the seat belt is tight and does not loosen.
Removing the child restraint system and deac-
tivating the special seat belt retractor:
X Make sure you observe the child restraint
system manufacturer's installation instruc-
tions.
X Press the release button of the seat belt
buckle and guide the seat belt tongue back
towards the belt sash guide.
The special seat belt retractor is deactivated. child restraint system
The use of seat belts and child restraint systems
is required by law in:
R all 50 states
R the U.S. territories
R the District of Columbia
R all Canadian provinces
If you install a rearward-facing child restraint
system on the center rear seat, the rear arm rest must be folded back as far as possible.
You can obtain further information about the
correct child restraint system from any author-
ized Mercedes-Benz Center. G
WARNING
If the child restraint system is installed incor- rectly on a suitable seat, it cannot protect as
intended. The child cannot then be restrained in the event of an accident, heavy braking or
sudden changes of direction. There is an
increased risk of injury, possibly even fatal.
Make sure that you observe the child restraint
system manufacturer's installation instruc-
tions and the notes on use. Please ensure,
that the base of the child restraint system is
always resting completely on the seat cush-
ion. Never place objects, e.g. cushions, under or behind the child restraint system. Only use
child restraint systems with the original cover designed for them. Only replace damaged
covers with genuine covers.
G
WARNING
If the child restraint system is installed incor- rectly or is not secured, it can come loose in
the event of an accident, heavy braking or a
sudden change in direction. The child
restraint system could be thrown about, strik- ing vehicle occupants. There is an increased
risk of injury, possibly even fatal.
Always install child restraint systems prop-
erly, even if they are not being used. Make
sure that you observe the child restraint sys-
tem manufacturer's installation instructions.
You will find further information on stowing
objects, luggage or loads under "Loading guide-
lines" (Y page 295). G
WARNING
Child restraint systems or their securing sys-
tems which have been damaged or subjected to a load in an accident can no longer protect
as intended. The child cannot then be
restrained in the event of an accident, heavy
braking or sudden changes of direction. There is an increased risk of injury, possibly even
fatal.
Replace child restraint systems which have
been damaged or subjected to a load in an
accident as soon as possible. Have the secur-
ing systems on the child restraint system
checked at a qualified specialist workshop,
before you install a child restraint system
again.
The securing systems of child restraint systems
are:
R the seat belt system
R the LATCH-type (ISOFIX) securing rings
R the Top Tether anchorages
If it is absolutely necessary to carry a child on
the front passenger seat, be sure to observe the information on the "Occupant Classification
System (OCS)" (Y page 51). There you will also
find information on disabling the front
passenger front air bag. Children in the vehicle
61Safety Z
Page 118 of 398
The daytime running lamps improve the visibility
of your vehicle during the day. To do this, the
daytime running lamps function must be
switched on using the on-board computer
(Y page 240).
If the engine is running and you turn the light
switch to 0060or0058, the manual settings
take precedence over the daytime running
lamps.
Low-beam headlamps
Even if the light sensor does not detect that it is dark, the parking lamps and low-beam head-
lamps switch on when the ignition is switched on and the light switch is set to the 0058position.
This is a particularly useful function in the event
of rain and fog.
X To switch on the low-beam headlamps:
turn the SmartKey to position
0048in the igni-
tion lock or start the engine.
X Turn the light switch to 0058.
The green 0058indicator lamp in the instru-
ment cluster lights up.
Rear fog lamp
The rear fog lamp improves visibility of your
vehicle for the traffic behind in the event of thick fog. Please take note of the country-specific
regulations for the use of rear fog lamps.
X To switch on the rear fog lamp: turn the
SmartKey to position 0048in the ignition lock or
start the engine.
X Turn the light switch to 0058or0071.
X Press the 005Ebutton.
The yellow 005Eindicator lamp in the instru-
ment cluster lights up.
X To switch off the rear fog lamp: press the
005E button.
The yellow 005Eindicator lamp in the instru-
ment cluster goes out.
Parking lamps ! If the battery charge is very low, the parking
lamps or standing lamps are automatically
switched off to enable the next engine start.
Always park your vehicle safely and in a well lit area, in accordance with the relevant legal
stipulations. Avoid using the 0060parking
lamps over a period of several hours. If pos-
sible, switch on the right-hand 0064or left-
hand 0063 standing lamps. X
To switch on: turn the light switch to 0060.
The green 0060indicator lamp in the instru-
ment cluster lights up.
Standing lamps Switching on the standing lamps ensures the
corresponding side of the vehicle is illuminated.X To switch on the standing lamps: the
SmartKey should not be in the ignition lock or in key position 0092in the ignition lock.
X Turn the light switch to 0063(left-hand side of
the vehicle) or 0064(right-hand side of the
vehicle).
Vehicles towing a trailer: both the right-hand
and left-hand standing lamps (tail lamps) are
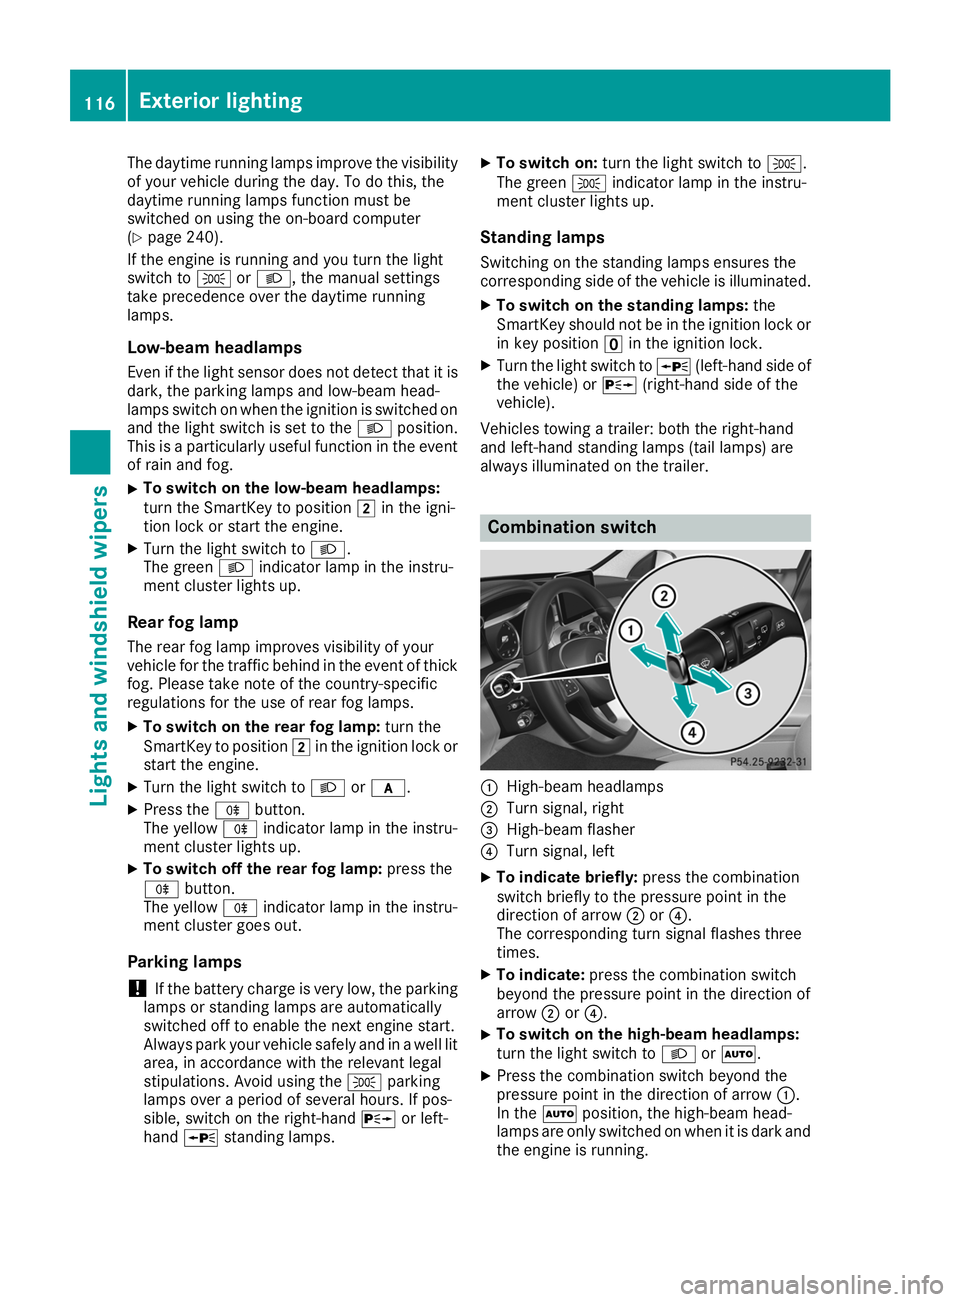
always illuminated on the trailer. Combination switch
0043
High-beam headlamps
0044 Turn signal, right
0087 High-beam flasher
0085 Turn signal, left
X To indicate briefly: press the combination
switch briefly to the pressure point in the
direction of arrow 0044or0085.
The corresponding turn signal flashes three
times.
X To indicate: press the combination switch
beyond the pressure point in the direction of
arrow 0044or0085.
X To switch on the high-beam headlamps:
turn the light switch to 0058or0058.
X Press the combination switch beyond the
pressure point in the direction of arrow 0043.
In the 0058position, the high-beam head-
lamps are only switched on when it is dark and
the engine is running. 116
Exterior lightingLights and windshield wipers
Page 153 of 398
Kickdown
Use kickdown for maximum acceleration.
X Depress the accelerator pedal beyond the
pressure point.
The automatic transmission shifts to a lower
gear depending on the engine speed.
X Ease off the accelerator pedal once the
desired speed is reached.
The automatic transmission shifts back up.
Rocking the vehicle free Shifting back and forth between transmission
positions 005Band 005Ecan help to free up the
vehicle if it gets stuck in mud or snow. The vehi- cle's engine management system limits the
speed to a maximum of 5 mph (9 km/h) when
shifting back and forth. To shift repeatedly
between transmission positions 005Band 005E,
move the DIRECT SELECT lever up and down
beyond the pressure point.
Towing a trailer X
Drive in the middle of the engine speed range
on uphill gradients.
X Depending on the uphill or downhill gradient,
use the left-hand steering wheel paddle
shifter (Y page 152) to select a lower gear,
even if cruise control or Active Distance
Assist DISTRONIC is activated. Drive programs
Slippery drive program The
Slippery drive program has the following
characteristics:
R reduced engine and transmission settings for
optimum propulsion on slippery or snow-cov-
ered roads.
R optimized ESP ®
stability control on slippery or
snow-covered roads.
R the vehicle has improved driving stability on
slippery or snow-covered roads, for example. Comfort drive program The
Comfort drive program has the following
characteristics:
R comfort-oriented engine and transmission
settings.
R optimal fuel consumption resulting from the
automatic transmission shifting up sooner.
R the vehicle pulls away more gently in forward
and reverse gears, unless the accelerator
pedal is depressed fully.
R the automatic transmission shifting up
sooner. This results in the vehicle being driven
at lower engine speeds and the wheels being
less likely to spin.
Sport drive program The
Sport drive program has the following char-
acteristics:
R sporty engine and transmission settings.
R the automatic transmission shifts up later.
The fuel consumption possibly being higher
as a result of the later automatic transmission
shift points.
R the suspension exhibits sporty damping (vehi-
cles with AIRMATIC).
Drive program Sport Plus (Mercedes-
AMG vehicles) The
Sport Plus drive program has the following
characteristics:
R the vehicle exhibits particularly sporty driving
characteristics.
R the vehicle pulls away in first gear.
R the automatic transmission shifts up later.
The fuel consumption possibly being higher
as a result of the later automatic transmission
shift points.
R the suspension exhibits particularly firm
springing and damping settings (vehicles with
AIRMATIC).
R the ECO start/stop function is deactivated, it
can, however, be activated again using the
ECO button (Y page 145). Automatic trans
mission
151Driving an d parking Z
Page 173 of 398

Further information on driving safety systems
(Y page 66). Cruise control
General notes Cruise control maintains a constant road speed
for you. It brakes automatically in order to avoid exceeding the set speed. You must select a
lower gear in good time on long and steep down-
hill gradients, especially if the vehicle is laden or towing a trailer. By doing so, you will make use of
the braking effect of the engine. This relieves the
load on the brake system and prevents the
brakes from overheating and wearing too
quickly.
Use cruise control only if road and traffic con-
ditions make it appropriate to maintain a steady speed for a prolonged period. You can store anyroad speed above 20 mph (30 km/h).
i Cruise control should not be activated when
driving off-road.
Important safety notes If you fail to adapt your driving style, cruise con-
trol can neither reduce the risk of an accident
nor override the laws of physics. Cruise control
cannot take into account the road, traffic and
weather conditions. Cruise control is only an
aid. You are responsible for the distance to the
vehicle in front, for vehicle speed, for braking in
good time and for staying in your lane.
Do not use cruise control:
R in road and traffic conditions which do not
allow you to maintain a constant speed, e.g. in
heavy traffic or on winding roads
R on slippery road surfaces. Braking or accel-
erating could cause the drive wheels to lose
traction and the vehicle could then skid
R when there is poor visibility, e.g. due to fog,
heavy rain or snow
If there is a change of drivers, advise the new
driver of the speed stored. Cruise control lever 0043
Activates or increases speed
0044 Activates or reduces speed
0087 Deactivates cruise control
0085 Activates at the current speed/last stored
speed
When you activate cruise control, the stored
speed is shown in the multifunction display for
five seconds.
Activation conditions To activate cruise control, all of the following
activation conditions must be fulfilled:
R the electric parking brake must be released.
R you are driving faster than 20 mph (30 km/h).
R ESP ®
must be active, but not intervening.
R the transmission must be in position 005B.
R DSR must be deactivated.
R the Offroad Plus drive program must be deac-
tivated (vehicles with the Off-road Engineer-
ing Package).
Storing, maintaining and calling up a
speed Storing and maintaining a speed
X Accelerate the vehicle to the desired speed.
X Briefly press the cruise control lever up 0043or
down 0085.
X Remove your foot from the accelerator pedal.
Cruise control is activated. The vehicle auto-
matically maintains the stored speed.
i Cruise control may be unable to maintain
the stored speed on uphill gradients. The
stored speed is resumed when the gradient
evens out. Cruise control maintains the Driving systems
171Driving and parking Z
Page 174 of 398
stored speed on downhill gradients by auto-
matically applying the brakes.
Storing or calling up a speed G
WARNING
If you call up the stored speed and it differs
from the current speed, the vehicle acceler-
ates or decelerates. If you do not know the
stored speed, the vehicle could accelerate or brake unexpectedly. There is a risk of an acci-
dent.
Pay attention to the road and traffic condi-
tions before calling up the stored speed. If you do not know the stored speed, store the
desired speed again.
X Briefly pull the cruise control lever towards
you 0087.
X Remove your foot from the accelerator pedal.
Cruise control is operational and when first
activated stores the current speed or regu-
lates the speed of the vehicle to the stored
speed.
Setting a speed Keep in mind that it may take a brief moment
until the vehicle has accelerated or braked to
the speed set.
X Press the cruise control lever up 0043for a
higher speed or down 0044for a lower speed.
X To adjust the set speed in 1 mph incre-
ments (1 km/h increments):
briefly press
the cruise control lever up 0043or down 0044to
the pressure point.
Every time the cruise control lever is pressed
up 0043 or down 0044the last speed stored is
increased or reduced.
X To adjust the set speed in 5 mph incre-
ments (10 km/h increments):
briefly press
the cruise control lever up 0043or down 0044
beyond the pressure point.
Every time the cruise control lever is pressed
up 0043 or down 0044the last speed stored is
increased or reduced.
i Cruise control is not deactivated if you
depress the accelerator pedal. For example, if
you accelerate briefly to overtake, cruise con-
trol adjusts the vehicle's speed to the last
speed stored after you have finished overtak-
ing. Deactivating cruise control There are several ways to deactivate cruise con-
trol:
X Briefly press the cruise control lever for-
wards 0043.
or X Brake.
Cruise control is automatically deactivated if: R you engage the electric parking brake
R you are driving at less than 20 mph (30 km/h)
R ESP ®
intervenes or you deactivate ESP ®
R you activate DSR
R you activate the Offroad Plus program (vehi-
cles with the Off-road Engineering Package)
R you shift the transmission to position 005C
while driving
If cruise control is deactivated, you will hear a
warning tone. You will see the Cruise Con‐ Cruise Con‐
trol Off
trol Off message in the multifunction display
for approximately five seconds.
i When you switch off the engine, the last
speed stored is cleared. Active Distance Assist DISTRONIC
General notes Active Distance Assist DISTRONIC regulates the
speed and automatically helps you maintain the
distance from the vehicle detected in front.
Vehicles are detected with the aid of the radar
sensor system. Active Distance Assist
DISTRONIC brakes automatically so that the set
speed is not exceeded.
You must select a lower gear in good time on
long and steep downhill gradients, especially if
the vehicle is laden or towing a trailer. By doing so, you will make use of the braking effect of theengine. This relieves the load on the brake sys-
tem and prevents the brakes from overheating
and wearing too quickly.
If Active Distance Assist DISTRONIC detects
that there is a risk of a collision with the vehicle
in front, you will be warned visually and audibly.
Active Distance Assist DISTRONIC cannot pre-
vent a collision without your intervention. An
intermittent warning tone will then sound and
the distance warning lamp will light up in the
instrument cluster. Brake immediately in order 172
Driving systemsDriving and parking