2019 MERCEDES-BENZ GLS SUV sunroof
[x] Cancel search: sunroofPage 95 of 398
If somebody becomes trapped:
R release the switch immediately, or
R during automatic operation, push the
switch briefly in any direction
The opening or closing procedure will be stop-
ped. G
WARNING
If children operate the sliding sunroof they
could become trapped, particularly if they are left unsupervised. There is a risk of injury.
When leaving the vehicle, always take the
SmartKey with you and lock the vehicle. Never
leave children unsupervised in the vehicle.
! Only open the sliding sunroof if it is free of
snow and ice. Otherwise, malfunctions may
occur.
Do not allow anything to protrude from the
sliding sunroof. Otherwise, the seals could be
damaged.
! The weather can change abruptly. It could
start to rain or snow. Make sure that the slid- ing sunroof is closed when you leave the vehi-cle. The vehicle electronics can be damaged ifwater enters the vehicle interior.
Resonance noises can occur in addition to the
usual airflow noises when the sliding sunroof is
open. They are caused by minor pressure fluc-
tuations in the vehicle interior. Change the posi-
tion of the sliding sunroof or open a side win-
dow. The noise will be reduced or eliminated. Sliding sunroof reversing feature
Your vehicle may be equipped with a sliding
sunroof or a panorama roof with power tilt/slid- ing panel. In the following section, the term
"sliding sunroof" refers to both sliding sunroof
variants.
The sliding sunroof is equipped with an auto-
matic reversing feature. If a solid object blocks
or restricts the sliding sunroof during the closing process, the sliding sunroof opens again auto-
matically. However, the automatic reversing
feature is only an aid and does not relieve you of the responsibility of paying attention when clos-ing the sliding sunroof. G
WARNING
The reversing feature does not react:
R to soft, light and thin objects, e.g. small fin-
gers
R over the last 1/6 in (4 mm) of the closing
movement
R during resetting
R when closing the sliding sunroof again man-
ually immediately after automatic reversing
This means that the reversing feature cannot
prevent someone being trapped in these sit-
uations. There is a risk of injury.
Make sure that no body parts are in close
proximity during the closing procedure.
If somebody becomes trapped:
R release the switch immediately, or
R press the switch in any direction during the
automatic closing process
The closing process is stopped. Operating the sliding sunroof
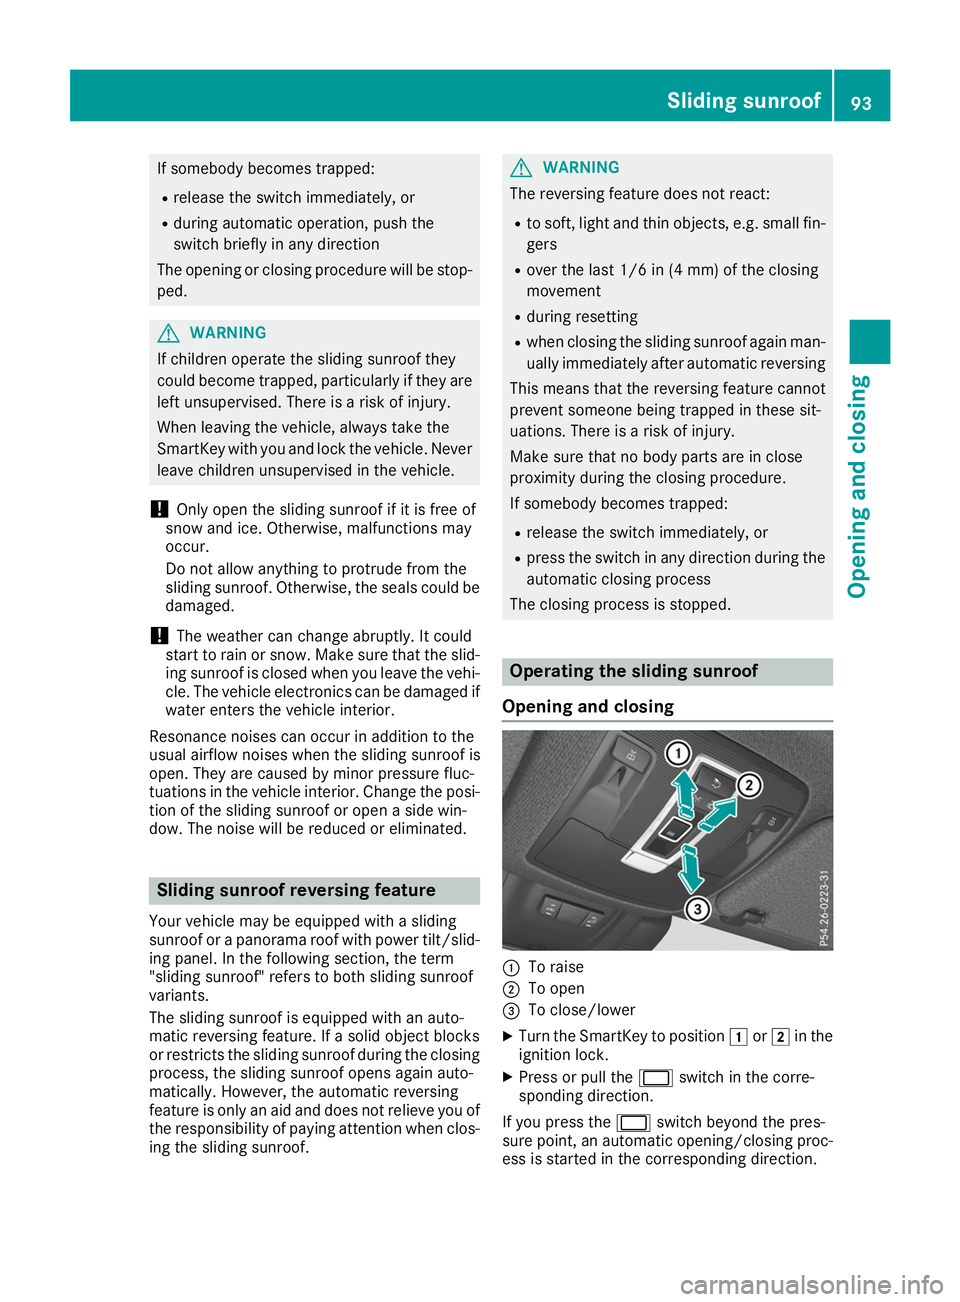
Opening and closing 0043
To raise
0044 To open
0087 To close/lower
X Turn the SmartKey to position 0047or0048 in the
ignition lock.
X Press or pull the 0056switch in the corre-
sponding direction.
If you press the 0056switch beyond the pres-
sure point, an automatic opening/closing proc- ess is started in the corresponding direction. Sliding sunroof
93Opening and closing Z
Page 96 of 398
You can stop automatic operation by pressing/
pulling the switch again.
When opening and raising the roof, automatic
operation is only available if the sliding sunroof
is in the closed position.
The sun protection cover automatically opens
along with the sliding sunroof. You can open or
close the sun protection cover manually when
the sliding sunroof is raised or closed.
You can continue to operate the sliding sunroof
after switching off the engine or removing the
SmartKey from the ignition lock. This function is available for up to five minutes or until the driv-
er's or front-passenger door is opened.
Resetting !
If the sliding sunroof still cannot be opened
or closed fully after resetting, contact a quali- fied specialist workshop.
Reset the sliding sunroof if it does not move
smoothly.
X Turn the SmartKey to position 0047or0048 in the
ignition lock.
X Raise the sliding sunroof fully at the rear
(Y page 93).
X Keep the 0056switch pressed for another
second.
X Make sure that the sliding sunroof can be fully
opened and closed again (Y page 93).
X If this is not the case, repeat the steps above. Operating the panorama roof with
power tilt/sliding panel
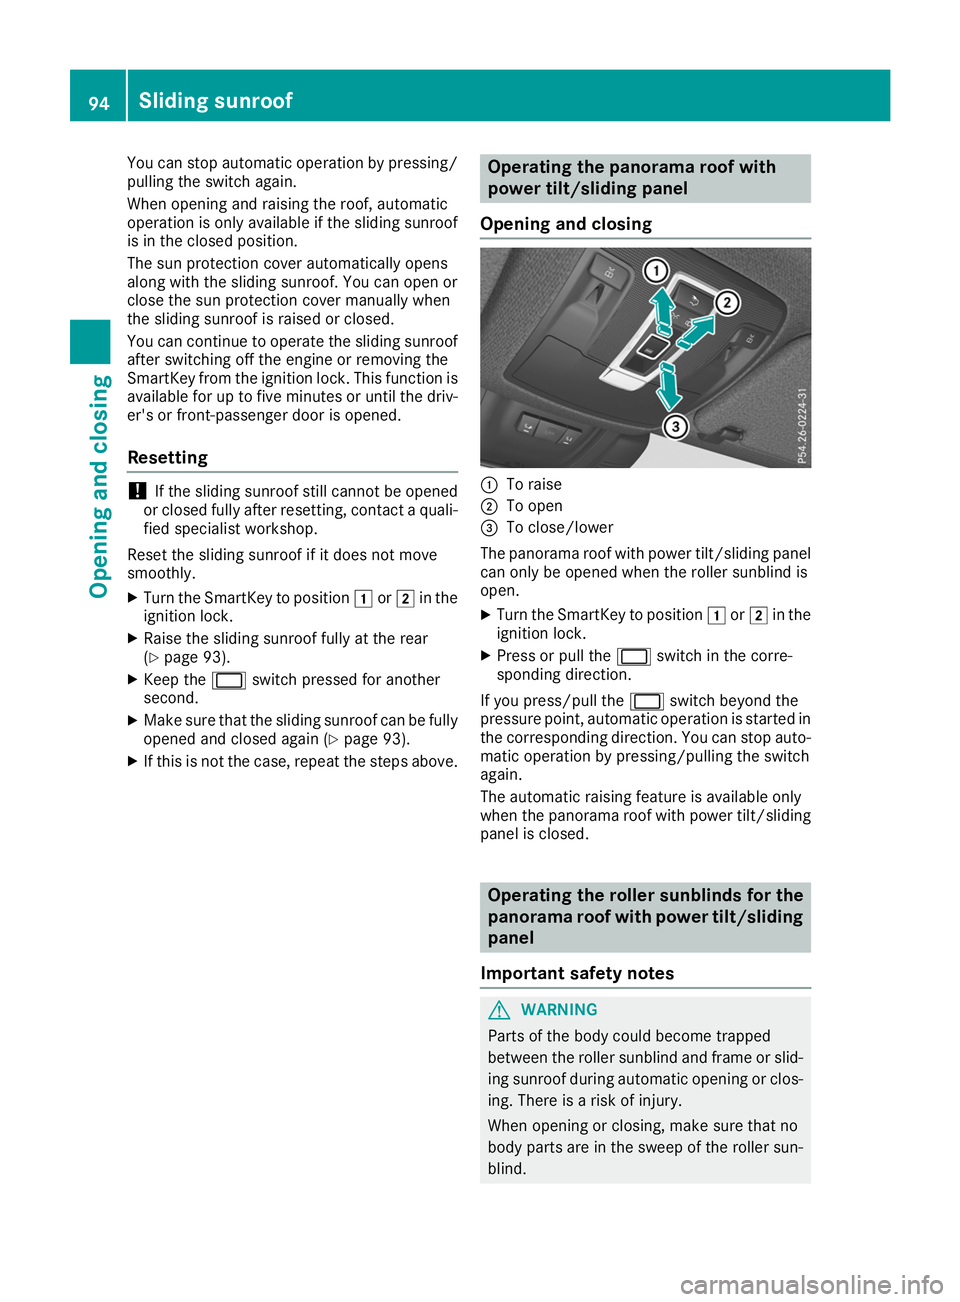
Opening and closing 0043
To raise
0044 To open
0087 To close/lower
The panorama roof with power tilt/sliding panel can only be opened when the roller sunblind is
open.
X Turn the SmartKey to position 0047or0048 in the
ignition lock.
X Press or pull the 0056switch in the corre-
sponding direction.
If you press/pull the 0056switch beyond the
pressure point, automatic operation is started in the corresponding direction. You can stop auto-
matic operation by pressing/pulling the switch
again.
The automatic raising feature is available only
when the panorama roof with power tilt/sliding panel is closed. Operating the roller sunblinds for the
panorama roof with power tilt/sliding
panel
Important safety notes G
WARNING
Parts of the body could become trapped
between the roller sunblind and frame or slid- ing sunroof during automatic opening or clos-
ing. There is a risk of injury.
When opening or closing, make sure that no
body parts are in the sweep of the roller sun- blind. 94
Sliding sunroofOpening and closing
Page 97 of 398
If somebody becomes trapped:
R release the switch immediately, or
R during automatic operation, push the
switch briefly in any direction
The opening or closing procedure will be stop-
ped.
The roller sunblinds shield the vehicle interior
from sunlight. The roller sunblinds can only be
opened and closed together when the pano-
rama roof with power tilt/sliding panel is closed.
Roller sunblind reversing feature The roller sunblinds are equipped with an auto-
matic reversing feature. If a solid object blocks
or restricts a roller sunblind during the closing
process, the roller sunblind opens again auto-
matically. However, the automatic reversing
feature is only an aid and is not a substitute of
your attentiveness when closing the roller sun-
blind. G
WARNING
The reversing feature does not react in par-
ticular to soft, light and thin objects, e.g. small fingers. This means that the reversing featurecannot prevent someone being trapped in
these situations. There is a risk of injury.
When closing the roller sunblind, make sure
that no body parts are in the sweep area.
If somebody becomes trapped:
R release the switch immediately, or
R press the switch in any direction during the
automatic closing process
The closing process is stopped. Opening and closing the roller sun-
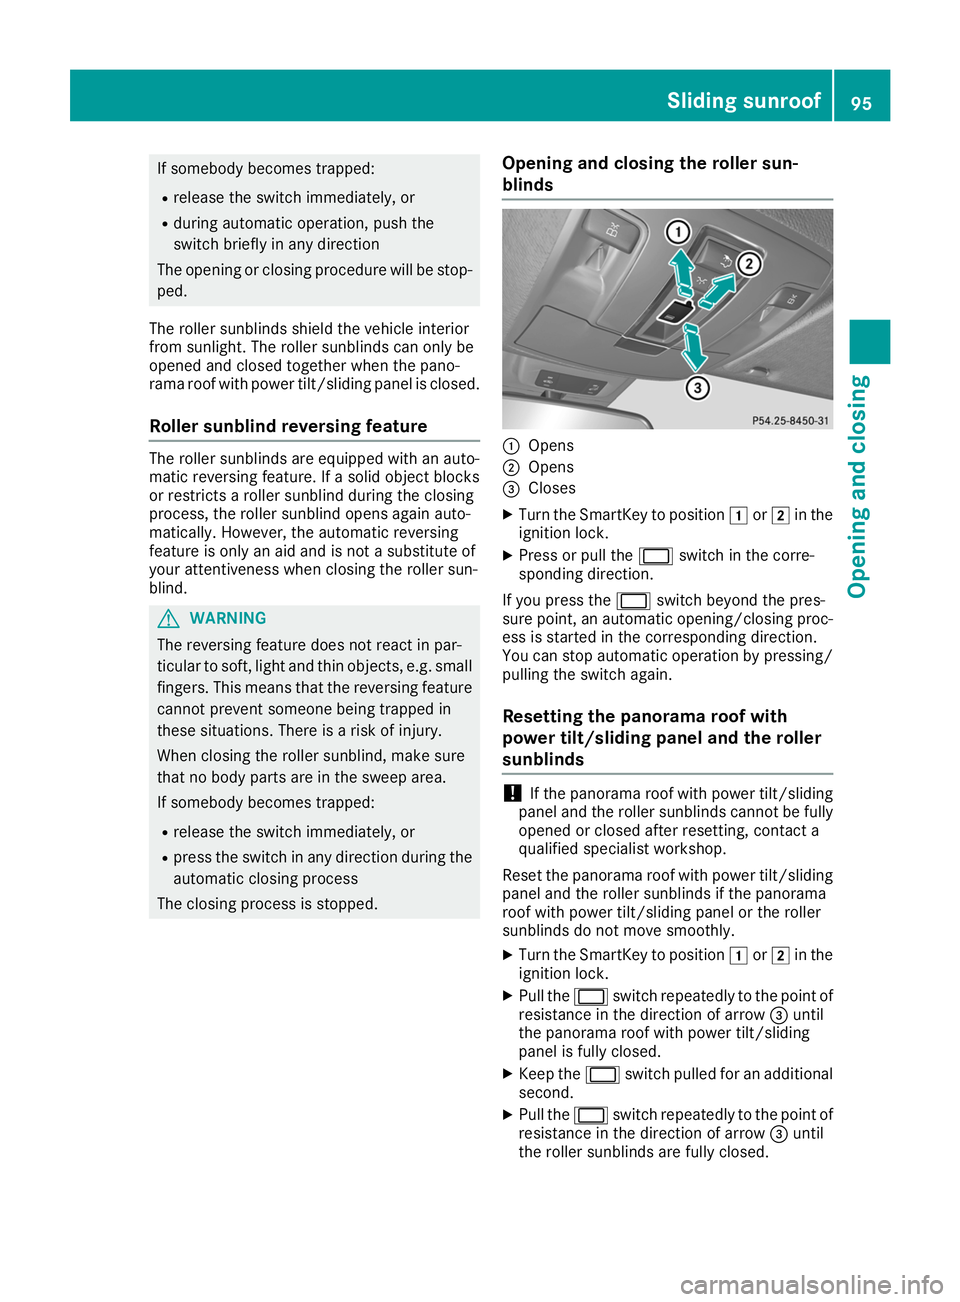
blinds 0043
Opens
0044 Opens
0087 Closes
X Turn the SmartKey to position 0047or0048 in the
ignition lock.
X Press or pull the 0056switch in the corre-
sponding direction.
If you press the 0056switch beyond the pres-
sure point, an automatic opening/closing proc- ess is started in the corresponding direction.
You can stop automatic operation by pressing/
pulling the switch again.
Resetting the panorama roof with
power tilt/sliding panel and the roller
sunblinds !
If the panorama roof with power tilt/sliding
panel and the roller sunblinds cannot be fully
opened or closed after resetting, contact a
qualified specialist workshop.
Reset the panorama roof with power tilt/sliding panel and the roller sunblinds if the panorama
roof with power tilt/sliding panel or the roller
sunblinds do not move smoothly.
X Turn the SmartKey to position 0047or0048 in the
ignition lock.
X Pull the 0056switch repeatedly to the point of
resistance in the direction of arrow 0087until
the panorama roof with power tilt/sliding
panel is fully closed.
X Keep the 0056switch pulled for an additional
second.
X Pull the 0056switch repeatedly to the point of
resistance in the direction of arrow 0087until
the roller sunblinds are fully closed. Sliding sunroof
95Opening and closing Z
Page 98 of 398
X
Keep the 0056switch pulled for an additional
second. X
Make sure that the panorama roof with power
tilt/sliding panel and the roller sunblinds can be fully opened again.
X If this is not the case, repeat the steps above. Problems with the sliding sunroof
Your vehicle may be equipped with a sliding sunroof or a panorama roof with power tilt/sliding
panel. In the following section, the term "sliding sunroof" refers to both sliding sunroof variants. G
WARNING
If you close the sliding sunroof again immediately after it has been blocked or reset, the sliding
sunroof closes with increased or maximum force. The reversing feature is then not active. Parts of the body could be trapped in the closing area in the process. This poses an increased risk of
injury or even fatal injury.
Make sure that no parts of the body are in the closing area.
If somebody becomes trapped:
R release the switch immediately, or
R press the switch in any direction during the automatic closing process
The closing process is stopped.
! If the sliding sunroof still cannot be opened or closed as a result of a malfunction, contact a
qualified specialist workshop. Problem
Possible causes/consequences and
0050 0050Solutions The sliding sunroof can-
not be closed and you
cannot see the cause. If the sliding sunroof is obstructed during closing and reopens again
slightly:
X Immediately after the sliding sunroof blocks, pull the 0056switch in
the overhead control panel down to the point of resistance and hold it until the sliding sunroof is closed.
The sliding sunroof is closed with increased force.
If the sliding sunroof is obstructed again during closing and then
reopens slightly:
X Immediately after the sliding sunroof blocks, pull the 0056switch in
the overhead control panel down to the point of resistance and hold it until the sliding sunroof is closed.
The sliding sunroof is closed without the automatic reversing fea-
ture. 96
Sliding sunroofOpening and closing
Page 109 of 398
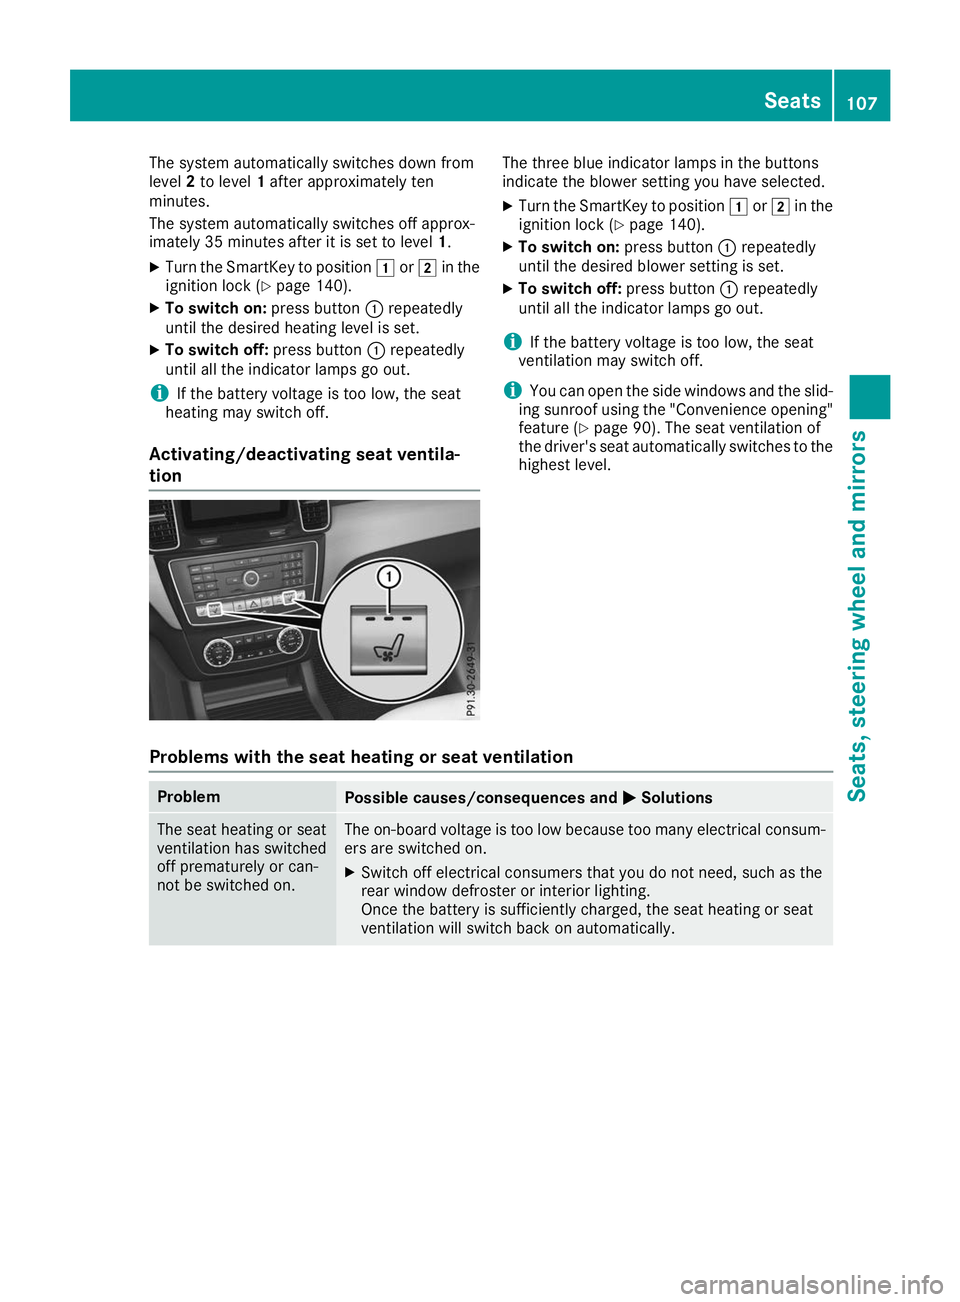
The system automatically switches down from
level 2to level 1after approximately ten
minutes.
The system automatically switches off approx-
imately 35 minutes after it is set to level 1.
X Turn the SmartKey to position 0047or0048 in the
ignition lock (Y page 140).
X To switch on: press button0043repeatedly
until the desired heating level is set.
X To switch off: press button0043repeatedly
until all the indicator lamps go out.
i If the battery voltage is too low, the seat
heating may switch off.
Activating/deactivating seat ventila-
tion The three blue indicator lamps in the buttons
indicate the blower setting you have selected.
X Turn the SmartKey to position 0047or0048 in the
ignition lock (Y page 140).
X To switch on: press button0043repeatedly
until the desired blower setting is set.
X To switch off: press button0043repeatedly
until all the indicator lamps go out.
i If the battery voltage is too low, the seat
ventilation may switch off.
i You can open the side windows and the slid-
ing sunroof using the "Convenience opening" feature (Y page 90). The seat ventilation of
the driver's seat automatically switches to the
highest level.
Problems with the seat heating or seat ventilation Problem
Possible causes/consequences and
0050 0050Solutions The seat heating or seat
ventilation has switched
off prematurely or can-
not be switched on. The on-board voltage is too low because too many electrical consum-
ers are switched on.
X Switch off electrical consumers that you do not need, such as the
rear window defroster or interior lighting.
Once the battery is sufficiently charged, the seat heating or seat
ventilation will switch back on automatically. Seats
107Seats, steering wheel and mirrors Z
Page 144 of 398
G
WARNING
Flammable materials introduced through
environmental influence or by animals can
ignite if in contact with the exhaust system or parts of the engine that heat up. There is a risk
of fire.
Carry out regular checks to make sure that
there are no flammable foreign materials in
the engine compartment or in the exhaust
system.
General notes Vehicles with a gasoline engine:
the catalytic
converter is preheated for up to 30 seconds
after a cold start. The sound of the engine may
change during this time.
Automatic transmission X
Shift the transmission to position 005D
(Y page 148).
The transmission position indicator on the
multifunction display shows 005D
(Y page 149).
i You can start the engine in transmission
position 005Dand 005C.
Starting procedure with the SmartKey X
Turn the SmartKey to position 0049in the igni-
tion lock (Y page 140) and release it as soon
as the engine is running.
Using KEYLESS-GO to start the engine The Start/Stop button can be used to start the
vehicle without inserting the SmartKey into the
ignition lock. The Start/Stop button must be
inserted in the ignition lock and the SmartKey
must be in the vehicle. This mode for starting the engine operates independently of the ECO
start/stop automatic engine start function.
X Depress the brake pedal and keep it
depressed.
X Press the Start/Stop button once
(Y page 140).
The engine starts. Starting procedure via smartphone Observe the important safety notes on starting
the engine (Y
page 141).
You can also start your engine via your smart-
phone from outside the vehicle. In this case, the previously selected climate control setting is
activated. In this way you can cool or heat the
interior of the vehicle before starting the jour-
ney.
Only start the engine via your smartphone if it is
safe to start and run the engine where your vehi-
cle is parked.
Observe the legal stipulations in the area where your vehicle is parked. Engine start via smart-
phone may be limited to certain countries or
regions.
You can execute a maximum of two consecutive
starting attempts via your smartphone. If you
insert the SmartKey into the ignition lock, you
can carry out two more starting attempts.
Once you have started the engine, you can
switch the engine off via your smartphone at any
time.
You can only start the engine via your smart-
phone if:
R the SmartKey is in the ignition lock
R park position 005Dis selected
R the accelerator pedal is not depressed
R the anti-theft alarm system is not activated
R the panic alarm is not activated
R the hazard warning lamps are switched off
R the hood is closed
R the doors are closed and locked
R the windows and sliding sunroof are closed
Also make sure that:
R the fuel tank is sufficiently filled
R the starter battery has been sufficiently
charged G
WARNING
Limbs could be crushed or trapped if the
engine is started unintentionally during ser-
vice or maintenance work. There is a risk of
injury.
Always secure the engine against uninten-
tional starting before carrying out mainte-
nance or repair work. 142
DrivingDriving and parking
Page 170 of 398
R
Take care when turning on an uphill or down-
hill slope or when driving across a slope. The
vehicle could otherwise tip over.
R Always keep the doors, the tailgate, the side
windows and the sliding sunroof closed while the vehicle is in motion.
R Do not shift the automatic transmission to
position 005C.
R Observe the notes on off-road fording
(Y page 165).
i Information about retrofitting special all-ter-
rain tires is available from any qualified spe-
cialist workshop.
i Do not use the HOLD function when driving
off-road, on steep uphill or downhill gradients
or on slippery or loose surfaces. The HOLD
function cannot hold the vehicle on such sur- faces.
Checklist before driving off-road !
If the engine oil warning lamp lights up while
the vehicle is in motion, stop the vehicle in a
safe place as soon as possible. Check the
engine oil level. The engine oil warning lamp
warning must not be ignored. Continuing the
journey while the symbol is displayed could
lead to engine damage.
X Engine oil level: check the engine oil level
and add engine oil if necessary.
When you drive on steep gradients, the engine
oil level must be sufficiently high to ensure
that oil is supplied correctly in the vehicle.
X Tire-changing tool kit: check that the jack is
working and make sure you have the lug
wrench, a robust tow cable and a folding
spade in the vehicle.
X Wheels and tires: check the tread depth and
pressure of the tires.
X Check for damage and remove any foreign
objects, e.g. small stones, from the wheels/
tires.
X Replace any missing valve caps.
X Replace dented or damaged wheels.
X Rims: dented or bent rims can result in a loss
of tire pressure and damage the tire bead.
Before driving off-road, check the wheels and
replace them if necessary. Checklist after driving off-road !
If you detect damage to the vehicle after
driving off-road, have the vehicle checked
immediately at a qualified specialist work-
shop.
Driving over rough terrain places greater
demands on your vehicle than driving on normal
roads. After driving off-road, check the vehicle.
This allows you to detect damage promptly and reduce the risk of an accident to yourself and
other road users.
X If the Offroad orOffroad Plus drive program
is selected: select the Individual,Sport,
Comfort orSlippery drive program
(Y page 147).
X Deactivate the LOW RANGE off-road gear
(Y page 218).
X Deactivate DSR (Y page 215).
X Lower the vehicle level again to a level suita-
ble to the road conditions, e.g. to the normal
level.
X Clean the headlamps and rear lights and
check for damage.
X Clean the front and rear license plates.
X Clean the wheels and tires with a water jet
and remove any foreign objects.
X Clean the wheels, wheel housings and the
vehicle underside with a water jet; check for
any foreign objects and damage.
X Check whether twigs or other parts of plants
have become trapped. These increase the risk of fire and can damage fuel pipes, brake
hoses or the rubber bellows of the axle joints
and propeller shafts.
X After the trip, examine without fail the entire
undercarriage, wheels, tires, brakes, body-
work structure, steering, chassis and exhaust
system for damage.
X After driving for extended periods across
sand, mud, gravel, water or in similarly dirty
conditions, have the brake discs, wheels,
brake pads/linings and axle joints checked
and cleaned.
X If you detect strong vibrations after off-road
travel, check for foreign objects in the wheels
and drive train and remove them if necessary.
Foreign objects can disturb the balance and
cause vibrations. 168
Driving tipsDriving and parking
Page 305 of 398
Roof carrier
Important safety notes G
WARNING
When you load the roof, the center of gravity
of the vehicle rises and the usual driving char- acteristics, as well as steering and braking,
change. The vehicle tilts more severely when
cornering and may react more sluggishly to
steering input.
If you exceed the maximum roof load, the
driving characteristics, as well as the steering
and braking, will be greatly impaired. There is a risk of an accident.
Adjust your driving style and never exceed the
maximum roof load.
! Mercedes-Benz recommends that you only
use roof carriers that have been tested and
approved for Mercedes-Benz vehicles. This
helps to prevent damage to the vehicle.
Position the load on the roof carrier in such a way that the vehicle will not sustain damage
even when it is in motion.
Depending on the vehicle equipment, ensure
that when the roof carrier is installed you can:
R raise the sliding sunroof fully
R open the panorama roof with power tilt/
sliding panel fully
R open the tailgate fully
You will find information on the maximum roof
load in the "Technical data" section
(Y page 389).
An incorrectly secured roof carrier or roof load
may become detached from the vehicle. You
must therefore ensure that you observe the roof
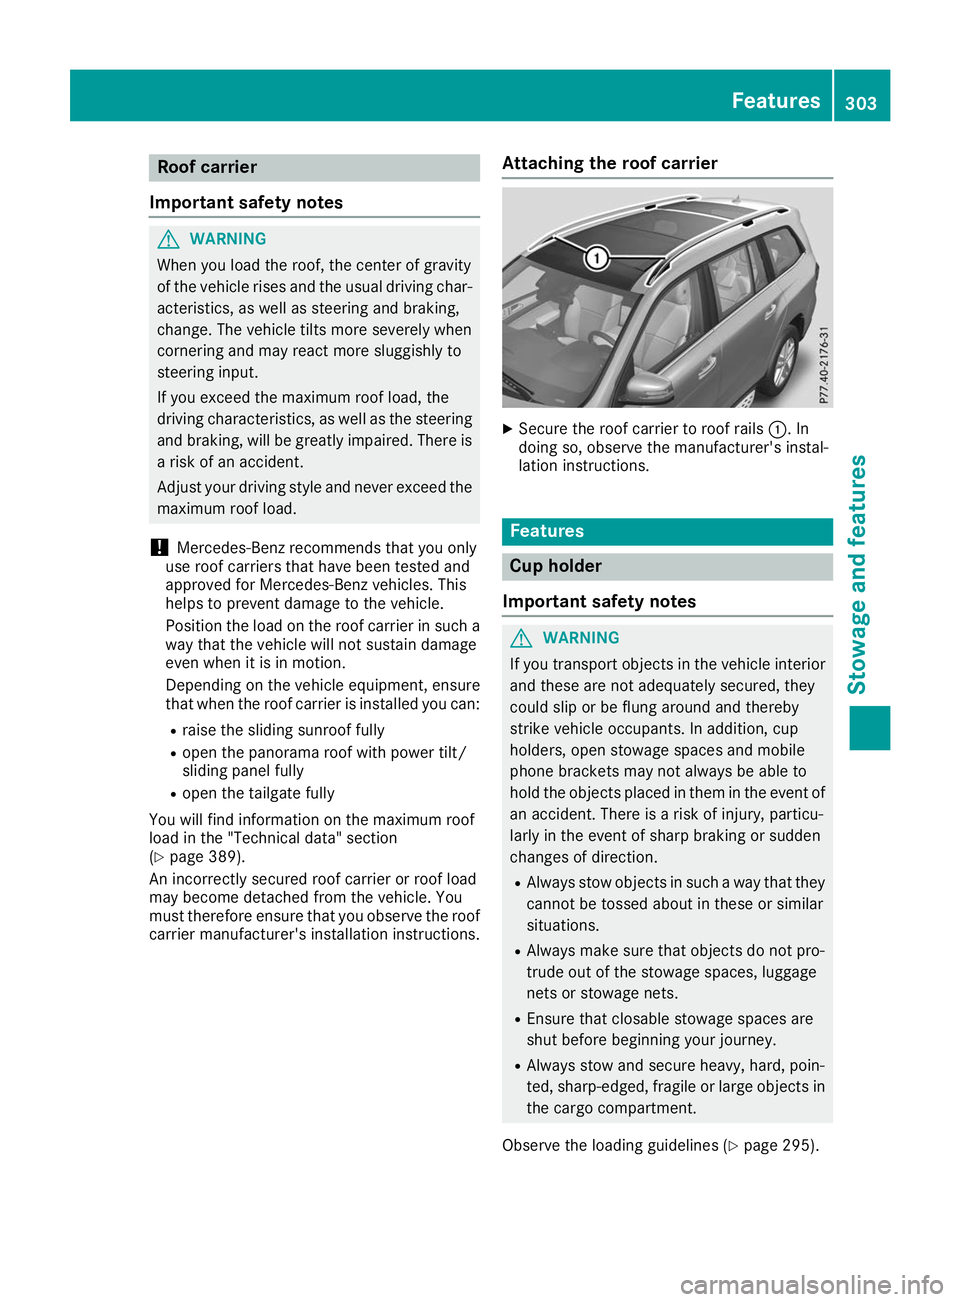
carrier manufacturer's installation instructions. Attaching the roof carrier X
Secure the roof carrier to roof rails 0043. In
doing so, observe the manufacturer's instal-
lation instructions. Features
Cup holder
Important safety notes G
WARNING
If you transport objects in the vehicle interior and these are not adequately secured, they
could slip or be flung around and thereby
strike vehicle occupants. In addition, cup
holders, open stowage spaces and mobile
phone brackets may not always be able to
hold the objects placed in them in the event of an accident. There is a risk of injury, particu-
larly in the event of sharp braking or sudden
changes of direction.
R Always stow objects in such a way that they
cannot be tossed about in these or similar
situations.
R Always make sure that objects do not pro-
trude out of the stowage spaces, luggage
nets or stowage nets.
R Ensure that closable stowage spaces are
shut before beginning your journey.
R Always stow and secure heavy, hard, poin-
ted, sharp-edged, fragile or large objects in
the cargo compartment.
Observe the loading guidelines (Y page 295). Features
303Stowage and features Z