2019 MERCEDES-BENZ GLS service
[x] Cancel search: servicePage 318 of 398
The data you receive contains the following
information:
R the location where the speed limit was excee-
ded
R the time at which the speed limit was excee-
ded
R the selected speed limit which was exceeded
Geo fencing Geo fencing allows you to select areas which the
vehicle should not enter or leave. You will be
informed if the vehicle crosses the boundaries
of the selected areas. You can select the way in which you receive this information beforehand.
Possible options include text message, e-mail or an automated call.
The area can be determined as either a circle or
a polygon with a maximum of ten corners. You
can specify up to ten areas simultaneously. Dif- ferent settings are possible for each area.
These settings can be called up under "Owners
Online" at http://www.mbusa.com.
Alternatively, you can also trigger an Info call
and notify the customer service representative
that you wish to activate geo-fencing.
Currently inactive areas can be activated by text
message.
Triggering the vehicle alarm With this function, you can trigger the vehicle's
panic alarm via text message. An alarm sounds
and the exterior lighting flashes. Depending on
the setting, the panic alarm lasts five or ten sec-
onds. Afterwards, the alarm switches off. Garage door opener
General notes The HomeLink
®
garage door opener integrated
in the rear-view mirror allows you to operate up to three different door and gate systems.
Use the integrated garage door opener only on
garage doors that:
R they are equipped with a safety stop and
reverse feature
R they conform to the current U.S. safety stand-
ards When it has been programmed, the integrated
garage door opener in the rear-view mirror will
assume the function of the garage door sys-
tem's remote control. Please also read the oper-
ating instructions for the garage door system.
When programming a garage door opener, park the vehicle outside the garage. Do not leave the
engine running while programming.
Certain garage door drives are incompatible
with the integrated garage door opener. If you
have difficulty programing the integrated garage
door opener, contact a Mercedes-Benz Service
Center.
Alternatively, you can call the following tele-
phone assistance services:
R USA: Mercedes-Benz Customer Assistance
Center at 1-800-FOR-MERCedes
R Canada: Customer Service at
1-800-387-0100
R HomeLink ®
hotline 1-800-355-3515 (free of
charge)
More information on HomeLink ®
and/or com-
patible products is also available on the Internet
at http://www.homelink.com.
Notes on the declaration of conformity
(Y page 30).
USA: FCC ID: CB2HMIHL4
Canada: IC: 279B-HMIHL4
Important safety notes G
WARNING
When you operate or program the door with
the integrated garage door opener, persons in the range of movement of the door may
become trapped or be struck by the door.
There is a risk of injury.
When using the integrated garage door
opener, always make sure that nobody is
within the range of movement of the door. G
DANGER
Combustion engines emit poisonous exhaust
gases such as carbon monoxide. Inhaling
these exhaust gases is hazardous to health
and can result in poisoning. There is a risk of
fatal injury. Therefore, never leave the engine running an enclosed space without adequate
ventilation. 316
FeaturesStowage and features
Page 323 of 398
Engine compartment
Hood
Important safety notes G
WARNING
If the hood is unlatched, it may open up when the vehicle is in motion and block your view.
There is a risk of an accident.
Never unlatch the hood while driving. Before
every trip, ensure that the hood is locked. G
WARNING
When opening and closing the hood, it may
suddenly fall into the closed position. There is a risk of injury to persons within range of
movement of the hood.
Open and close the hood only when no one is
within its range of movement. G
WARNING
Opening the hood when the engine is over-
heated or when there is a fire in the engine
compartment could expose you to hot gases
or other service products. There is a risk of
injury.
Let an overheated engine cool down before
opening the hood. If there is a fire in the
engine compartment, keep the hood closed
and contact the fire department. G
WARNING
The engine compartment contains moving
components. Certain components, such as
the radiator fan, may continue to run or start
again suddenly when the ignition is off. There is a risk of injury.
If you need to do any work inside the engine
compartment:
R switch off the ignition
R never reach into the area where there is a
risk of danger from moving components,
such as the fan rotation area R
remove jewelry and watches
R keep items of clothing and hair, for exam-
ple, away from moving parts G
WARNING
The ignition system and the fuel injection sys- tem work under high voltage. If you touch
components which are under voltage, you
could get an electric shock. There is a risk of
injury.
Never touch components of the ignition sys-
tem or fuel injection system when the ignition is switched on.
Electrically live components include ignition
coils, spark plug connectors and the test socket. To ensure the flow of fresh air through the air
vents into the vehicle interior, please observe
the following notes (Y page 136):
Opening the hood G
WARNING
Certain components in the engine compart-
ment, such as the engine, radiator and parts
of the exhaust system, can become very hot.
Working in the engine compartment poses a
risk of injury.
Where possible, let the engine cool down and touch only the components described in the
following. G
WARNING
When the hood is open and the windshield
wipers are set in motion, you can be injured by the wiper linkage. There is a risk of injury.
Always switch off the windshield wipers and
the ignition before opening the hood.
! Make sure that the windshield wipers are
not folded away from the windshield. You
could otherwise damage the windshield wip-
ers or the hood. Engine compartment
321Maintenance and care Z
Page 324 of 398
X
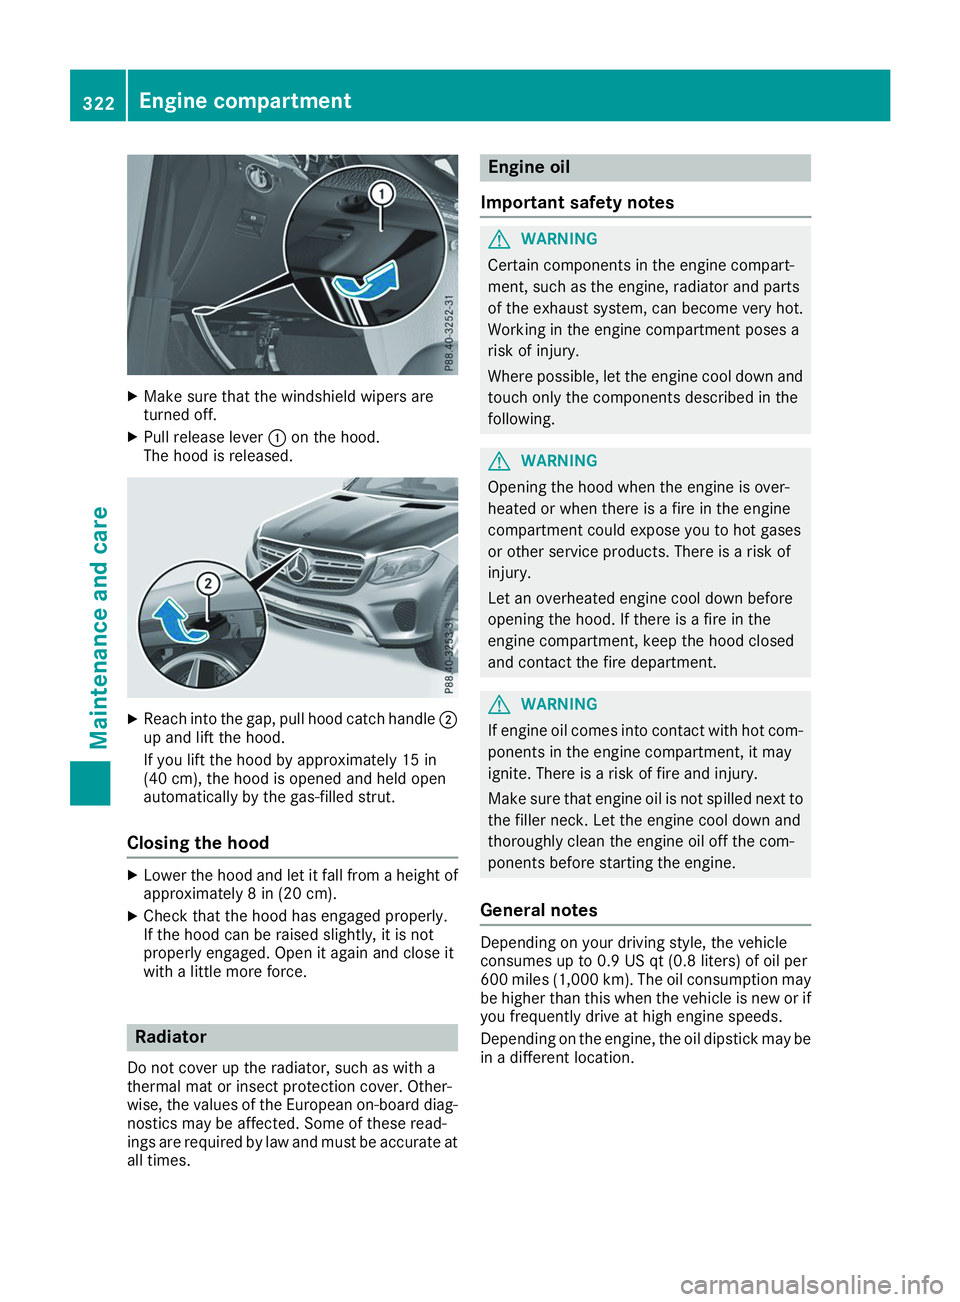
Make sure that the windshield wipers are
turned off.
X Pull release lever 0043on the hood.
The hood is released. X
Reach into the gap, pull hood catch handle 0044
up and lift the hood.
If you lift the hood by approximately 15 in
(40 cm), the hood is opened and held open
automatically by the gas-filled strut.
Closing the hood X
Lower the hood and let it fall from a height of
approximately 8 in (20 cm).
X Check that the hood has engaged properly.
If the hood can be raised slightly, it is not
properly engaged. Open it again and close it
with a little more force. Radiator
Do not cover up the radiator, such as with a
thermal mat or insect protection cover. Other-
wise, the values of the European on-board diag- nostics may be affected. Some of these read-
ings are required by law and must be accurate at all times. Engine oil
Important safety notes G
WARNING
Certain components in the engine compart-
ment, such as the engine, radiator and parts
of the exhaust system, can become very hot.
Working in the engine compartment poses a
risk of injury.
Where possible, let the engine cool down and touch only the components described in the
following. G
WARNING
Opening the hood when the engine is over-
heated or when there is a fire in the engine
compartment could expose you to hot gases
or other service products. There is a risk of
injury.
Let an overheated engine cool down before
opening the hood. If there is a fire in the
engine compartment, keep the hood closed
and contact the fire department. G
WARNING
If engine oil comes into contact with hot com- ponents in the engine compartment, it may
ignite. There is a risk of fire and injury.
Make sure that engine oil is not spilled next to
the filler neck. Let the engine cool down and
thoroughly clean the engine oil off the com-
ponents before starting the engine.
General notes Depending on your driving style, the vehicle
consumes up to 0.9 US qt (0.8 liters) of oil per
600 miles (1,000 km). The oil consumption may
be higher than this when the vehicle is new or if
you frequently drive at high engine speeds.
Depending on the engine, the oil dipstick may be in a different location. 322
Engine compartmentMaintenance and care
Page 325 of 398
When checking the oil level:
R
park the vehicle on a level surface.
R the engine should be switched off for approx-
imately five minutes if the engine is at normal
operating temperature.
R if the engine is not at normal operating tem-
perature, e.g. if the engine was only started
briefly, wait about 30 minutes before carrying
out the measurement.
Checking the engine oil level using the
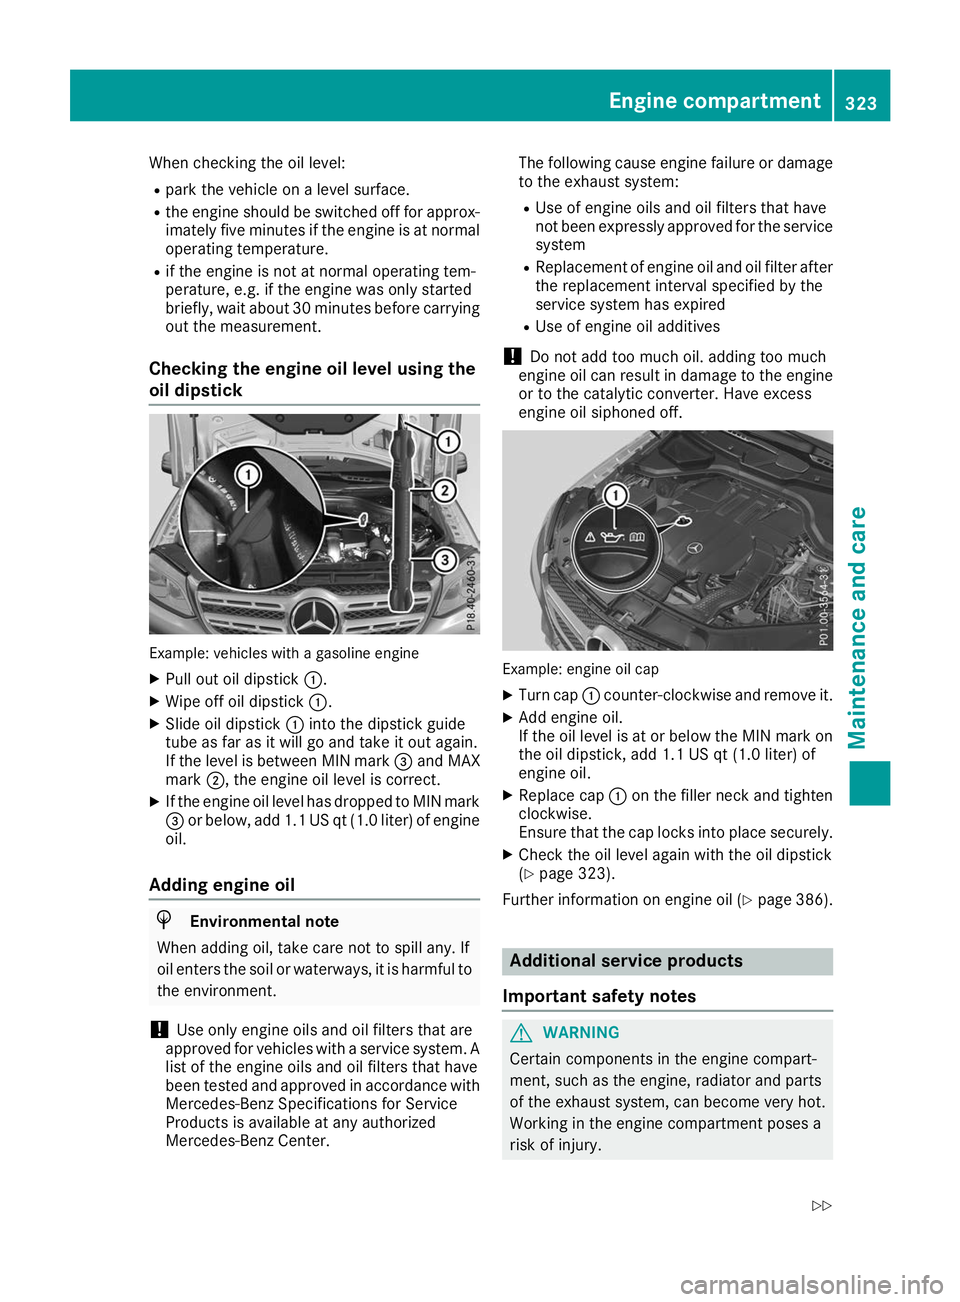
oil dipstick Example: vehicles with a gasoline engine
X Pull out oil dipstick 0043.
X Wipe off oil dipstick 0043.
X Slide oil dipstick 0043into the dipstick guide
tube as far as it will go and take it out again.
If the level is between MIN mark 0087and MAX
mark 0044, the engine oil level is correct.
X If the engine oil level has dropped to MIN mark
0087 or below, add 1.1 US qt (1.0 liter) of engine
oil.
Adding engine oil H
Environmental note
When adding oil, take care not to spill any. If
oil enters the soil or waterways, it is harmful to the environment.
! Use only engine oils and oil filters that are
approved for vehicles with a service system. A list of the engine oils and oil filters that have
been tested and approved in accordance with
Mercedes-Benz Specifications for Service
Products is available at any authorized
Mercedes-Benz Center. The following cause engine failure or damage
to the exhaust system:
R Use of engine oils and oil filters that have
not been expressly approved for the service
system
R Replacement of engine oil and oil filter after
the replacement interval specified by the
service system has expired
R Use of engine oil additives
! Do not add too much oil. adding too much
engine oil can result in damage to the engine or to the catalytic converter. Have excess
engine oil siphoned off. Example: engine oil cap
X Turn cap 0043counter-clockwise and remove it.
X Add engine oil.
If the oil level is at or below the MIN mark on
the oil dipstick, add 1.1 US qt (1.0 liter) of
engine oil.
X Replace cap 0043on the filler neck and tighten
clockwise.
Ensure that the cap locks into place securely.
X Check the oil level again with the oil dipstick
(Y page 323).
Further information on engine oil (Y page 386). Additional service products
Important safety notes G
WARNING
Certain components in the engine compart-
ment, such as the engine, radiator and parts
of the exhaust system, can become very hot.
Working in the engine compartment poses a
risk of injury. Engine compartment
323Maintenance and care
Z
Page 327 of 398
Further information on windshield washer fluid
(Y page 388). ASSYST PLUS
Service message
i If the scheduled service intervals are excee-
ded, this may result in damage to the vehicle.
You can obtain up-to-date information concern-
ing the servicing of your vehicle from a qualified specialist workshop, e.g. an authorized
Mercedes-Benz Center or at
http://www.mbusa.com (USA only).
i The ASSYST PLUS service interval display
does not show any information on the engine
oil level. Observe the notes on the engine oil
level (Y page 322).
The multifunction display shows a service mes-
sage for several seconds, e.g.:
R Service A in .. Days Service A in .. Days
R Service A Due
Service A Due
R Service A Exceeded by .. Days
Service A Exceeded by .. Days
Depending on the operating conditions of the
vehicle, the remaining time or distance until the next service due date is displayed.
The letter A
A or B B, possibly in connection with a
number or another letter, shows the type of ser-
vice. A
A stands for a minor service and B
Bfor a
major service.
Further information can be obtained at a quali-
fied specialist workshop.
The ASSYST PLUS service interval display does
not take into account any periods of time during
which the battery is disconnected.
Maintaining the time-dependent service sched-
ule:
X Note down the service due date displayed in
the multifunction display before disconnect-
ing the battery.
or
X After reconnecting the battery, subtract the
battery disconnection periods from the ser-
vice date shown on the display. Hiding a service message
X Press the 0038or0076 button on the steering
wheel. Displaying service messages
X Switch on the ignition.
X Press the 0059or0065 button on the steering
wheel to select the Serv. Serv.menu.
X Press the 0063or0064 button to select the
ASSYST
ASSYST PLUS
PLUSsubmenu and confirm by press-
ing the 0076button.
The service due date appears in the multi-
function display. Information about Service
Resetting the ASSYST PLUS service
interval display !
If the ASSYST PLUS service interval display
has been inadvertently reset, this setting can
be corrected at a qualified specialist work-
shop.
Have service work carried out as described in the Maintenance Booklet. This may otherwise
lead to increased wear and damage to the
major assemblies or the vehicle.
A qualified specialist workshop will reset the
ASSYST PLUS service interval display after the
service work has been carried out. You can also obtain further information on maintenance
work, for example.
Special service requirements The specified maintenance interval takes only
the normal operation of the vehicle into
account. Under increased load on the vehicle,
maintenance work must be carried out more
frequently, for example:
R Regular city driving with frequent intermedi-
ate stops
R If the vehicle is primarily used to travel short
distances
R Use in mountainous terrain or on poor road
surfaces
R If the engine is often left idling for long periods
Under these or similar conditions, have, for
example, the air filter, engine oil and oil filter
replaced or changed more frequently. Under
arduous operating conditions, the tires must be checked more often. Further information can be
obtained at a qualified specialist workshop. ASSYST PLUS
325Maintenance and care Z
Page 328 of 398
Driving abroad
An extensive Mercedes-Benz Service network is
also available in other countries. You can obtain further information from any authorized
Mercedes-Benz Center. Care
General notes
H
Environmental note
Dispose of empty packaging and cleaning
cloths in an environmentally responsible man- ner.
! When cleaning your car, do not use:
R dry, coarse or hard cloths
R abrasive cleaning agents
R solvents
R cleaning agents containing solvents
Do not scrub.
Do not touch the surfaces and films with hard
objects, e.g. rings or ice scrapers. Otherwise,
you may scratch or damage the surfaces and films.
! Do not park your vehicle for a long period of
time directly after cleaning, particularly after
cleaning the wheel rim with wheel cleaner.
Wheel cleaner can lead to the increased cor-
rosion of the brake discs and pads. Therefore,
drive for a few minutes after cleaning. By
heating up the brakes, the brake discs and
pads dry. The vehicle can then be parked for a long period of time.
Regular care of your vehicle is a condition for
retaining the quality in the long term.
Use care products and cleaning agents recom-
mended and approved by Mercedes-Benz. Washing the vehicle and cleaning the
paintwork
Automatic car wash G
WARNING
Braking efficiency is reduced after washing
the vehicle. There is a risk of an accident. After the vehicle has been washed, brake
carefully while paying attention to the traffic
conditions until full braking power is restored.
! Before driving into an automatic car wash,
make sure that it is suitable for the dimen-
sions of the vehicle. In particular, make sure
that:
R there is enough ground clearance between
the vehicle underbody and the guide rails of the automatic car wash.
R the clearance width of the automatic car
wash is sufficient, particularly the width of
the guide rails.
R you enter the automatic car wash straight
and in the center of the guide rails in order
to avoid damaging the tires or wheel rims.
Fold in the exterior mirrors before the vehicle
is washed. The exterior mirrors could other-
wise be damaged.
! When Active Distance Assist DISTRONIC or
the HOLD function is activated, the vehicle
brakes automatically in certain situations.
To avoid damage to the vehicle, deactivate
Active Distance Assist DISTRONIC and the
HOLD function in the following or similar sit-
uations:
R when towing the vehicle
R in the car wash
! Never clean your vehicle in a Touchless
Automatic Car Wash as these use special
cleaning agents. These cleaning agents can
damage the paintwork or plastic parts.
! Make sure that:
R the side windows and the sliding sunroof
are fully closed.
R that the blower of the ventilation/heating
system is switched off (OFF button has
been pressed).
R the windshield wiper switch is at position
005A.
The vehicle may otherwise be damaged.
! In car washes with a towing mechanism,
make sure that the automatic transmission is
in transmission position 005C; otherwise, the
vehicle could be damaged.
R Vehicles with a SmartKey:
Do not remove the SmartKey from the igni-
tion lock. Do not open the driver's door or 326
CareMaintenance and care
Page 344 of 398
occupants from suffering acid burns should the
battery be damaged in the event of an accident.
In order for the battery to achieve the maximum possible service life, it must always be suffi-
ciently charged.
Like other batteries, the vehicle battery may
discharge over time if you do not use the vehicle. In this case, have the battery disconnected at a
qualified specialist workshop. However, you can also charge the battery with a charger recom-
mended by Mercedes-Benz. Contact a qualified
specialist workshop for further information.
Have the battery charge state checked more
frequently if you use the vehicle mainly for short trips or if you leave it standing idle for a lengthyperiod. Consult a qualified specialist workshop
if you wish to leave your vehicle parked for a long
period of time.
Remove the SmartKey if you park the vehicle
and do not require any electrical consumers.
The vehicle will then use very little energy, thus
conserving battery power.
If the power supply has been interrupted, e.g. if
you reconnect the battery, you will have to:
R set the clock (see the Digital Operator's Man-
ual)
On vehicles with a multimedia system and
navigation system, the clock is set automati-
cally.
R reset the function for automatically folding
the exterior mirrors in/out by folding the mir-
rors out once(Y page 111) Charging the 12 V battery
G
WARNING
During charging and jump-starting, explosive
gases can escape from the battery. There is a risk of an explosion.
Particularly avoid fire, open flames, creating
sparks and smoking. Ensure there is sufficient
ventilation while charging and jump-starting.
Do not lean over a battery. G
WARNING
Battery acid is caustic. There is a risk of injury. Avoid contact with skin, eyes or clothing. Do
not inhale any battery gases. Do not lean over
the battery. Keep children away from batter- ies. Wash away battery acid immediately with
plenty of clean water and seek medical atten-tion. G
WARNING
A discharged battery can freeze at tempera-
tures below freezing point. When jump-start-
ing the vehicle or charging the battery, gases can escape from the battery. There is a risk of
an explosion.
Allow the frozen battery to thaw out before
charging it or jump-starting.
! Only use battery chargers with a maximum
charging voltage of 14.8 V.
! Only charge the battery using the jump-
starting connection point.
The jump-starting connection point is in the
engine compartment (Y page 343).
X Open the hood.
X Connect the battery charger to the positive
terminal and ground point in the same order
as when connecting the donor battery in the
jump-starting procedure (Y page 343).
Keep away from fire and open flames. Do not
lean over a battery. Never charge the battery if it is still installed in the vehicle, unless you use a
battery charger which has been tested and
approved by Mercedes-Benz. A battery charger
unit specially adapted for Mercedes-Benz vehi-
cles and tested and approved by Mercedes-
Benz is available as an accessory. It permits the
charging of the battery in its installed position.
Contact an authorized Mercedes-Benz Center
for further information and availability. Read the battery charger's operating instructions before
charging the battery.
If, at low temperatures, the indicator lamps/
warning lamps in the instrument cluster do not
light up, it is highly likely that the discharged
battery has frozen. In this case you may neither
jump-start the vehicle nor charge the battery.
The service life of a thawed-out battery may be
shorter. The starting characteristics can be
impaired, particularly at low temperatures. Have
the thawed-out battery checked at a qualified
specialist workshop. 342
Battery (vehicle)Breakdown assistance
Page 346 of 398
G
WARNING
A discharged battery can freeze at temperatures below freezing point. When jump-starting the
vehicle or charging the battery, gases can escape from the battery. There is a risk of an explosion.
Allow the frozen battery to thaw out before charging it or jump-starting.
! Vehicles with a gasoline engine:
avoid repeated and lengthy starting attempts. Otherwise, the
catalytic converter could be damaged by non-combusted fuel.
If the indicator/warning lamps do not light up at low temperatures, it is very likely that the dis-
charged battery has frozen. In this case you may neither jump-start the vehicle nor charge the
battery. The service life of a thawed-out battery may be shorter. The starting characteristics can be
impaired, particularly at low temperatures. Have the thawed-out battery checked at a qualified
specialist workshop.
Do not start the vehicle using a rapid charging device. If your vehicle's battery is discharged, the
engine can be jump-started from another vehicle or from a donor battery using jumper cables.
Observe the following points:
R The battery is not accessible in all vehicles. If the other vehicle's battery is not accessible, jump-
start the vehicle using a donor battery or a jump-starting device.
R Vehicles with a gasoline engine: only jump-start the vehicle when the engine and exhaust
system are cold.
R Do not start the engine if the battery is frozen. Let the battery thaw first.
R Only jump-start from batteries with a 12 V voltage rating.
R Only use jumper cables which have a sufficient cross-section and insulated terminal clamps.
R If the battery is fully discharged, leave the battery that is being used to jump-start connected for
a few minutes before attempting to start. This charges the battery slightly.
R Make sure that the two vehicles do not touch.
Make sure that:
R The jumper cables are not damaged.
R Bare parts of the terminal clamp do not come into contact with other metal parts while the jumper
cables are connected to the battery.
R The jumper cables cannot come into contact with parts that can move when the engine is running,
such as the V-belt pulley or the fan.
X Secure the vehicle by applying the electric parking brake.
X Shift the transmission to position 005D.
X Make sure that the ignition is switched off. All indicator lamps in the instrument cluster must be
off. When using the SmartKey, turn the SmartKey to position 0092in the ignition lock and remove it
(Y page 140).
X Switch off all electrical consumers, e.g. rear window defroster, lighting, etc.
X Open the hood.
i Right-hand-drive vehicle:
the jump-starting connection points may be located on the other
side of the vehicle. 344
Jump-startingBreakdown assistance